Dựng Apache Airflow phiên bản cực nhẹ LocalExecutor với Docker Compose
Đã có bao giờ bạn tự hỏi rằng khi dựng Airflow ở local hay home server cho mục đích học tập và testing DAG, vậy thì làm gì mà lại ngốn nhiều RAM và CPU dữ vậy trời? Mới đây thôi, mình vừa thử mang lên con server 4GB ram mà đôi khi còn bị đứng ở idle luôn, không thể làm được gì chứ đừng nói là viết hay schedule bất kỳ cái DAG nào.

Thế thì bài viết này chính là giải pháp, một stack Airflow phiên bản lightweight, với RAM usage chưa đạt đến 1GB ở idle. 🤭

Để bắt đầu nhanh, thì các bạn tua tới ngay section "Dựng Apache Airflow bằng Docker Compose" luôn nha.
Làm thế nào để Airflow nhẹ hơn?
-
Trước khi tiến hành tìm hiểu cách để có một phiên bản nhẹ, thì hãy cùng mình tham khảo stack mặc định của AIrflow gồm có những gì. Chúng ta tham khảo file docker compose chính chủ của airflow ở đây:
https://airflow.apache.org/docs/apache-airflow/2.0.2/docker-compose.yaml, gồm những service sau:- postgres - Database của airflow (MUST)
- airflow-scheduler - schedule tất cả các tasks và DAGs (MUST)
- airflow-webserver - UI tại
http://<IP>:8080. (MUST) - airflow-init - service khởi tạo liên kết giữa scheduler, webserver và db postgres. (MUST)
- airflow-worker - Worker thực thi các tasks được giao bởi airflow-scheduler.
- flower - monitoring cho các Celery Clusters
- redis - dùng làm caching server, phục vụ cho Celery Clusters
-
Những cái mà mình mark MUST là những service bắt buộc phải có.
-
Okay giờ thì mình check qua cái flow này thử xem:
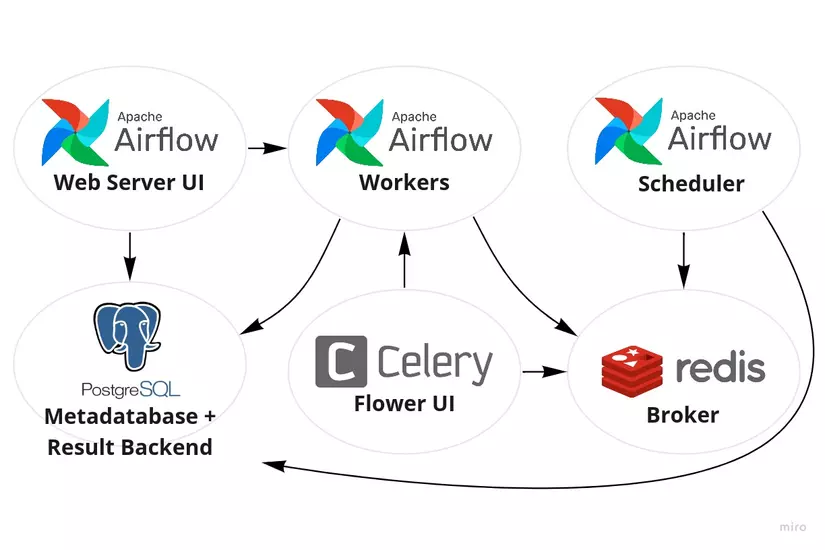
Rõ ràng nó có đề cập đến một khái niệm là Celery/CeleryExecutor, là gì nhỉ? Check qua thử khái niệm trong Documentation của Airflow:
CeleryExecutor is one of the ways you can scale out the number of workers. For this to work, you need to setup a Celery backend (RabbitMQ, Redis, Redis Sentinel …), install the required dependencies (such as librabbitmq, redis …) and change your airflow.cfg to point the executor parameter to CeleryExecutor and provide the related Celery settings. --- https://airflow.apache.org/docs/apache-airflow-providers-celery/stable/celery_executor.html
Dễ thấy ở local thì không cần thiết để scale số lượng workers lên, cho nên...
Ý tưởng chính của việc làm nhẹ đi là mình bỏ đi các thành phần, service liên quan đến CeleryExecutor trong Airflow stack. Bản thân CeleryExecutor sẽ phải tốn kha khá service để phục vụ nó, nên mình tắt/loại bỏ nó đi để làm bớt đau khổ cho máy/server của mình.
Lưu ý rằng: Giải pháp này không phù hợp với PRODUCTION, vì không có CeleryExecutor (multi-node) đồng nghĩa với việc Airflow đang chạy LocalExecutor (single-node), và chỉ phù hợp với mục đích TESTING LOCAL.
Như vậy mình sẽ bỏ đi những service sau:
- airflow-worker
- flower
- redis
Ngoài ra, với biến AIRFLOW__CORE__EXECUTOR, ta cũng sẽ set từ CeleryExecutor thành LocalExecutor.
'
Dựng Apache Airflow bằng Docker Compose
Bước 1: Tạo trước các folders sau để tránh việc container tự tạo và lỗi permissions:
mkdir -p scripts dags logs plugins
Bước 2: Tạo file .env gồm các biến sau:
- Ở đây mình cân nhắc dùng image
slimđể kích thước nhẹ hết sức có thể, bạn có thể chính version tùy với mục đích sử dụng của bản thân. Mình dùng quen2.9.3nên đặt tag làslim-2.9.3. - Nhớ đổi lại username và password, hai giá trị này dùng để login vào Airflow Webserver.
AIRFLOW_IMAGE_NAME=apache/airflow:slim-2.9.3
AIRFLOW_UID=1000
AIRFLOW_GID=1000
_AIRFLOW_WWW_USER_USERNAME=changeme
_AIRFLOW_WWW_USER_PASSWORD=changeme
- Lưu ý nhỏ,
AIRFLOW_UIDvàAIRFLOW_GIDkhông được bỏ qua mà phải set trùng với máy ở local thì mới tránh được lỗi permission nha, không thôi folder dags không save được file nào mà phảisudo vimvào thì khổ lắm 😷. Lấy UID và GID của máy local như sau:
id -u #AIRFLOW_UID
id -g #AIRFLOW_GID
Bước 3: Tạo file airflow.requirements.txt và airflow.Dockerfile chung một thư mục với file .env trên.
- File
airflow.requirements.txt- sẽ là các package mà PythonExecutor của Airflow cần dùng, thường thì mình luôn install 3 python packages như sau, nhưng sẽ thêm vào tùy yêu cầu của mỗi project:
pandas
numpy
psycopg2-binary
- File
airflow.Dockerfile: không thể chạy nếu không cóairflow.requirements.txtđâu nha.
ARG AIRFLOW_IMAGE_NAME
FROM ${AIRFLOW_IMAGE_NAME}

ENV AIRFLOW_HOME=/opt/airflow

WORKDIR $AIRFLOW_HOME

USER root
RUN apt-get update -qq && apt-get install vim -qqq && apt-get install -y python3-pip

ENV JAVA_HOME=/home/jdk-11.0.2

ENV PATH="${JAVA_HOME}/bin/:${PATH}"

RUN DOWNLOAD_URL="https://download.java.net/java/GA/jdk11/9/GPL/openjdk-11.0.2_linux-x64_bin.tar.gz" \
    && TMP_DIR="$(mktemp -d)" \
    && curl -fL "${DOWNLOAD_URL}" --output "${TMP_DIR}/openjdk-11.0.2_linux-x64_bin.tar.gz" \
    && mkdir -p "${JAVA_HOME}" \
    && tar xzf "${TMP_DIR}/openjdk-11.0.2_linux-x64_bin.tar.gz" -C "${JAVA_HOME}" --strip-components=1 \
    && rm -rf "${TMP_DIR}" \
    && java --version


COPY airflow.requirements.txt .

RUN python3 -m pip install --upgrade pip
RUN python3 -m pip install --no-cache-dir -r airflow.requirements.txt

COPY scripts scripts
RUN chmod +x scripts

USER $AIRFLOW_UID
Bước 3: Tạo file docker-compose.yml đã được cắt giảm các service mình đã đề cập:
---
x-airflow-common:
  &airflow-common
  # In order to add custom dependencies or upgrade provider packages you can use your extended image.
  # Comment the image line, place your Dockerfile in the directory where you placed the docker-compose.yaml
  # and uncomment the "build" line below, Then run `docker-compose build` to build the images.
  build:
    context: .
    dockerfile: ./airflow.Dockerfile
    args:
      AIRFLOW_IMAGE_NAME: ${AIRFLOW_IMAGE_NAME:-apache/airflow:2.2.3}
  environment:
    &airflow-common-env
    AIRFLOW__CORE__EXECUTOR: LocalExecutor
    AIRFLOW__CORE__SQL_ALCHEMY_CONN: postgresql+psycopg2://airflow:airflow@postgres/airflow
    AIRFLOW__CELERY__RESULT_BACKEND: db+postgresql://airflow:airflow@postgres/airflow
    AIRFLOW__CORE__FERNET_KEY: ''
    AIRFLOW__CORE__DAGS_ARE_PAUSED_AT_CREATION: 'true'
    AIRFLOW__CORE__LOAD_EXAMPLES: 'false'
    AIRFLOW__API__AUTH_BACKEND: 'airflow.api.auth.backend.basic_auth'
  volumes:
    - ./dags:/opt/airflow/dags
    - ./logs:/opt/airflow/logs
    - ./plugins:/opt/airflow/plugins
  user: "${AIRFLOW_UID:-50000}:0"
  depends_on:
    &airflow-common-depends-on
    postgres:
      condition: service_healthy

services:
  postgres:
    image: postgres:13
    environment:
      POSTGRES_USER: airflow
      POSTGRES_PASSWORD: airflow
      POSTGRES_DB: airflow
    volumes:
      - postgres-db-volume:/var/lib/postgresql/data
    healthcheck:
      test: ["CMD", "pg_isready", "-U", "airflow"]
      interval: 5s
      retries: 5
    restart: always

  airflow-webserver:
    <<: *airflow-common
    command: webserver
    ports:
      - 8080:8080
    healthcheck:
      test: ["CMD", "curl", "--fail", "http://localhost:8080/health"]
      interval: 10s
      timeout: 10s
      retries: 5
    restart: always
    depends_on:
      <<: *airflow-common-depends-on
      airflow-init:
        condition: service_completed_successfully

  airflow-scheduler:
    <<: *airflow-common
    command: scheduler
    healthcheck:
      test: ["CMD-SHELL", 'airflow jobs check --job-type SchedulerJob --hostname "$${HOSTNAME}"']
      interval: 10s
      timeout: 10s
      retries: 5
    restart: always
    depends_on:
      <<: *airflow-common-depends-on
      airflow-init:
        condition: service_completed_successfully

  airflow-init:
    <<: *airflow-common
    entrypoint: /bin/bash
    # yamllint disable rule:line-length
    command:
      - -c
      - |
        function ver() {
          printf "%04d%04d%04d%04d" $${1//./ }
        }
        if [[ -z "${AIRFLOW_UID}" ]]; then
          echo
          echo -e "\033[1;33mWARNING!!!: AIRFLOW_UID not set!\e[0m"
          echo "If you are on Linux, you SHOULD follow the instructions below to set "
          echo "AIRFLOW_UID environment variable, otherwise files will be owned by root."
          echo "For other operating systems you can get rid of the warning with manually created .env file:"
          echo "    See: https://airflow.apache.org/docs/apache-airflow/stable/start/docker.html#setting-the-right-airflow-user"
          echo
        fi
        one_meg=1048576
        mem_available=$$(($$(getconf _PHYS_PAGES) * $$(getconf PAGE_SIZE) / one_meg))
        cpus_available=$$(grep -cE 'cpu[0-9]+' /proc/stat)
        disk_available=$$(df / | tail -1 | awk '{print $$4}')
        warning_resources="false"
        if (( mem_available < 4000 )) ; then
          echo
          echo -e "\033[1;33mWARNING!!!: Not enough memory available for Docker.\e[0m"
          echo "At least 4GB of memory required. You have $$(numfmt --to iec $$((mem_available * one_meg)))"
          echo
          warning_resources="true"
        fi
        if (( cpus_available < 2 )); then
          echo
          echo -e "\033[1;33mWARNING!!!: Not enough CPUS available for Docker.\e[0m"
          echo "At least 2 CPUs recommended. You have $${cpus_available}"
          echo
          warning_resources="true"
        fi
        if (( disk_available < one_meg * 10 )); then
          echo
          echo -e "\033[1;33mWARNING!!!: Not enough Disk space available for Docker.\e[0m"
          echo "At least 10 GBs recommended. You have $$(numfmt --to iec $$((disk_available * 1024 )))"
          echo
          warning_resources="true"
        fi
        if [[ $${warning_resources} == "true" ]]; then
          echo
          echo -e "\033[1;33mWARNING!!!: You have not enough resources to run Airflow (see above)!\e[0m"
          echo "Please follow the instructions to increase amount of resources available:"
          echo "   https://airflow.apache.org/docs/apache-airflow/stable/start/docker.html#before-you-begin"
          echo
        fi
        mkdir -p /sources/logs /sources/dags /sources/plugins
        chown -R "${AIRFLOW_UID}:0" /sources/{logs,dags,plugins}
        exec /entrypoint airflow version
    # yamllint enable rule:line-length
    environment:
      <<: *airflow-common-env
      _AIRFLOW_DB_UPGRADE: 'true'
      _AIRFLOW_WWW_USER_CREATE: 'true'
      _AIRFLOW_WWW_USER_USERNAME: ${_AIRFLOW_WWW_USER_USERNAME:-airflow}
      _AIRFLOW_WWW_USER_PASSWORD: ${_AIRFLOW_WWW_USER_PASSWORD:-airflow}
    user: "0:0"
    volumes:
      - .:/sources

  airflow-cli:
    <<: *airflow-common
    profiles:
      - debug
    environment:
      <<: *airflow-common-env
      CONNECTION_CHECK_MAX_COUNT: "0"
    # Workaround for entrypoint issue. See: https://github.com/apache/airflow/issues/16252
    command:
      - bash
      - -c
      - airflow

volumes:
  postgres-db-volume:
Bước 4: Up các services bằng một lệnh duy nhất:
docker compose up -d
Bước 5 Truy cập vào http://localhost:8080 và đăng nhập username/password đã define ở file env.
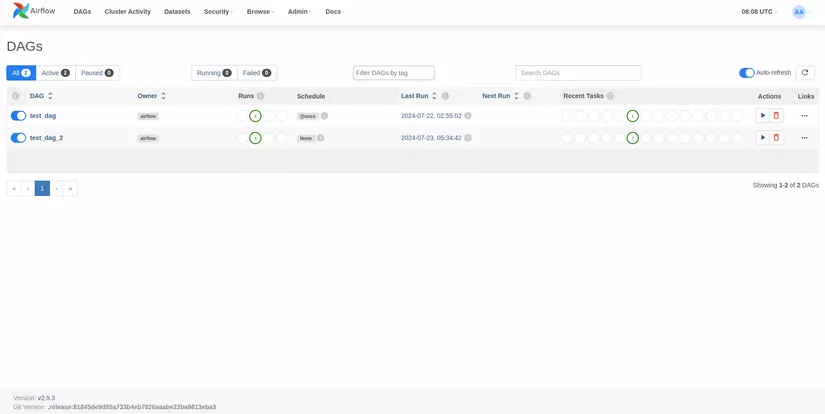
Hy vọng bài viết sẽ giúp ích cho các bạn! 🎉
References
All rights reserved
