Custom View Controller Presentation Transitions
Bài đăng này đã không được cập nhật trong 4 năm
Trong bài viết này mình sẽ hưỡng dẫn các bạn cách custom view controller presentation transition
1. Chuẩn bị
Bạn cần chuẩn bị một project về đề tài các món ăn chẳng hạn, nó đơn giản gồm có: - View controller thứ nhất chứa một title khái quát nội dung của project (trong bài này mình đặt tên là các món ăn ngon), một mô tả về project của bạn và quan trọng nhất là một collection view chứa các item mà mỗi item là một món ăn. Trong bài này mình hard code để có dữ liệu (các bạn có thể download project về tham khảo, chi tiết mình sẽ hướng dẫn bên dưới). - View controller thứ hai là một view controller được present từ view controller thứ nhất để hiển thị các thông tin chi tiết của một item (món ăn). Chú ý: từ view controller thứ hai có thể dismiss để quay lại view controller thứ nhất.
Tiếp theo mình sẽ hướng dẫn cho các bạn tạo một project đơn giản đáp ứng được yêu cầu bên trên (dành cho các bạn cảm thấy khó khăn ở bước đầu tiên này). Tuy nhiên các bạn có thể tự mình làm khi cảm thấy tự tin viểt code.

Một điều chú ý: trong bài viết này mình chỉ nhằm mục đích hướng dẫn các bạn cách để custom view controller presentation transition nên giao diện mình không chú trọng mong các bạn thông cảm.
** Bước 1: các bạn tạo một empty project**
Bước 2: Các bạn mở file storyboard ra để thực hiện kéo thả giao diện
- Trong bước này bạn thực hiện kéo hai view controllercontroller. Mình có đặt tên tương ứng: PresentationTransitionViewController và DetailPresentationTransitionViewController
- Đồng thời bạn tạo hai class tương ứng với hai tên ở trên
Bước 3: Tạo dữ liệu
class Food: NSObject {
        var name: String
        var imageName: String
        var foodDescription: String

        override init() {
            self.name = String()
            self.imageName = String()
            self.foodDescription = String()
        }

        init(name: String, imageName: String, foodDescription: String) {
            self.name = name
            self.imageName = imageName
            self.foodDescription = foodDescription
        }
}
Bạn hãy tạo một model tên Food để lưu trữ một số thông tin như tên món ăn, ảnh, mô tả món ăn. Trong đó bạn overwrite hàm init() và tự tạo một hàm khởi tạo với các tham số truyền vào như bên trên
class PresentationTransitionModel: NSObject {

    	static let shareInstance = PresentationTransitionModel()

        func generateModel() -> [Food] {
            return [
                Food(
                    name: "Cơm cháy chả cá lạ miệng mà ngon",
                    imageName: "basil.jpg",
                    foodDescription: "1 bát con xôi trắng (hoặc bạn có thể thay bằng 200g cơm cháy khô). Cá thác lác: 300. Thì là, ớt, tiêu, bột nêm, dầu ăn, tương ớt."
                ),
                Food(
                    name: "Cơm cháy chả cá lạ miệng mà ngon",
                    imageName: "saffron.jpg",
                    foodDescription: "1 bát con xôi trắng (hoặc bạn có thể thay bằng 200g cơm cháy khô). Cá thác lác: 300. Thì là, ớt, tiêu, bột nêm, dầu ăn, tương ớt."
                ),
                Food(
                    name: "Cơm cháy chả cá lạ miệng mà ngon",
                    imageName: "rosemary.jpg",
                    foodDescription: "1 bát con xôi trắng (hoặc bạn có thể thay bằng 200g cơm cháy khô). Cá thác lác: 300. Thì là, ớt, tiêu, bột nêm, dầu ăn, tương ớt."
                ),
                Food(
                    name: "Cơm cháy chả cá lạ miệng mà ngon",
                    imageName: "marjorana.jpg",
                    foodDescription: "1 bát con xôi trắng (hoặc bạn có thể thay bằng 200g cơm cháy khô). Cá thác lác: 300. Thì là, ớt, tiêu, bột nêm, dầu ăn, tương ớt."
                ),
                Food(
                    name: "Cơm cháy chả cá lạ miệng mà ngon",
                    imageName: "anise.jpg",
                    foodDescription: "1 bát con xôi trắng (hoặc bạn có thể thay bằng 200g cơm cháy khô). Cá thác lác: 300. Thì là, ớt, tiêu, bột nêm, dầu ăn, tương ớt."
                ),
                Food(
                    name: "Cơm cháy chả cá lạ miệng mà ngon",
                    imageName: "saffron.jpg",
                    foodDescription: "1 bát con xôi trắng (hoặc bạn có thể thay bằng 200g cơm cháy khô). Cá thác lác: 300. Thì là, ớt, tiêu, bột nêm, dầu ăn, tương ớt."
                )
            ]
        }
}
Bạn hãy tạo ra một instance để tạo dữ liệu (trong bài mình có tạo 6 đối tượng Food)
Bước 4: Quay trở lại với hai view controller chính
- Với view controller thứ nhất: PresentationTransitionViewController. Chúng ta sử dụng các delegate UICollectionViewDelegate, UICollectionViewDataSource, UICollectionViewDelegateFlowLayout
	private func registerFoodCell() {
        self.collectionView.registerNib(
            UINib(
                nibName: FoodCell.foodCellName(),
                bundle: NSBundle.mainBundle()
            ),
            forCellWithReuseIdentifier: FoodCell.foodCellIdentifier()
        )
    }

    // Mark: UICollectionViewDelegate, UICollectionViewDataSource
    func collectionView(collectionView: UICollectionView, numberOfItemsInSection section: Int) -> Int {
        return self.dataSource.count
    }

    func collectionView(collectionView: UICollectionView, layout collectionViewLayout: UICollectionViewLayout, sizeForItemAtIndexPath indexPath: NSIndexPath) -> CGSize {
        let width: CGFloat = collectionView.frame.size.width / CGFloat(numberItemPerRow)
        let height: CGFloat = collectionView.frame.size.height
        return CGSize(width: width, height: height)
    }

    func collectionView(collectionView: UICollectionView, cellForItemAtIndexPath indexPath: NSIndexPath) -> UICollectionViewCell {
        let foodCell = collectionView.dequeueReusableCellWithReuseIdentifier(
            FoodCell.foodCellIdentifier(),
            forIndexPath: indexPath
        ) as! FoodCell

        foodCell.updateInformation(self.dataSource[indexPath.row])

        return foodCell
    }
Trong đoạn mã trên chúng ta tiến hành register cell cho collection view và implement datasource & delegate
- Với view controller thứ hai DetailPresentationTransitionViewController tạm thời chúng ta chưa sử dụng
Bước 5: Tạo Food cell
Chúng ta tạo ra file FoodCell.swift và có sử dụng file xib
class FoodCell: UICollectionViewCell {

    @IBOutlet weak var name: UILabel!
    @IBOutlet weak var imageView: UIImageView!
    @IBOutlet weak var foodDescription: UILabel!

    class func foodCellName() -> String {
        return "FoodCell"
    }

    class func foodCellIdentifier() -> String {
        return "FoodCellIdentifier"
    }

    override func awakeFromNib() {
        super.awakeFromNib()
        self.makeUp()
    }

    private func makeUp() {
        self.imageView.layer.masksToBounds = true
        self.imageView.layer.opaque = false
        self.imageView.layer.cornerRadius = 4.0
    }

    func updateInformation(foodModel: Food) {
        self.name.text = foodModel.name
        if let image = UIImage(named: foodModel.imageName) {
            self.imageView.image = image
        }
        self.foodDescription.text = foodModel.foodDescription
    }
}
Một số mã đơn giản có phần quen thuộc với mọi người nên mình không giải thích ở đây nữa.
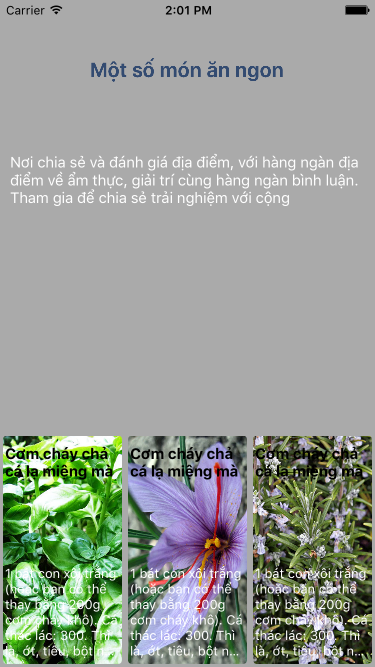
Kết quả sau khi tạo project đơn giản bên trên (hình ảnh bên dưới)

2. Cách custom view controller presentation transition
Mỗi khi bạn thực hiện một present view controller thì UIKit sẽ hỏi delegate có sử dụng custom transition hay không. Đây chính là điều quan trọng, nói tới đây các bạn hình dung mình đang ở đâu? Câu trả lời là mình đang đứng giữa giai đoạn trước và sau khi present view controller. Để có thể custom transition thì đây chính là lúc mã mà bạn custom sẽ được thực hiện. Nói ngắn gọn là đã đến lúc custom transition rồi.
Để hiểu rõ bản chất bạn có thể tham khảo hình vẽ sau
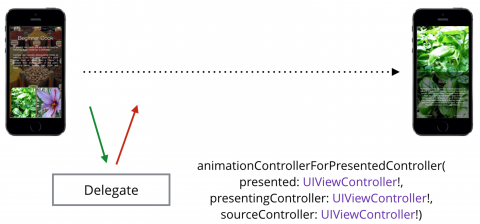
Có một vài bước sẽ được thực hiện trước khi UIKit thực hiện custom transition
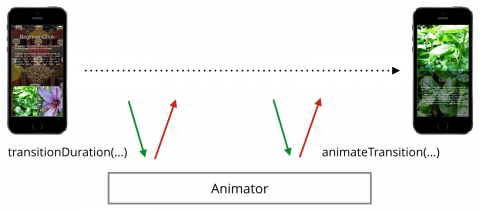
Đầu tiên UIKit sẽ yêu cầu animation controller hoạt động trong suốt thời gian chuyển tiếp (vài giây: chính là duration mà bạn emplement). Trong animate transition bạn có thể truy cập cả current view controller trên màn hình của bạn và cả view controller khi present (chính là hai view controller mà chúng ta đề cập tới bên trên). Khi đó bạn có thể fade, scale, rotate một cái view đã có sẵn hoặc một view mới mà bạn muốn.
Bây giờ bạn đã hiểu một chút về cách custom transition. Chúng ta bắt tay vào việc thực hiện custom ngay thôi.
Implementing Transition Delegates
class Animator: NSObject, UIViewControllerAnimatedTransitioning {

    // UIViewControllerAnimatedTransitioning

    let duration    = 1.0
    var presenting  = true  // true khi present và false khi dismiss view controller
    var originFrame = CGRect.zero

    // implement to custom duration
    func transitionDuration(transitionContext: UIViewControllerContextTransitioning?) -> NSTimeInterval {
        return duration
    }

    // emplement to custom trasition
    func animateTransition(transitionContext: UIViewControllerContextTransitioning) {
        // get current container view
        let containerView = transitionContext.containerView()!

        /*
            purpose: transition from "start view" to "destination view"
        */
        // get destination view
        var toView: UIView = UIView()
        if #available(iOS 8.0, *) {
            toView = transitionContext.viewForKey(UITransitionContextToViewKey)!
        } else {
            // Fallback on earlier versions
        }

        // get start view
        var herbView: UIView = UIView()
        if #available(iOS 8.0, *) {
            herbView = presenting ? toView : transitionContext.viewForKey(UITransitionContextFromViewKey)!
        } else {
            // Fallback on earlier versions
        }

        // frame when start present view controller
        let initialFrame = presenting ? originFrame : herbView.frame
        // frame when finish present view controller
        let finalFrame = presenting ? herbView.frame : originFrame

        // compute scale ratio with x and y demension
        let xScaleFactor = presenting ? initialFrame.width / finalFrame.width : finalFrame.width / initialFrame.width
        let yScaleFactor = presenting ? initialFrame.height / finalFrame.height : finalFrame.height / initialFrame.height

        let scaleTransform = CGAffineTransformMakeScale(xScaleFactor, yScaleFactor)

        if presenting {
            herbView.transform = scaleTransform
            herbView.center = CGPoint(
                x: CGRectGetMidX(initialFrame),
                y: CGRectGetMidY(initialFrame))
            herbView.clipsToBounds = true
        }

        containerView.addSubview(toView)
        containerView.bringSubviewToFront(herbView)

        // add animate with duration when set transfrom and center view
        UIView.animateWithDuration(duration, delay:0.0,
            usingSpringWithDamping: 0.4,
            initialSpringVelocity: 0.0,
            options: [],
            animations: {
                herbView.transform = self.presenting ?
                    CGAffineTransformIdentity : scaleTransform

                herbView.center = CGPoint(x: CGRectGetMidX(finalFrame),
                    y: CGRectGetMidY(finalFrame))

            }, completion:{_ in
                transitionContext.completeTransition(true)
        })

        // create corner radius and add animation for herb view when presnting and dismissing
        let round = CABasicAnimation(keyPath: "cornerRadius")
        round.fromValue = presenting ? 4.0/xScaleFactor : 0.0
        round.toValue = presenting ? 0.0 : 4.0/xScaleFactor
        round.duration = duration / 2
        herbView.layer.addAnimation(round, forKey: nil)
        herbView.layer.cornerRadius = presenting ? 0.0 : 4.0/xScaleFactor

    }

}
- Khi bạn implement UIViewControllerAnimatedTransitioning thì bạn buộc phải thực hiện thêm method sau
func transitionDuration(transitionContext: UIViewControllerContextTransitioning?) -> NSTimeInterval {
        return duration
    }
    func animateTransition(transitionContext: UIViewControllerContextTransitioning) {

    }
- Tiếp theo chúng ta bắt action select item trong collection view
func collectionView(collectionView: UICollectionView, didSelectItemAtIndexPath indexPath: NSIndexPath) {
        //present details view controller
        let detailViewController = storyboard!.instantiateViewControllerWithIdentifier("DetailPresentationTransitionViewController") as! DetailPresentationTransitionViewController
        detailViewController.foodModel = self.dataSource[indexPath.row]
        let currentCell: FoodCell = collectionView.cellForItemAtIndexPath(indexPath) as! FoodCell
        selectedImageView = currentCell.imageView
        detailViewController.transitioningDelegate = self
        presentViewController(detailViewController, animated: true, completion: nil)
    }
Chú ý: code detailViewController.transitioningDelegate = self để có thể implement custom transition
- Bạn dismiss detail view controller
override func viewWillAppear(animated: Bool) {
        super.viewWillAppear(animated)
        self.updateDetailViewController()
        self.backgroundView.addGestureRecognizer(
            UITapGestureRecognizer(
                target: self,
                action: Selector("actionClose:")
            )
        )
    }

    func actionClose(tap: UITapGestureRecognizer) {
        presentingViewController?.dismissViewControllerAnimated(true, completion: nil)
    }
Đoạn mã trên được viết trong detail view controller. Mục đích để bắt action khi người dùng muốn ẩn màn hình detail. Và ẩn màn hình detail khi action đó được thực hiện
- Vậy với hai action đó là present và dismiss view controller trên đã được bắt. Làm sao để đoạn mã custom transition của chúng ta có thể hoạt động được. Chúng ta cần implement UIViewControllerTransitioningDelegate
extension PresentationTransitionViewController: UIViewControllerTransitioningDelegate {

        func animationControllerForPresentedController(presented: UIViewController, presentingController presenting: UIViewController, sourceController source: UIViewController) -> UIViewControllerAnimatedTransitioning? {

            transition.originFrame = selectedImageView!.superview!.convertRect(selectedImageView!.frame, toView: nil)
            transition.presenting = true

            return transition
        }

        func animationControllerForDismissedController(dismissed: UIViewController) -> UIViewControllerAnimatedTransitioning? {

            transition.presenting = false

            return transition
        }
}
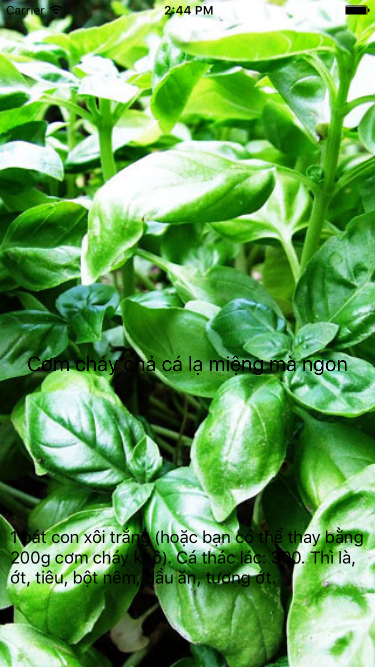
Cuối cùng run và thưởng thức thành quả chúng ta tạo ra ngay thôi. Bên dưới là một số hình ảnh kết quả mình làm được.
Link download project https://github.com/dungodac/CustomViewControllerPresentationTransitions
All rights reserved
