Custom Toast trong Android
Bài đăng này đã không được cập nhật trong 7 năm
Giới thiệu
Trong bài viết này mình sẽ hướng dẫn các bạn thay đổi giao diện Toast nhàm chán như mặc định thành nhiều kiểu dáng, màu sắc tương ứng với từng nội dung khi show toast.
Toast
– Toast có thể được tạo và hiển thị trong Activity hoặc trong Servive.
– Không cho phép người sử dụng tương tác
– Khi hiển thị sau khoảng thời gian nào đó sẽ tự đóng lại
– Có 2 giá trị mặc định (ta nên sử dụng 2 giá trị này, không nên gõ con số cụ thể vào): hằng số Toast.LENGTH_SHORT hiển thị trong 2 giây, Toast.LENGTH_LONG hiển thị trong 3.5 giây.
1. Custom Toast
1.1 Tạo file layout custom toast
Mình đặt tên layout này là customtoast_layout trong folder layout của project
<?xml version="1.0" encoding="utf-8"?>
<RelativeLayout xmlns:android="http://schemas.android.com/apk/res/android"
    android:layout_width="match_parent"
    android:layout_height="wrap_content">

    <LinearLayout
        android:layout_width="wrap_content"
        android:layout_height="wrap_content"
        android:background="@drawable/success_shape"
        android:paddingTop="8dp"
        android:paddingBottom="8dp"
        android:paddingRight="24dp"
        android:paddingLeft="16dp"
        android:layout_marginTop="20dp"
        android:id="@+id/toast_type">

        <ImageView
            android:layout_width="20dp"
            android:layout_height="20dp"
            android:id="@+id/toast_icon"
            android:layout_gravity="center"
            android:src="@drawable/ic_info_outline_black_24dp" />

        <TextView
            android:id="@+id/toast_text"
            android:text="This is Custom Toast."
            android:textColor="#FFFFFF"
            android:layout_marginLeft="10dp"
            android:layout_width="wrap_content"
            android:layout_height="wrap_content" />
    </LinearLayout>

    <ImageView
        android:id="@+id/imageView4"
        android:layout_width="28dp"
        android:layout_height="28dp"
        android:src="@drawable/androidicon"
        android:layout_alignParentTop="true"
        android:layout_alignEnd="@+id/toast_type" />
</RelativeLayout>
Các bạn có thể hình dung view này gồm một ImageView hiển thị bên trái và một LinearLayout chứa nội dung hiển thị thông báo nằm ở bên trong Toast.
Background của LinearLayout cũng chính là phần quyết định màu sắc hay kiểu dáng của việc custom Toast.
1.2 Tạo background
Mình sử dụng layer-list trong drawable để tạo background cho toast:
- Đầu tiên là file success_shape.xml
<?xml version="1.0" encoding="utf-8"?>
<layer-list xmlns:android="http://schemas.android.com/apk/res/android" >

    <!-- "shadow" -->
    <item>
        <shape android:shape="rectangle" >
            <solid android:color="#388E3C"/>
            <corners android:radius="200dp" />
        </shape>
    </item>

    <item android:bottom="4px">
        <shape android:shape="rectangle">
            <solid android:color="#4CAF50" />
            <corners android:radius="200dp"/>
        </shape>
    </item>
</layer-list>
- Tiếp theo là file: warning_shape.xml
<?xml version="1.0" encoding="utf-8"?>
<layer-list xmlns:android="http://schemas.android.com/apk/res/android" >

    <!-- "shadow" -->
    <item>
        <shape android:shape="rectangle" >
            <solid android:color="#F57C00"/>
            <corners android:radius="200dp" />
        </shape>
    </item>

    <item android:bottom="4px">
        <shape android:shape="rectangle">
            <solid android:color="#FF9800" />
            <corners android:radius="200dp"/>
        </shape>
    </item>
</layer-list>
- và file: error_shape.xml
<?xml version="1.0" encoding="utf-8"?>
<layer-list xmlns:android="http://schemas.android.com/apk/res/android" >

    <!-- "shadow" -->
    <item>
        <shape android:shape="rectangle" >
            <solid android:color="#D32F2F"/>
            <corners android:radius="200dp" />
        </shape>
    </item>

    <item android:bottom="4px">
        <shape android:shape="rectangle">
            <solid android:color="#F44336" />
            <corners android:radius="200dp"/>
        </shape>
    </item>

</layer-list>
- cuối cùng là file: confusing_shape.xml
<?xml version="1.0" encoding="utf-8"?>
<layer-list xmlns:android="http://schemas.android.com/apk/res/android" >

    <!-- "shadow" -->
    <item>
        <shape android:shape="rectangle" >
            <solid android:color="#455A64"/>
            <corners android:radius="200dp" />
        </shape>
    </item>

    <item android:bottom="4px">
        <shape android:shape="rectangle">
            <solid android:color="#607D8B" />
            <corners android:radius="200dp"/>
        </shape>
    </item>
</layer-list>
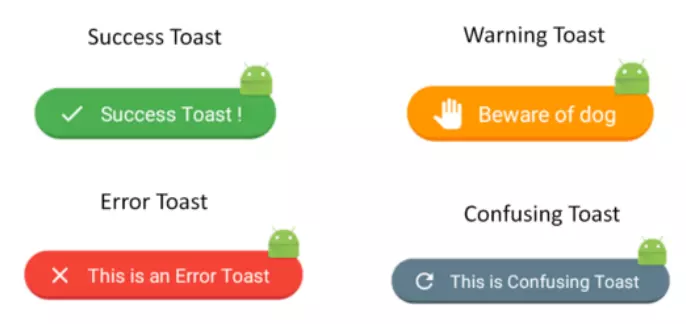
Các file tương ứng với những hình ảnh bên trên.
1.3 Tùy chỉnh trong Java code
import android.app.Activity;
import android.app.Application;
import android.content.Context;
import android.graphics.Color;
import android.view.LayoutInflater;
import android.view.View;
import android.widget.ImageView;
import android.widget.LinearLayout;
import android.widget.RelativeLayout;
import android.widget.TextView;
import android.widget.Toast;

public class CustomToast extends Toast {

    public static int SUCCESS = 1;
    public static int WARNING = 2;
    public static int ERROR = 3;
    public static int CONFUSING = 4;

    private statis long SHORT = 4000;
    private statis long LONG = 7000;

    public CustomToast(Context context) {
        super(context);
    }

    public static Toast makeText(Context context, String message, int duration, int type, boolean androidicon) {
        Toast toast = new Toast(context);
        toast.setDuration(duration);
        View layout = LayoutInflater.from(context).inflate(R.layout.customtoast_layout, null, false);
        TextView l1 = (TextView) layout.findViewById(R.id.toast_text);
        LinearLayout linearLayout = (LinearLayout) layout.findViewById(R.id.toast_type);
        ImageView img = (ImageView) layout.findViewById(R.id.toast_icon);
        ImageView img1 = (ImageView) layout.findViewById(R.id.imageView4);
        l1.setText(message);
        if (androidicon == true)
            img1.setVisibility(View.VISIBLE);
        else if (androidicon == false)
            img1.setVisibility(View.GONE);
        if (type == 1) {
            linearLayout.setBackgroundResource(R.drawable.success_shape);
            img.setImageResource(R.drawable.ic_check_black_24dp);
        } else if (type == 2) {
            linearLayout.setBackgroundResource(R.drawable.warning_shape);
            img.setImageResource(R.drawable.ic_pan_tool_black_24dp);
        } else if (type == 3) {
            linearLayout.setBackgroundResource(R.drawable.error_shape);
            img.setImageResource(R.drawable.ic_clear_black_24dp);
        } else if (type == 4) {
            linearLayout.setBackgroundResource(R.drawable.confusing_shape);
            img.setImageResource(R.drawable.ic_refresh_black_24dp);
        }
        toast.setView(layout);
        return toast;
    }

    public static Toast makeText(Context context, String message, int duration, int type, int ImageResource) {
        Toast toast = new Toast(context);
        View layout = LayoutInflater.from(context).inflate(R.layout.fancytoast_layout, null, false);
        TextView l1 = (TextView) layout.findViewById(R.id.toast_text);
        LinearLayout linearLayout = (LinearLayout) layout.findViewById(R.id.toast_type);
        ImageView img = (ImageView) layout.findViewById(R.id.toast_icon);
        l1.setText(message);
        if (type == 1) {
            linearLayout.setBackgroundResource(R.drawable.success_shape);
            img.setImageResource(ImageResource);
        } else if (type == 2) {
            linearLayout.setBackgroundResource(R.drawable.warning_shape);
            img.setImageResource(ImageResource);
        } else if (type == 3) {
            linearLayout.setBackgroundResource(R.drawable.error_shape);
            img.setImageResource(ImageResource);
        } else if (type == 4) {
            linearLayout.setBackgroundResource(R.drawable.confusing_shape);
            img.setImageResource(ImageResource);
        }
        toast.setView(layout);
        return toast;
    }
}
Các bạn có thể túy chỉnh việc sử dụng các type tương ứng với trạng thái mà mình quy định, cũng như thời gian hiển thị của Toast.
Hay việc có hay không xuất hiện icon của app tương ứng khi hiển thị toast.
Cách sử dụng
Thay vì gọi dòng toast cũ:
Toast.makeText(MainActivity.this, "This is old Toast", Toast.LENGTH_LONG).show();
bây giờ chúng ta có thể thay bằng:
CustomToast.makeText(MainActivity.this,"This is Custom Toast Toast",CustomToast.LONG,CustomToast.SUCCESS,true).show();
Tham khảo
https://github.com/Shashank02051997/FancyToast-Android
Bài viết tới đây là hết. Hy vọng mình có thể giúp ích mọi người.
All rights reserved
