Cùng mình tạo Boilerplate cho dự án NextJS v12 - Phần 1: MUI v5, Emotion Cache và Axios-hooks
Bài đăng này đã không được cập nhật trong 2 năm
Hello mọi người, hôm nay chúng ta sẽ cùng bàn luận về việc tạo cấu trúc cho dự án Front-end dùng NextJS v12 như thế nào để thuận tiện triển khai và bảo trì.
Tính đến thời điểm hiện tại của bài viết ( 05/03/2023 ) NextJS version 12 đã phát triển được một khoảng thời gian dài và hiện tại vừa cho ra mắt version 13, cho nên để tìm hiểu sự khác biệt giữa chúng mình sẽ làm lần lượt version 12 và 13 để có thể có cái nhìn trực quan hơn về sự thay đổi. Đây là kinh nghiệm cá nhân của mình nên sẽ có những phần mà các bạn thấy không hợp lý, hãy để lại góp ý giúp mình để chúng ta cùng bàn luận.
Đặt vấn đề
Trong quá trình phát triển và bảo trì dự án FE có bao giờ các bạn gặp phải các trường hợp sau:
- Ban đầu team FE của bạn và team API phát triển song song và mọi thứ rất thuận lợi, nhưng vì một vài nguyên do nào đó mà phía API bị chậm so với tiến độ, team thiếu người còn khách hàng thì liên tục hối deadline, bạn đã làm xong việc của mình nhưng không có API nên một số tính năng chưa thể hoàn thiện.
- Dự án ban đầu không yêu cầu hỗ trợ nhiều theme, nhưng sau một thời gian dài phát triển, đặc biệt với sự phổ biến của dark mode trong thời gian gần đây. Bạn được yêu cầu phải thêm vào theme mới và bạn hình dung được mình phải sửa lại hàng loạt thứ với yêu cầu đó.
- Dự án ngày càng phát triển và có thêm nhiều tính năng, bạn nhận ra hiệu năng website chưa thật sự cao, đôi khi người dùng phản ánh về UX nên cần cải thiện performance của dự án.
- Hay đơn giản bạn muốn sử dụng custom hook nhưng chưa có nhiều kinh nghiệm làm cho việc tự mình custom hook mất nhiều thời gian.
- Đôi khi API bị lỗi nhưng bạn đang implement giao diện dang dở nên bạn muốn tìm cách chuyển qua lại giữa xài mock data và API một cách nhanh nhất để tiếp tục triển khai mà không cần chờ API fix xong lỗi.
- Mất nhiều thời gian để tạo ra các file resource i18n trong tính năng đa ngôn ngữ.
Nếu các bạn đã gặp các trường hợp như trên thì bài viết này sẽ phần nào giúp các bạn giải quyết các vấn đề đó. Nếu chưa gặp thì các bạn nên xem qua để sau này tránh gặp hoặc có cách phòng trừ các trường hợp đó.
Nếu các bạn đã có kinh nghiệm hoặc không muốn xem hướng dẫn có thể tải về source code ở đây.
System Requirements
- Node.js 14.6.0 or newer
Prerequisites
Chỉ cần kiến thức căn bản về ReactJS hooks, NextJS, MUI, Axios và i18n
Triển khai
1. Cài đặt NextJS
Chúng ta sẽ tiến hành cài đặt tự động theo hướng dẫn của NextJS. Mình sử dụng Typescript nên sẽ thêm vào option --typescript. Version của NextJS hiện tại là v13.1.6
npx create-next-app example-next-v12 --typescript
Cấu trúc thư mục được tự động tạo như hình dưới:
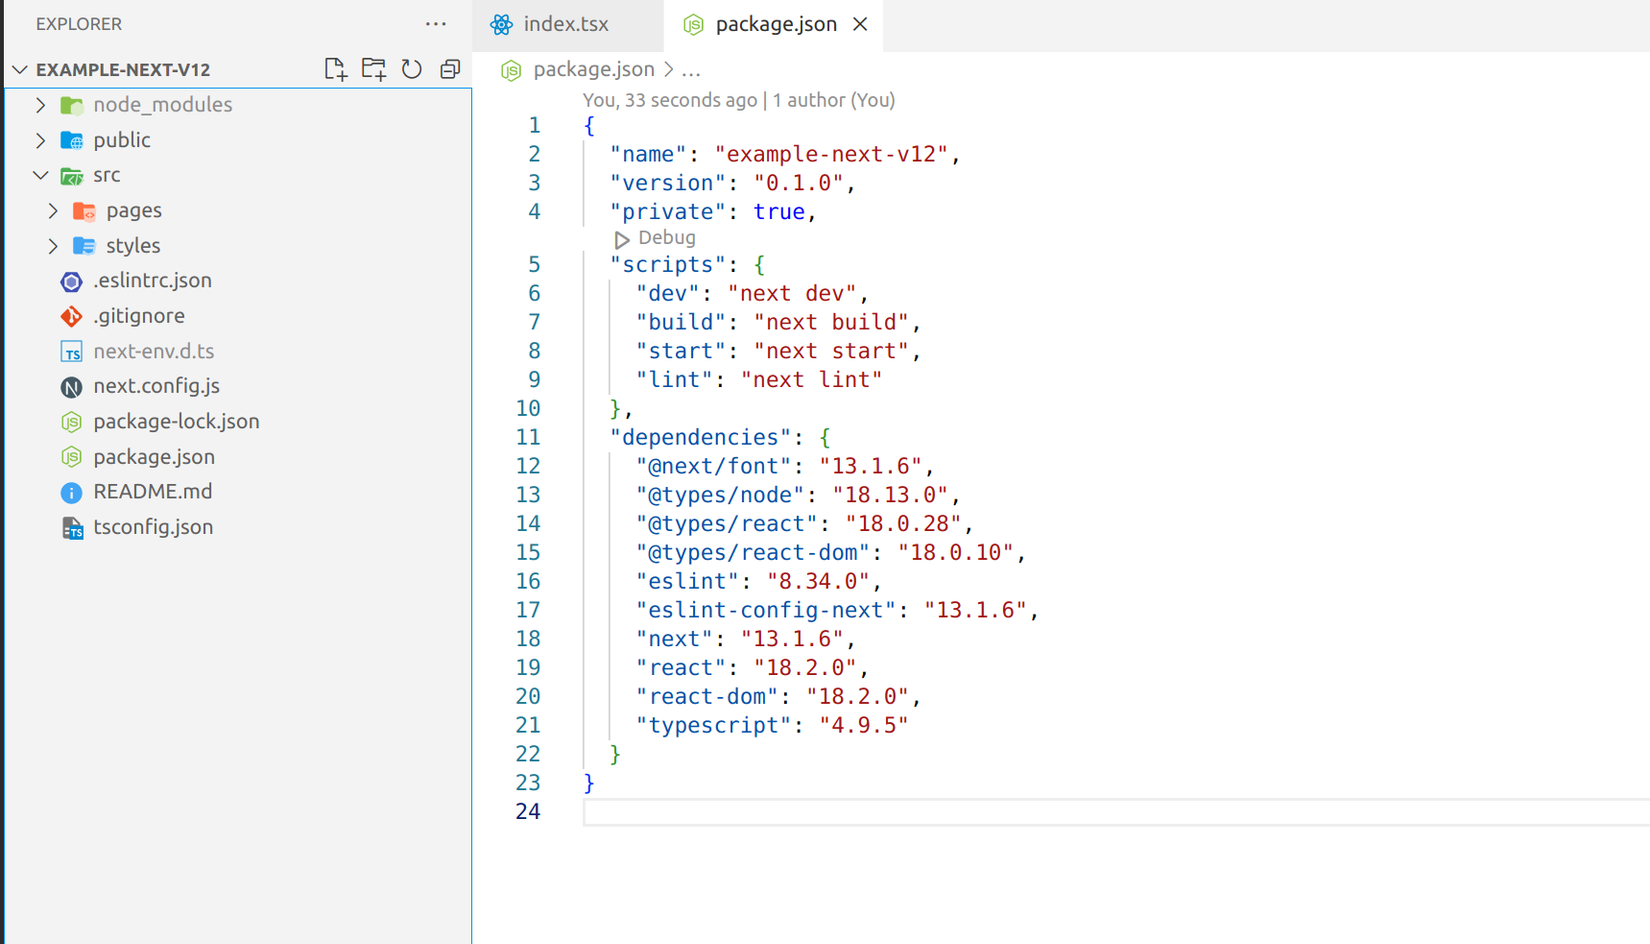
Hiện tại với create-next-app sẽ install version 13 nên chúng ta sẽ downgrade về version 12 bằng lệnh:
npm i next@12.2.5 eslint-config-next@12.2.5
2. Cài đặt MUI
Tiếp theo chúng ta sẽ cài đặt MUI theo như tài liệu hướng dẫn từ trang chủ, do mình có sử dụng icons nên sẽ tải thêm icons-material:
npm install @mui/material @emotion/react @emotion/styled @mui/icons-material
Nếu các bạn có để ý sẽ thấy khi chúng ta cài đặt sẽ thường cài kèm theo 2 package của Emotion như bên trên, nguyên nhân là do:
The default style library used for generating CSS styles for MUI components is emotion.
Theo như tài liệu từ MUI việc generating CSS styles của họ mặc định là dùng thư viện emotion. Emotion là một thư viện CSS-in-JS mạnh mẽ cung cấp cho chúng ta nhiều tính năng nổi bật - tiêu biểu là về optimize performance, lát nữa chúng ta sẽ cùng làm rõ hơn ở phần tiếp theo. Để tận dụng thêm các tính năng của nó mình sẽ cài thêm 2 package:
- @emotion/server để CSS được render đúng cách và tối ưu hóa hiệu suất cho SSR
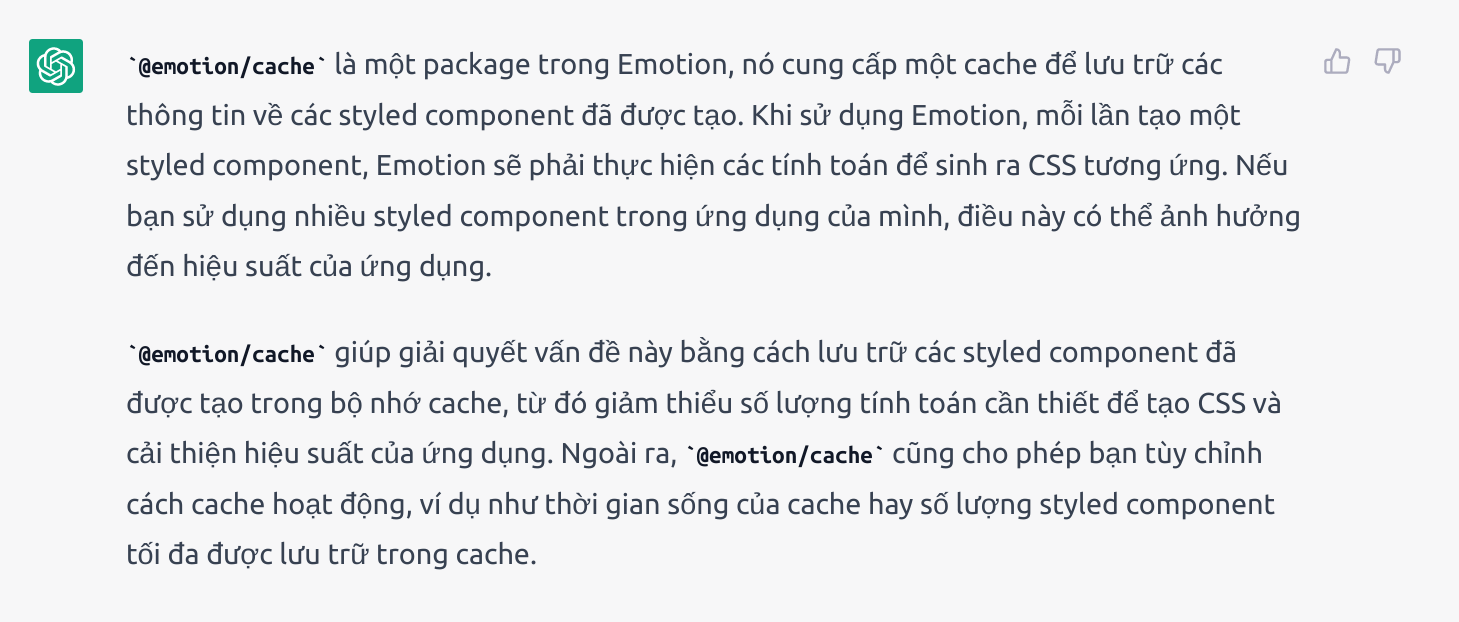
- @emotion/cache để lưu trữ các styled component đã được tạo trong bộ nhớ cache, từ đó giảm thiểu số lượng tính toán cần thiết để tạo CSS và cải thiện hiệu suất của ứng dụng.
Cài đặt:
npm i @emotion/server @emotion/cache
3. Tạo MUI theme (Optional)
Bước này tùy theo các bạn có muốn giao diện của mình có chức năng thay đổi theme hay không, nhưng theo mình các bạn nên làm bước này để đề phòng trường hợp sau này có yêu cầu từ khách hàng. Việc cập nhật thêm vào theme cho dự án có sẵn không ít thì nhiều cũng tốn thời gian. Tạo folder theme trong folder styles, sau đó thêm vào file light-theme-option.ts dùng cho Light theme:
import { ThemeOptions } from '@mui/material';
import { lightBlue, lightGreen, red, blueGrey } from '@mui/material/colors';

// Create a theme instance.
const lightThemeOptions: ThemeOptions = {
  palette: {
    primary: {
      main: lightBlue[200],
    },
    secondary: {
      main: lightGreen[200],
    },
    error: {
      main: red.A400,
    },
    background: {
      default: blueGrey.A100,
    },
  },
};

export default lightThemeOptions;
- Mình sử dụng màu từ colors của MUI cho nhanh và gọn, nếu các bạn có custom color riêng thì có thể tùy chỉnh.
- Tên file sẽ đặt theo tên theme, nếu sau này các bạn có cần thêm theme mới ( dark theme ) thì chỉ cần thêm file dựa theo loại theme ( dark-theme-option.ts ) là được.
- Thêm theme vừa tạo vào file _app.tsx để các component con ở trong có thể truy cập vào các thuộc tính của theme mà chúng ta đã thiết lập sẵn.:
import 'src/styles/globals.css';
import type { AppProps } from 'next/app';
import { createTheme, ThemeProvider } from '@mui/material/styles';
import { CssBaseline } from '@mui/material';
import { NextPage } from 'next';

import lightThemeOptions from 'src/styles/theme/light-theme-option';

type ExtendedAppProps = AppProps & {
  Component: NextPage;
};

const lightTheme = createTheme(lightThemeOptions);

function App({
  Component,
  pageProps,
}: ExtendedAppProps) {
  return (
      <ThemeProvider theme={lightTheme}>
        {/* CssBaseline kickstart an elegant, consistent, and simple baseline to build upon. */}
        <CssBaseline />
        <Component {...pageProps} />
      </ThemeProvider>
  );
}

export default App;
4. Tạo Emotion cache
Như lúc nảy chúng ta đã nói về các tính năng của emotion phần này chúng ta sẽ cài đặt emotion cache. Package @emotion/cache hỗ trợ việc optimize performance của web, mình sẽ nhờ ChatGPT giải thích cụ thể hơn như sau:
- Tạo folder utility trong folder src, sau đó tạo file createEmotionCache.ts.
import createCache from '@emotion/cache';

const createEmotionCache = () => {
  return createCache({ key: 'mui-style', prepend: true });
};

export default createEmotionCache;
- Giải thích
- key: dùng để định danh tên của cache được tạo ra và được sử dụng để đảm bảo rằng mỗi lần tạo một cache mới với các tùy chọn giống nhau, cache được trả về là duy nhất và tương ứng với các tùy chọn đó.
- prepend: giá trị true giúp các MUI styles được chuyển lên đầu và load trước. Như trong docs của MUI:
It allows developers to easily override MUI styles with other styling solutions, like CSS modules.
-
Để có thể sử dụng emotion cache chúng ta cần cập nhật lại 2 file:
- _document.tsx: mục đích lưu trữ tất cả các CSS được tạo ra bởi Emotion vào trong cache và sử dụng lại chúng cho các request tiếp theo giúp giảm thiểu thời gian render và tối ưu hóa hiệu suất của ứng dụng. Ngoài ra giúp tránh việc tạo ra các CSS trùng lặp giúp giảm dung lượng tải trang và cải thiện hiệu suất.
- _app.tsx: giúp tối ưu hóa hiệu suất của ứng dụng bằng cách giảm thiểu thời gian tạo mới các CSS và sử dụng lại các CSS đã được tạo ra trước đó. Khi chúng ta sử dụng Emotion để tạo các style cho các component trong ứng dụng, mỗi lần component được render lại, Emotion sẽ tạo ra các CSS mới tương ứng với các thay đổi trong component đó. Việc sử dụng Emotion cache trong _app.tsx giúp lưu trữ các CSS đã được tạo ra trước đó, giảm thiểu việc tạo mới các CSS và cải thiện hiệu suất của ứng dụng.
-
Cập nhật lại file _document.tsx sử dụng getInitialProps để cài đặt cache:
import * as React from 'react';
import { Children } from 'react';
import Document, { Html, Head, Main, NextScript } from 'next/document';
import createEmotionServer from '@emotion/server/create-instance';
import createEmotionCache from 'src/utility/createEmotionCache';

class CustomDocument extends Document {
  render() {
    return (
      <Html lang="en">
        <Head>
          <link
            rel="stylesheet"
            href="https://fonts.googleapis.com/css?family=Roboto:300,400,500,700&display=swap"
          />
        </Head>
        <body>
          <Main />
          <NextScript />
        </body>
      </Html>
    );
  }
}

CustomDocument.getInitialProps = async (ctx) => {
  const originalRenderPage = ctx.renderPage;
  // You can consider sharing the same emotion cache between all the SSR requests to speed up performance.
  // However, be aware that it can have global side effects.
  const cache = createEmotionCache();
  const { extractCriticalToChunks } = createEmotionServer(cache);

  ctx.renderPage = () =>
    originalRenderPage({
      enhanceApp: (App) => (props) =>
        (
          <App
            {...props} // @ts-ignore
            emotionCache={cache}
          />
        ),
    });

  const initialProps = await Document.getInitialProps(ctx);
  // This code prevents emotion from rendering invalid HTML.
  // It is a part of the work around for a bug in material-ui that caused it to render invalid HTML when using emotion.
  // This code ensures that any HTML sent through emotion is sanitized and only valid HTML is rendered.
  // See https://github.com/mui-org/material-ui/issues/26561#issuecomment-855286153
  const emotionStyles = extractCriticalToChunks(initialProps.html);
  const emotionStyleTags = emotionStyles.styles.map((style) => {
    return (
      <style
        key={style.key}
        dangerouslySetInnerHTML={{ __html: style.css }}
        data-emotion={`${style.key} ${style.ids.join(' ')}`}
      />
    );
  });

  return {
    ...initialProps,
    styles: [...Children.toArray(initialProps.styles), ...emotionStyleTags],
  };
};

export default CustomDocument;
- Tiếp theo cập nhật file _app.tsx và thêm vào
CacheProvider.
import 'src/styles/globals.css';
import type { AppProps } from 'next/app';
import { CacheProvider, EmotionCache } from '@emotion/react';
import { createTheme, ThemeProvider } from '@mui/material/styles';
import { CssBaseline } from '@mui/material';
import { NextPage } from 'next';

import createEmotionCache from 'src/utility/createEmotionCache';
import lightThemeOptions from 'src/styles/theme/light-theme-option';

// Client-side cache, shared for the whole session of the user in the browser.
const clientSideEmotionCache = createEmotionCache();

type ExtendedAppProps = AppProps & {
  Component: NextPage;
  emotionCache: EmotionCache;
};

const lightTheme = createTheme(lightThemeOptions);

function App({
  Component,
  emotionCache = clientSideEmotionCache,
  pageProps,
}: ExtendedAppProps) {
  return (
    <CacheProvider value={emotionCache}>
      <ThemeProvider theme={lightTheme}>
        {/* CssBaseline kickstart an elegant, consistent, and simple baseline to build upon. */}
        <CssBaseline />
        <Component {...pageProps} />
      </ThemeProvider>
    </CacheProvider>
  );
}

export default App;
-
Giải thích
- Ở trên chúng ta sử dụng
CacheProviderđể truyền cache của chúng ta tạo vào hệ thống Emotion. Nếu để ý các bạn có thể thấy chúng ta sử dụngcreateEmotionCacheở cả 2 file: _document.tsx và _app.tsx. Tùy vào từng file sẽ có mục đích riêng:- Trong _document.tsx: được sử dụng để xây dựng các CSS inline cho trang web của chúng ta. Việc sử dụng inline CSS sẽ giảm thời gian tải trang bằng cách tránh các yêu cầu CSS không cần thiết. Bằng cách đó, Emotion cache giúp tăng tốc độ tải trang và cải thiện SEO.
- Trong _app.tsx: được sử dụng để xử lý tất cả các style của ứng dụng. Khi tải một trang mới, các style được lưu trữ trong cache sẽ được sử dụng lại, giúp tăng tốc độ tải trang và cải thiện trải nghiệm người dùng.
- Đặt tag
CSSBaselinephía trên tagComponentđể đảm bảo rằng các style của trang web được áp dụng đúng cách và không bị ghi đè hoặc ảnh hưởng bởi các style khác.
- Ở trên chúng ta sử dụng
-
Đến đây thì chúng ta đã hoàn thành xong phần cài đặt cho MUI, chúng ta sẽ thử test xem trang web có chạy như ý mình không. Sử dụng lệnh mặc định của NextJS:
npm run dev
-
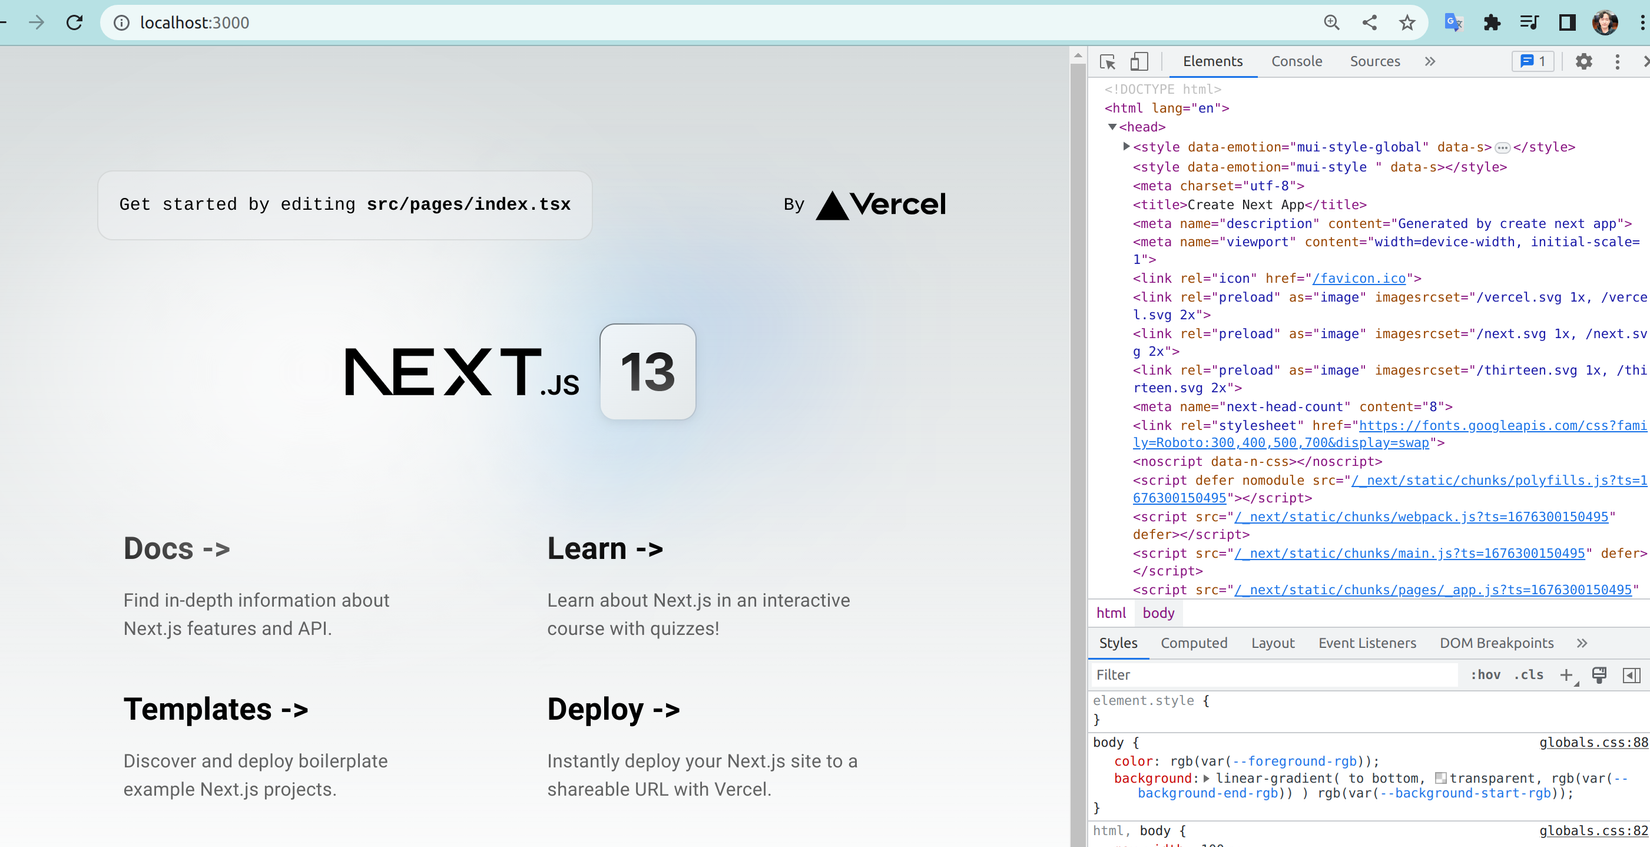
Sau đó truy cập vào http://localhost:3000 và mở developer tool để xem kết quả:
![image.png]()
-
Có thể thấy chúng ta đã chạy thành công với các tag style đầu có key mui-style mà chúng ta đã chỉ định ở file createEmotionCache.tsx khi nảy. Đến thời điểm hiện tại chúng ta sẽ có cấu trúc như hình dưới:
![image.png]()
5. Cài đặt và cấu hình Axios-hooks
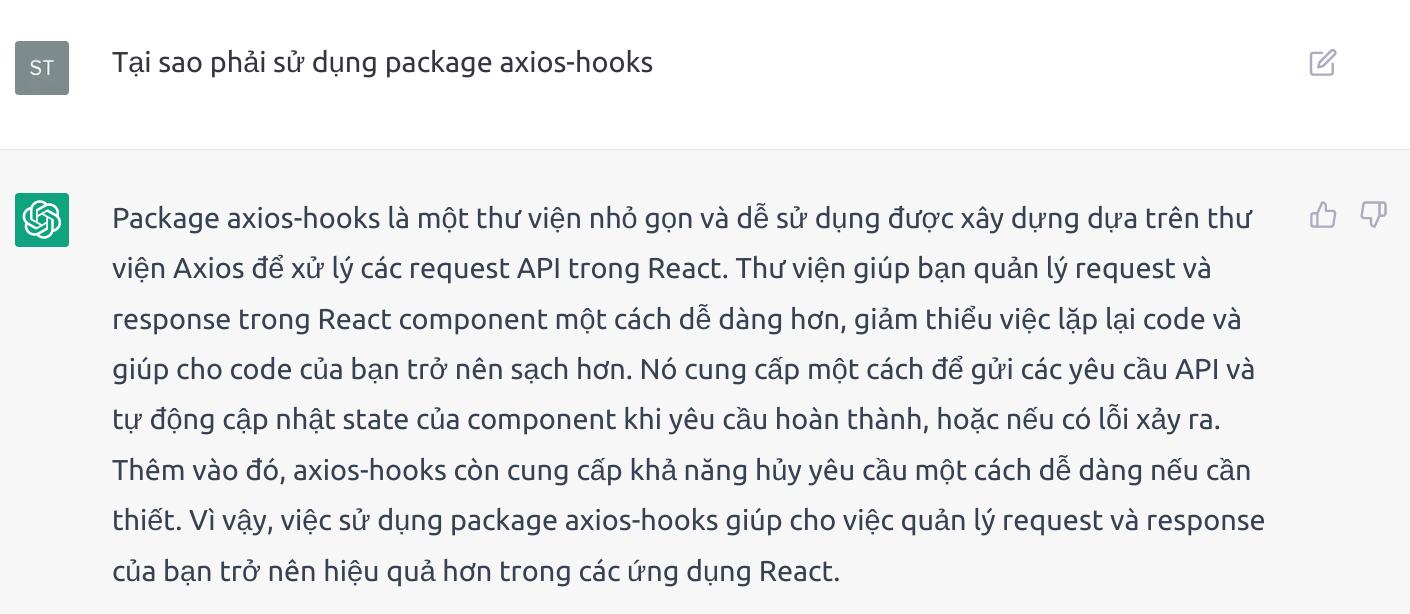
5.1 Tại sao mình chọn dùng axios-hooks
Phần này mình cũng sẽ nhờ ChatGPT giải thích cho dễ hiểu:
5.2 Cài đặt
Tiến hành cài đặt package axios-hooks. Version thời điểm hiện tại mình đang dùng là axios@1.3.2, axios-hooks@4.0.0 và lru-cache@7.14.1
npm install axios axios-hooks lru-cache
5.3 Cấu hình
-
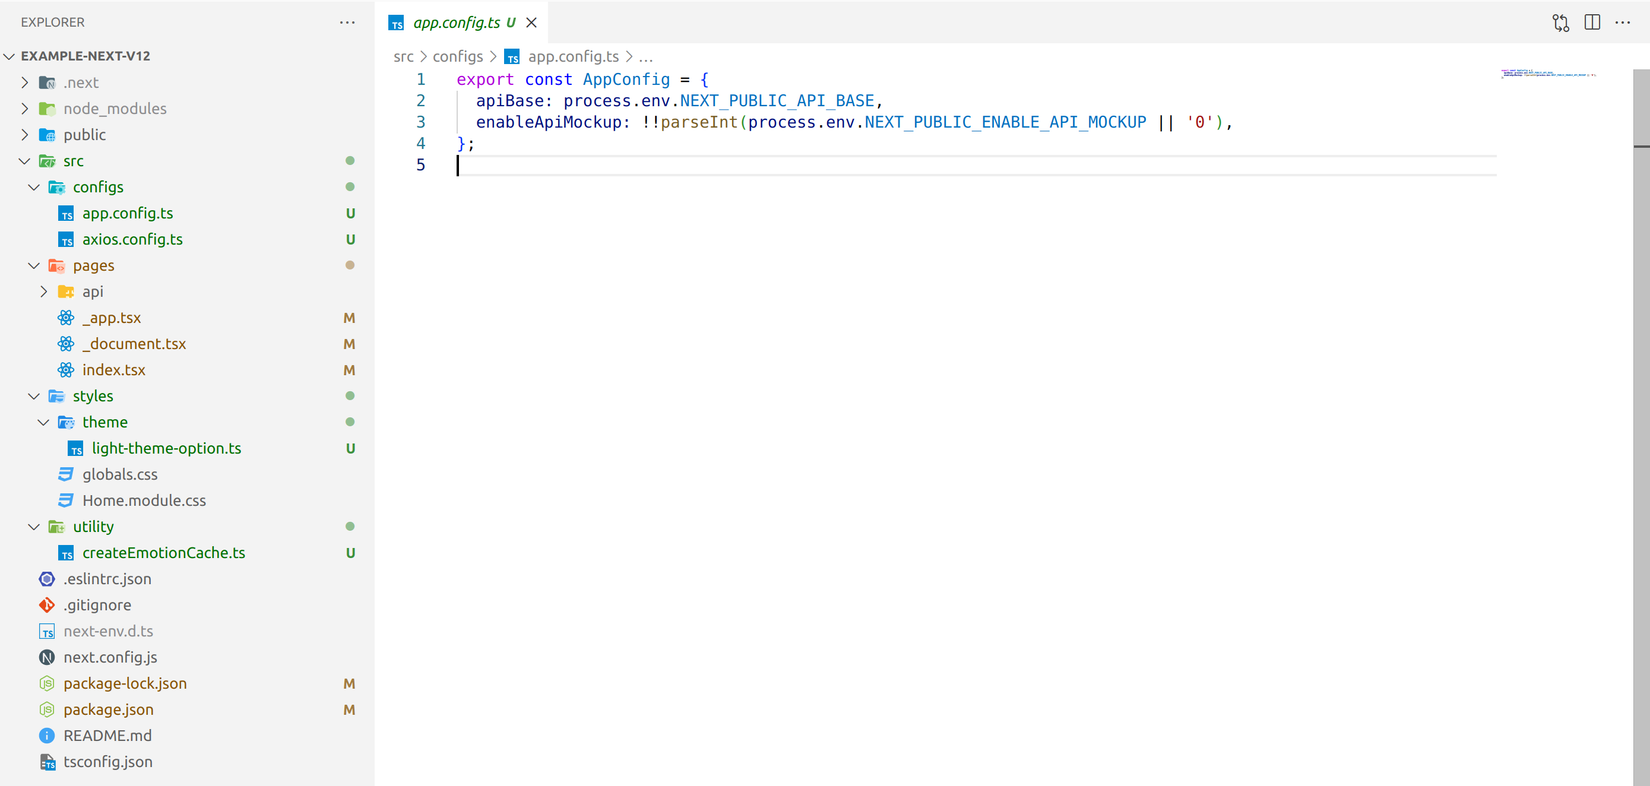
Để sử dụng đầu tiên mình sẽ tạo folder configs chứa thông tin về endpoint API và cấu hình cho axios-hooks. Sau đó tạo 2 file bên trong folder configs:
![image.png]()
-
Tạo file chứa biến môi trường để file app.config.ts có thể sử dụng
NEXT_PUBLIC_API_BASE=https://reqres.in/api
NEXT_PUBLIC_ENABLE_API_MOCKUP=0
- Nội dung file app.config.ts:
export const AppConfig = {
  apiBase: process.env.NEXT_PUBLIC_API_BASE,
  enableApiMockup: !!parseInt(process.env.NEXT_PUBLIC_ENABLE_API_MOCKUP || '0'),
};
-
Giải thích
- apiBase: endpoint API mà chúng ta sẽ gọi tới.
- enableApiMockup: trả về giá trị boolean cho biết có đang sử dụng data mockup thay vì gọi đến API hay không.
-
Cấu hình axios-hooks:
import Axios from 'axios';
import { configure } from 'axios-hooks';
import LRU from 'lru-cache';
import { AppConfig } from 'src/configs/app.config';

const axios = Axios.create({
  baseURL: AppConfig.apiBase,
});

const cache = new LRU({ max: 10 });

// request interceptor to add token to request headers
axios.interceptors.request.use(
  async (config) => {
    // Implement function to get token
    const token = {
      accessToken: 'my-access-token',
      refreshToken: 'my-refresh-token',
    };

    if (token?.accessToken) {
      config.headers.Authorization = `Bearer ${token?.accessToken}`;
    }
    return config;
  },
  (error) => Promise.reject(error)
);

// response interceptor intercepting 401 responses, refreshing token and retrying the request
axios.interceptors.response.use(
  (response) => response,
  async (error) => {
    // Implement logic here

    return Promise.reject(error);
  }
);

configure({ axios, cache });
-
Giải thích:
- Chúng ta sẽ lấy end point từ app config để dùng làm baseURL mặc định khi gọi đi.
- Sử dụng LRU cache để lưu trữ tạm thời các kết quả phản hồi từ các yêu cầu axios trước đó để tránh việc gửi lại các yêu cầu giống nhau và giảm thiểu thời gian chờ đợi phản hồi từ server.
axios.interceptors.request: đây là nơi chúng ta sẽ thêm vào access_token để gửi đi, các bạn sẽ không cần phải thêm access token vào mỗi khi tạo các request khác nhau.axios.interceptors.response: mình sẽ xử lý việc dùng refresh_token để lấy access_token mới khi hết hạn. Chúng ta sẽ quay trở lại 2 interceptors này khi cấu hình xác thực ở Phần 2.
-
Chúng ta sẽ tiến hành test thử config đã chạy được chưa bằng cách tạo folder example trong folder pages ( hoặc các bạn có thể làm theo cách riêng của mình ). Sau đó thêm vào file index.tsx với nội dung từ example của axios-hook
import Head from 'next/head';
import useAxios from 'axios-hooks';

export default function Example() {
  const [{ data, loading, error }] = useAxios(
    '/users?delay=1'
  );

  if (loading) return <p>Loading...</p>;
  if (error) return <p>Error!</p>;
  return (
    <>
      <Head>
        <title>Create Next App</title>
        <meta name="description" content="Generated by create next app" />
        <meta name="viewport" content="width=device-width, initial-scale=1" />
        <link rel="icon" href="/favicon.ico" />
      </Head>
      <main>
        <pre>{JSON.stringify(data, null, 2)}</pre>
      </main>
    </>
  );
}
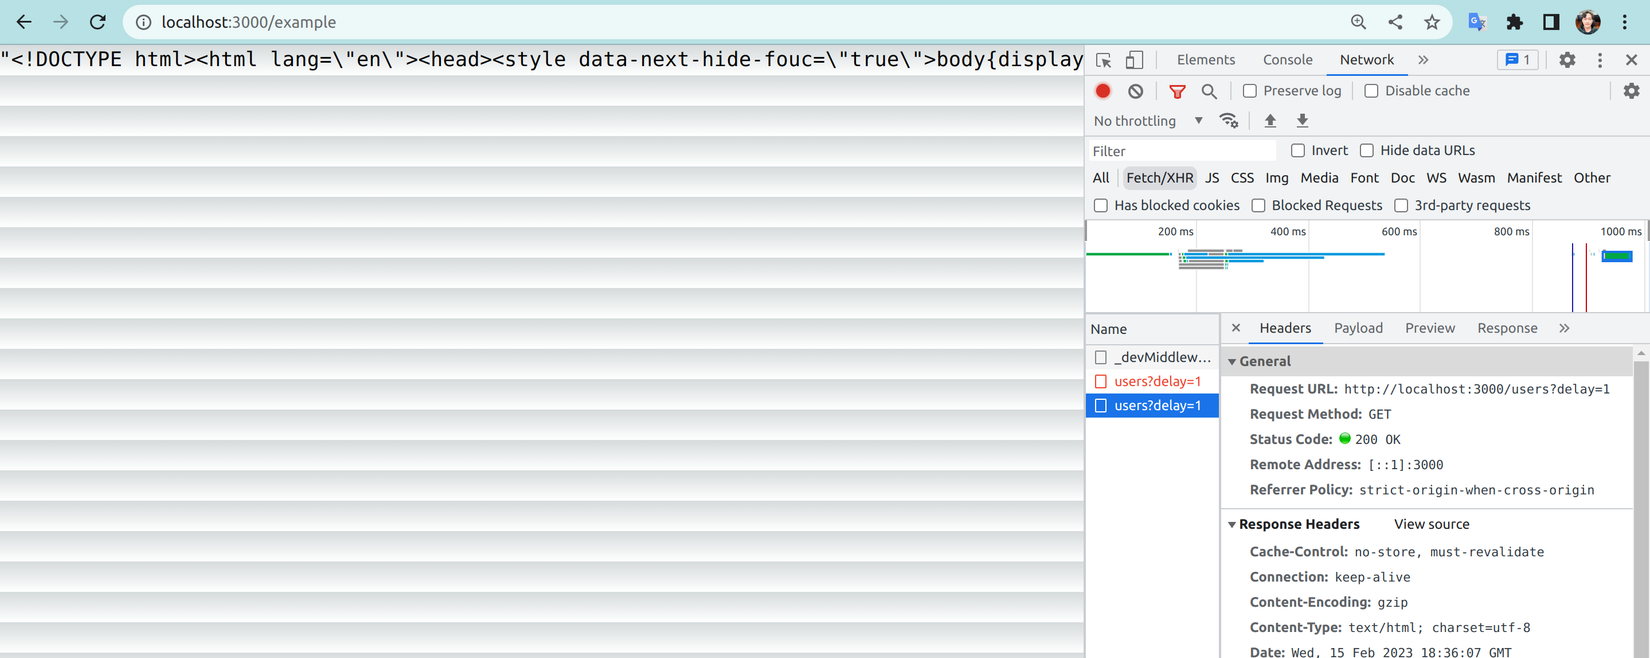
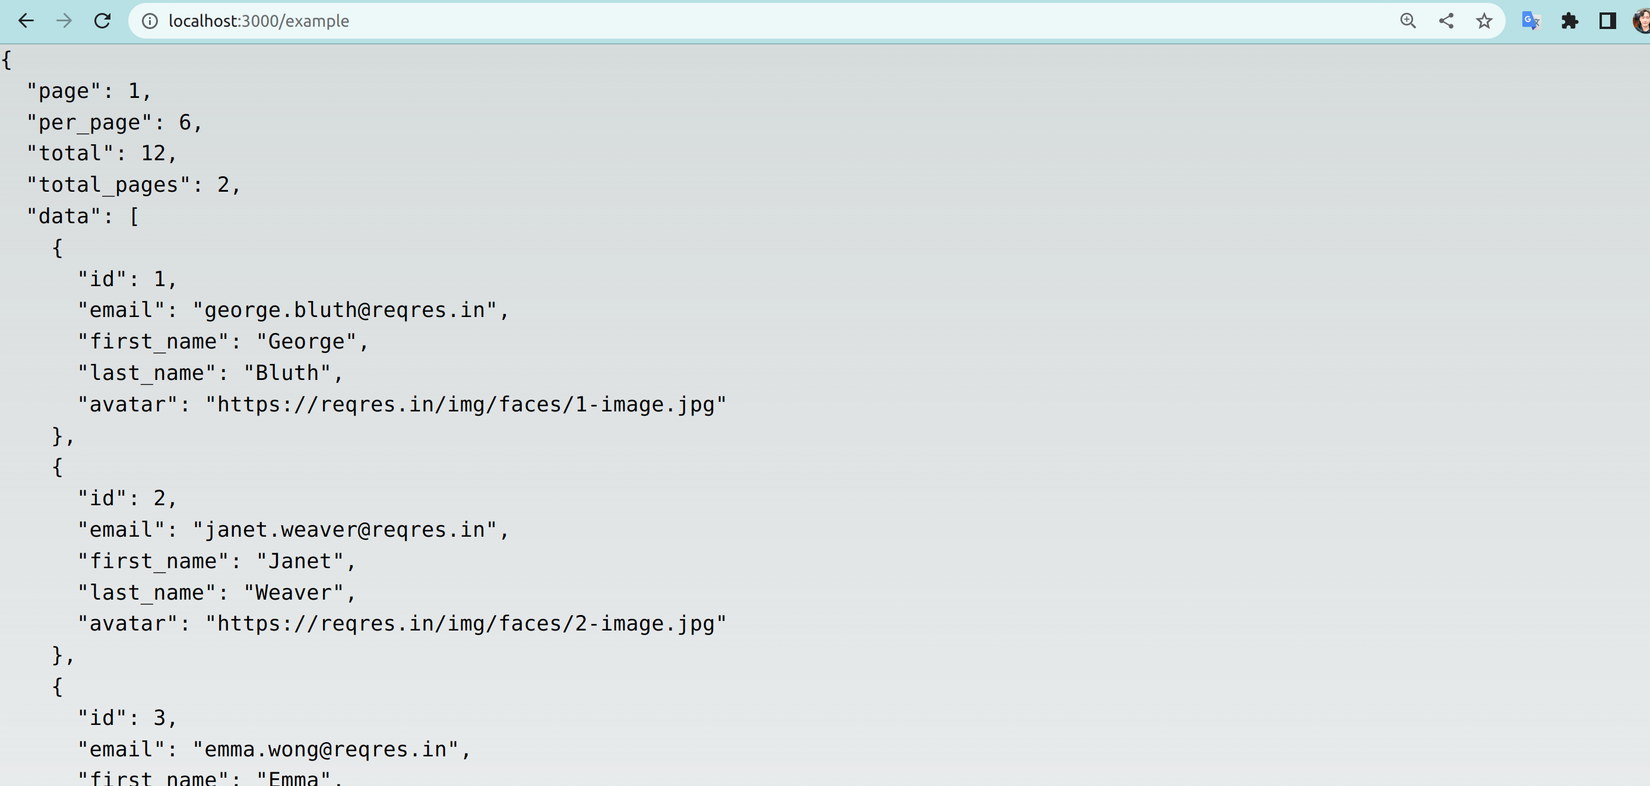
- Truy cập http://localhost:3000/example để xem kết quả thì sẽ gặp lỗi do chúng ta chỉ mới tạo file axios config mà vẫn chưa import vào file _app.tsx.
![image.png]()
- Mình sẽ thêm vào ở đầu file _app.tsx:
import 'src/configs/axios.config';
...
- Chỉnh sửa lại file .env để test với domain trong example
NEXT_PUBLIC_API_BASE=https://reqres.in/api
NEXT_PUBLIC_ENABLE_API_MOCKUP=0
- Refresh lại trang có thể thấy mọi thứ đã hoạt động như những gì chúng ta cấu hình. Phần tiếp theo chúng ta sẽ viết một số hooks CRUD với axios hooks để phục vụ yêu cầu cơ bản của website.
![image.png]() .
.
6. Tạo hooks kết hợp Axios-hooks và Mock data
Trong phần này mình sẽ hướng dẫn các bạn tạo mock data bằng package @faker-js để chuyển đổi giữa 2 môi trường phòng cho trường hợp API từ Backend ( BE ) chưa available cho chúng ta sử dụng hoặc gặp lỗi đột xuất trong quá trình phát triển dự án. Việc này giúp làm giảm sự phụ thuộc của team FE vào team BE trong lúc lập trình. Để có thể chủ động được trong vấn đề đó chúng ta sẽ dựa vào interface đã thỏa thuận trước với phía BE để tạo các mock data. Tiến hành cài đặt:
npm install @faker-js/faker --save-dev
- Sau khi đã cài đặt xong chúng ta sẽ tạo folder mocks bên trong folder src, sau đó tạo file users.mock.ts. Giả sử interface về user chúng ta như sau:
interface User {
  id: number;
  email: string;
  first_name: string;
  last_name: string;
  avatar: string;
}
- Nội dung file users.mock.ts sẽ được tạo như bên dưới:
import { User } from '@/types/users.type';
import { faker } from '@faker-js/faker';

export const mockUsers: User[] = [];

for (let index = 0; index < 99; index++) {
  mockUsers.push({
    id: faker.helpers.unique(faker.datatype.number),
    email: `${faker.name.fullName()}@example.com`,
    first_name: faker.name.firstName(),
    last_name: faker.name.lastName(),
    avatar: faker.image.animals(500, 500, true),
  });
}
-
Sau khi đã có mock data chúng ta sẽ tiến hành tạo fake request với mock data bằng cách tạo hook
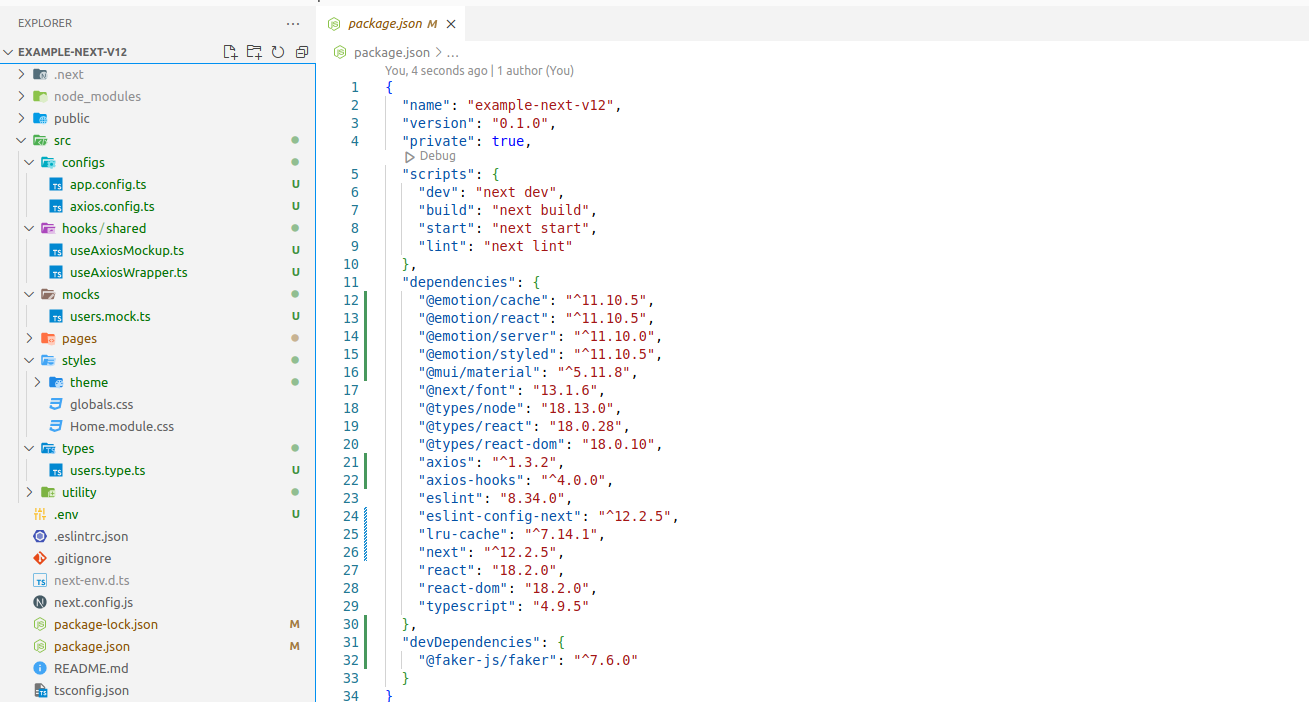
useAxiosMockup. Tạo folder hooks trong src, sau đó tạo folder shared cho các hooks dùng chung. Tạo thêm file useAxiosMockup.ts và useAxiosWrapper.ts. Cấu trúc của chúng ta đến hiện tại sẽ như sau:![image.png]()
-
Ở file useAxiosMockup.ts để làm cho request giống thực tế, mình sẽ tạo một
Promisesử dụngsetTimeoutđể giả lập như đang gọi request đi và chờ response:
import { AxiosError, AxiosPromise, AxiosRequestConfig } from 'axios';
import { RefetchOptions, UseAxiosResult } from 'axios-hooks';
import { useCallback, useEffect, useState } from 'react';

type MockupConfigType<T> = {
  result?: T;
  manual?: boolean;
  refetchKey?: string;
  config?: AxiosRequestConfig;
};

function useAxiosMockup<T>({
  result,
  manual = false,
  refetchKey = '',
  config,
}: MockupConfigType<T>): UseAxiosResult<T> {
  const [data, setData] = useState<T>();
  const [loading, setLoading] = useState(false);
  const [error, setError] = useState<AxiosError | null>(null);

  const refetch = useCallback(
    (
      config1?: AxiosRequestConfig | undefined,
      options?: RefetchOptions | undefined
    ): AxiosPromise<T> => {
      return new Promise((resolve) => {
        setLoading(true);
        setError(null);
        setData(undefined);
        setTimeout(() => {
          setLoading(false);
          setData(result);
          resolve({
            data: result || ({} as T),
            status: config?.method == 'POST' ? 201 : 200,
            statusText: '',
            headers: {},
            // @ts-ignore
            config: {},
          });
        }, Math.random() * 3 * 1000);
      });
    },
    [result, config?.method]
  );

  useEffect(() => {
    if (!manual) {
      refetch();
    }
  }, [manual, refetchKey]);

  // @ts-ignore
  return [{ data, loading, error }, refetch, () => undefined];
}

export default useAxiosMockup;
- Giải thích
- Option
resultnhận vào là mock data mà chúng ta đã tạo khi nảy. - Option
manualdùng để gọi request thủ công, vì mặc định của axios-hooks khi component được render sẽ tự động thực thi. Chúng ta sẽ dùng cho các method như POST, PATCH, PUT. - 2 option
configvàrefreshKeydùng để lấy ra method của request hoặc refresh. - Chúng ta cũng sẽ sử dụng tính năng Generic của Typescript để linh động trong kiểu trả về của data.
- Vì ở đây chúng ta chỉ giả lập request nên sẽ có những chỗ data không match với type, nên
Typescriptsẽ báo lỗi, để giải quyết các lỗi đó mình sử dụng@ts-ignore.
- Option
- Tiếp theo chúng ta sẽ sử dụng file useAxiosWrapper.ts để kết hợp axios-hooks với
useAxiosMockupnhư sau:
import { AxiosRequestConfig } from 'axios';
import useOriginalAxios, { Options, UseAxiosResult } from 'axios-hooks';
import { AppConfig } from '@/configs/app.config';
import useAxiosMockup from './useAxiosMockup';

function useAxios<TResponse = any, TBody = any, TError = any>(
  config: AxiosRequestConfig<TBody> | string,
  options?: Options & { mockData?: TResponse }
): UseAxiosResult<TResponse, TBody, TError> {
  const mockupResult = useAxiosMockup<TResponse>({
    result: options?.mockData,
    manual: options?.manual,
    refetchKey: JSON.stringify(config),
    config: config as AxiosRequestConfig,
  });
  const apiResult = useOriginalAxios<TResponse>(config, {
    ...options,
    manual: AppConfig.enableApiMockup || options?.manual,
  });
  if (AppConfig.enableApiMockup) {
    return mockupResult;
  }
  return apiResult;
}

export default useAxios;
- Giải thích:
- Option
configsẽ là thông tin về request như url, method, params,... mà chúng ta sẽ truyền vào khi tạo các hook riêng. optionssẽ là options của axios-hooks kết hợp với mockData mà chúng ta đã chỉ định. Khi dùng mock data sẽ truyền vào các custom data từ hook riêng. Đến phần tiếp theo chúng ta sẽ làm rõ hơn mục này.- Chúng ta sẽ để ý để biến
enableApiMockuptừappConfig, nếu như biến này có giá trị true thì sẽ sử dụng mock data thay vì gọi đến server. Việc cấu hình như thế này giúp chúng ta dễ dàng chuyển qua lại giữa môi trường sử dụng mock data và data từ server.
- Option
Vậy là chúng ta đã tạo xong các common hooks cần thiết, tiếp theo chúng ta sẽ tạo các hook riêng để quản lí users.
7. Tạo hooks CRUD cho users
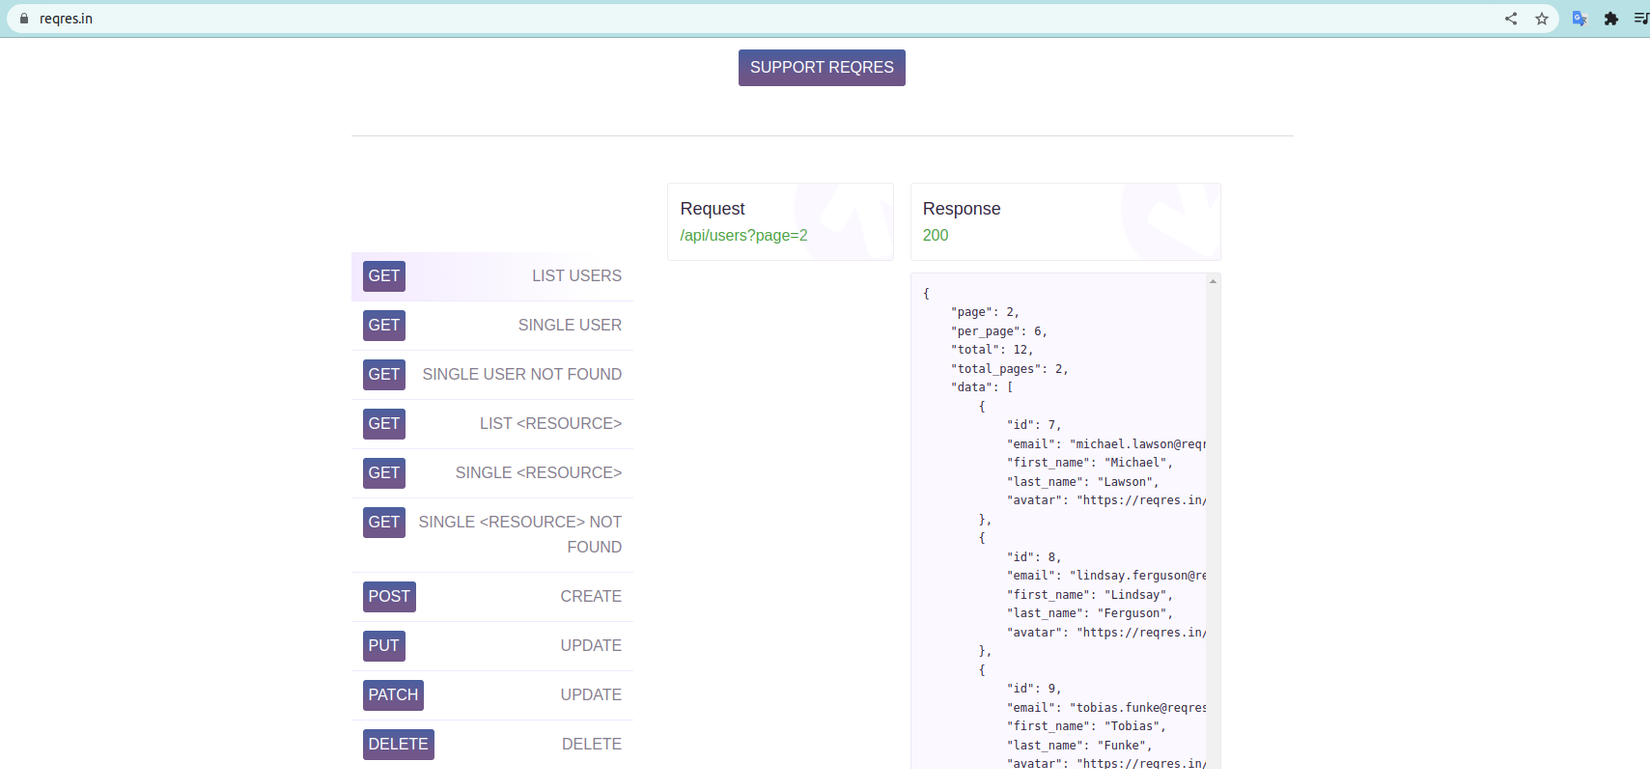
Phần này mình sẽ thực hiện song song việc CRUD với user trong mock data và gọi cả lên server cho trực quang. Do chúng ta không có server nên mình sẽ sử dụng API của https://reqres.in như đã dùng ở example
7.1 Read danh sách users
Đầu tiên chúng ta sẽ tạo hook lấy về danh sách user, tạo folder users trong folder hooks, sau đó tạo file useGetListUsers.ts và thêm vào interface UserGetParams như sau:
...
export interface UserGetParams {
 keyword?: string;
 per_page?: number;
 page?: number;
}
useGetListUsers.ts
import { mockUsers } from '@/mocks/users.mock';
import { User, UserGetParams } from '@/types/users.type';
import useAxios from '@/hooks/shared/useAxiosWrapper';

function useUserList(params: UserGetParams) {
 const { page = 0, per_page = 10, keyword = '' } = params ?? {};
 return useAxios<{
   data: User[];
 }>(
   {
     method: 'GET',
     url: '/users',
     params,
   },
   {
     mockData: {
       data: mockUsers
         .filter((user) =>
           user.email.toLowerCase().includes(keyword.toLowerCase())
         )
         .slice(page, per_page),
     },
   }
 );
}

export default useUserList;
- Giải thích:
- Chúng ta sẽ sử dụng
useAxiostừ file useAxiosWrapper đã tạo khi nảy paramslà thông số dùng để phân trang cũng như filter user theo email. Phần này các bạn có thể custom tùy theo ý của mình.- Chúng ta sẽ cho
useAxioscả thông tin để gọi đến server và dữ liệu từ mock data sau khi đã xử lý. Tùy theo cài đặt ở biến môi trườngenableApiMockupmàuseAxiossẽ sử dụng dữ liệu tương ứng.
- Chúng ta sẽ sử dụng
Để hiển thị ra giao diện chúng ta sẽ tạo folder views trong folder src dùng để hiển thị dữ liệu. Sau đó tạo folder users bên trong và cuối cùng là 2 file UserList.tsx và UserListItem.tsx.
Vì đây là giao diện nên các bạn có thể sử dụng giao diện tùy ý không cần giống mình cũng được, các bạn chỉ cần xem cách dùng hook của mình để ứng dụng.
import React from 'react';
import { Alert, CircularProgress, Grid } from '@mui/material';
import useUserList from '@/hooks/users/useGetListUsers';
import { User, UserGetParams } from '@/types/users.type';
import UserListItem from './UserListItem';

type Props = {
  filter: UserGetParams;
  justCreatedUser: User[];
};

function UserList({ filter, justCreatedUser }: Props) {
  const [{ data, error, loading }] = useUserList(filter);

  return (
    <Grid container spacing={2} justifyContent="stretch">
      {loading && (
        <Grid item xs={12} sx={{ textAlign: 'center' }}>
          <CircularProgress />
        </Grid>
      )}

      {error && (
        <Grid item xs={12}>
          <Alert severity="error">{error.message}</Alert>
        </Grid>
      )}

      {!loading && !data?.length && (
        <Grid item xs={12}>
          <Alert severity="warning">{'No data found'}</Alert>
        </Grid>
      )}

      {justCreatedUser.map((user) => (
        <Grid item xs key={user.id}>
          <UserListItem user={user} isNew />
        </Grid>
      ))}

      {data &&
        data.map((user) => (
          <Grid item xs key={user.id}>
            <UserListItem user={user} />
          </Grid>
        ))}
    </Grid>
  );
}

export default UserList;
- Giải thích:
- Chúng ta sẽ lấy về data, error, loading từ hook lấy danh sách user khi nảy và sẽ hiển thị tùy theo kết quả trả về.
- justCreatedUser đơn giản dùng để highlight user mới tạo.
import React, { useState } from 'react';
import {
  Box,
  Button,
  Card,
  CardActionArea,
  CardActions,
  CardContent,
  CardMedia,
  Chip,
  Collapse,
  IconButton,
  Typography,
} from '@mui/material';
import { User } from '@/types/users.type';
import { useRouter } from 'next/router';
import EditIcon from '@mui/icons-material/Edit';
import DeleteIcon from '@mui/icons-material/Delete';

type Props = {
  user: User;
  isNew?: boolean;
};

function UserListItem({ user, isNew = false }: Props) {
  const router = useRouter();
  const [openEdit, setOpenEdit] = useState(false);
  const [openDelete, setOpenDelete] = useState(false);
  const [visible, setVisible] = useState(true);
  const [data, setData] = useState(user);

  const toggleEdit = () => {
    setOpenEdit((prev) => !prev);
  };

  const toggleDelete = () => {
    setOpenDelete((prev) => !prev);
  };

  const handleItemClick = () => {
    router.push(`/users/${user.id}`);
  };

  return (
    <Collapse in={visible}>
      <Card sx={{ minWidth: 300 }}>
        <CardActionArea
          onClick={handleItemClick}
          sx={{ backgroundColor: 'primary.main' }}>
          <CardMedia component={'img'} image={data.avatar} height="180" />
          {isNew && (
            <Chip
              label="Just Created"
              color="warning"
              size="small"
              sx={{ position: 'absolute', top: 12, right: 12 }}
            />
          )}
        </CardActionArea>
        <CardContent>
          <Typography gutterBottom variant="h5">
            {data.first_name} {data.last_name}
          </Typography>
          <Typography>${data.email}</Typography>
        </CardContent>
        <CardActions>
          <Button startIcon={<EditIcon />} onClick={toggleEdit}>
            Edit
          </Button>
          <Button
            color="error"
            startIcon={<DeleteIcon />}
            onClick={toggleDelete}>
            Delete
          </Button>
          <Box flexGrow={1} />
        </CardActions>
      </Card>
    </Collapse>
  );
}

export default UserListItem;
- Để có thể hiển thị ra chúng ta sẽ tạo folder users trong folder pages. Sau đó tạo file index.tsx trong đó:
import React, { useCallback, useState } from 'react';
import { User, UserGetParams } from '@/types/users.type';
import UserList from '@/views/users/UserList';
import { Container } from '@mui/material';
import Head from 'next/head';

function UserPage() {
  const [filter, setFilter] = useState<UserGetParams>({});
  const [justCreatedUser, setJustCreatedUser] = useState<User[]>([]);

  const handleCreatedUser = useCallback((data: User) => {
    setJustCreatedUser((prev) => [data, ...prev]);
  }, []);

  return (
    <>
      <Head>
        <title>Users</title>
      </Head>
      <Container maxWidth="xl">
        <UserList filter={filter} justCreatedUser={justCreatedUser} />
      </Container>
    </>
  );
}

export default UserPage;
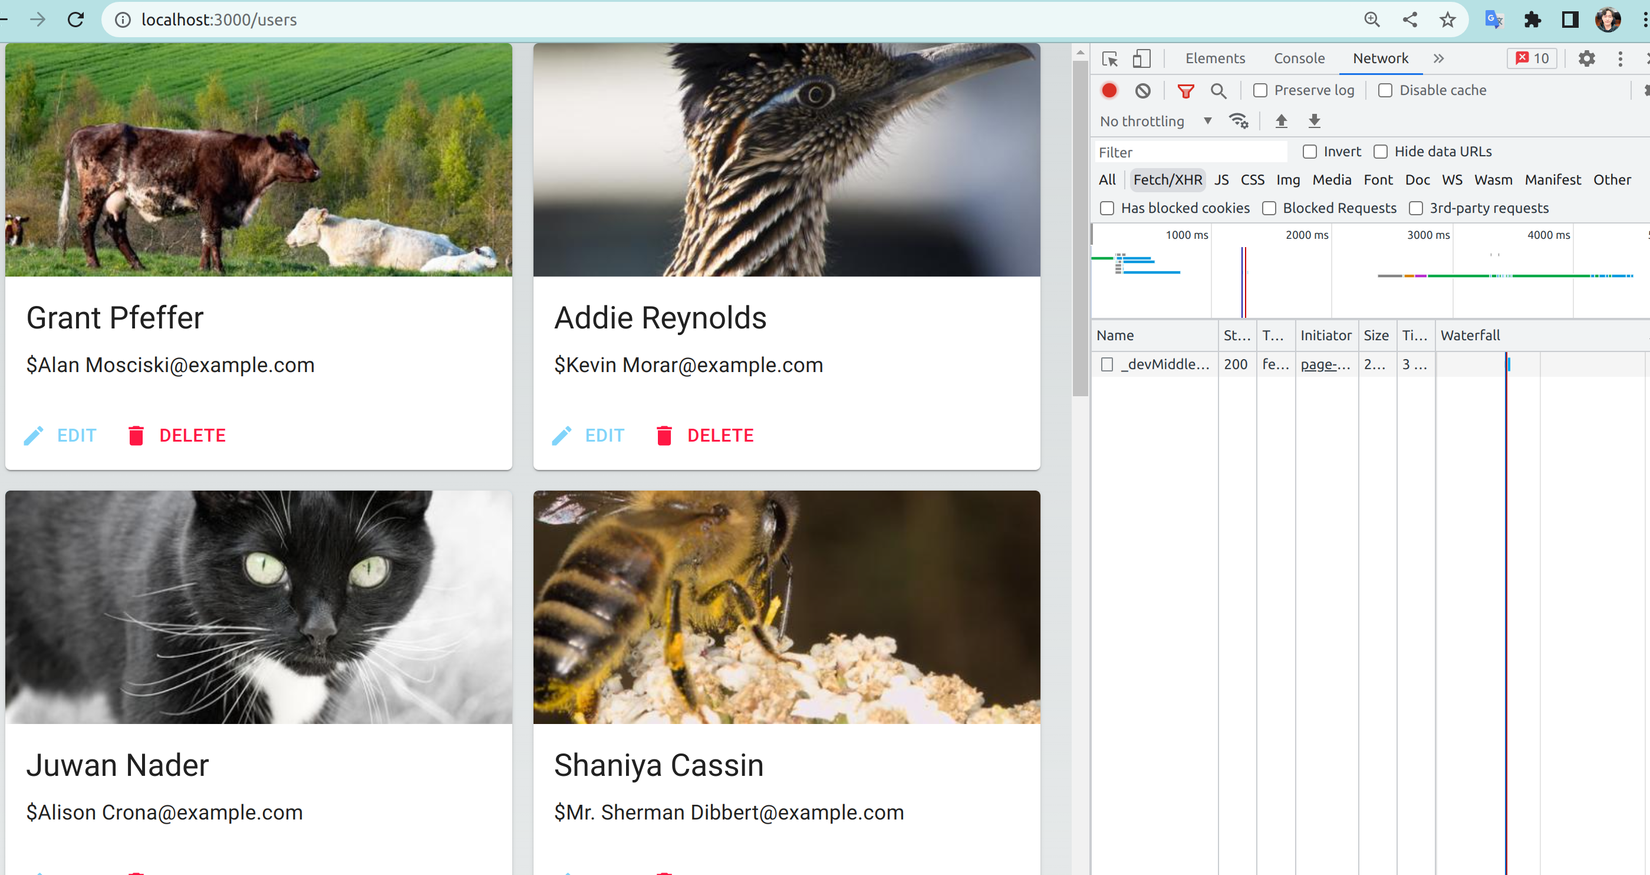
- Truy cập vào http://localhost:3000/users để kiểm tra xem kết quả.Phía Tab Network không có request nào gọi đến server:
![image.png]()
- Có thể thấy dữ liệu mock data chúng ta tạo khi nảy đã được hiển thị, giờ hãy thử thay đổi giá trị
NEXT_PUBLIC_ENABLE_API_MOCKUP=0ở file .env để gọi đến API của reqres.in.
NEXT_PUBLIC_API_BASE=https://reqres.in/api
NEXT_PUBLIC_ENABLE_API_MOCKUP=0
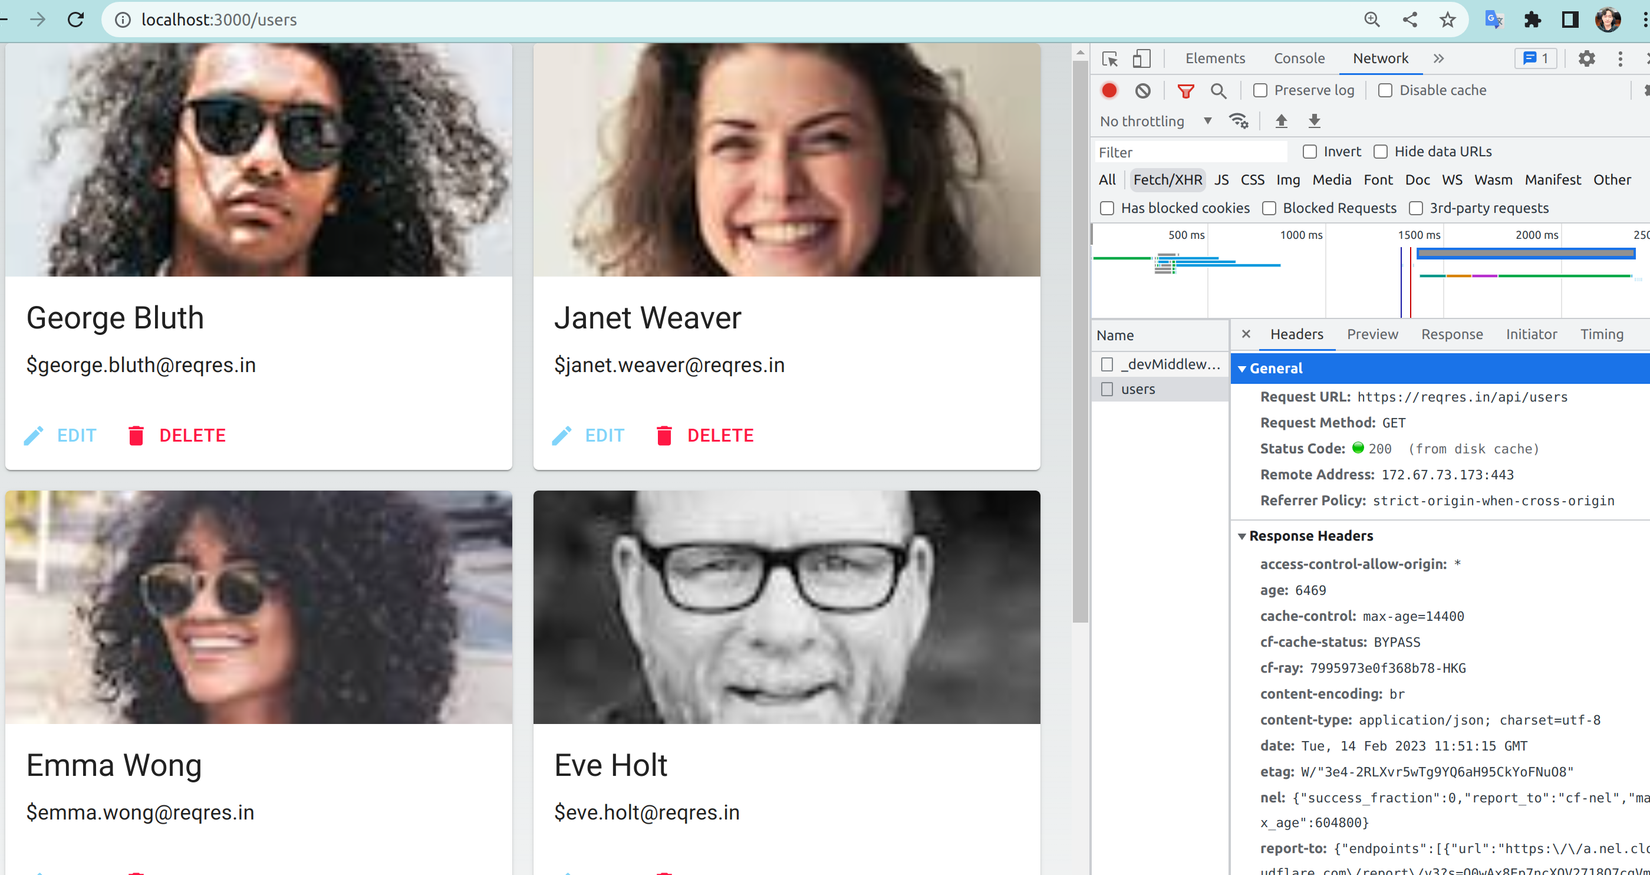
- Truy cập lại vào http://localhost:3000/users để xem sự thay đổi. Có thể thấy ở Tab Network chúng ta đã gọi đến API của reqres.in:
7.2 Create user mới
- Chúng ta sẽ tạo hook để tạo user mới:
import { User } from '@/types/users.type';
import useAxios from '../shared/useAxiosWrapper';

function useCreateUser(mockData?: User) {
  return useAxios<User>(
    {
      method: 'POST',
      url: '/user',
    },
    {
      manual: true,
      mockData,
    }
  );
}
export default useCreateUser;
- Hook này của chúng ta cũng tương tự, chỉ khác ở option
manuallà true. Như mình đã giải thích axios hooks mặc định sẽ tự động thực thi khi component được render, chúng ta dùngmanualđể dừng chức năng đó. - Tiếp theo mình sẽ tạo UserCreateDialog để popup form điền user mới. Trước tiên mình sẽ cài các package liên quan đến validate form để chuyên nghiệp hơn:
npm i react-hook-form yup @hookform/resolvers
- Sau khi cài đặt xong chúng ta sẽ thêm vào thông tin file
import {
  Box,
  Button,
  Dialog,
  DialogActions,
  DialogContent,
  DialogContentText,
  DialogTitle,
  FormControl,
  FormHelperText,
  LinearProgress,
  TextField,
} from '@mui/material';
import React, { useEffect } from 'react';
// form
import { Controller, useForm } from 'react-hook-form';
import * as yup from 'yup';
import { yupResolver } from '@hookform/resolvers/yup';
import { User } from '@/types/users.type';
import useCreateUser from '@/hooks/users/useCreateUser';

type Props = {
  open: boolean;
  onClose: () => void;
  onCreated: (data: User) => void;
};

const schema = yup.object().shape({
  first_name: yup.string().min(1).max(40).required(),
  last_name: yup.string().min(1).max(40).required(),
  email: yup.string().min(1).max(1000).email().required(),
});

const defaultValues = {
  first_name: '',
  last_name: '',
  email: '',
};

function UserCreateDialog({ open, onClose, onCreated }: Props) {
  const [{ loading, error }, doCreate] = useCreateUser({
    // mock data
    first_name: '',
    last_name: '',
    email: '',
    avatar: 'https://loremflickr.com/500/500/animals',
    id: 99999 * Math.random(),
  });
  const {
    reset,
    control,
    handleSubmit,
    formState: { errors },
  } = useForm({
    defaultValues,
    mode: 'onChange',
    resolver: yupResolver(schema),
  });

  const onSubmit = (data: Partial<User>) => {
    doCreate({ data }).then((res) => {
      if (res.status == 201) {
        onClose();
        onCreated({ ...res.data, ...data }); // in real-project, it should be onCreated(res.data);
        reset();
      }
    });
  };

  useEffect(() => {
    reset();
  }, [open, reset]);

  return (
    <Dialog open={open} onClose={onClose} fullWidth maxWidth="sm">
      <DialogTitle>Create User</DialogTitle>
      {loading && <LinearProgress />}
      <DialogContent>
        <Box
          id="user-create-form"
          component={'form'}
          onSubmit={handleSubmit(onSubmit)}
          mt={2}>
          <FormControl fullWidth sx={{ mb: 3 }}>
            <Controller
              name="first_name"
              control={control}
              rules={{ required: true }}
              render={({ field: { value, onChange } }) => (
                <TextField
                  value={value}
                  label="First name"
                  onChange={onChange}
                  placeholder="Enter your first name"
                  error={Boolean(errors.first_name)}
                />
              )}
            />
            {errors.first_name && (
              <FormHelperText sx={{ color: 'error.main' }}>
                {errors.first_name.message}
              </FormHelperText>
            )}
          </FormControl>
          <FormControl fullWidth sx={{ mb: 3 }}>
            <Controller
              name="last_name"
              control={control}
              rules={{ required: true }}
              render={({ field: { value, onChange } }) => (
                <TextField
                  value={value}
                  label="Last name"
                  onChange={onChange}
                  placeholder="Enter your last name"
                  error={Boolean(errors.last_name)}
                />
              )}
            />
            {errors.last_name && (
              <FormHelperText sx={{ color: 'error.main' }}>
                {errors.last_name.message}
              </FormHelperText>
            )}
          </FormControl>
          <FormControl fullWidth sx={{ mb: 3 }}>
            <Controller
              name="email"
              control={control}
              rules={{ required: true }}
              render={({ field: { value, onChange } }) => (
                <TextField
                  value={value}
                  label="Email"
                  onChange={onChange}
                  placeholder="Enter your email address"
                  error={Boolean(errors.email)}
                />
              )}
            />
            {errors.email && (
              <FormHelperText sx={{ color: 'error.main' }}>
                {errors.email.message}
              </FormHelperText>
            )}
          </FormControl>
        </Box>
        {error && (
          <DialogContentText color={'error'}>
            Error: {error.message}
          </DialogContentText>
        )}
      </DialogContent>
      <DialogActions>
        <Button onClick={onClose} disabled={loading}>
          Close
        </Button>
        <Button
          type="submit"
          form="user-create-form"
          color="success"
          disabled={loading}>
          Save
        </Button>
      </DialogActions>
    </Dialog>
  );
}

export default UserCreateDialog;
- File này chủ yếu là validate nên các bạn có thể tham khảo thêm ở docs của Yup
- Chúng ta vẫn chưa có button Tạo User và các option để phân trang, mình sẽ tạo file UserFilter.tsx để thêm vào các phần còn thiếu đó.
import {
  FormControl,
  IconButton,
  InputAdornment,
  MenuItem,
  Select,
  SelectChangeEvent,
  TextField,
  Toolbar,
  Typography,
} from '@mui/material';
import React, { useEffect, useState } from 'react';
import SearchIcon from '@mui/icons-material/Search';
import AddIcon from '@mui/icons-material/Add';
import UserCreateDialog from './UserCreateDialog';
import { User, UserGetParams } from '@/types/users.type';

type Props = {
  filter: UserGetParams;
  onChange: (newFilter: UserGetParams) => void;
  onCreatedUser: (data: User) => void;
};

function UserFilter({ filter, onChange, onCreatedUser }: Props) {
  const [per_page, setLimit] = useState('10');
  const [keyword, setKeyword] = useState('');
  const [openCreate, setOpenCreate] = useState(false);

  const toggleCreate = () => {
    setOpenCreate((prev) => !prev);
  };

  const handleChangePageSize = (e: SelectChangeEvent) => {
    setLimit(e.target.value);
  };

  const handleKeywordChange = (e: React.ChangeEvent<HTMLInputElement>) => {
    setKeyword(e.target.value);
  };

  useEffect(() => {
    const timer = setTimeout(() => {
      if (keyword != filter.keyword) {
        onChange({ ...filter, keyword });
      }
    }, 500);
    return () => clearTimeout(timer);
  }, [keyword, filter, onChange]);

  useEffect(() => {
    if (filter.per_page != parseInt(per_page)) {
      onChange({ ...filter, per_page: parseInt(per_page) });
    }
  }, [filter, per_page, onChange]);

  return (
    <Toolbar disableGutters>
      <Typography
        sx={{ flexGrow: 1, display: 'flex', alignItems: 'center' }}
        variant="h5">
        All Users
        <IconButton
          sx={{ marginLeft: 2 }}
          color="primary"
          onClick={toggleCreate}>
          <AddIcon />
        </IconButton>
      </Typography>
      <UserCreateDialog
        open={openCreate}
        onClose={toggleCreate}
        onCreated={onCreatedUser}
      />
      <TextField
        sx={{ marginRight: 2 }}
        size="small"
        placeholder="Search term..."
        value={keyword}
        onChange={handleKeywordChange}
        InputProps={{
          endAdornment: (
            <InputAdornment position="end">
              <SearchIcon />
            </InputAdornment>
          ),
        }}
      />
      <FormControl size="small">
        <Select
          value={per_page}
          onChange={handleChangePageSize}
          startAdornment={
            <InputAdornment position="start">Page Size:</InputAdornment>
          }>
          <MenuItem value={10}>10</MenuItem>
          <MenuItem value={20}>20</MenuItem>
          <MenuItem value={30}>30</MenuItem>
        </Select>
      </FormControl>
    </Toolbar>
  );
}

export default UserFilter;
- Cập nhật lại file pages/users/index.tsx để thêm vào UserFilter:
import React, { useCallback, useState } from 'react';
import { User, UserGetParams } from '@/types/users.type';
import UserList from '@/views/users/UserList';
import { Container } from '@mui/material';
import Head from 'next/head';
import UserFilter from '@/views/users/UserFilter';

function UserPage() {
  const [filter, setFilter] = useState<UserGetParams>({});
  const [justCreatedUser, setJustCreatedUser] = useState<User[]>([]);

  const handleChangeFilter = useCallback((newFilter: UserGetParams) => {
    setFilter(newFilter);
  }, []);

  const handleCreatedUser = useCallback((data: User) => {
    setJustCreatedUser((prev) => [data, ...prev]);
  }, []);

  return (
    <>
      <Head>
        <title>Users</title>
      </Head>
      <Container maxWidth="xl">
        <UserFilter
          filter={filter}
          onChange={handleChangeFilter}
          onCreatedUser={handleCreatedUser}
        />
        <UserList filter={filter} justCreatedUser={justCreatedUser} />
      </Container>
    </>
  );
}

export default UserPage;
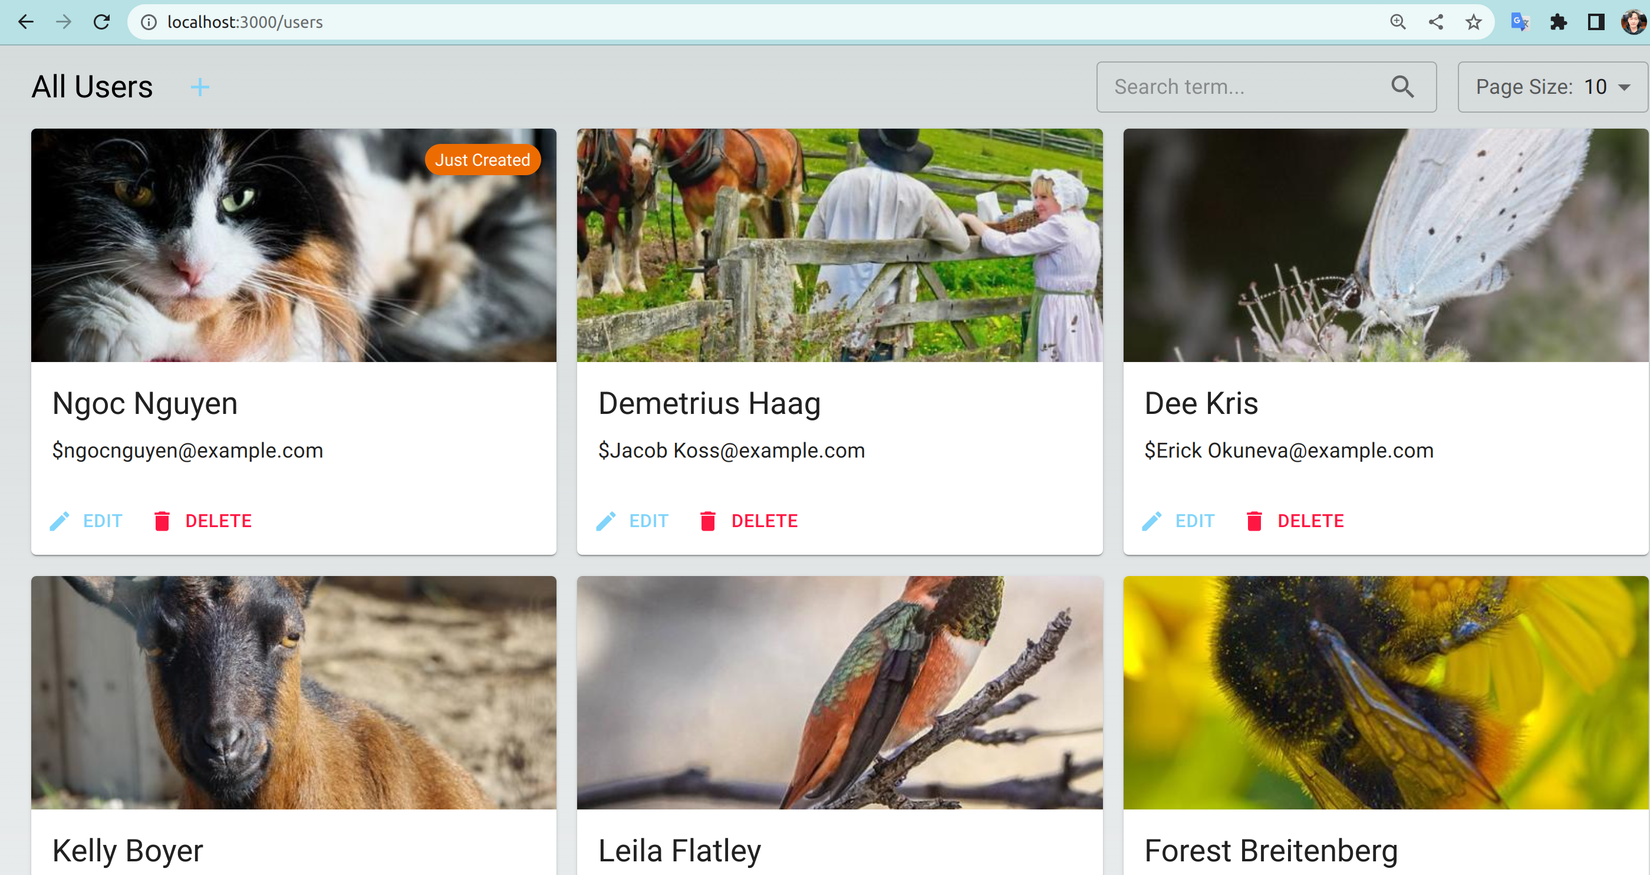
- Toàn bộ các bước đã xong giờ chúng ta quay lại http://localhost:3000/users refresh để xem giao diện mới. Sau đó bấm vào dấu + ở All Users để tiến hành tạo user mới:
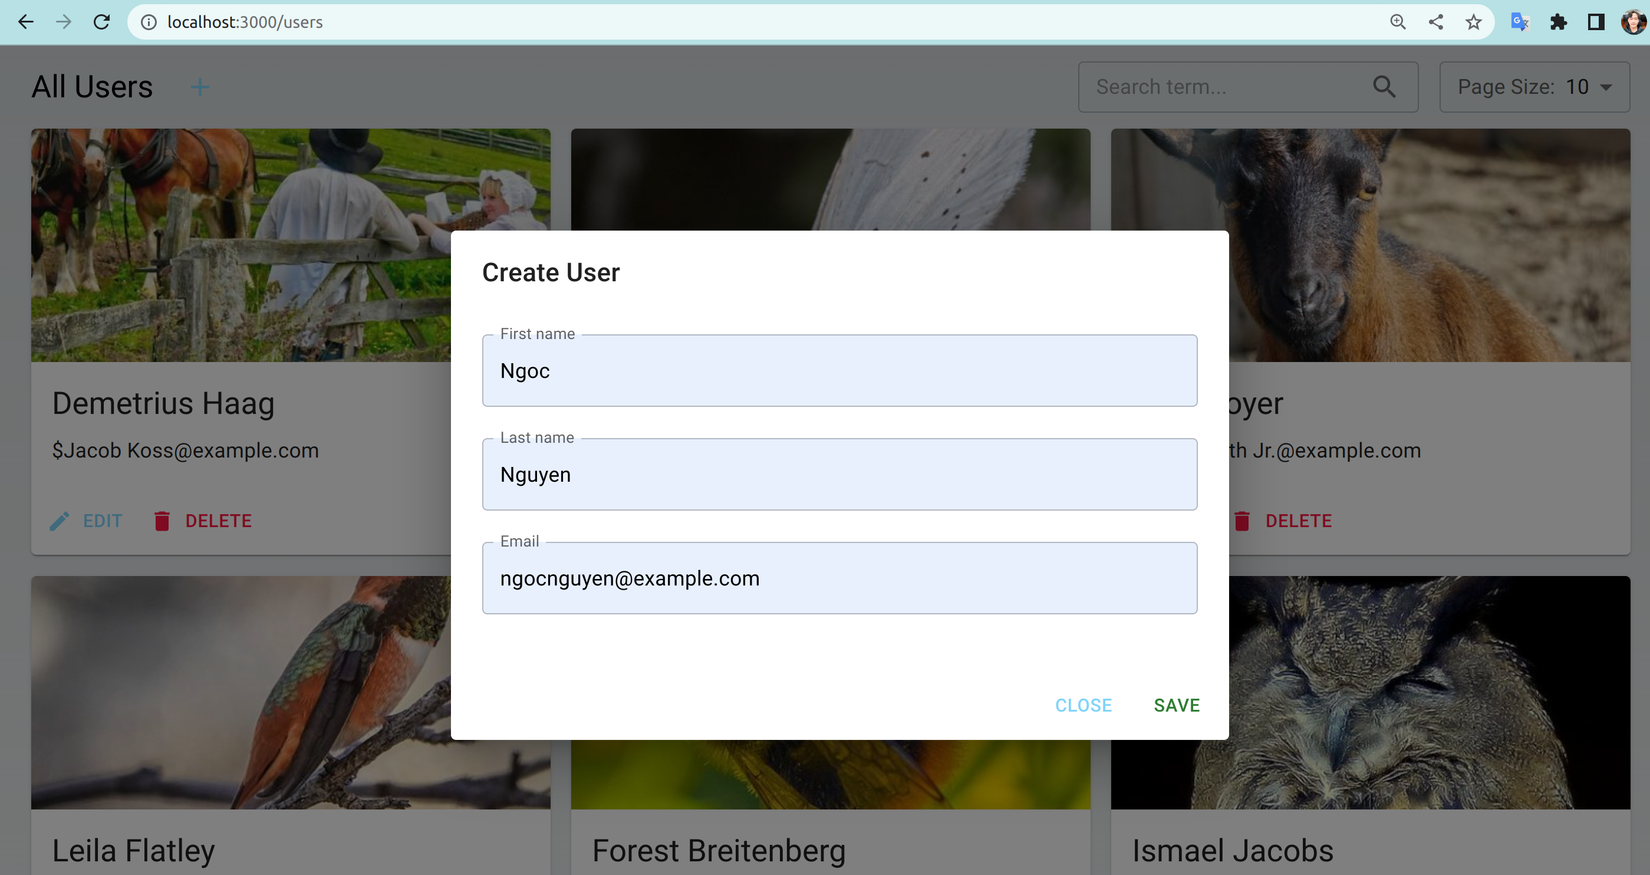
- Sau khi ấn save user mới tạo đã hiển thị kèm label Just Created:
- Thay đổi biến môi trường để thử lại với API của reqres.in. Không may là chúng ta gặp phải lỗi "CanceledError" từ Axios, để giải quyết chúng ta sẽ cập nhật lại hook useCreateUser
import { User } from '@/types/users.type';
import useAxios from '@/hooks/shared/useAxiosWrapper';

/**
 * Topic: Manage Users
 *
 * Feature: Create new user
 *
 * @returns
 */
function useCreateUser(mockData?: User) {
  return useAxios<User>(
    {
      method: 'POST',
      url: '/users',
    },
    {
      manual: true,
      mockData,
      autoCancel: false, // Thêm vào để ngăn axios hook tự cancel request
    }
  );
}

export default useCreateUser;
- Thử lại thì các bạn có thể thấy chúng ta đã thành công gọi request tạo user đến server.
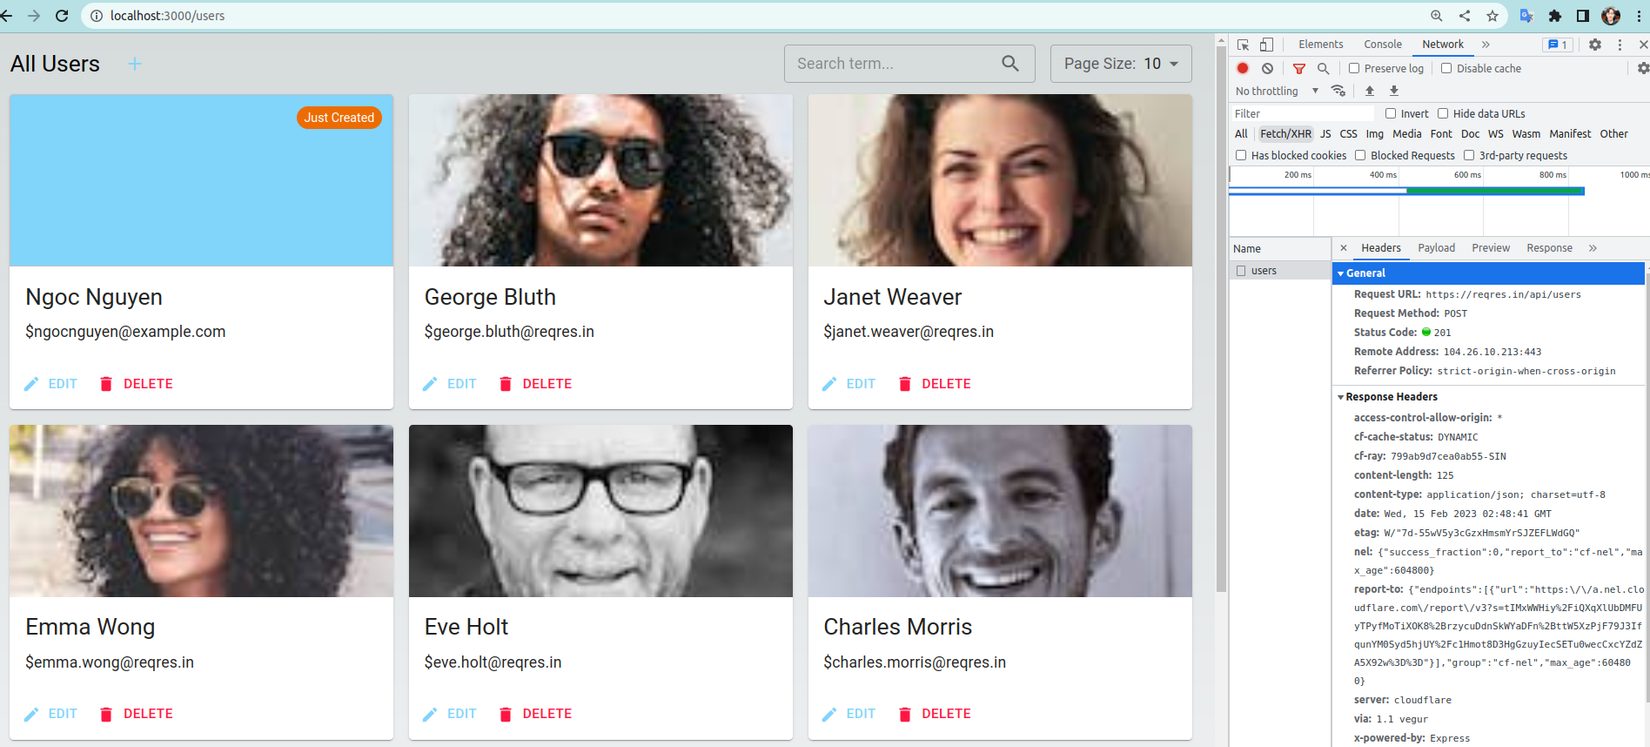
Vậy là chúng ta đã tạo thành công hook tạo user và get all users. Vì bài viết hiện tại đã quá dài nên hook updateUser và deleteUser các bạn có thể tự mình hoàn thiện hoặc tải về từ repo của mình.
Kết luận
Chúng ta đã cùng nhau hoàn thành phần 1 của bài viết về NextJS 12 + MUI 5 + Axios hooks. Có thể thấy được sự tiện dụng từ package axios-hooks mang lại cũng như tách biệt sự phụ thuộc của FE khỏi API để phát triển độc lập nhờ Mockup data. Ở phần tiếp theo mình sẽ tích hợp xác thực với NextAuth.js kết hợp với intercepters của Axios và sau đó dùng i18n để translation giữa nhiều ngôn ngữ với nhau giúp hoàn thiện dự án của chúng ta.
Nếu có thắc mắc gì các bạn có thể comment ở dưới hoặc inbox cho mình. Cảm ơn các bạn đã giành thời gian đọc bài viết. Chúc các bạn năm mới vui vẻ bình an và gặt hái được nhiều thành công trong công việc cũng như cuộc sống.
Tài liệu tham khảo
All rights reserved
