Clean Architecture For iOS Development Using The VIPER Pattern
Bài đăng này đã không được cập nhật trong 6 năm
What is VIPER?
Chắc hẳn các bạn đã quá quen thuộc với các kiến trúc như MVC, MVP và MVVM. Khi áp dụng các kiến trúc này trong các dự án có bao giờ các bạn tự đặt ra câu hỏi ngoài các kiến trúc này còn có kiến trúc nào xịn hơn không? Vậy chúng ta hãy bắt đầu với một kiến trúcmới là VIPER. Một kiến trúc mà theo mình khá là xịn.
Bắt đầu với câu hỏi VIPER là gì? VIPER là một Clean Architecture được tuân thủ theo quy tắc Single Responsibility Principle. Như với cái tên VIPER được viết tắt từ 5 thành phần tạo nên kiến trúc VIPER này. Chúng ta hãy tìm hiểu từng thành phần nhé.
- View: Phần View này được thiết kế để hiển thị thông tin được xử lý từ phần Presenter và gửi tới Presenter các thao tác của người dùng từ giao diện.
- Interactor: Phần xử lý liên quan đến Entity, phần này có thể sử dụng dữ liệu ở nhiêu các Presenter khác nhau.
- Presenter: Xử lý dữ liệu để hiển thị và lấy dữ liệu từ các Interactor.
- Entity: Là Model Objects được thiết kế sao cho phù hợp với dữ liệu trả về từ Server.
- Router: Xử lý điều hướng logic, phần liên quan chuyển màn hình trong ứng dụng.
Với các thành phần trên, chúng ta sẽ chia nhỏ ứng dụng thành các Modules nhỏ để phân tách logic thành từng phần nhỏ, giúp chúng ta dễ dàng quản lý hơn.
The Flow of VIPER
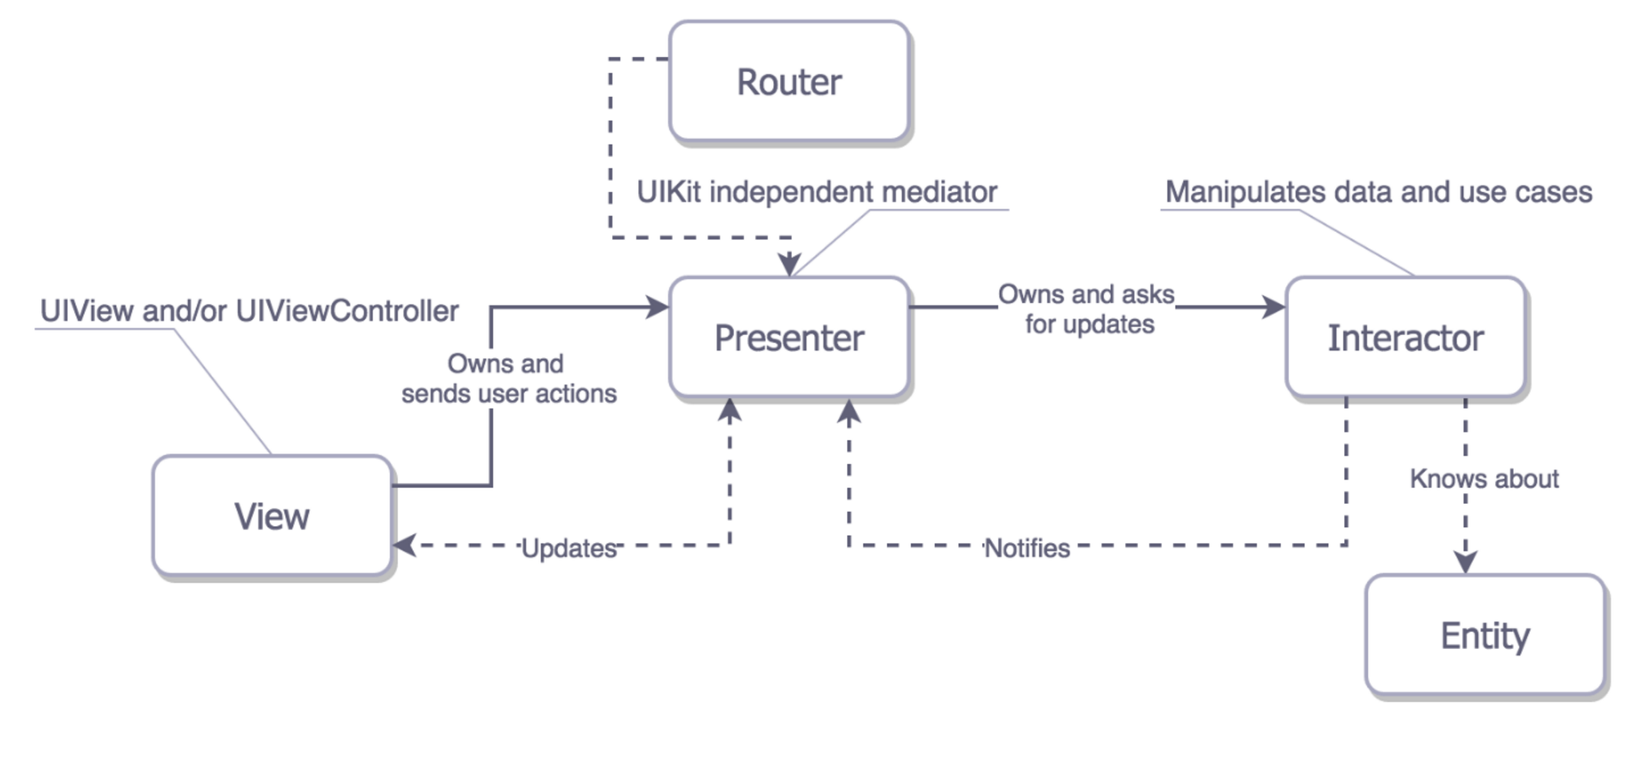
Kiến trúc VIPER được mô tả đơn giản như theo hình trên. Chúng ta thấy 5 thành phần trên sẽ có được sự tương tác qua lại với nhau. Chúng ta lưu ý một điều ở trong kiến trúc VIPER thì phần View sẽ gồm cả phần UIViewController. Nên trong phần xử lý về logic chúng ta sẽ không xử lý ở phần UIViewController như ở các mô hình khác nữa. Phần đấy sẽ được chia ra cho các phần còn lại. Để hiểu rõ hơn chúng ta sẽ đi vào ví dụ sau.
Implementing VIPER
Chúng ta đi vào ví dụ đơn giản là hiển thị danh sác Cars lên màn hình List Cars. Với mỗi Cell là một Car và khi User click vào từng Cell sẽ ra Detail thông tin về Car đấy. User có thể tạo mới một Car mới. Hãy bắt đầu với Entity đầu tiên nhé.
Entity
struct Car {
    let id: String
    let make: String
    let model: String
    let trim: String
}
Đầy là Entity sẽ được trả về từ phía Server. Nhưng để hiển thị thì chúng ta sẽ không cần đầy đủ các thông tin đấy. Nên chúng ta tạo ra một Model mới. Tạm gọi là CarViewModel.
CarViewModel
struct CarViewModel {
    let make: String
    let model: String
}
Phần hiển thị chúng ta chỉ cần 2 thuộc tính là make và model thôi. Nên CarViewModel sẽ được thiết kế rút gọn lại như trên.
Interactor
Phần Interactor sẽ được xử lý để lấy dữ liệu từ phía Server hoặc từ Local Database về nên phần này sẽ liên quan đến Network hoặc Local Database. Trong ví dụ này chúng ta sẽ sử dụng lấy dữ liệu từ Server. Đoạn code sẽ như sau:
protocol CarsInteractorProtocol {
    func getCars(_ completion: (_ cars: [Car]?)-> Void)
}

class CarsInteractor: CarsInteractorProtocol {
    let apiService: CarsAPIServiceProtocol

    init(apiService: CarsAPIServiceProtocol) {
        self.apiService = apiService
    }

    func getCars(_ completion: ([Car]?) -> Void) {
        apiService.getCars { (cars, error) in
            guard let cars = cars else {
                completion([])
                return
            }

            completion(cars)
        }
    }
}
Presenter
Phần tiếp theo là phần Presenter là phần sẽ lấy dữ liệu đã được xử lý từ phần Interactor và sẽ nhờ phần Router để điều hướng sang các Modules khác với các phần dữ liệu đã được xử lý và phù hợp với từng Modules đó.
protocol CarsPresenterProtocol {
    func showCars(_ completion: (_ cars: [CarViewModel]) -> Void)
    func showCarDetail(for viewModel: CarViewModel)
    func showCreateCarScreen()
}

class CarsPresenter: CarsPresenterProtocol {
    let interactor: CarsInteractorProtocol
    let router: CarsRouterProtocol

    init(interactor: CarsInteractorProtocol, router: CarsRouterProtocol) {
        self.interactor = interactor
        self.router = router
    }

    func showCars(_ completion: ([CarViewModel]) -> Void) {
        interactor.getCars { (cars) in
            guard let cars = cars else {
                completion([])
                return
            }

            completion(createCarsViewModels(from: cars))
        }
    }

    func showCarDetail(for viewModel: CarViewModel) {
        router.showCarDetail(for: viewModel)
    }

    func showCreateCarScreen() {
        router.showCreateCarScreen()
    }

    private func createCarsViewModels(from cars: [Car]) -> [CarViewModel] {
        return cars.map({ (car) -> CarViewModel in
            return CarViewModel(make: car.make, model: car.model)
        })
    }
}
Router
Sau khi nhận nhiệm vụ nhờ từ Presenter. Phần Router sẽ thực hiện phần việc của mình là điều hướng sang các Modules khác.
protocol CarsRouterProtocol {
    func showCarDetail(for viewModel: CarViewModel)
    func showCreateCarScreen()
}

class CarsRouter: CarsRouterProtocol {
    let presentingViewController: UIViewController

    init(presentingViewController: UIViewController) {
        self.presentingViewController = presentingViewController
    }

    func showCarDetail(for viewModel: CarViewModel) {
        guard let navigationController = presentingViewController.navigationController else {
            return
        }

        let storyboard = UIStoryboard(name: "Main", bundle: nil)
        let carDetailViewController = storyboard.instantiateViewController(withIdentifier: "CarDetailViewController")
        carDetailViewController.viewModel = viewModel

        navigationController.pushViewController(carDetailViewController, animated: true)
    }

    func showCreateCarScreen() {
        guard let navigationController = presentingViewController.navigationController else {
            return
        }

        let storyboard = UIStoryboard(name: "Main", bundle: nil)
        let carDetailViewController = storyboard.instantiateViewController(withIdentifier: "CreateCarViewController")

        navigationController.pushViewController(carDetailViewController, animated: true)
    }
}
View
Phía Presenter đã xong phần việc xử lý logic thì phần tiếp theo sẽ đẩy các dữ liệu này sang phần View để hiển thị lên. Phần View dựa vào các tương tác của User để gửi các thông tin hành động tương ứng về Presenter để tiếp tục xử lý logic.
class CarsViewController: UIViewController {
    @IBOutlet weak var tableView: UITableView!

    var presenter: CarsPresenterProtocol!
    var viewModels: [CarViewModel] = []

    override func viewDidLoad() {
        super.viewDidLoad()
        tableView.delegate = self
        tableView.dataSource = self

        presenter.showCars { (viewModels) in
            self.viewModels = viewModels
            tableView.reloadData()
        }
    }

    @IBAction func createNewCar(_ sender: UIButton) {
        presenter.showCreateCarScreen()
    }
}

extension CarsViewController: UITableViewDelegate {
    func tableView(_ tableView: UITableView, didSelectRowAt indexPath: IndexPath) {
        presenter.showCarDetail(for: viewModels[indexPath.row])
    }
}

extension CarsViewController: UITableViewDataSource {
    func tableView(_ tableView: UITableView, numberOfRowsInSection section: Int) -> Int {
        return viewModels.count
    }

    func tableView(_ tableView: UITableView, cellForRowAt indexPath: IndexPath) -> UITableViewCell {
        let cell = tableView.dequeueReusableCell(withIdentifier: "carTableViewCell", for: indexPath)
        let viewModel = viewModels[indexPath.row]

        cell.textLabel?.text = viewModel.model
        cell.detailTextLabel?.text = viewModel.make

        return cell
    }
}
Kết luận
Vậy với việc phần chia công việc cho từng thành phần của kiến trúc VIPER chúng ta sẽ chia nhỏ ra các việc và mỗi phần đảm nhiệm một việc. Công việc sẽ giảm tải cho phần UIViewController như mô hình MVC trước đấy. Nhưng với nhược điểm phải chia quá nhiều thành phần. Mỗi Modules chúng ta phải có các thành phần trên. Tuy nhiên một số trường hợp chúng ta không cần đủ 5 thành phần. Như nếu một View chỉ hiển thị mà không cần dữ liệu lấy từ Server về, lúc này chúng ta có thể bỏ qua phần Interactor và phần Entity. Việc xử lý nhuần nhuyễn giưa các thành phần, giữa các Modules với nhau chúng ta sẽ làm cho code của chúng ta sạch, đẹp hơn.
Nguồn tham khảo: https://medium.com/slalom-engineering/clean-architecture-for-ios-development-using-the-viper-pattern-fac30f5d29fc
All rights reserved
