Circular Reveal Animation
Bài đăng này đã không được cập nhật trong 7 năm
Hôm nay mình sẽ giới thiệu đến các bạn một loại Animation được sử dụng khá phổ biến hiện nay, đó là Circular Reveal Animation. Animation này được giới thiệu từ phiên bản Android L; nó cung cấp cho người dùng tính liên tục trực quan khi bạn ẩn hoặc hiện một nhóm UI. Dưới đây là một số app sử dụng animation này.
Tổng quan
Đầu tiên, chúng ta sẽ đi qua một chút lý thuyết để tạo ra Animation này và sau đó sẽ làm một ví dụ nhỏ.
Kể từ Android 5.0 (API 21), Android cung cấp cho chúng ta một số phương thức để tạo ra các animations một cách tiện lợi và dễ dàng. Trong đó, phương thức ViewAnimationUtils.createCircularReveal() được cung cấp từ class ViewAnimationUtils, sẽ cho phép chúng ta tạo ra được animation như các ví dụ trên.
Dưới đây là ví dụ để tạo ra một circular reveal animation:
// previously invisible view
View myView = findViewById(R.id.my_view);

// Check if the runtime version is at least Lollipop
if (Build.VERSION.SDK_INT >= Build.VERSION_CODES.LOLLIPOP) {
    // get the center for the clipping circle
    int cx = myView.getWidth() / 2;
    int cy = myView.getHeight() / 2;

    // get the final radius for the clipping circle
    float finalRadius = (float) Math.hypot(cx, cy);

    // create the animator for this view (the start radius is zero)
    Animator anim = ViewAnimationUtils.createCircularReveal(myView, cx, cy, 0f, finalRadius);

    // make the view visible and start the animation
    myView.setVisibility(View.VISIBLE);
    anim.start();
} else {
    // set the view to invisible without a circular reveal animation below Lollipop
    myView.setVisibility(View.INVISIBLE);
}
Phương thức ViewAnimationUtils.createCircularReveal() sẽ nhận vào 5 tham số:
- Tham số đâu tiên là
Viewmà bạn muốn ẩn hoặc hiện với animation. - Hai tham số tiếp theo lần lượt là tọa độ x và y của tâm vòng tròn hiệu ứng.
- Tham số thứ tư là bán kính ban đầu của vòng tròn khi animation được kích hoạt. Ví dụ ở trên giá trị 0f thì
Viewsẽ bị ẩn đi. - Và cuối cùng là giá trị cuối của bán kính vòng tròn. Giá trị này nên lớn hơn bán kính của
Viewđể nó có thể thực hiện hoàn toàn animation trước khi bị kết thúc.
Trường hợp bạn muốn làm animation ẩn View đi thì chỉ cần thay đổi hay giá trị tham số cuối cùng cho nhau và ẩn View sau khi kết thúc như sau:
Animator anim = ViewAnimationUtils.createCircularReveal(myView, cx, cy, initialRadius, 0f);

// make the view invisible when the animation is done
anim.addListener(new AnimatorListenerAdapter() {
    @Override
    public void onAnimationEnd(Animator animation) {
        super.onAnimationEnd(animation);
        myView.setVisibility(View.INVISIBLE);
    }
});
Ví dụ
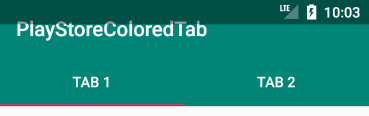
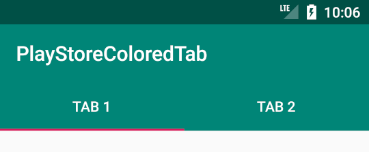
Chúng ta sẽ làm ví dụ kích hoạt animation khi chuyển tab như ứng dụng Play Store ở trên.
Đầu tiên chúng ta cần phải tạo một layout gồm Toolbar, TabLayout, và ViewPager như sau:
<?xml version="1.0" encoding="utf-8"?>
<layout xmlns:app="http://schemas.android.com/apk/res-auto">

    <android.support.constraint.ConstraintLayout xmlns:android="http://schemas.android.com/apk/res/android"
        android:layout_width="match_parent"
        android:layout_height="match_parent">

        <View
            android:id="@+id/backgroundView"
            android:layout_width="match_parent"
            android:layout_height="0dp"
            android:background="@color/colorPrimary"
            app:layout_constraintTop_toTopOf="parent"
            app:layout_constraintStart_toStartOf="parent"
            app:layout_constraintEnd_toEndOf="parent"
            app:layout_constraintBottom_toTopOf="@+id/viewPager"/>

        <View
            android:id="@+id/revealView"
            android:layout_width="match_parent"
            android:layout_height="0dp"
            app:layout_constraintTop_toTopOf="parent"
            app:layout_constraintStart_toStartOf="parent"
            app:layout_constraintEnd_toEndOf="parent"
            app:layout_constraintBottom_toTopOf="@+id/viewPager"
            android:visibility="invisible" />

        <android.support.v7.widget.Toolbar
            android:id="@+id/toolbar"
            android:layout_width="match_parent"
            android:layout_height="0dp"
            app:layout_constraintTop_toTopOf="parent"
            app:layout_constraintStart_toStartOf="parent"
            app:layout_constraintEnd_toEndOf="parent"
            android:theme="@style/ThemeOverlay.AppCompat.Dark.ActionBar"
            app:popupTheme="@style/ThemeOverlay.AppCompat.Dark"
            />

        <android.support.design.widget.TabLayout
            android:id="@+id/tabLayout"
            android:layout_width="match_parent"
            android:layout_height="wrap_content"
            app:layout_constraintTop_toBottomOf="@+id/toolbar"
            app:layout_constraintStart_toStartOf="parent"
            app:layout_constraintEnd_toEndOf="parent"
            app:tabRippleColor="@null"
            app:tabMode="fixed"
            app:tabGravity="fill"
            app:tabBackground="@android:color/transparent"
            app:tabPaddingEnd="0dp"
            app:tabPaddingStart="0dp"
            app:tabSelectedTextColor="@color/white"
            app:tabTextColor="@color/white" />

        <android.support.v4.view.ViewPager
            android:id="@+id/viewPager"
            android:layout_width="match_parent"
            android:layout_height="0dp"
            app:layout_constraintTop_toBottomOf="@+id/tabLayout"
            app:layout_constraintStart_toStartOf="parent"
            app:layout_constraintEnd_toEndOf="parent"
            android:elevation="0dp"
            app:elevation="0dp"/>

    </android.support.constraint.ConstraintLayout>

</layout>
- Chúng ta cần chú ý ở đây có thêm 2
Viewđể thay đổi background khi thực hiện animation. Mặc định ban đầubackgroundViewsẽ hiển thị với màucolorPrimary( xanh ) vàrevealViewsẽ được sử dụng để thực hiện animation.
Và để có được animation phía dưới status bar như ví dụ thì chúng ta cần phải cài đặt thêm như sau:
<resources>
    <style name="AppTheme" parent="Theme.AppCompat.Light.NoActionBar">
        <item name="colorPrimary">@color/colorPrimary</item>
        <item name="colorPrimaryDark">@color/colorPrimaryDark</item>
        <item name="colorAccent">@color/colorAccent</item>

        <item name="windowActionBar">false</item>
        <item name="windowNoTitle">true</item>
        <item name="android:windowTranslucentStatus">true</item>
    </style>
</resources>
Tuy nhiên, chúng ta có thể thấy được Toolbar bị status bar đè lên và che đi một phần của toolbar. Vì vậy, chúng ta cần phải setMarginTop cho Toolbar với giá trị bằng đúng kích thước height của status bar.
private void initToolbarDimension() {
    ConstraintLayout.LayoutParams params = (ConstraintLayout.LayoutParams)binding.toolbar.getLayoutParams();
    params.setMargins(0, getStatusBarHeight(), 0, 0);
    binding.toolbar.setLayoutParams(params);
}

public int getStatusBarHeight() {
    int result = 0;
    int resourceId = getResources().getIdentifier("status_bar_height", "dimen", "android");
    if (resourceId > 0) {
        result = getResources().getDimensionPixelSize(resourceId);
    }
    return result;
}
Tiếp theo, chúng ta sẽ tạo animation khi chuyển tab. Như mình đã đề cập ở trên, chúng ta sẽ sử dụng thêm 2 View để thực hiện và 2 View này có kích thước bằng đúng Toolbar + TabLayout .
Để thực hiện Circular Reveal animation, chúng ta cần phải xác định được tọa độ x và y của tâm vòng tròn. Ở đây, chúng ta sẽ lấy tọa độ khi người dùng click vào một Tab và bắt trong sự kiện OnTouchListener.
View tab1 = ((ViewGroup) binding.tabLayout.getChildAt(0)).getChildAt(0);
tab1.setOnTouchListener(new View.OnTouchListener() {
    @Override
    public boolean onTouch(View v, MotionEvent event) {
        if (event.getAction() == MotionEvent.ACTION_UP) {
            reveal(0, event.getRawX(), event.getRawY());
        }
        return false;
    }
});
Sau khi có được tọa độ, chúng ta sẽ tạo animation như sau:
public void reveal(final int position, float x, float y) {
    binding.revealView.setVisibility(View.VISIBLE);
    int revealViewX = binding.revealView.getWidth();
    int revealViewY = binding.revealView.getHeight();

    float radius = Math.max(revealViewX, revealViewY) * 1.2f;
    Animator reveal = ViewAnimationUtils
            .createCircularReveal(binding.revealView, (int) x, (int) y, 0f, radius);

    reveal.addListener(new AnimatorListenerAdapter() {
        @Override
        public void onAnimationEnd(Animator animator) {
            if (position == 0) {
                binding.backgroundView.setBackgroundColor(ResourcesCompat.getColor(getResources(), R.color.colorPrimary, getTheme()));
            } else {
                binding.backgroundView.setBackgroundColor(ResourcesCompat.getColor(getResources(), R.color.purple_500, getTheme()));
            }
            binding.revealView.setVisibility(View.INVISIBLE);
        }
    });

    if (position == 0) {
        binding.revealView.setBackgroundColor(ResourcesCompat.getColor(getResources(), R.color.colorPrimary, getTheme()));
    } else {
        binding.revealView.setBackgroundColor(ResourcesCompat.getColor(getResources(), R.color.purple_500, getTheme()));
    }
    reveal.start();
}
Và đây là kết quả :
All rights reserved
