Các layout cơ bản trong android
Bài đăng này đã không được cập nhật trong 4 năm
Chào các bạn, tháng này mời các bạn cùng tôi thực hành về các layout trong android, tôi cũng mới tìm hiểu nó  . Ở trong bài viết này chúng ta sẽ không nhắc nhiều đến lý thuyết layout và cấu trúc project hoặc cài đặt android sdk nữa bởi vì có thể search google ra rất nhiều, và tôi cũng tìm hiểu về các layout qua các trang tài liệu mà google tìm được.
Nếu bạn là người hiểu rõ về android rồi mà thấy có chỗ nào chưa hợp lý thì rất welcome những lời khuyên.
. Ở trong bài viết này chúng ta sẽ không nhắc nhiều đến lý thuyết layout và cấu trúc project hoặc cài đặt android sdk nữa bởi vì có thể search google ra rất nhiều, và tôi cũng tìm hiểu về các layout qua các trang tài liệu mà google tìm được.
Nếu bạn là người hiểu rõ về android rồi mà thấy có chỗ nào chưa hợp lý thì rất welcome những lời khuyên.
Layout: Giúp ta định nghĩa cấu trúc cho một user interface. Chúng ta có thể tạo layout bằng 2 cách đó là:
- Định nghĩa trong các file xml.
- Khởi tạo trong thời điểm runtime.
Trong bài này chúng ta sẽ tập trung vào việc định nghĩa chúng trong các file xml.
Trước tiên, khi tạo project chúng ta có một activity_main.xml trong thư mục layout và một MainActivity.java trong src mặc định như hình dưới:

Mà file xml trong project tôi vừa tạo có gì vậy?
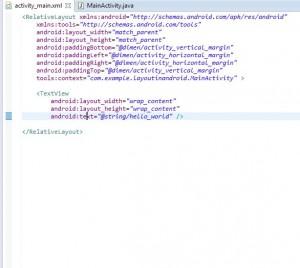
Đó là một RelativeLayout và một TextView. Vậy trước tiên chúng ta cùng thực hành về RelativeLayout nhé.
Relative Layout: Là một group view, trong đó các thành phần con của nó được hiển thị theo mối quan hệ giữa chúng với thằng view cha hoặc giữa các thành phần con với nhau. Sau đây chúng ta sẽ tạo một ví dụ gồm có 2 Relative layout. Trong đó sẽ thể hiện mối quan hệ giữa các layout này với cha và các thành phần con của layout dưới với nhau. Trước tiên chúng ta tạo 2 layout Ralative trước.
<RelativeLayout xmlns:android="http://schemas.android.com/apk/res/android" xmlns:tools="http://schemas.android.com/tools" android:layout_width="match_parent" android:layout_height="match_parent" android:paddingBottom="@dimen/activity_vertical_margin" android:paddingLeft="@dimen/activity_horizontal_margin" android:paddingRight="@dimen/activity_horizontal_margin" android:paddingTop="@dimen/activity_vertical_margin" tools:context="com.example.layoutinandroid.MainActivity" >
<RelativeLayout android:id="@+id/layout_bottom" android:layout_width="match_parent" android:layout_alignParentBottom="true" android:layout_below="@+id/layout_top" android:background="@android:color/darker_gray" >
</RelativeLayout><RelativeLayout android:id="@+id/layout_top" android:layout_width="match_parent" android:layout_height="60dp" android:layout_alignParentTop="true" android:background="@android:color/black" > </RelativeLayout>
</RelativeLayout>Kết quả: 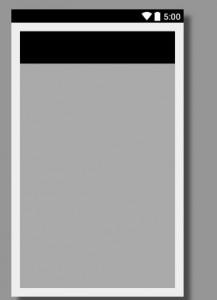
Tiếp đến chúng ta tạo các thành phần con cho layout có id: layout_bottom
<RelativeLayout xmlns:android="http://schemas.android.com/apk/res/android" xmlns:tools="http://schemas.android.com/tools" android:layout_width="match_parent" android:layout_height="match_parent" android:paddingBottom="@dimen/activity_vertical_margin" android:paddingLeft="@dimen/activity_horizontal_margin" android:paddingRight="@dimen/activity_horizontal_margin" android:paddingTop="@dimen/activity_vertical_margin" tools:context="com.example.layoutinandroid.MainActivity" >
<RelativeLayout android:id="@+id/layout_bottom" android:layout_width="match_parent" android:layout_alignParentBottom="true" android:layout_below="@+id/layout_top" android:background="@android:color/darker_gray" >
<Button android:id="@+id/btn1" android:layout_width="wrap_content" android:layout_height="wrap_content" android:layout_alignParentLeft="true" android:text="Button 1"/>
<Button android:id="@+id/btn2" android:layout_width="wrap_content" android:layout_height="wrap_content" android:layout_alignParentRight="true" android:text="Button 2"/>
<Button android:id="@+id/btn3" android:layout_width="wrap_content" android:layout_height="wrap_content" android:layout_toLeftOf="@id/btn2" android:text="Button 3"/>
</RelativeLayout><RelativeLayout android:id="@+id/layout_top" android:layout_width="match_parent" android:layout_height="60dp" android:layout_alignParentTop="true" android:background="@android:color/black" > </RelativeLayout>
</RelativeLayout>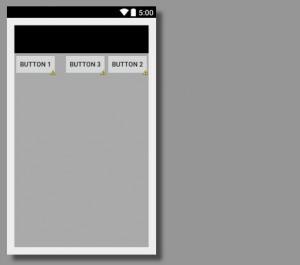
Để hiểu rõ hơn thì bạn có thể đổi các thuộc tính android:layout_alignParentRight/Left, android:layout_toLeftOf="@id/xxx" về cơ bản thì relative layout là như vậy. Tiếp đến chúng ta cùng thực hành về LinearLayout.
LinearLayout: Đặc trưng của loại layout này là sắp xếp các thành phần con theo chiều ngang hay chiều dọc và có liên quan tới thứ tự trước sau trong file xml, không giống như relative layout bạn có thể định nghĩa các thành phần con mà không cần theo thứ tự. Giờ chúng ta cùng làm một ví dụ: Chia màn hình làm 2 phần, phần trên sắp xếp một số phần tử theo chiều ngang và phần dưới sẽ sắp xếp một số phần tử theo chiều dọc.
- Trước tiên chúng ta tạo thêm một file xml như sau:
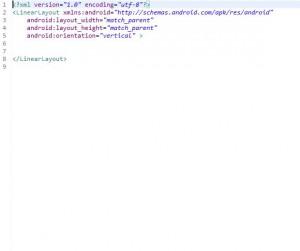
Mặc định có orientation=vertical nghĩa là các thành phần con sẽ tự sắp xếp theo chiều dọc. Sau đó định nghĩa 2 layout lớn với id: layout1 và layout2 và các thành phần con:
<?xml version="1.0" encoding="utf-8"?><LinearLayout xmlns:android="http://schemas.android.com/apk/res/android" android:layout_width="match_parent" android:layout_height="match_parent" android:orientation="vertical" >
<LinearLayout android:id="@+id/layout1" android:layout_width="match_parent" android:layout_height="200dp" android:orientation="horizontal" android:background="@android:color/holo_blue_light">
<Button android:layout_width="wrap_content" android:layout_height="wrap_content" android:text="Button 1"/>
<Button android:layout_width="wrap_content" android:layout_height="wrap_content" android:text="Button 2"/>
<Button android:layout_width="wrap_content" android:layout_height="wrap_content" android:text="Button 3"/> </LinearLayout>
<LinearLayout android:id="@+id/layout2" android:layout_width="match_parent" android:layout_height="200dp" android:orientation="vertical" android:gravity="center" android:background="@android:color/holo_orange_dark">
<Button android:layout_width="wrap_content" android:layout_height="wrap_content" android:text="Button 1"/>
<Button android:layout_width="wrap_content" android:layout_height="wrap_content" android:text="Button 2"/>
<Button android:layout_width="wrap_content" android:layout_height="wrap_content" android:text="Button 3"/> </LinearLayout>
</LinearLayout>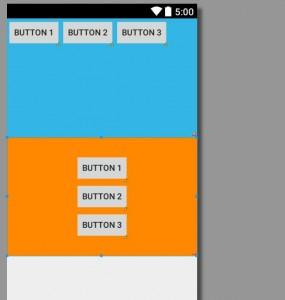
Kết quả như hình trên. Ở phần này chúng ta cần chú ý đến thuộc tính orientation và gravity. Bạn nên thử thay đổi thuộc tính của chúng để hiểu và thấy rõ hơn sự khác biệt.
FrameLayout: Với ông layout này thì các thành phần con của nó mặc định sẽ nằm ở phía trên-trái của màn hình và ông sau sẽ đè lên ông trước. Ví dụ thế này:
<?xml version="1.0" encoding="utf-8"?><FrameLayout xmlns:android="http://schemas.android.com/apk/res/android" android:layout_width="match_parent" android:layout_height="match_parent">
<ImageView android:id="@+id/imageView1" android:layout_width="214dp" android:layout_height="237dp" android:layout_weight="0.63" android:src="@drawable/abc_list_focused_holo" />
<TextView android:id="@+id/textView1" android:layout_width="217dp" android:layout_height="95dp" android:textSize="30dp" android:text="vi du ve framelayout" />
</FrameLayout>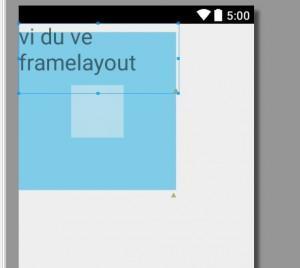
Cái này không biết có ứng dụng nhiều không đây.
Table Layout: Loại này thì lại cho phép chia các thành phần con thành các hàng, cột như trong table trong html. Cùng thực hiện ví dụ dưới đây (ví dụ này có phần copy trên nguồn trang khác về chỉnh sửa, tắt mất trang đó rồi, giờ không nhớ link nữa nên các bạn thông cảm):
<?xml version="1.0" encoding="utf-8"?><TableLayout xmlns:android="http://schemas.android.com/apk/res/android" android:layout_width="match_parent" android:layout_height="match_parent" >
<!-- hàng 1 : một cột --><TableRow android:layout_width="fill_parent" android:layout_height="wrap_content" android:gravity="center_horizontal" >
<TextView android:layout_width="match_parent" android:layout_height="wrap_content" android:layout_span="3" android:background="#b0b0b0" android:gravity="center" android:padding="18dip" android:text="Hàng 1" android:textColor="#000" android:textSize="18dp" />
</TableRow> <!-- hàng 2: 3 cột --><TableRow android:id="@+id/tableRow1" android:layout_width="match_parent" android:layout_height="wrap_content" >
<TextView android:id="@+id/TextView04" android:layout_weight="1" android:background="#dcdcdc" android:gravity="center" android:padding="20dip" android:text="Hàng 2 cột 1" android:textColor="#000000" />
<TextView android:id="@+id/TextView04" android:layout_weight="1" android:background="#d3d3d3" android:gravity="center" android:padding="20dip" android:text="Hàng 2 cột 2" android:textColor="#000000" />
<TextView android:id="@+id/TextView04" android:layout_weight="1" android:background="#cac9c9" android:gravity="center" android:padding="20dip" android:text="Hàng 2 cột 3" android:textColor="#000000" /> </TableRow>
<!-- hàng 3: 2 cột --><TableRow android:layout_width="fill_parent" android:layout_height="wrap_content" android:gravity="center_horizontal" >
<TextView android:id="@+id/TextView04" android:layout_weight="1" android:background="#b0b0b0" android:gravity="center" android:padding="18dip" android:text="Hàng 3 cột 1" android:textColor="#000000" />
<TextView android:id="@+id/TextView04" android:layout_weight="1" android:background="#a09f9f" android:gravity="center" android:padding="18dip" android:text="Hàng 3 cột 2" android:textColor="#000000" /> </TableRow>
</TableLayout>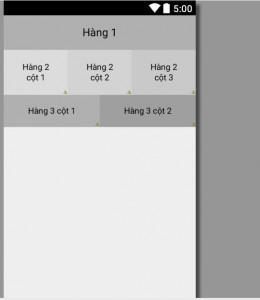
Với ví dụ này bạn có thể thực hành thêm với hàng một 5 cột, hàng 2 3 cột, hàng 3: 2 cột chẳng hạn.
Bạn cũng có thể tạo, thực hành với các layout lồng nhau, cùng hay khác loại đều được, nhưng thấy bảo có các layout lồng nhau nhiều, độ sâu của cây sẽ lớn nên sẽ ảnh hưởng khá nhiều tới performance thì phải. Vậy nên có thực hành để hiểu thì thực hành thôi còn để đưa layout lồng nhau vào dự án thì nên hạn chế nhé.
Cảm ơn các bạn đã đọc.
All rights reserved
