Các bước khởi tạo CI/CD Pipleline với Google Cloud Services
Bài đăng này đã không được cập nhật trong 4 năm
Overview
Ở bài viết này, chúng ta sẽ cũng tìm hiểu cách để khởi tạo một CI/CD Pipeline bằng cách sử dụng Google Cloud Services: Google Source Repositories, Container Registry, CloudBuild & Google Kubernetes Engine.
Introduction
Sau khi đã hoàn thành phase dev và deploy application/product, sẽ cần phải update code liên tục dựa trên user feedback cũng như phát triển các module feature/function mới. Và quá trình này nên được tự động hoá, nếu không tiến hành tự động hoá tiến trình này sẽ phát sinh effort chạy steps/commands deployment mỗi khi update code.
Với Continuous Integration (Tích hợp liên tục) và Continuous Delivery Pipeline (Pipeline delivery liên tục), chúng ta có thể tự động hoá workflow từ building, testing, packaging, và deploy, việc này được trigger khi có bất kì thay đổi nào phát sinh trên application hay nói một cách khác là khi có bất kì commit nào mới trên repository.
Link đăng kí Google Cloud Services: https://cloud.google.com/free Đối với các account mới, google sẽ cung cấp cho người dùng $300 free credits.
Project Setup
Select project
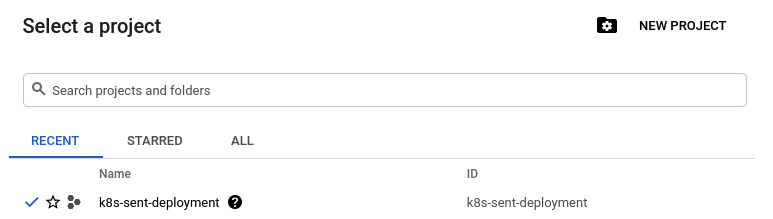
Source: Author
Ở bài viết này, project được khởi tạo là k8s-sent-deployment, chúng ta cùng đi tiếp tới hướng dẫn set up pipeline
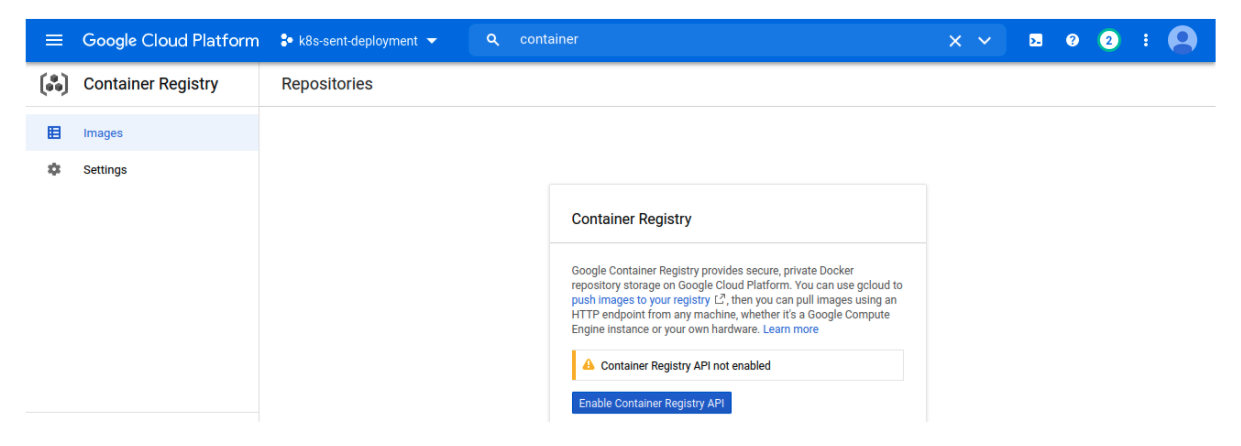
Container Registry
Được sử dụng để lưu trữ Docker Container image, Giống với DockerHub, AWS ECS, hoặc các container registries của các Cloud service khác.
Lợi ích của việc sử dụng Container Registry
- Secure, Private Docker Registry
- Build and deploy automatically
- In-depth vulnerability scanning
- Lockdown risky images
- Native Docker support
- Fast, high-availability access
Detail chi tiết, có thể tham khảo link sau:
https://cloud.google.com/container-registry
Để dử dụng được service chúng ta cần active API, search Container registry ở search bar, và ở page tiếp theo click vào Enable Container Registry API button
Google Source Repositories
Đây là version control tool tương tự như Github/Bitbucket sử dụng để store, manage và tracking code.
Detail vể Google Srouce Repositories có thể tham khảo page sau:
https://cloud.google.com/source-repositories
Có option để lựa chọn tạo mới repository hoặc sử dụng repository extrenal như là Github hoặc Gitbucket. Ở bài viết này, mình sẽ đèe cập tới việc tạo mới repository. Nếu muốn sử dụng external repository thì có thể skip qua phần này.
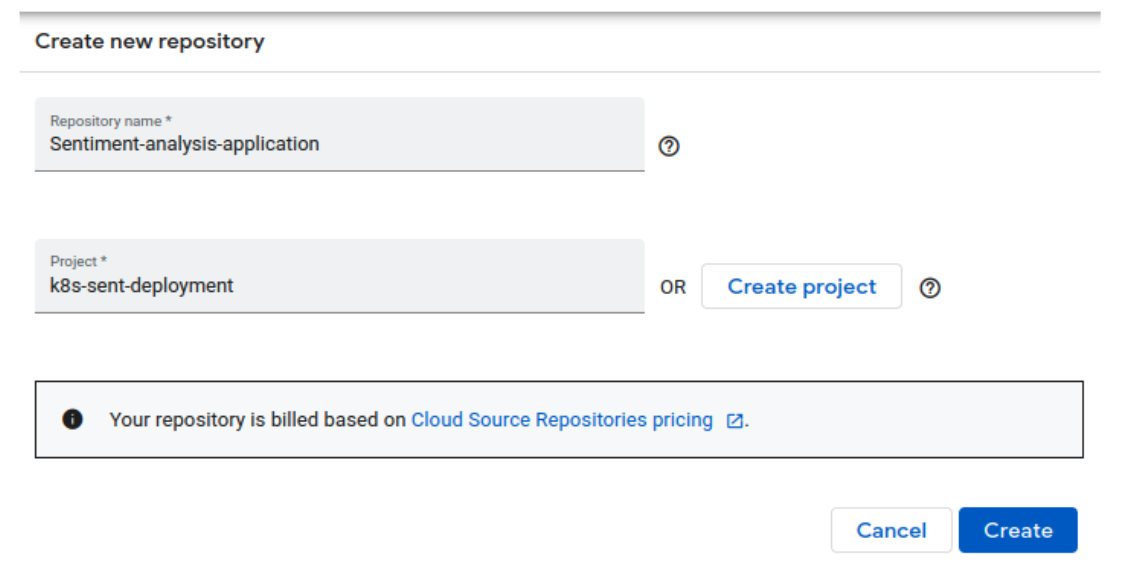
Chọn Create a new repository, input repository name và chọn project chúng ta đã khởi toạ trước đó sau đó click Create
Sau khi Cloud Source Repository đã được khởi tạo, chúng ta sẽ được redirect sang page để Add code to your repository. Có thể lựa chọn Clone repository tới local Git repository hoặc chạy theo các step dưới đây để Tạo credentials manually.
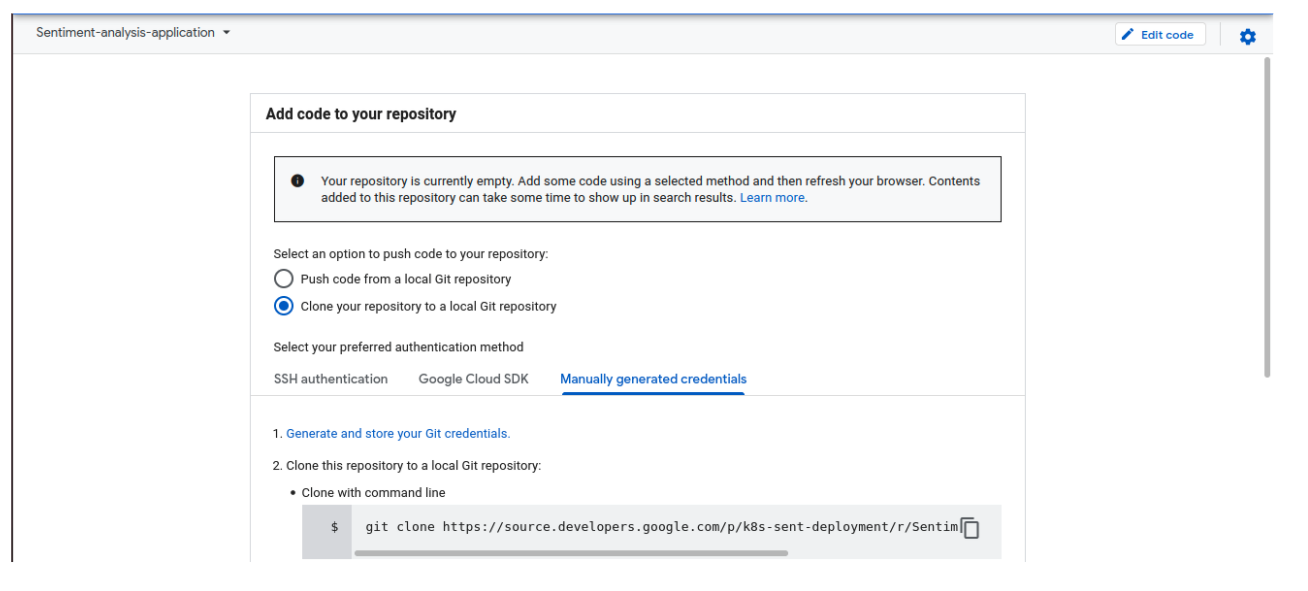
Step 1 là Generate and store Git credentials, clcik vào link và site sẽ tự hiển thị một command, copy và chạy command này dưới Terminal/Comman Prompt. Và giờ chúng ta có thể access vào Cloud Source Repository
Follow theo các step tiếp theo, tạo một folder ở local system, mở Terminal/command prompt, chạy git clone command và clonde repository, sau đó tiến hành copy application code files tới clone folder và thực hiện run commit và push command để update lene Google Cloud Source Repository.
Khi đó, source repository đã có thể sử dụng được.
Google Kubernetes Engine (GKE)
GKE là Kubernetes quản lý bởi Google Infrastructure. Một số lợi ích có thể kể đến như:
- Auto Scale
- Auto Upgrade
- Auto Repair
- Logging and Monitoring
- Load Balancing
Detail chi tiết, có thể tham khảo thêm tại link sau:
https://cloud.google.com/kubernetes-engine#section-9
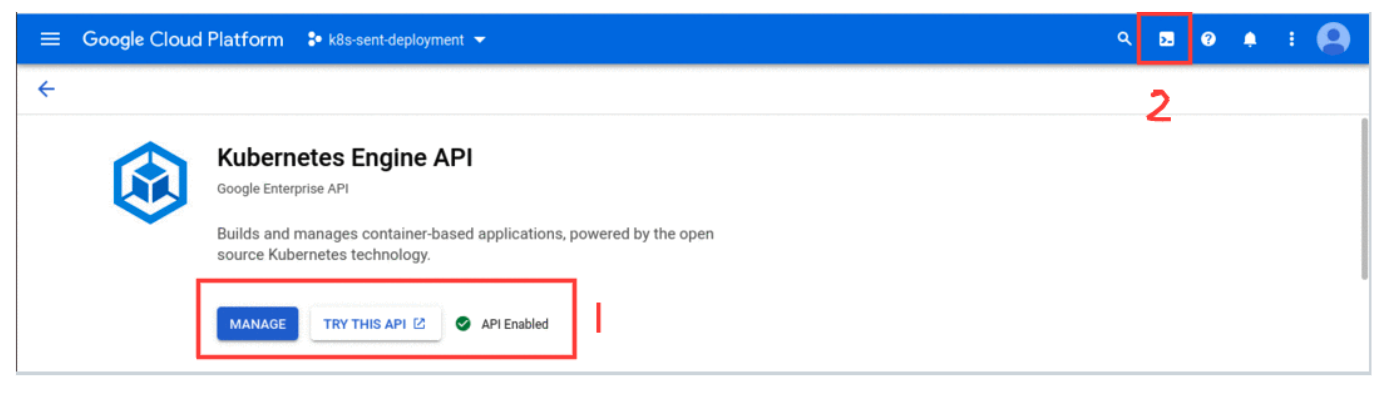
Để sử dụng service, chúng ta cần enable các đầu API. Search theo Kubernetes Engine API trên search bar để enable API.
Sau khi API đã được enable, chúng ta cần tạo một cluster. Để open cloud shell, chúng ta cần tìm icon trên top phải màn hình để Activate Cloud Shell như sau:
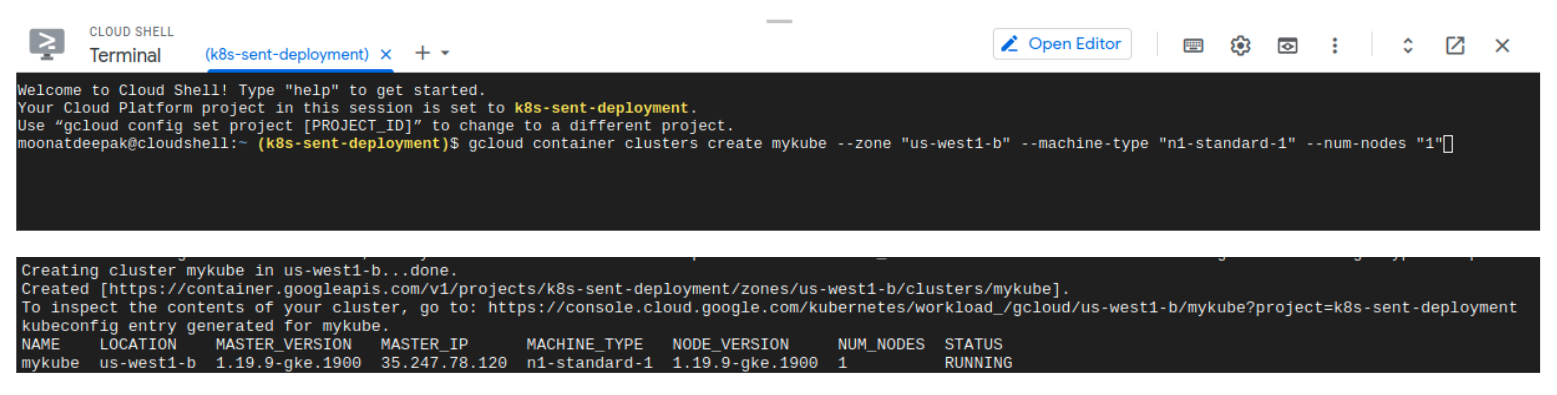
Để tạo một cluster, cần tiến hành chạy command sau trên Cloud Shell:
create cluster gcloud container clusters create mykube --zone "us-west1-b" --machine-type "n1-standard-1" --num-nodes "1"
Command này sẽ tạo một Kubernetes cluster, 'mykube' với 1 compute node của n1-standard-1 machine type.
Sau đây, chúng ta cần tạo các config sau trên pipeline.
Dockerfile:
FROM python:3.8-slim-buster
WORKDIR /app
COPY . /app
RUN pip install -r requirements.txt
EXPOSE 5000
CMD ["python3","app.py"]
Deployment YAML: Để run application chúng ta cần để tạo một deployment object và có thể làm được bằng cách sử dụng YAML file
apiVersion: apps/v1
kind: Deployment
metadata:
  name: sentiment
spec:
  replicas: 2
  selector:
    matchLabels:
      app: sentimentanalysis
  template:
    metadata:
      labels:
        app: sentimentanalysis
    spec:
      containers:
      - name: nlp-app
        image: gcr.io/k8s-sent-deployment/myapp:v1
        ports:
        - containerPort: 5000
- apiVersion: Version của Kubernetes API
- kind: Loại object để tạo, ở đây là Deployment
- metadata: Data objects để nhận biết
- spec: Spec của object, bao gồm replicas(no. of pods), labels, container image chúng ta sẽ tạo đẻe sử dụng docker file và push to google container registry và container port number.
Service YAML: Để expose một application đang chạy trên một set của Pods như là network service thì chúng ta cần một Service YAML file.
apiVersion: v1
kind: Service
metadata:
  name: sentimentanalysis
spec:
  type: LoadBalancer
  selector:
    app: sentimentanalysis
  ports:
  - port: 80
    targetPort: 5000
Trong file này, chúng ta có các kind như: Service, in spec type: Loadbalancer để tự động hoá điều phối tải, và app name sẽ giống với trong Deploymen YAML file. Có port mapping các target container port 5000
CloudBuild
CloudBuild là một service execute các builds trên infrasturcture của Google Cloud Platform.
Source: Google Cloud Build Doc
Nó sẽ tiến hành chạy các command theo các steps, tương tự với việc chạy command trong script. steps:
#Build the image
- name: 'gcr.io/cloud-builders/docker'
  args: ['build', '-t', 'gcr.io/$PROJECT_ID/myapp:v1', '.']
  timeout: 180s

#Push the image
- name: 'gcr.io/cloud-builders/docker'
  args: ['push', 'gcr.io/$PROJECT_ID/myapp:v1']

# deploy container image to GKE
- name: "gcr.io/cloud-builders/gke-deploy"
  args:
  - run
  - --filename=K8s_configs/
  - --image=gcr.io/$PROJECT_ID/myapp:v1
  - --location=us-west1-b
  - --cluster=mykube
Ở step đầu tiên, chúng ta sẽ build Docker image và ở step tiếp theo, chúng ta sẽ push image tới Google Container Registry. Bước cuối cùng là deploy application trên Kubernetes cluster, file name là folder directory hiện có Deployment và Service YAML file, chỉ định image và cluster name chúng ta đã khơi tạo trước đó.
Note: $PROJECT_ID là biến giá trị sẽ được fetch từ môi trường.
Giờ chúng ta đã có tất cả mọi thứ cần thiết để build pipeline.
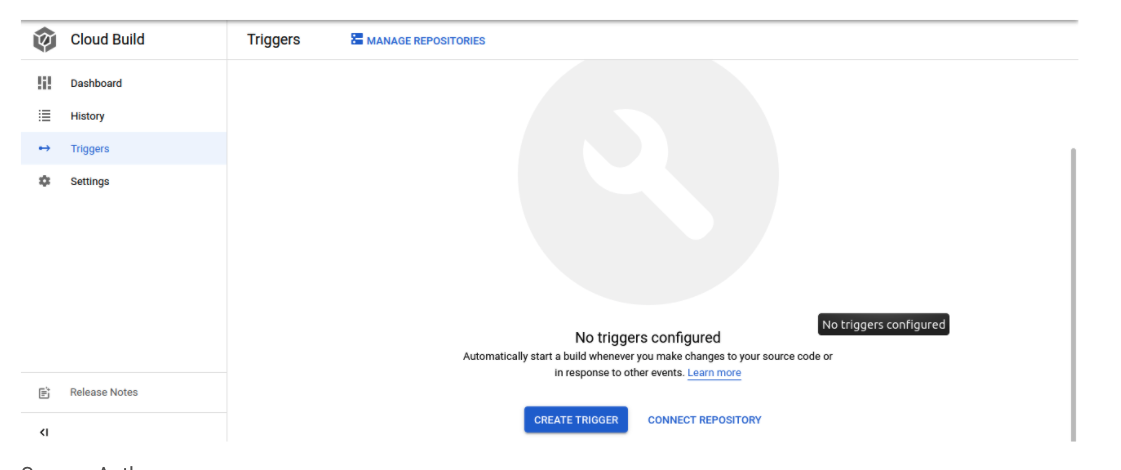
Đầu tiên, chúng ta cần tạo một Trigger để dù phát sinh bất kì thay đổi nào trên Code repository thì pipeline sẽ tự động trigger. Nếu bạn đang sử dụng Github/Bitbucket như là Source repository theo link sau và connect tới repository
Để tạo một Trigger, search Cloud Build trên console và click CREATE TRIGGERS
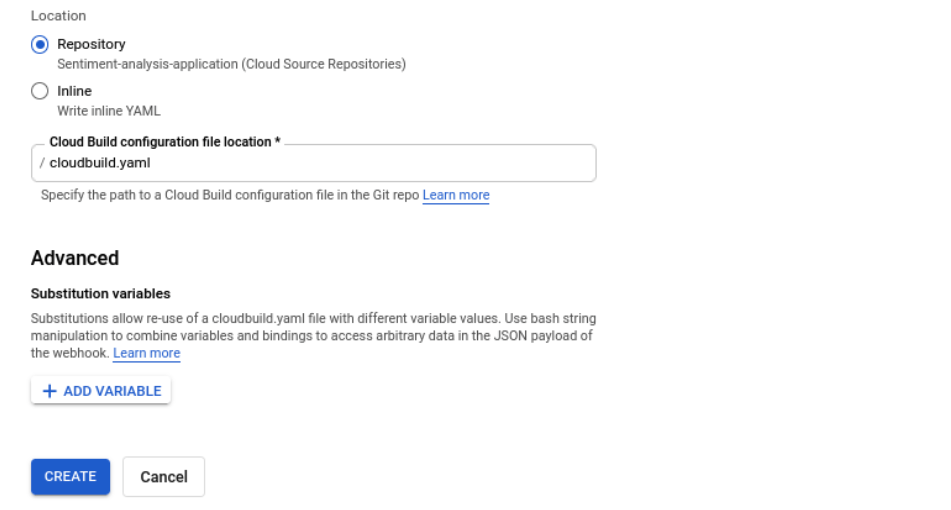
Ở page tiếp theo, chọn event how to trigger the pipeline và cung cấp Repository và Branch for monitoring for any changes, chọn type Cloud Build config và cung cấp file location sau đó click CREATE

Trên Trigger setup, chúng ta sẽ option để trigger pipeline manually hoặc có thể sửa để khi có thay đổi ở code thì pipeline sẽ trigger tự động.

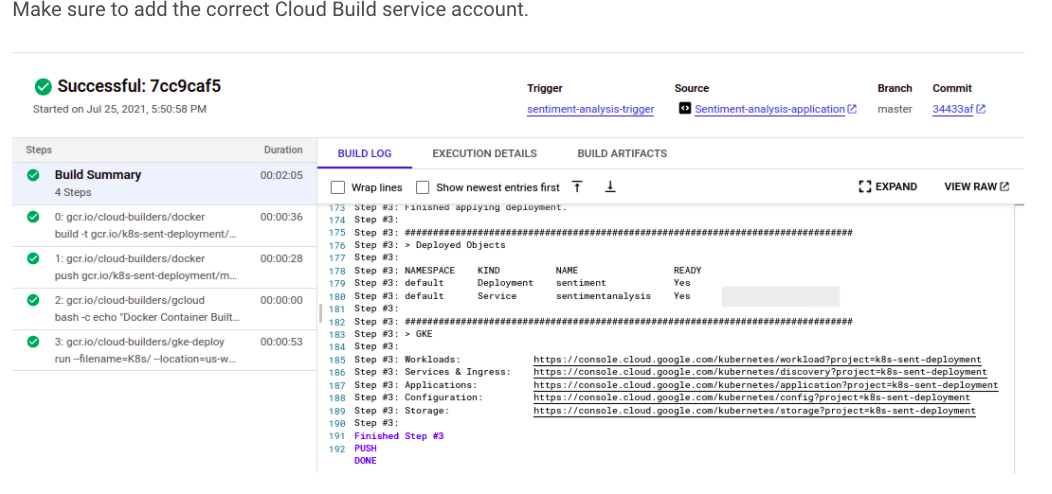
Đầu tiên, hãy cùng check manual process, click RUN sau đó click RUN TRIGGER, pipeline sẽ bắt đầu chạy và follow các steps dưới đây trên Cloud Build YAML file. sẽ tốn khoảng 3-4 phút để hoàn thành việc build. Một khi build hoàn thành thì chúng ta có thể check container registry cho docker image và Kubernetes Engine để confirm Workloads và Service đang chạy. Nếu build fails chúng ta có thể xem logs và check xem lỗi ở đâu để fix.
Ở case trong bài viết này, nếu bị fail do permission issue, thì chúng ta có thể add IAM policy bằng các sử dụng IAM console hoặc thông qua Cloud Shell>
gcloud projects add-iam-policy-binding k8s-sent-deployment --member=serviceAccount:@cloudbuild.gserviceaccount.com --role=roles/container.developer

Giờ chúng ta có thể tới endpoint và check application
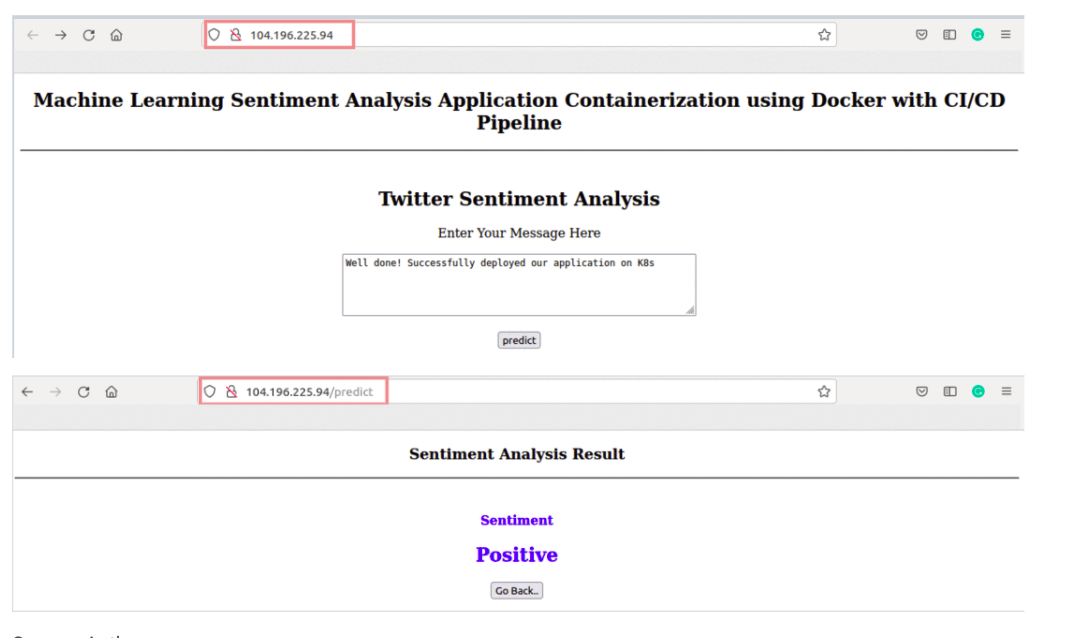
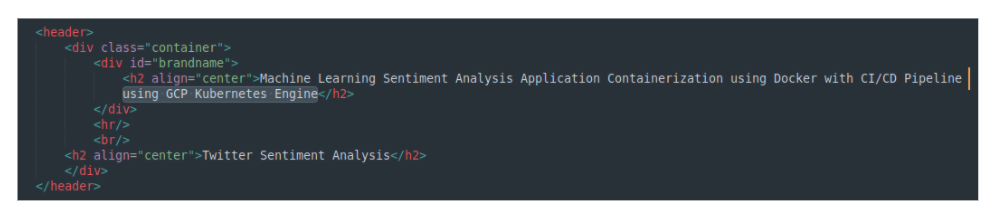
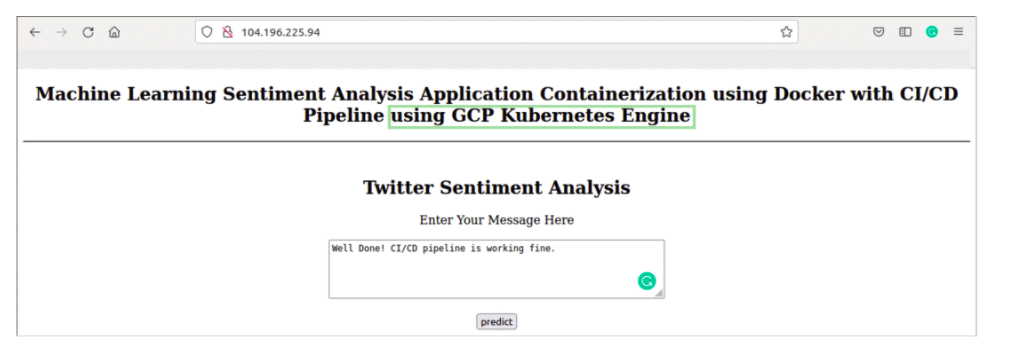
Tiếp theo chúng ta hay sửa code repository và build sẽ tiếp hành trigger tự động bằng cách add thêm line 'using GCP Kubernetes Engine' trong home.html
Khi build complete, thì chúng ta sẽ refresh lại endpoint và check thay đổi.
Vậy là chúng ta đã hoàn thành việc tạo một CI/CD pipeline bằng cách sử dụng Google Cloud Services.
All rights reserved
