


Build Openwrt image cho Pi4
Mục tiêu
- Build được OpenWrt image cho Raspberry Pi 4.
- Bật giao diện Ethernet để có thể sử dụng
SSHvàSCP.
Về giới thiệu OpenWrt, anh em xem tại đây nhé:
1. Clone source code
Ta sẽ clone source code trực tiếp từ repository chính thức của OpenWrt:
git clone https://github.com/openwrt/openwrt.git
Sau đó checkout ra một branch riêng để làm việc:
cd openwrt
git checkout -b develop/pi4
2. Update feeds
Chạy command:
./scripts/feeds update -a && ./scripts/feeds install -a
3. Add config cho giao diện Ethernet
OpenWrt sử dụng file:
/etc/config/network
để cấu hình network interface.
Trong source code, tạo file này tại:
cd package/base-files/files/etc
mkdir config
cd config
touch network
vim network
Nếu muốn interface có tên là eth0 và sử dụng IP 192.168.1.42 thì cấu hình như sau:
config interface 'wan'
    option ifname 'eth0'
    option proto 'static'
    option ipaddr '192.168.1.42'
    option netmask '255.255.255.0'
    option broadcast '192.168.1.255'
Trong đó:
interface : wan
interface name : eth0
protocol : static
IP address : 192.168.1.42
netmask : 255.255.255.0
broadcast : 192.168.1.255
Lưu ý: Anh em cần cấu hình
IP,netmaskvàbroadcastphù hợp với network của mình.
4. Chạy menuconfig
Tại thư mục root của OpenWrt, chạy:
make menuconfig
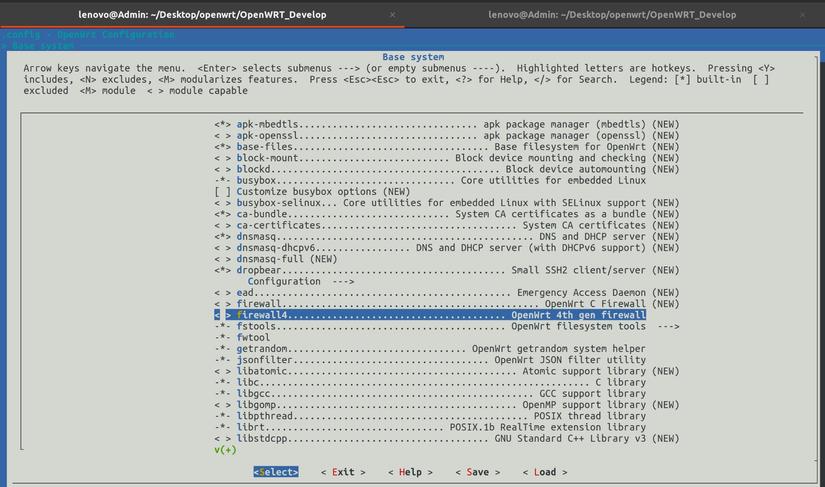
Sau đó chọn target tương ứng với Raspberry Pi 4 và tắt firewall như trong ảnh đính kèm
5. Build OpenWrt
Di chuyển về thư mục root của OpenWrt:
cd <openwrt>
Sau đó build:
make -j$(nproc)
Lần build đầu tiên có thể mất khoảng:
30 - 45 phút
Thời gian thực tế phụ thuộc vào cấu hình máy build và tốc độ mạng.
Sau khi build xong, image sẽ nằm tại:
bin/targets/bcm27xx/bcm2711/
Trong đó, image mình cần sử dụng là:
openwrt-bcm27xx-bcm2711-rpi-4-ext4-factory.img.gz
6. Flash image vào thẻ nhớ
6.1. Xác định device của thẻ nhớ
Cắm thẻ nhớ vào máy.
Sau đó sử dụng:
lsblk
để xác định device tương ứng với thẻ nhớ.
Ví dụ:
NAME        MAJ:MIN RM   SIZE RO TYPE MOUNTPOINTS
nvme0n1     259:0    0   512G  0 disk
├─nvme0n1p1
└─nvme0n1p2

sdb           8:16   1    32G  0 disk
├─sdb1
└─sdb2
Trong ví dụ này:
/dev/sdb
là toàn bộ device của thẻ nhớ.
Cẩn thận:
ddsẽ ghi trực tiếp vào device. Chọn sai device có thể làm mất dữ liệu trên ổ đĩa khác.
6.2. Giải nén OpenWrt image
Image hiện tại có dạng:
openwrt-bcm27xx-bcm2711-rpi-4-ext4-factory.img.gz
Giải nén:
gzip -d openwrt-bcm27xx-bcm2711-rpi-4-ext4-factory.img.gz
Sau khi giải nén sẽ có:
openwrt-bcm27xx-bcm2711-rpi-4-ext4-factory.img
6.3. Ghi image vào thẻ nhớ
Sử dụng dd:
sudo dd if=openwrt-bcm27xx-bcm2711-rpi-4-ext4-factory.img \
        of=/dev/<device> \
        bs=4M \
        status=progress \
        conv=fsync
Ví dụ nếu thẻ nhớ là /dev/sdb:
sudo dd if=openwrt-bcm27xx-bcm2711-rpi-4-ext4-factory.img \
        of=/dev/sdb \
        bs=4M \
        status=progress \
        conv=fsync
Sau khi hoàn tất:
sync
7. Boot Raspberry Pi 4
Cắm thẻ nhớ vào Raspberry Pi 4 và boot board.
Sau khi OpenWrt boot lên thành công, do chúng ta đã cấu hình Ethernet interface:
eth0
với IP:
192.168.1.42
nên có thể truy cập vào board thông qua SSH:
ssh root@192.168.1.42
Sau khi SSH thành công, sẽ thấy shell của OpenWrt:
BusyBox v1.36.1 (2024-11-16 18:57:58 UTC) built-in shell (ash)

  _______                     ________        __
 |       |.-----.-----.-----.|  |  |  |.----.|  |_
 |   -   ||  _  |  -__|     ||  |  |  ||   _||   _|
 |_______||   __|_____|__|__||________||__|  |____|
          |__| W I R E L E S S   F R E E D O M
 -----------------------------------------------------
 OpenWrt SNAPSHOT, r0+28105-afffcd09e5
 -----------------------------------------------------
=== WARNING! =====================================
There is no root password defined on this device!
Use the "passwd" command to set up a new password
in order to prevent unauthorized SSH logins.
--------------------------------------------------
root@OpenWrt:~#

All rights reserved