


Bringup uboot trên openwrt image
Board mình sẽ sử dụng là Raspberry Pi 4 — một con board kinh điển và khá phổ biến trong giới Embedded Linux.
Mục tiêu của bài này là đưa U-Boot vào boot flow mặc định của Raspberry Pi 4 khi chạy OpenWrt.
1. Build OpenWrt image cho Raspberry Pi 4
Đầu tiên, cần build được một image OpenWrt cho Raspberry Pi 4.
Lưu ý: Image mặc định cho Raspberry Pi 4 của OpenWrt vốn không sử dụng U-Boot.
Cách build image OpenWrt cho Pi 4 khá đơn giản, phần này anh em có thể tự tìm hiểu thêm.
Sau khi build xong, trong thư mục bin sẽ có một file dạng:
openwrt-bcm27xx-bcm2711-rpi-4-ext4-factory.img.gz
Để flash image, đầu tiên giải nén:
gzip -d openwrt-bcm27xx-bcm2711-rpi-4-ext4-factory.img.gz
Sau đó dùng dd để ghi image vào thẻ SD:
sudo dd if=openwrt-bcm27xx-bcm2711-rpi-4-ext4-factory.img \
        of=/dev/sdX \
        bs=4M \
        status=progress \
        conv=fsync
Thay
/dev/sdXbằng đúng device của thẻ SD.
Sau khi flash xong, boot Raspberry Pi 4 lên OpenWrt.
2. Boot files của Raspberry Pi 4
Sau khi boot vào board:
cd /boot
ls
Có thể thấy các file:
COPYING.linux
LICENCE.broadcom
bcm2711-rpi-4-b.dtb
bcm2711-rpi-400.dtb
bcm2711-rpi-cm4.dtb
config.txt
cmdline.txt
distroconfig.txt
fixup4.dat
fixup4cd.dat
fixup4x.dat
kernel8.img
overlays/
partuuid.txt
start4.elf
start4cd.elf
start4x.elf
Đây chính là những file mà Raspberry Pi 4 sử dụng trong quá trình boot.
3. Boot flow mặc định của Raspberry Pi 4
Điểm quan trọng đầu tiên:
Boot flow mặc định của Raspberry Pi 4 không sử dụng U-Boot.
Flow mặc định:
BOOTROM
   │
   ▼
start4.elf
   │
   ▼
config.txt
   │
   ├── Load kernel
   ├── Load Device Tree
   │
   ▼
Linux Kernel
   │
   ▼
OpenWrt
Trong đó:
BOOTROM: code boot đầu tiên của Raspberry Pi.start4.elf: firmware/bootloader của Raspberry Pi 4.config.txt: file cấu hình quan trọng, quyết định firmware sẽ load gì tiếp theo.kernel8.img: Linux kernel 64-bit..dtb: Device Tree Blob.
4. config.txt mặc định của OpenWrt
File config.txt mặc định của OpenWrt gần như không chứa cấu hình boot đặc biệt:
################################################################################
# Bootloader configuration - config.txt
################################################################################

################################################################################
# For overclocking and various other settings, see:
# https://www.raspberrypi.com/documentation/computers/config_txt.html
################################################################################

# OpenWrt config
include distroconfig.txt

[all]
# Place your custom settings here
Do đó, Raspberry Pi tiếp tục sử dụng các thiết lập mặc định.
Một thiết lập quan trọng là:
arm_64bit=1
Raspberry Pi 4 sẽ boot ở chế độ ARM 64-bit, vì vậy kernel mặc định là:
kernel8.img
Flow lúc này:
start4.elf
    │
    ▼
config.txt
    │
    ├── arm_64bit=1
    │
    ▼
kernel8.img
    │
    ├── bcm2711-rpi-4-b.dtb
    │
    ▼
Linux Kernel
5. Thêm U-Boot vào boot flow
Bây giờ mục tiêu là chèn U-Boot vào giữa Raspberry Pi firmware và Linux kernel.
Cách làm là chỉnh config.txt để Raspberry Pi firmware load u-boot.bin thay vì load Linux kernel trực tiếp.
Thêm:
enable_uart=1
arm_64bit=1
kernel=u-boot.bin
device_tree=bcm2711-rpi-4-b_owrt.dtb
Ý nghĩa:
enable_uart=1
Bật UART để debug U-Boot.
arm_64bit=1
Boot ARM ở chế độ 64-bit.
kernel=u-boot.bin
Thay vì load:
kernel8.img
Raspberry Pi firmware sẽ load:
u-boot.bin
device_tree=bcm2711-rpi-4-b_owrt.dtb
Sử dụng Device Tree dành cho U-Boot.
Boot flow mới:
BOOTROM
   │
   ▼
start4.elf
   │
   ▼
config.txt
   │
   ├── kernel=u-boot.bin
   └── device_tree=bcm2711-rpi-4-b_owrt.dtb
   │
   ▼
U-Boot
   │
   ├── Load kernel
   ├── Load Device Tree
   │
   ▼
Linux Kernel
   │
   ▼
OpenWrt
Từ thời điểm U-Boot được load lên, việc Linux kernel được load như thế nào sẽ do U-Boot đảm nhiệm.
6. Build U-Boot
Sau khi đã có boot flow mới, bước tiếp theo là build U-Boot sao cho U-Boot có thể load Linux kernel của Pi 4.
Clone source:
git clone https://github.com/u-boot/u-boot.git
cd u-boot
Tạo branch riêng để làm việc:
git checkout -b rpi4-openwrt
7. Hai file cần quan tâm trong U-Boot
Có hai file gốc của Raspberry Pi 4 cần quan tâm:
configs/rpi_4_defconfig
arch/arm/dts/bcm2711-rpi-4-b.dts
Mình không muốn sửa trực tiếp hai file gốc.
Thay vào đó, tạo hai file riêng:
configs/rpi_4_owrt_defconfig
arch/arm/dts/bcm2711-rpi-4-b_owrt.dts
Có thể copy như sau:
cd configs
cp rpi_4_defconfig rpi_4_owrt_defconfig

cd ../arch/arm/dts
cp bcm2711-rpi-4-b.dts bcm2711-rpi-4-b_owrt.dts
Từ đây, mình sẽ xử lý defconfig và Device Tree ở hai phần riêng biệt.
8. U-Boot defconfig
8.1. Đổi Device Tree mặc định
Trong:
configs/rpi_4_owrt_defconfig
có dòng:
CONFIG_DEFAULT_DEVICE_TREE="bcm2711-rpi-4-b"
Đây là Device Tree mà U-Boot sẽ sử dụng/build.
Do mình đã tạo Device Tree riêng:
bcm2711-rpi-4-b_owrt.dts
nên sửa thành:
CONFIG_DEFAULT_DEVICE_TREE="bcm2711-rpi-4-b_owrt"
8.2. Tắt Boot Standard
Một config khác cần đặc biệt chú ý:
CONFIG_BOOTSTD_DEFAULTS=y
Đây là Boot Standard (bootstd) của U-Boot.
Khi bật bootstd, U-Boot sẽ thực hiện quá trình bootflow discovery để tìm một bootflow hợp lệ trên các thiết bị boot.
Trong quá trình này, U-Boot có thể thử các boot method như:
EFI
PXE
DHCP
...
Trong khi đó, OpenWrt có boot layout riêng, ví dụ:
kernel
Device Tree
root filesystem
Vì vậy nếu tiếp tục sử dụng:
CONFIG_BOOTSTD_DEFAULTS=y
có thể gặp lỗi:
Card did not respond to voltage select: 110
Can not persist EFI variable without system partition
bootflow NULL with efi_mgr
Với boot flow hiện tại, mình sẽ không sử dụng bootstd mà chuyển sang boot bằng bootargs và bootcmd thủ công.
Thay:
CONFIG_BOOTSTD_DEFAULTS=y
bằng:
# CONFIG_BOOTSTD_DEFAULTS is not set
8.3. Cấu hình CONFIG_BOOTARGS
Thêm:
CONFIG_USE_BOOTARGS=y
CONFIG_BOOTARGS="console=tty1 console=ttyAMA0,115200 root=PARTUUID=c509a674-02 rootfstype=squashfs,ext4 rootwait"
CONFIG_BOOTARGS chính là kernel command line được truyền cho Linux kernel.
Khi Raspberry Pi boot mà không có U-Boot, thông tin này nằm trong:
/boot/cmdline.txt
Ví dụ:
console=tty1 console=serial0,115200 root=@ROOT@ rootfstype=squashfs,ext4 rootwait
Nhưng khi đưa U-Boot vào boot flow, U-Boot không tự động sử dụng cmdline.txt theo cách boot flow mặc định của Raspberry Pi.
Vì vậy, mình truyền trực tiếp kernel command line thông qua:
CONFIG_BOOTARGS
Vấn đề với root=@ROOT@
Trong cmdline.txt:
root=@ROOT@
@ROOT@ cuối cùng sẽ được thay bằng PARTUUID của partition chứa root filesystem.
Điểm cần chú ý là:
PARTUUIDcó thể thay đổi theo từng image.
Ở đây, mình đã hardcode bằng cách boot OpenWrt lên board rồi kiểm tra:
cd /boot
cat cmdline.txt
Sau đó lấy giá trị root=... tương ứng và đưa vào:
CONFIG_BOOTARGS
Ví dụ:
root=PARTUUID=c509a674-02
thì:
CONFIG_BOOTARGS="console=tty1 console=ttyAMA0,115200 root=PARTUUID=c509a674-02 rootfstype=squashfs,ext4 rootwait"
8.5. Cấu hình CONFIG_BOOTCOMMAND
Tiếp theo:
CONFIG_USE_BOOTCOMMAND=y
CONFIG_BOOTCOMMAND="fatload mmc 0:1 ${kernel_addr_r} kernel8.img; fatload mmc 0:1 ${fdt_addr_r} bcm2711-rpi-4-b.dtb; booti ${kernel_addr_r} - ${fdt_addr_r}"
CONFIG_BOOTCOMMAND là command mà U-Boot sẽ thực thi sau quá trình boot delay/countdown.
Ở đây U-Boot sẽ thực hiện 3 bước.
Load kernel
fatload mmc 0:1 ${kernel_addr_r} kernel8.img
Trong đó:
mmc 0:1
→ partition 1 của MMC device 0.
${kernel_addr_r}
→ địa chỉ RAM dùng để load kernel.
kernel8.img
→ Linux kernel.
Load Device Tree
fatload mmc 0:1 ${fdt_addr_r} bcm2711-rpi-4-b.dtb
U-Boot load:
bcm2711-rpi-4-b.dtb
vào:
${fdt_addr_r}
Boot Linux
booti ${kernel_addr_r} - ${fdt_addr_r}
Trong đó:
${kernel_addr_r}
→ địa chỉ kernel.
-
→ không sử dụng initrd.
${fdt_addr_r}
→ địa chỉ Device Tree.
Tức là:
booti <kernel address> - <device tree address>
8.6. Địa chỉ kernel_addr_r và fdt_addr_r
Các địa chỉ này không cần tự nghĩ ra.
Có thể tìm trong:
board/raspberrypi/rpi/rpi.env
8.7. Bật FAT command để debug
Vì boot partition của Raspberry Pi sử dụng FAT, có thể bật thêm:
CONFIG_CMD_FAT=y
Tham khảo: https://github.com/u-boot/u-boot/commit/17e57b1975d804fe88e95885c168da4ca29ba7a
9. Device Tree bcm2711-rpi-4-b_owrt.dts
Sau khi xử lý defconfig, chuyển sang Device Tree.
File:
arch/arm/dts/bcm2711-rpi-4-b_owrt.dts
9.1. Vấn đề MMC
Nếu không chỉnh sửa gì thêm trong Device Tree, khi boot có thể gặp:
U-Boot 2026.07-rc1-00004-g33d676df8693 (Sep 01 2026 - 19:43:26 +0700)

DRAM:  1.9 GiB
RPI 4 Model B (0xb03115)
Core:  176 devices, 18 uclasses, devicetree: board
MMC:   mmc@7e300000: 0, mmc@7e340000: 1
Loading Environment from FAT... Card did not respond to voltage select! : -110
** Bad device specification mmc 0 **
Có thể thấy:
MMC:
mmc@7e300000: 0
mmc@7e340000: 1
Tức là U-Boot đang khởi tạo hai MMC device:
mmc0 → 0x7e300000
mmc1 → 0x7e340000
Tại sao mmc 0 bị lỗi?
Trong CONFIG_BOOTCOMMAND, mình đang sử dụng:
fatload mmc 0:1 ...
Tức là U-Boot cần truy cập:
MMC device 0
Nhưng vấn đề là SD card của Raspberry Pi 4 lại k nằm đây
Xác định SD card nằm ở đâu
file arch/arm/dts/bcm2711-rpi-4-b_owrt.dts
/* EMMC2 is used to drive the SD card */
check device tree full ( Thật ra là mk đã build ra file bcm2711-rpi-4-b_owrt.dtb trong TH k chỉnh sửa gì rồi dùng command dtc để dump ngược thành file dts )
emmc2
nằm tại:
0x7e340000
Do đó:
SD card
   │
   ▼
emmc2
   │
   ▼
0x7e340000
   │
   ▼
MMC device 1
--> SD card nằm tại mmc1
9.2. Fix bằng Device Tree alias
Có thể sửa mapping của MMC bằng aliases.
Thêm:
aliases {
    mmc0 = &emmc2;
    mmc1 = &sdhci;
};
Khi đó:
mmc0
 │
 └──> emmc2
       │
       └──> SD card
Và command:
fatload mmc 0:1 ...
sẽ truy cập đúng SD card.
Tham khảo: https://github.com/u-boot/u-boot/commit/5a297f0d06e092e46c0c761207d3c710b39b2e73
10. Script build U-Boot
Có thể thêm một script riêng để đơn giản hóa quá trình build.
Ví dụ:
./build.sh rpi_4_owrt_defconfig
Tham khảo:
https://github.com/u-boot/u-boot/commit/7ab72e1d28f24f836331802abd54bc2f7acd3053
---

# 11. Build U-Boot

Sau khi hoàn tất:

```text
configs/rpi_4_owrt_defconfig
arch/arm/dts/bcm2711-rpi-4-b_owrt.dts
tiến hành build U-Boot.
Sau khi build xong, hai file cần quan tâm là:
out/u-boot.bin
arch/arm/dts/bcm2711-rpi-4-b_owrt.dtb
12. Copy U-Boot vào OpenWrt
Trên Raspberry Pi 4:
cd /boot
Chỉnh sửa:
config.txt
thành:
################################################################################
# Bootloader configuration - config.txt
################################################################################

################################################################################
# For overclocking and various other settings, see:
# https://www.raspberrypi.com/documentation/computers/config_txt.html
################################################################################

# OpenWrt config
include distroconfig.txt

[all]

# Place your custom settings here.
enable_uart=1
arm_64bit=1
device_tree=bcm2711-rpi-4-b_owrt.dtb
kernel=u-boot.bin
Sau đó copy:
out/u-boot.bin
arch/arm/dts/bcm2711-rpi-4-b_owrt.dtb
vào:
/boot
Có thể dùng scp:
scp out/u-boot.bin root@<PI_IP>:/boot/
scp arch/arm/dts/bcm2711-rpi-4-b_owrt.dtb root@<PI_IP>:/boot/
13. Boot thử
Sau khi copy xong:
/boot
├── u-boot.bin
├── bcm2711-rpi-4-b_owrt.dtb
├── kernel8.img
├── config.txt
├── cmdline.txt
└── ...
Rút thẻ SD ra, cắm lại vào Raspberry Pi 4 và boot.
Nếu UART đã được bật:
enable_uart=1
có thể mở serial console để quan sát log của U-Boot.
Boot flow cuối cùng sẽ là:
┌──────────────┐
│   BOOTROM    │
└──────┬───────┘
       │
       ▼
┌──────────────┐
│  start4.elf  │
└──────┬───────┘
       │
       ▼
┌──────────────┐
│  config.txt  │
└──────┬───────┘
       │
       │ kernel=u-boot.bin
       ▼
┌──────────────┐
│    U-Boot    │
└──────┬───────┘
       │
       ├── fatload kernel8.img
       │
       ├── fatload Device Tree
       │
       └── booti
              │
              ▼
       ┌──────────────┐
       │ Linux Kernel │
       └──────┬───────┘
              │
              ▼
          OpenWrt
Bài viết trên có 1 vài chỗ mình hơi hardcode, anh chị em có ý kiến gì thì cmt cùng sửa nhé 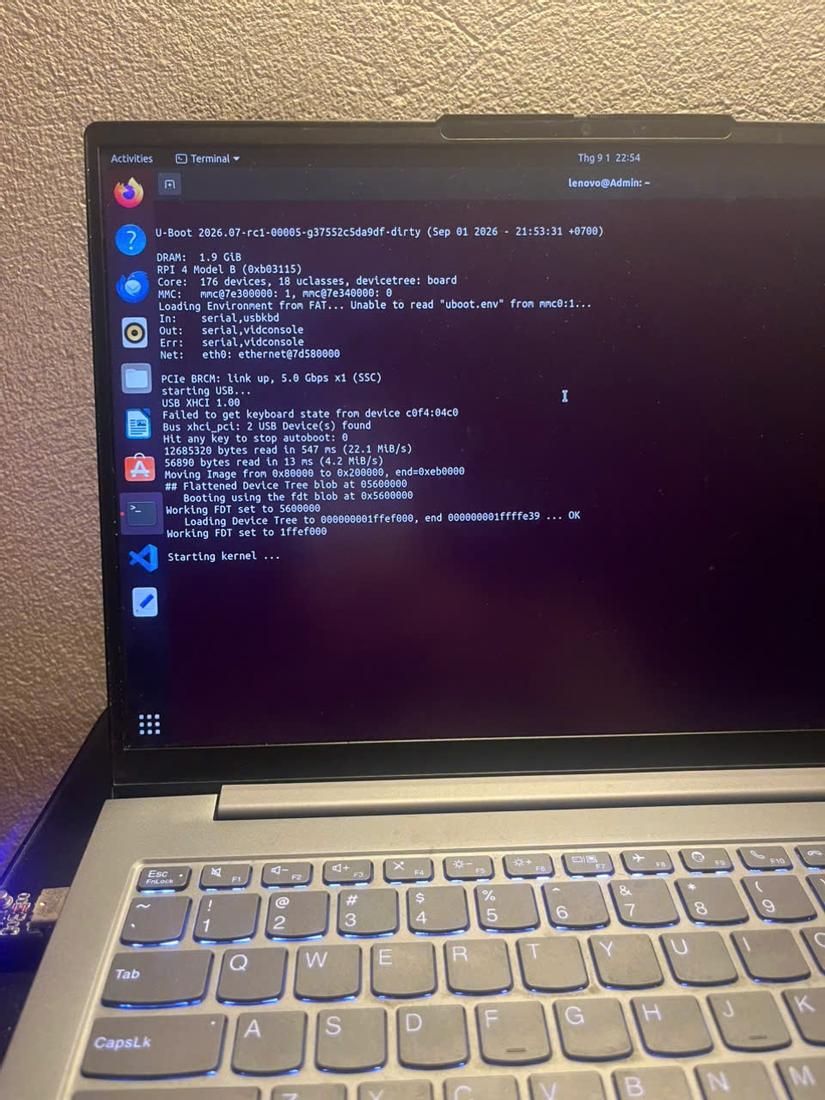
All rights reserved