Bắt đầu phát triển iOS Apps với Swift part 6.2 : Tạo Table View
Bài đăng này đã không được cập nhật trong 7 năm
Ở phần Bắt đầu phát triển iOS Apps với Swift part 6.1 : Tạo Table View chúng ta đã học được các kiến thức cơ bản như:
- Tạo được màn hình storyboard thứ 2
- HIểu được các thành phần cơ bản của table view
- Tạo và thiết kết custom table view cell
Ở Phần 6.2 này chúng ta sẽ cùng nhau tìm hiểu thêm về:
- Vai trò của table view delegates và nguồn data (data resources)
- Sử dụng mảng để lưu trữ và làm việc với data
- Hiển thị dynamic data trên table view Đây đề là những kiến thức rất quan trọng để làm việc với table view trong tương lai. Nào, chúng ta bắt tay vào tìm hiểu nhé.
Ở 6.1 chúng ta đã thêm ảnh vào project rồi. Mở đầu 6.2 sẽ là cách kết nối UI của table cell với Code
Kết nối UI của table cell với Code
Chúng ta cần tạo các outlet kết nối prototype ở storyboard với source code tương ứng với table view cell ở file MealTableViewCell.swift để có thể hiển thị dynamic data ở table view cell ở phần sau.
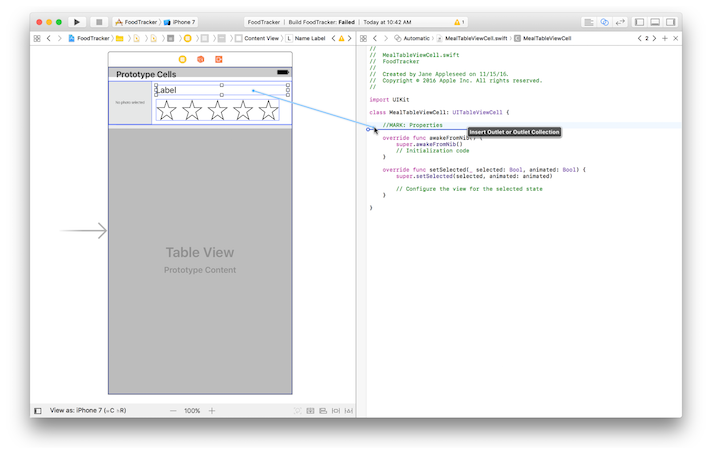
Cách kết nối views tới code của MealTableViewCell.swift.
- Ở storyboard, chọn lable ở table view cell
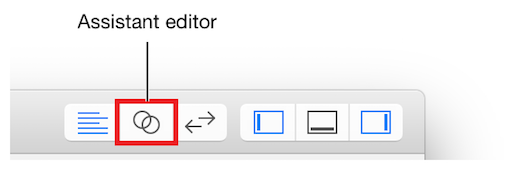
- Mở assistant editor cho dễ quan sát
- Chuyển chế độ xem từ Preview sang Automatic > MealTableViewCell.swift.
- Tìm class MealTableViewCell
class MealTableViewCell: UITableViewCell {
Thêm dòng comment để add properties
//MARK: Properties
- Control-drag từ lable vào editor
- Ở dialog vừa xuất hiện, gõ Name là
nameLabel. Để các lựa chọn còn lại default
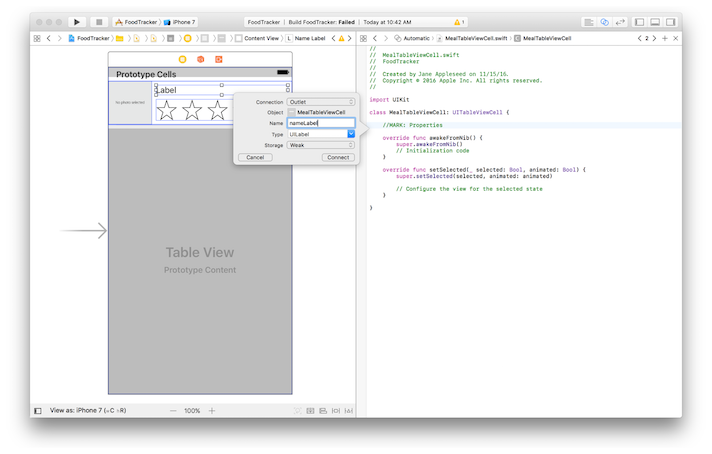
- Click Connect
- Làm tương tự với image view, Name là
photoImageView - Tương tự với phần rating, Name đặt là
ratingControl - Chúng ta sẽ có các outlets như dưới đây
@IBOutlet weak var nameLabel: UILabel!
@IBOutlet weak var photoImageView: UIImageView!
@IBOutlet weak var ratingControl: RatingControl!
Load dữ liệu ban đầu
Để hiển thị dữ liệu thật ở mỗi table cell, chúng ta cần viết code để load data ra. Nhưng ở thời điểm hiện tại, chúng ta mới chỉ tạo ra được data model quản lý từng món ăn (Meal) mà thôi. Chúng ta còn cần thêm một controller để quản lý list các món ăn (Meal List) nữa, và controller đó sẽ là một subclass của view controller, có kết nối với màn hình meal list, đồng thời có reference tới các data model (meal model) tương ứng được hiển thị trên UI.
Các tạo subclass của UITableViewController
- Chọn File > New > File (hoặc tổ hợp Command-N).
- Ở top của dialog hiện ra, chọn iOS, và chọn Cocoa Touch Class.
- Click Next.
- Ở Class field, chọn Meal.
- Ở “Subclass of” field, chọn UITableViewController.
- Đảm bảo là “Also create XIB file” không được chọn. XIB files là cách cũ hơn để controller quản lý views. Lần này chúng ta không cần dùng tới.
- Language option để Swift.
- Click Next. Để các phần còn lại default
- click Create. Xcode sẽ tạo ra file MealTableViewController.swift, đây là nơi lưu giữ source code của custom subclass chúng ta vừa tạo ra.
Ở custom subclass này chúng ta có thể định nghĩa các property để lưu trữ list các Meal objects. Và Array chính là cấu trúc thư việc chuẩn Swift chuẩn bị để quản lý list này.
Load dữ liệu ban đầu
- Chuyển từ assistant editor sang Standar editor
- Mở file
MealTableViewController.swift - Thêm mảng meals
//MARK: Properties

var meals = [Meal]()
- Thêm function để load data ví dụ lên Meal list
//MARK: Private Methods

private func loadSampleMeals() {

}
- Thêm các ảnh cho data ví dụ
let photo1 = UIImage(named: "meal1")
let photo2 = UIImage(named: "meal2")
let photo3 = UIImage(named: "meal3")
- Tạo 3 meal objects tương ứng
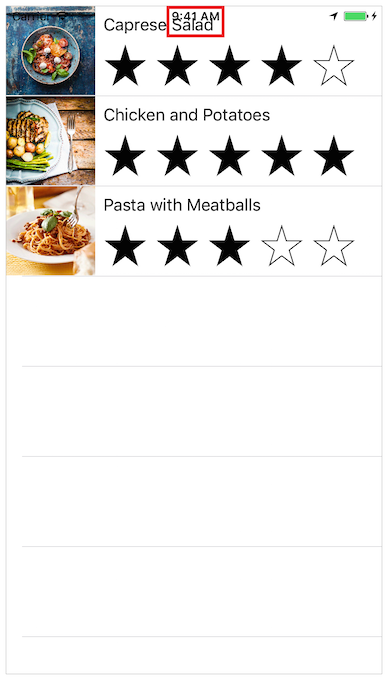
guard let meal1 = Meal(name: "Caprese Salad", photo: photo1, rating: 4) else {
    fatalError("Unable to instantiate meal1")
}

guard let meal2 = Meal(name: "Chicken and Potatoes", photo: photo2, rating: 5) else {
    fatalError("Unable to instantiate meal2")
}

guard let meal3 = Meal(name: "Pasta with Meatballs", photo: photo3, rating: 3) else {
    fatalError("Unable to instantiate meal2")
}
- Thêm 3 object đó vào mảng meals
meals += [meal1, meal2, meal3]
- Ở
viewDidLoad(), thêm vào dòng lệnh gọi hàm load data ví dụ
// Load the sample data.
loadSampleMeals()
Hiện tại hàm viewDidLoad() sẽ có dạng
override func viewDidLoad() {
    super.viewDidLoad()

    // Load the sample data.
    loadSampleMeals()
}
và hàm loadSampleMeals() sẽ có dạng
private func loadSampleMeals() {

    let photo1 = UIImage(named: "meal1")
    let photo2 = UIImage(named: "meal2")
    let photo3 = UIImage(named: "meal3")

    guard let meal1 = Meal(name: "Caprese Salad", photo: photo1, rating: 4) else {
        fatalError("Unable to instantiate meal1")
    }

    guard let meal2 = Meal(name: "Chicken and Potatoes", photo: photo2, rating: 5) else {
        fatalError("Unable to instantiate meal2")
    }

    guard let meal3 = Meal(name: "Pasta with Meatballs", photo: photo3, rating: 3) else {
        fatalError("Unable to instantiate meal2")
    }

    meals += [meal1, meal2, meal3]
}
Hiển thị dữ liệu
Để hiển thị dynamic data, table view cần 2 thành phần quan trọng: đó là data resource và delegate. Data resource như tên của nó, cung cấp cho table view dữ liệu nó cần để hiển thị. Trong khi đó, Delegate giúp table view quản lý việc user chọn cell, điều chỉnh chiều cao của cell và các đặc trưng khác phục vụ quá trình hiển thị dữ liệu. 2 thành phần được mặc định cung cấp cho UITableViewController và các subclass của nó. Công việc của chúng ta chỉ là implement nó một các hợp lý để dữ liệu được show theo đúng yêu cầu ban đầu.
Có 3 method cho data resource là
func numberOfSections(in tableView: UITableView) -> Int
func tableView(_ tableView: UITableView, numberOfRowsInSection section: Int) -> Int
func tableView(_ tableView: UITableView, cellForRowAt indexPath: IndexPath) -> UITableViewCell
Method đầu tiên numberOfSections(In:) quy định số lượng section trong table, hay nói cách khác là số lượng group trong table. Trong app của chúng ta chỉ có một group duy nhết nên cũng không cần chỉnh sửa quá nhiều
Để phân chia số section ở table view
- Tìm tới method
numberOfSections(In:)
override func numberOfSections(in tableView: UITableView) -> Int {
    // #warning Incomplete implementation, return the number of sections
    return 0
}
- Trả về 1 thay vì 0, bỏ qua phần warning
override func numberOfSections(in tableView: UITableView) -> Int {
    return 1
}
Method thứ 2, tableView(_:numberOfRowsInSection:) chỉ định số rows của table ở mỗi section. App chúng ta có một section thôi, vì vậy số lượng meal trong section này cũng là số meal trong cả table view của chúng ta luôn
Trả về số lượng rows ở table view
- Tìm hàm
tableView(_:numberOfRowsInSection:)
override func tableView(_ tableView: UITableView, numberOfRowsInSection section: Int) -> Int {
    // #warning Incomplete implementation, return the number of rows
    return 0
}
- Trả về số lượng rows thích hợp (chính bằng số lượng item trong array
meals.count)
override func tableView(_ tableView: UITableView, numberOfRowsInSection section: Int) -> Int {
    return meals.count
}
Method cuối cùng tableView(_:cellForRowAt:) chỉ định số lượng cell cho mỗi row. Ở app của chúng ta, mỗi row chỉ hiển thị đúng 1 cell thôi.
Cài đặt và hiện thị cells ở table view
- Uncomment method
tableView(_:cellForRowAt:)
override func tableView(_ tableView: UITableView, cellForRowAt indexPath: IndexPath) -> UITableViewCell {
    let cell = tableView.dequeueReusableCell(withIdentifier: "reuseIdentifier", for: indexPath)

    // Configure the cell...

    return cell
}
dequeueReusableCell là method cho phép sử dụng lại các cell khi user scroll, thay vì tạo cell mới và xoá cell cũ.
- Chỉ định identifiler là prototype cell chúng ta đã set ở storyboard (MealTableViewCell)
// Table view cells are reused and should be dequeued using a cell identifier.
let cellIdentifier = "MealTableViewCell"
- Update lại cellIdentifier ở dòng code thứ 2
let cell = tableView.dequeueReusableCell(withIdentifier: cellIdentifier, for: indexPath)
- Đảm bảo việc setting cell thành công
guard let cell = tableView.dequeueReusableCell(withIdentifier: cellIdentifier, for: indexPath) as? MealTableViewCell  else {
    fatalError("The dequeued cell is not an instance of MealTableViewCell.")
}
- Lấy meal từ mảng meals
// Fetches the appropriate meal for the data source layout.
let meal = meals[indexPath.row]
- Config các cell vào nơi comment được đặt
// Configure the cell...
cell.nameLabel.text = meal.name
cell.photoImageView.image = meal.photo
cell.ratingControl.rating = meal.rating
Method tableView(_:cellForRowAt:) giờ đây sẽ có dạng
override func tableView(_ tableView: UITableView, cellForRowAt indexPath: IndexPath) -> UITableViewCell {

   // Table view cells are reused and should be dequeued using a cell identifier.
   let cellIdentifier = "MealTableViewCell"

   guard let cell = tableView.dequeueReusableCell(withIdentifier: cellIdentifier, for: indexPath) as? MealTableViewCell  else {
       fatalError("The dequeued cell is not an instance of MealTableViewCell.")
   }

   // Fetches the appropriate meal for the data source layout.
   let meal = meals[indexPath.row]

   cell.nameLabel.text = meal.name
   cell.photoImageView.image = meal.photo
   cell.ratingControl.rating = meal.rating

   return cell
}
Bước cuối cùng để hiển thị dữ liệu lên là kết nối code đã định nghĩa ở MealTableViewController.swift tới màn hình meal list
Trỏ Table View Controller tới file MealTableViewController.swift
- Mở storyboard
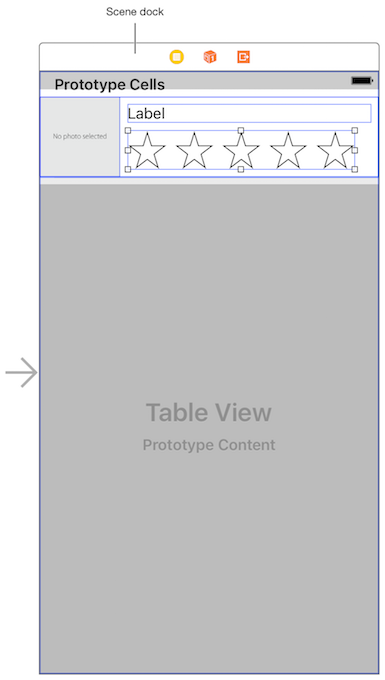
- Chọn table view controller bằng cách click vào Screne dock
- Open Identify inspector
- Ở Class field, chọn
MealTableViewController - Run thử app và chúng ta sẽ thấy data ví dụ được load lên bởi hàm
viewDidLoad()
Chỉnh sửa màn hình Meal Detail
Để từ màn hình meal list chuyển qua meal detail, chúng ta sẽ loại bỏ một vài phần code thừa trước đó (vì trước đó chúng ta đã thêm vào để hiển thị detail trước khi có meal list)
Xoá bỏ code thừa
- Mở storyboard và tìm màn hình meal detail scene
- Xoá bỏ label
Meal Name - Mở
ViewController.swift - Xoá code setting label
mealNameLabel.text = textField.text
- Bỏ outlet tương ứng
@IBOutlet weak var mealNameLabel: UILabel!
Sửa tên ViewController.swift file
- Chọn file
ViewController.swift, ấn Return key. - Đổi tên thành
MealViewController.swift.. Return - Tìm nơi định nghĩa class
class ViewController: UIViewController, UITextFieldDelegate, UIImagePickerControllerDelegate, UINavigationControllerDelegate {
- Đổi tên class đó thành
MealViewController
class MealViewController: UIViewController, UITextFieldDelegate, UIImagePickerControllerDelegate, UINavigationControllerDelegate {
- Sửa luôn cả comment ở top cho đúng
- Mở storyboard
- Chọn view controller bằng cách click vào sence dock
- Mở Identify inspector
- Ở đâu ta cũng phải thay tên class từ
ViewControllersangMealViewController
- Chạy app và test kết quả!
Kết
Trong phần này chũng ta đã tạo được custom view cell. Gắn model object vào table view controller. Đưa sample data vào model và hiển thị được dynamic data trên table view. Trong phần tiếp theo chúng ta sẽ setting để có thể điều hướng giữa các màn hình trong app.
All rights reserved
