Bắt đầu phát triển iOS Apps với Swift part 4: Tự tạo một Custom Control
Bài đăng này đã không được cập nhật trong 4 năm
Chào các bạn, tới thời điểm hiện tại chúng ta đã cùng nhau đi qua 3 phần của series hướng dẫn phát triển app iOS với Swift. part 1: Xây dựng Basic UI part 2: Kết nối UI và Source Code part 3: Làm việc với View Controller
Trong phần tiếp theo này chúng ta sẽ tạo một Custom Control cho phép người dùng đánh giá món ăn. Các kiến thức sẽ tích luỹ được trong bài này bao gồm:
- Tạo custom source code file và kết nối nó với các thành phần trong storyboard
- Định nghĩa một custom class
- Khởi tạo từ custome class
- Sử dụng UIStackView như một container
- Hiểu được cách tạo views
- Làm việc với
@IBInspectablevà@IBDesignableđể hiển thị và control custom view ở Interface Builder
I. Tạo Custom View
Ý tưởng của chúng ta khá đơn giản thôi, đó là tạo một stack view subclass để điều khiển một dãy các buttons có biểu tượng ngôi sao. Người dùng tap vào sao để xác định rank của món ăn, tap ngôi sao đó một lần nữa để bỏ đánh giá.

Cách tạo custom stack view (UIStackView) subclass
- Chọn File > New > File hoặc Command-N
- Chọn iOS
- Chọn CCocoa Touch Class,
- Ở Class field, gõ
RatingControl - Ở Subclass of” field, chọn UIStackView
- Ngôn ngữ để Swift
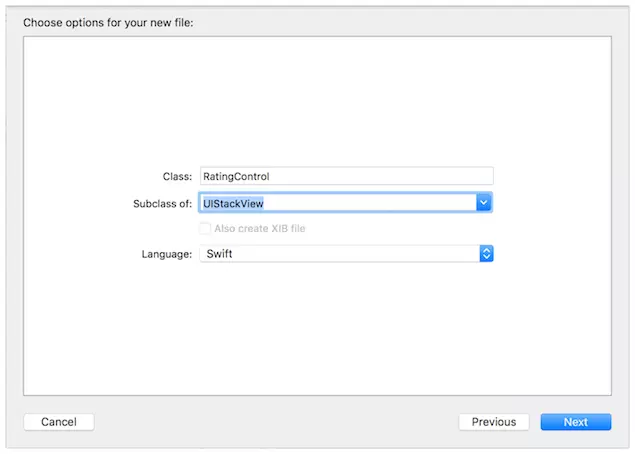
- Để các giá trị còn lại default và click Create
- Trong file
RatingControl.swiftmới được tạo ra, xoá hết nội dung và bắt đầu với khai báo class
import UIKit
class RatingControl: UIStackView {

}
Có 2 cách thông thường để tạo view: 1 là khai báo bằng source code bằng cách dùng hàm init(frame:), 2 là load từ storyboard với hàm init?(coder:).
Để override hàm khai báo
- Trong
RatingControl.swift, thêm comment sau ngay dưới dòng định nghĩa class
//MARK: Initialization
- Gõ
initđể xuất hiện gợi ý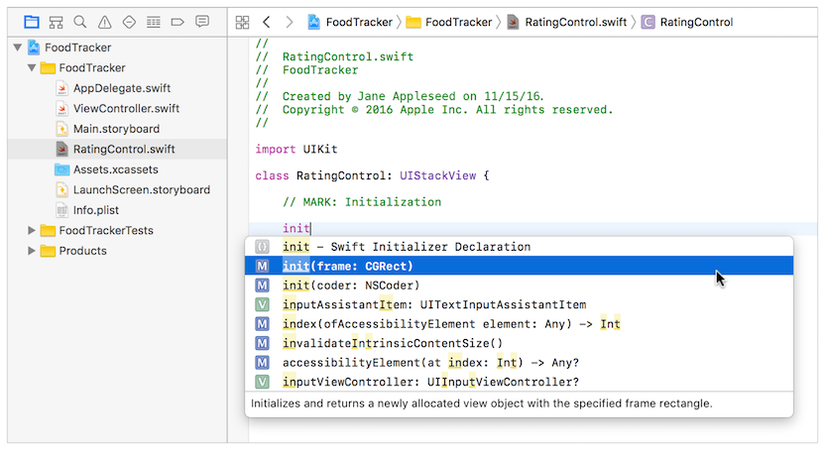
- Chọn
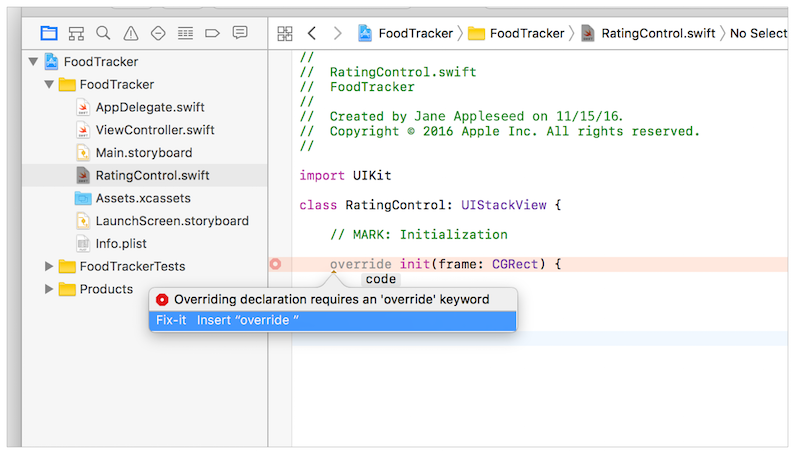
init(frame: CGRect) - Click vào cảnh báo xuất hiện để hiển thị chi tiết và click tiếp vào Fix-it để sửa lỗi này.
- Thêm dòng dưới đây để gọi khởi tạo của class cha
super.init(frame: frame)
- Ngay dưới
init(frame:), gõ thêm 1 lần init nữa để gọiinit(coder: NSCoder)ra. - Chúng ta sẽ có khởi tạo như sau
override init(frame: CGRect) {
    super.init(frame: frame)
}

required init(coder: NSCoder) {
    super.init(coder: coder)
}
II. Hiển thị Custom View
Để hiển thị Custom View, trước hết chúng ta phải thêm stack view vào storyboard và kết nối stack view và code chúng ta vừa viết.
- Mở storyboard
- Mở
Object libraryvà tìmHorizontal Stack View, kéo thả vào màn hình như dưới đây
- Mở
Identity inspector, chọnRatingControlcho mục Class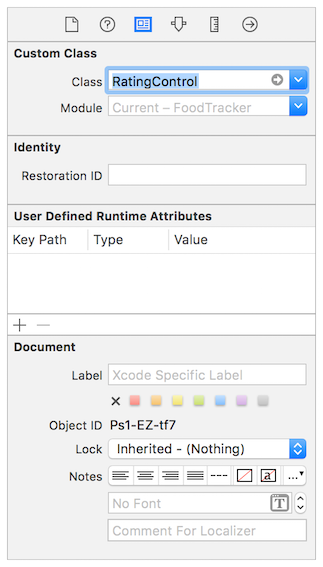
III. Thêm buttons vào View
Bắt đầu từ bước đơn giản nhất, ta chỉ thêm 1 button đỏ vào view thôi
- Trong
RatingControl.swift, thêm chú thích
//MARK: Private Methods
- Khai báo method
private func setupButtons() {

}
- Tạo một button màu đỏ
// Create the button
let button = UIButton()
button.backgroundColor = UIColor.red
Vì chúng ta đang sử dụng Auto Layout, nên bước tiếp theo sẽ là thêm constraints: 4. Thêm constraints cho buttons
// Add constraints
button.translatesAutoresizingMaskIntoConstraints = false
button.heightAnchor.constraint(equalToConstant: 44.0).isActive = true
button.widthAnchor.constraint(equalToConstant: 44.0).isActive = true
Dòng code đầu tiên disable việc tự động tạo constraints của iOS. Vì chúng ta muốn tự xử lý nó. 5. Cuối cùng chúng ta thêm button vào stack:
// Add the button to the stack
addArrangedSubview(button)
Method này sẽ thêm button vào list views được quản lý bởi RatingControl stack; đồng thời cũng yêu cầu RatingControl tạo các constraints để quản lý vị trí của button.
Và hàm setupButtons của chúng ta sẽ như dưới đây
private func setupButtons() {

    // Create the button
    let button = UIButton()
    button.backgroundColor = UIColor.red

    // Add constraints
    button.translatesAutoresizingMaskIntoConstraints = false
    button.heightAnchor.constraint(equalToConstant: 44.0).isActive = true
    button.widthAnchor.constraint(equalToConstant: 44.0).isActive = true

    // Add the button to the stack
    addArrangedSubview(button)
}
Và setupButtons sẽ được gọi từ hàm khởi tạo.
override init(frame: CGRect) {
    super.init(frame: frame)
    setupButtons()
}

required init(coder: NSCoder) {
    super.init(coder: coder)
    setupButtons()
}
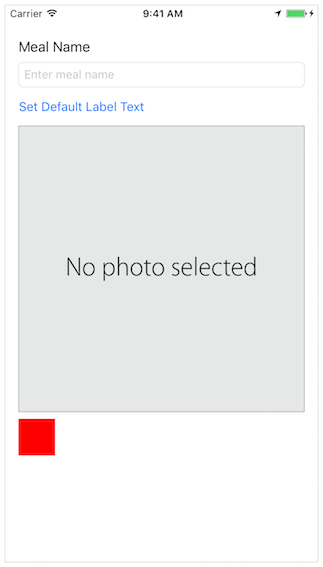
Checkpoint: Run app và bạn sẽ thấy button đỏ hiện lên
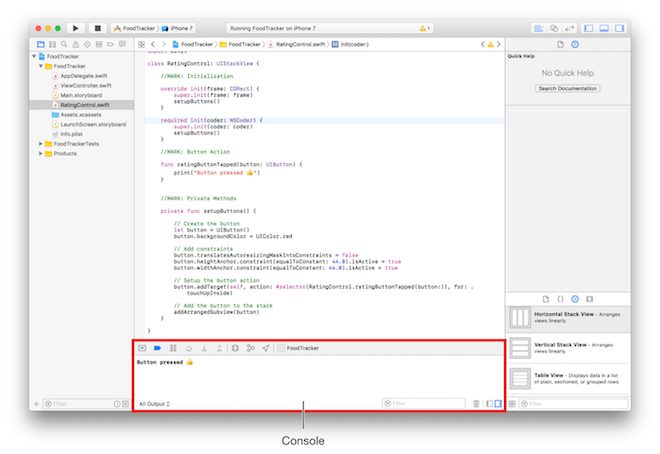
Tiếp theo là thêm action cho button. Chúng ta sử dụng button này để thay đổi rating của món ăn. Tuy nhiên đầu tiên phải chắc chắn được rằng action cho button này hoạt động đã.
Để thêm action cho button
- Ngay sau vùng
//MARK Initializationthêm vùng Action
//MARK: Button Action
- Thêm action xử lý khi tap và button
func ratingButtonTapped(button: UIButton) {
    print("Button pressed 👍")
}
- Vào hàm
setupButtons()và thêm setup button action trước khi// Add the button to the stack
// Setup the button action
button.addTarget(self, action: #selector(RatingControl.ratingButtonTapped(button:)), for: .touchUpInside)
Hàm addTarget chúng ta đã ngâm cứu ở các phần trước rồi. Ở đây chỉ cần chú ý tới touchUpInside event. Event này xảy ra khi user ấn vào button và rời tay khỏi màn hình khi vẫn đang trong vùng ảnh hưởng của button đó. Nghĩa là nếu chúng ta chạm và button và di tay ra khỏi button đó và rời tay khỏi màn hình cảm ứng thì event này sẽ ko được ghi nhận.
Vì chúng ta không sử dụng Interface Builder nên ko cần phải khai báo IBAction. Chúng ta đơn giản là đang khai báo action như mọi method bình thường khác.
Đến đây hàm setupButtons() của chúng ta sẽ có dạng:
private func setupButtons() {

    // Create the button
    let button = UIButton()
    button.backgroundColor = UIColor.red

    // Add constraints
    button.translatesAutoresizingMaskIntoConstraints = false
    button.heightAnchor.constraint(equalToConstant: 44.0).isActive = true
    button.widthAnchor.constraint(equalToConstant: 44.0).isActive = true

    // Setup the button action
    button.addTarget(self, action: #selector(RatingControl.ratingButtonTapped(button:)), for: .touchUpInside)

    // Add the button to the stack
    addArrangedSubview(button)
}
Khi run app và click vào button thì trên Console sẽ xuất hiện text "Button pressed 👍"
Để thêm giá trị cho người dùng đánh giá.
- Ngay dưới phần định nghĩa class của
RatingControl.swift. Thêm mảng các buttons.
//MARK: Properties
private var ratingButtons = [UIButton]()

var rating = 0
Giá trị mặc định rating đánh giá là 0
Dùng vòng for tạo 5 buttons.
private func setupButtons() {

    for _ in 0..<5 {
        // Create the button
        let button = UIButton()
        button.backgroundColor = UIColor.red

        // Add constraints
        button.translatesAutoresizingMaskIntoConstraints = false
        button.heightAnchor.constraint(equalToConstant: 44.0).isActive = true
        button.widthAnchor.constraint(equalToConstant: 44.0).isActive = true

        // Setup the button action
        button.addTarget(self, action: #selector(RatingControl.ratingButtonTapped(button:)), for: .touchUpInside)

        // Add the button to the stack
        addArrangedSubview(button)

        // Add the new button to the rating button array
        ratingButtons.append(button)
    }
}
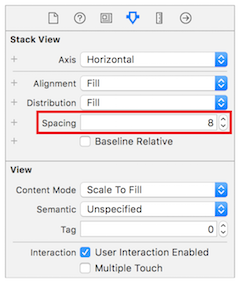
Mở Main.storyboard, chọn RatingControl stack view, mở Attributes inspector và set khoảng cách cho các buttons.
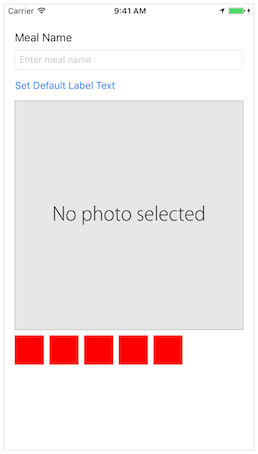
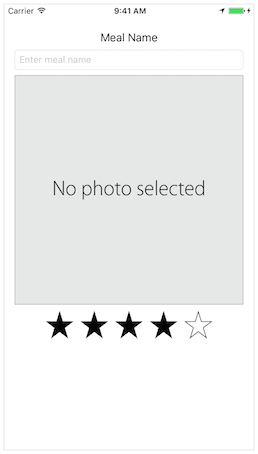
 Checkpoint: Chúng ta đã có 5 buttons.
IV. Thêm support cho Interface Builder
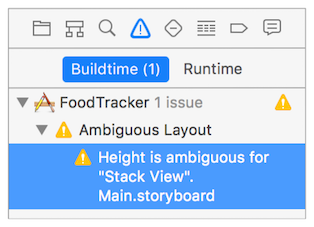
Dù kết quả khi hiển thị trên màn hình cho ra 4 button nhưng khi mở Main.storyboard ta có thể thấy rằng stack view của chúng ta chỉ là 1 hình chữ nhật lớn duy nhất. Ngoài ra cũng có warning và báo lỗi như dưới đây.
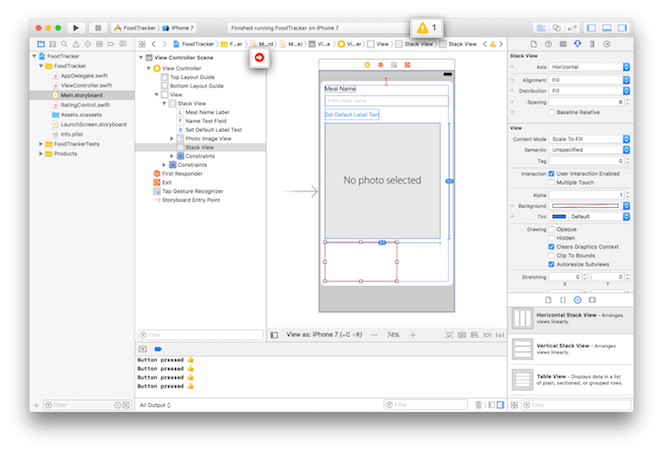
 Lý do bởi Interface Builder không hề biết gì tới sự tồn tại của RatingControl mà chúng ta vừa viết. Để sửa lỗi đó, chúng ta định nghĩa control này như là một
 @IBDesignable. Nó cho phép Interface Builder nhận diện và vẽ ra một bản copy của control ngay trên canvas.
Khai báo control như một @IBDesignable
- Chạy tới
RatingControl.swift, phần định nghĩa class
class RatingControl: UIStackView {
- Sửa thành
@IBDesignable class RatingControl: UIStackView {
- Build lại project
- Mở
Main.storyboardđể check lại kết quả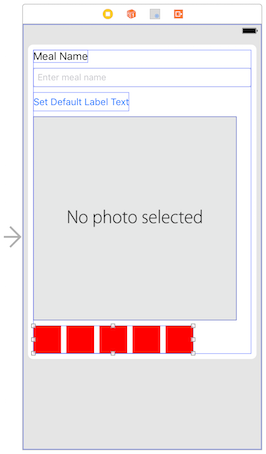
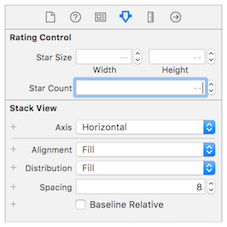
Interface Builder còn làm được nhiều hơn là chỉ hiển thị. Nó cho phép bạn set thêm các properties ở Attributes inspector. Khi ta thêm @IBInspectable IB sẽ giúp chúng ta hiển thị chúng ở Attributes inspector.
Các thêm inspectable properties (các đặc tính có thể kiểm tra được)
- Ở
RatingControl.swiftthêm vào dưới MARK properties
@IBInspectable var starSize: CGSize = CGSize(width: 44.0, height: 44.0)
@IBInspectable var starCount: Int = 5
- Sửa các hằng số đã set ở func
setupButtonsbằng các giá trị vừa khai báo
private func setupButtons() {

    for _ in 0..<starCount {
        // Create the button
        let button = UIButton()
        button.backgroundColor = UIColor.red

        // Add constraints
        button.translatesAutoresizingMaskIntoConstraints = false
        button.heightAnchor.constraint(equalToConstant: starSize.height).isActive = true
        button.widthAnchor.constraint(equalToConstant: starSize.width).isActive = true

        // Setup the button action
        button.addTarget(self, action: #selector(RatingControl.ratingButtonTapped(button:)), for: .touchUpInside)

        // Add the button to the stack
        addArrangedSubview(button)

        // Add the new button to the rating button array
        ratingButtons.append(button)
    }
}
Giờ chúng ta hãy cùng mở lại Attributes inspector để thấy sự thay đổi. Star Size và Star Count đã được hiển thị và có thể thay đổi.
 3. Để update control thì chúng ta phải reset control buttons mỗi khi mà attribute thay đổi. Để làm điều đó chúng ta cần thêm các property observer (người theo dõi các property) cho mỗi property. Property observers được gọi mỗi khi giá trị của property được set, nên nó được dùng để thực thi ngay tác vụ khi mà giá trị property thay đổi.
Chúng ta chỉ cần sửa các properties đã khai báo như dưới đây.
3. Để update control thì chúng ta phải reset control buttons mỗi khi mà attribute thay đổi. Để làm điều đó chúng ta cần thêm các property observer (người theo dõi các property) cho mỗi property. Property observers được gọi mỗi khi giá trị của property được set, nên nó được dùng để thực thi ngay tác vụ khi mà giá trị property thay đổi.
Chúng ta chỉ cần sửa các properties đã khai báo như dưới đây.
@IBInspectable var starSize: CGSize = CGSize(width: 44.0, height: 44.0) {
    didSet {
        setupButtons()
    }
}

@IBInspectable var starCount: Int = 5 {
    didSet {
        setupButtons()
    }
}
didSet là hàm sẽ được gọi ra ngay sau khi giá trị của property bị thay đổi.
Hàm setupButtons được sử dụng sẽ thêm button mới vào, tuy nhiên button cũ vẫn còn nên chúng ta cần xoá chúng đi.
4. Xoá các button cũ
// clear any existing buttons
for button in ratingButtons {
    removeArrangedSubview(button)
    button.removeFromSuperview()
}
ratingButtons.removeAll()
Hàm này xoá button ở list views được quản lý bởi stack view, tuy nhiên nó vẫn còn tồn tại ở subview của stack view nên cần xoá hẳn. Cuối cùng là xoá hoàn toàn cả mảng ratingButtons. Giờ chúng ta có hàm setupButtons như sau.
private func setupButtons() {

    // clear any existing buttons
    for button in ratingButtons {
        removeArrangedSubview(button)
        button.removeFromSuperview()
    }
    ratingButtons.removeAll()

    for _ in 0..<starCount {
        // Create the button
        let button = UIButton()
        button.backgroundColor = UIColor.red

        // Add constraints
        button.translatesAutoresizingMaskIntoConstraints = false
        button.heightAnchor.constraint(equalToConstant: starSize.height).isActive = true
        button.widthAnchor.constraint(equalToConstant: starSize.width).isActive = true

        // Setup the button action
        button.addTarget(self, action: #selector(RatingControl.ratingButtonTapped(button:)), for: .touchUpInside)

        // Add the button to the stack
        addArrangedSubview(button)

        // Add the new button to the rating button array
        ratingButtons.append(button)
    }
}
Checkpoint: Mở Main.storyboard và thay đổi giá trị của Star Size, chúng ta sẽ tâhys tren canvas thể hiện được sự thay đổi tương ứng.

V. Thêm ảnh ngôi sao vào cho Buttons
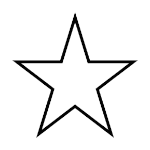
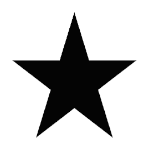
Các ánh sao được dùng:
- EmptyStar
- FilledStar
- HighlightedStar

Các bạn thêm vào Assets.xcassets theo hướng dẫn từ các phần trước.
Thêm ảnh star cho button
- Ở
RatingControl.swiftvào funcsetupButtons()và thêm đoạn code sau ngay trước vòng lặp for
// Load Button Images
let bundle = Bundle(for: type(of: self))
let filledStar = UIImage(named: "filledStar", in: bundle, compatibleWith: self.traitCollection)
let emptyStar = UIImage(named:"emptyStar", in: bundle, compatibleWith: self.traitCollection)
let highlightedStar = UIImage(named:"highlightedStar", in: bundle, compatibleWith: self.traitCollection)
- Tìm dòng set màu background màu đỏ và thay nó bằng set ảnh cho button
// Set the button images
button.setImage(emptyStar, for: .normal)
button.setImage(filledStar, for: .selected)
button.setImage(highlightedStar, for: .highlighted)
button.setImage(highlightedStar, for: [.highlighted, .selected])
Mỗi button sẽ có các trạng thái: normal, highlighted, focused, selected, và disabled. Chúng ta set mỗi ảnh với trạng thái tương ứng muốn hiển thị bằng đoạn code bên trên. Chú ý rằng button có thể ở 2 trạng thái cùng một lúc.
setupButtons func của chúng ta sẽ như sau:
private func setupButtons() {

    // Clear any existing buttons
    for button in ratingButtons {
        removeArrangedSubview(button)
        button.removeFromSuperview()
    }
    ratingButtons.removeAll()

    // Load Button Images
    let bundle = Bundle(for: type(of: self))
    let filledStar = UIImage(named: "filledStar", in: bundle, compatibleWith: self.traitCollection)
    let emptyStar = UIImage(named:"emptyStar", in: bundle, compatibleWith: self.traitCollection)
    let highlightedStar = UIImage(named:"highlightedStar", in: bundle, compatibleWith: self.traitCollection)

    for _ in 0..<starCount {
        // Create the button
        let button = UIButton()

        // Set the button images
        button.setImage(emptyStar, for: .normal)
        button.setImage(filledStar, for: .selected)
        button.setImage(highlightedStar, for: .highlighted)
        button.setImage(highlightedStar, for: [.highlighted, .selected])

        // Add constraints
        button.translatesAutoresizingMaskIntoConstraints = false
        button.heightAnchor.constraint(equalToConstant: starSize.height).isActive = true
        button.widthAnchor.constraint(equalToConstant: starSize.width).isActive = true

        // Setup the button action
        button.addTarget(self, action: #selector(RatingControl.ratingButtonTapped(button:)), for: .touchUpInside)

        // Add the button to the stack
        addArrangedSubview(button)

        // Add the new button to the rating button array
        ratingButtons.append(button)
    }
}
Checkpoint: Chạy app và click thử nhé.
VI. Viết Action cho Button
Xử lý hàm ratingButtonTapped
- Tìm hàm ratingButtonTapped(button:) trong RatingControl.swift
- Thay đoạn code in text bằng đoạn code xử lý như sau
func ratingButtonTapped(button: UIButton) {
    guard let index = ratingButtons.index(of: button) else {
        fatalError("The button, \(button), is not in the ratingButtons array: \(ratingButtons)")
    }

    // Calculate the rating of the selected button
    let selectedRating = index + 1

    if selectedRating == rating {
        // If the selected star represents the current rating, reset the rating to 0.
        rating = 0
    } else {
        // Otherwise set the rating to the selected star
        rating = selectedRating
    }
}
Ý tưởng là ta sẽ lấy index của button được chạm (báo lỗi nếu không tìm thấy). Nếu chọn vào button thể hiện rating cũng thì reset về 0. Nếu là giá trị mới thì cập nhật. 3. Sau khi đã lấy được rating phù hợp với button được chọn, ta cần update lại hiển thị của các button tương ứng với trạng thái của nó. Thêm method này ngay ở cuối của class.
private func updateButtonSelectionStates() {
    for (index, button) in ratingButtons.enumerated() {
        // If the index of a button is less than the rating, that button should be selected.
        button.isSelected = index < rating
    }
}
Nếu index của button mà nhỏ hơn rating thì các button đấy đều phải ở trạng thái được chọn.
5. Thêm property observer để gọi hàm updateButtonSelectionStates() mỗi khi giá trị rating thay đổi.
var rating = 0 {
    didSet {
        updateButtonSelectionStates()
    }
}
Method setupButtons của chúng ta giờ có dạng.
private func setupButtons() {

    // Clear any existing buttons
    for button in ratingButtons {
        removeArrangedSubview(button)
        button.removeFromSuperview()
    }
    ratingButtons.removeAll()

    // Load Button Images
    let bundle = Bundle(for: type(of: self))
    let filledStar = UIImage(named: "filledStar", in: bundle, compatibleWith: self.traitCollection)
    let emptyStar = UIImage(named:"emptyStar", in: bundle, compatibleWith: self.traitCollection)
    let highlightedStar = UIImage(named:"highlightedStar", in: bundle, compatibleWith: self.traitCollection)

    for index in 0..<starCount {
        // Create the button
        let button = UIButton()

        // Set the button images
        button.setImage(emptyStar, for: .normal)
        button.setImage(filledStar, for: .selected)
        button.setImage(highlightedStar, for: .highlighted)
        button.setImage(highlightedStar, for: [.highlighted, .selected])

        // Add constraints
        button.translatesAutoresizingMaskIntoConstraints = false
        button.heightAnchor.constraint(equalToConstant: starSize.height).isActive = true
        button.widthAnchor.constraint(equalToConstant: starSize.width).isActive = true

        // Setup the button action
        button.addTarget(self, action: #selector(RatingControl.ratingButtonTapped(button:)), for: .touchUpInside)

        // Add the button to the stack
        addArrangedSubview(button)

        // Add the new button to the rating button array
        ratingButtons.append(button)
    }

    updateButtonSelectionStates()
}
Checkout: Run app và kiểm tra khi tap và một button bất kì.

VII. Kết nối Rating Control vào View Controller
Tương tự như các phần trước, chúng ta tiến hành theo các bước sau.
- Mở
storyboard - Chọn
Assistant Editor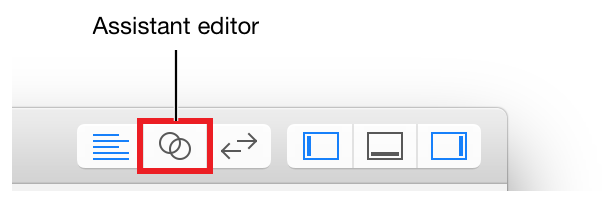
- Chọn RatingControl.
- Control-Drag vào phần property của
ViewController.swift - Ở mục Name trong pop-up được hiển thị chọn ratingControl
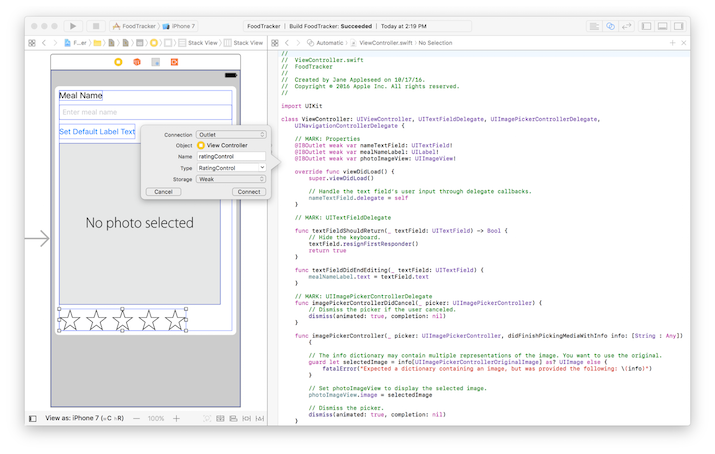 Done!
Checkpoint: Run app để check kết quả:
Done!
Checkpoint: Run app để check kết quả:
All rights reserved
