
Bạn đã sử dụng DevSpace để triển khai ứng dụng Kubernetes dưới môi trường dev chưa?
Bài đăng này đã không được cập nhật trong 3 năm

Chào anh em lại một mùa Mayfest nữa lại về rồi nhỉ 😁. Hòa chung không khí của ngày hội chia sẻ kiến thức lớn nhất trong năm của Viblo mình cũng mạn phép được cầm gõ phím và viết ra vài dòng tâm sự 😚
Chuyện là thời gian gần đây dự án của mình có migrate từ việc quản lý apps sử dụng docker swarm (docker) sang Kubernetes (k8s). Trước đó thì dev bọn mình vẫn sử dụng docker-compose viết file YAML để build và run các container, và sau khi migrate chuyển qua quản lý container với Kubernetes thì phia dev vẫn sử dụng docker và docker-compose. Vẫn là triển khai ứng dụng dưới dạng container nên cũng không có thay đổi gì cho đến khi ...
ĐẶT VẤN ĐỀ
Kubernetes có thể hoạt động tốt với Docker?
Kubernetes là một hệ thống điều phối container nên nó không thể hoạt động nếu thiếu một môi trường container như Docker. Tuy nhiên, nếu không có Docker, Kubernetes vẫn có thể hoạt động với nhiều môi trường container khác như RunC, cri-o,... Nói là thế, nhưng Kubernetes lại được thiết kế để hoạt động tốt với Docker. Và hầu hết các tài liệu của Kubernetes cũng được viết cho Docker… Song song đó, Docker đã chấp nhận Kubernetes và còn cung cấp bản Kubernetes tích hợp cho riêng nó. Nhà sản xuất cũng đã đề cập đến việc loại bỏ Docker Swarm (có tính năng tương tự như Kubernetes) và sử dụng Kubernetes làm hệ thống điều phối mặc định cho Docker.
Từ phiên bản Kubernetes 1.24 và mới hơn không còn hỗ trợ docker 🤔 ?
Dockershim is removed in Kubernetes 1.24 and later versions. Therefore, Docker is not supported in Kubernetes 1.24 and later versions. However, you can continue to use Docker images. When you create new nodes, we recommend that you use containerd as the container runtime
Ngày 02 tháng 12 năm 2020, trong thông báo đi kèm với bản phát hành Kubernetes v1.20, Kubernetes đã tuyên bố ngừng việc hỗ trợ docker từ những bản release tiếp theo. Điều này cũng đồng nghĩa với Dockershim (lớp hỗ trợ tiêu chuẩn CRI của Kubernetes) sẽ bị gỡ bỏ.
zZZzzzz 😭
Điều này đồng nghĩa với việc ứng dụng trên production của mình khi upgrade version Kubernetes lên version 1.24 sẽ không thể sử dụng Dockershim được nữa. Vì vậy mình sẽ phải refactor ứng dụng trước khi deploy lên production với version mới. Để đảm bảo ứng dụng refactor thành công trước khi deloy lên môi trường production thì sẽ cần phải dựng môi trường K8s dev thay thế cho việc sử dụng docker, docker-compose trước kia.
Sau thời gian tìm tòi mình đã tìm ra DevSpace một Kubernetes tool giúp build dựng ứng dụng một cách nhanh chóng, cùng mình triển khai ứng dụng Kubernetes dưới môi trường dev nhé 
👉️ Phần 2: Bạn đã sử dụng DevSpace để triển khai ứng dụng Kubernetes dưới môi trường dev chưa?
Ở phần 1 trong series mình có hướng dẫn triển khai Lightweight Kubernetes, sử dụng kubectl, kubectx, kubens command và helm chart môi trường dev. Trong phần này mình sẽ tiếp tục hướng dẫn sử dụng DevSpace cho project tại môi trường dev 😀
Giới thiệu về DevSpace
DevSpace là một open-source Kubenetes tool, chỉ dành cho client và hỗ trợ phát triển ứng dụng Kubenetes rất tốt, cụ thể:
- Xây dựng, kiểm thử và gỡ lỗi (debug) trực tiếp bên trong Kubernetes
- Tính năng hot reloading : Cập nhật các containers mà không cần phải build lại images hay restart container
- Thống nhất quy trình triển khai: trong team và thông qua các môi trường dev, staging và production
- Tự động hóa các tác vụ lặp đi, lặp lại: trong việc xây dựng và triển khai image
DevSpace hoạt động như thế nào?
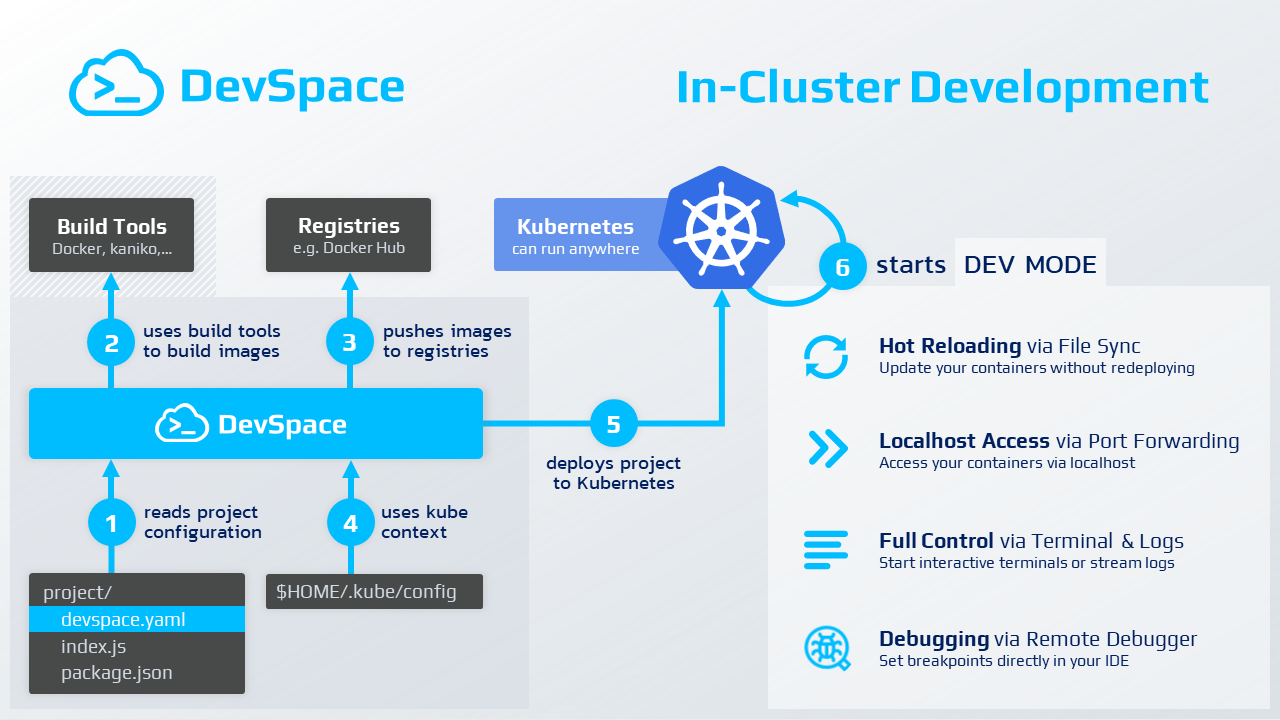
1. Reads project configuration
Tại bước đầu tiên chúng ta cần phải tạo file config của DevSpace có tên là devspace.yaml (bằng việc cài đặt và sử dụng lệnh sẽ tạo ra file này một cách tự động). Chúng ta có thể chỉnh sửa nội dung file theo yêu cầu và đặc trưng của dự án. DevSpace sẽ tiến hành đọc file config
2. Uses build tools to buid images
DevSpace sử dụng các build tools để build các images, một số build tools mà DevSpace hỗ trợ có thể kể đến: docker, kaniko,...
3. Pushes images to registries
Sau khi build xong các images DevSpace thực hiện push các image lên các registry như: Docker Hub, Github Registry, ... hay các self-hosted registry
4. Uses kube context
Devspace sử dụng kube context, truy cập thông qua config tại $HOME/.kube/config ở bài viết trước mình cũng có hướng dẫn cài đặt Kubernetes và thêm các file config, xem thêm tại: Sử dụng kubectl, kubectx, kubens command thao tác với Kubernetes cluster
5. Deploys project to Kubernetes
Ở bước này Devspace dựa vào config trong devspace.yaml sẽ deploy dự án lên Kubernetes cluster
6. Starts DEV MODE
Hot Reloadingthông qua đồng bộ file: Update các container mà không cần phải redeployLocalhost Accessthông qua Port Forwarding: Truy cập container thông qua localhostFull Controlthông qua Terminal và Logs: tương tác thông qua Terminals hoặc stream logsDebuggingthông qua Remote Debugger: Thiết lập breakpoints trực tiếp trên IDE
Cài đặt và sử dụng Devspace
Cài đặt Devspace
Cài đặt cho Linux với lệnh bên dưới:
curl -L -o devspace "https://github.com/loft-sh/devspace/releases/latest/download/devspace-linux-amd64" && sudo install -c -m 0755 devspace /usr/local/bin
Với các hệ điều hành khác tham khảo thêm tại: https://www.devspace.sh/docs/getting-started/installation?x0=5
Kiểm tra xem dưới máy đã sử dụng được devspace chưa:
devspace version

DevSpace version : 6.3.2
Khởi tạo 1 dự án mẫu
Trường hợp bạn chưa có dự án có thể clone repo mẫu về, ở đây mình chọn ngôn ngữ là PHP
git clone https://github.com/loft-sh/devspace-quickstart-php
cd devspace-quickstart-php
- Để sử dụng devspace cho repo bạn chạy lệnh sau để tạo ra file
devspace.yaml:
devspace init
     %########%
     %###########%       ____                 _____
         %#########%    |  _ \   ___ __   __ / ___/  ____    ____   ____ ___
         %#########%    | | | | / _ \\ \ / / \___ \ |  _ \  / _  | / __// _ \
     %#############%    | |_| |(  __/ \ V /  ____) )| |_) )( (_| |( (__(  __/
     %#############%    |____/  \___|  \_/   \____/ |  __/  \__,_| \___\\___|
 %###############%                                  |_|
 %###########%


info Detecting programming language...
- Devspace support khá nhiều ngôn ngữ phổ biến. Do mình đang chọn môi trường cho PHP nên mình sẽ lựa chọn ngôn ngữ là PHP
? Select the programming language of this project  [Use arrows to move, type to filter]
  c# (dotnet)
  go
  java-gradle
  java-maven
  javascript
> php
  python
Lựa chọn tool deploy, ở phần 1 mình cũng có giới thiệu qua về helm chart cũng như hiệu quả mà nó mang lại. Nên mình lựa chọn helm làm tool deploy cho Kubernetes
? How do you want to deploy this project?  [Use arrows to move, type to filter]
> helm
  kubectl
  kustomize
Lựa chọn cấu hình helm nếu bạn chọn yes, Devspace sẽ tự tạo cấu hình nhanh chóng nếu không bạn sẽ phải lựa chọn cấu hình helm chart. Ở đây mình lựa chọn Quickstart của Devspace cho nhanh
? Is this a DevSpace Quickstart project?  [Use arrows to move, type to filter]
> Yes
  No
? Do you want to develop this project with DevSpace or just deploy it?  [Use arrows to move, type to filter]  [Use arrows to move, type to filter]
> I want to develop this project and my current working dir contains the source code
  I just want to deploy this project
? How should DevSpace build the container image for this project?  [Use arrows to move, type to filter]
> Use this existing Dockerfile: ./Dockerfile
  Use a different Dockerfile (e.g. ./backend/Dockerfile)
  Use alternative build tool (e.g. jib, bazel)
  Skip / I don't know
? If you were to push any images, which container registry would you want to push to?  [Use arrows to move, type to filter]
> Skip Registry
  Use hub.docker.com
  Use GitHub image registry
  Use other registry
Done nha 😀
done Project successfully initialized
info Configuration saved in devspace.yaml - you can make adjustments as needed

You can now run:
1. devspace use namespace - to pick which Kubernetes namespace to work in
2. devspace dev - to start developing your project in Kubernetes

Run `devspace -h` or `devspace [command] -h` to see a list of available commands and flags
Sau khi khởi tạo thành công Devspace, trong thư mục dự án sẽ thấy có 3 thay đổi trong dự án:
- 1 file mới
devspace.yaml: tất cả các hoạt động build, deploy, develop sẽ đượcDevspacethực thi nhờ nó - 1 file mới
devspace_start.sh: được sử dụng để đưa ra thông tin khi user sử dụng terminal cho các container đang mở - Thêm
.devspace/vào .gitignore
version: v2beta1
name: devspace-quickstart-php

# This is a list of `pipelines` that DevSpace can execute (you can define your own)
pipelines:
  # This is the pipeline for the main command: `devspace dev` (or `devspace run-pipeline dev`)
  dev:
    run: |-
      run_dependencies --all       # 1. Deploy any projects this project needs (see "dependencies")
      ensure_pull_secrets --all    # 2. Ensure pull secrets
      create_deployments --all     # 3. Deploy Helm charts and manifests specfied as "deployments"
      start_dev app                # 4. Start dev mode "app" (see "dev" section)
  # You can run this pipeline via `devspace deploy` (or `devspace run-pipeline deploy`)
  deploy:
    run: |-
      run_dependencies --all                            # 1. Deploy any projects this project needs (see "dependencies")
      ensure_pull_secrets --all                         # 2. Ensure pull secrets
      build_images --all -t $(git describe --always)    # 3. Build, tag (git commit hash) and push all images (see "images")
      create_deployments --all                          # 4. Deploy Helm charts and manifests specfied as "deployments"

# This is a list of `images` that DevSpace can build for this project
# We recommend to skip image building during development (devspace dev) as much as possible
images:
  app:
    image: my-image-registry.tld/username/app
    dockerfile: ./Dockerfile

# This is a list of `deployments` that DevSpace can create for this project
deployments:
  app:
    # This deployment uses `helm` but you can also define `kubectl` deployments or kustomizations
    helm:
      # We are deploying this project with the Helm chart you provided
      chart:
        name: component-chart
        repo: https://charts.devspace.sh
      # Under `values` we can define the values for this Helm chart used during `helm install/upgrade`
      # You may also use `valuesFiles` to load values from files, e.g. valuesFiles: ["values.yaml"]
      values:
        containers:
          - image: my-image-registry.tld/username/app
        service:
          ports:
            - port: 80

# This is a list of `dev` containers that are based on the containers created by your deployments
dev:
  app:
    # Search for the container that runs this image
    imageSelector: my-image-registry.tld/username/app
    # Replace the container image with this dev-optimized image (allows to skip image building during development)
    devImage: ghcr.io/loft-sh/devspace-containers/php:8-apache
    # Sync files between the local filesystem and the development container
    sync:
      - path: ./
        uploadExcludeFile: .dockerignore
    # Open a terminal and use the following command to start it
    terminal:
      command: ./devspace_start.sh
    # Inject a lightweight SSH server into the container (so your IDE can connect to the remote dev env)
    ssh:
      enabled: true
    # Make the following commands from my local machine available inside the dev container
    proxyCommands:
      - command: devspace
      - command: kubectl
      - command: helm
      - gitCredentials: true
    # Forward the following ports to be able access your application via localhost
    ports:
      - port: 8080:80
    # Open the following URLs once they return an HTTP status code other than 502 or 503
    open:
      - url: http://localhost:8080

# Use the `commands` section to define repeatable dev workflows for this project
commands:
  migrate-db:
    command: |-
      echo 'This is a cross-platform, shared command that can be used to codify any kind of dev task.'
      echo 'Anyone using this project can invoke it via "devspace run migrate-db"'

# Define dependencies to other projects with a devspace.yaml
# dependencies:
#   api:
#     git: https://...  # Git-based dependencies
#     tag: v1.0.0
#   ui:
#     path: ./ui        # Path-based dependencies (for monorepos)
Chạy ứng dụng với devspace
- Config Kubernetes cluster, context
Mình đã có cài đặt từ phần trước: Triển khai Lightweight Kubernetes, sử dụng kubectl, kubectx, kubens command và helm chart môi trường dev
Cần chạy lệnh để lựa chọn context cũng như namespace để tạo ứng dụng trên Kubernetes cluster
devspace use context                  # to select the right Kubernetes cluster
devspace use namespace my-namespace   # will be automatically created during deployment
Mình đã tạo sẵn config với context là viblo-dev, namespace mình đặt là php (devspace sẽ tạo nếu chưa có namespace), nên lệnh sẽ viết như sau:
devspace use viblo-dev
devspace use namespace php
- Chạy dev containter
devspace dev
Chạy lệnh trên tất cả pipelines được định nghĩa trong dev tại file devspace.yaml sẽ được thực thi
# This is a list of `pipelines` that DevSpace can execute (you can define your own)
pipelines:
  # This is the pipeline for the main command: `devspace dev` (or `devspace run-pipeline dev`)
  dev:
    run: |-
      run_dependencies --all       # 1. Deploy any projects this project needs (see "dependencies")
      create_deployments --all     # 2. Deploy Helm charts and manifests specfied as "deployments"
      start_dev app
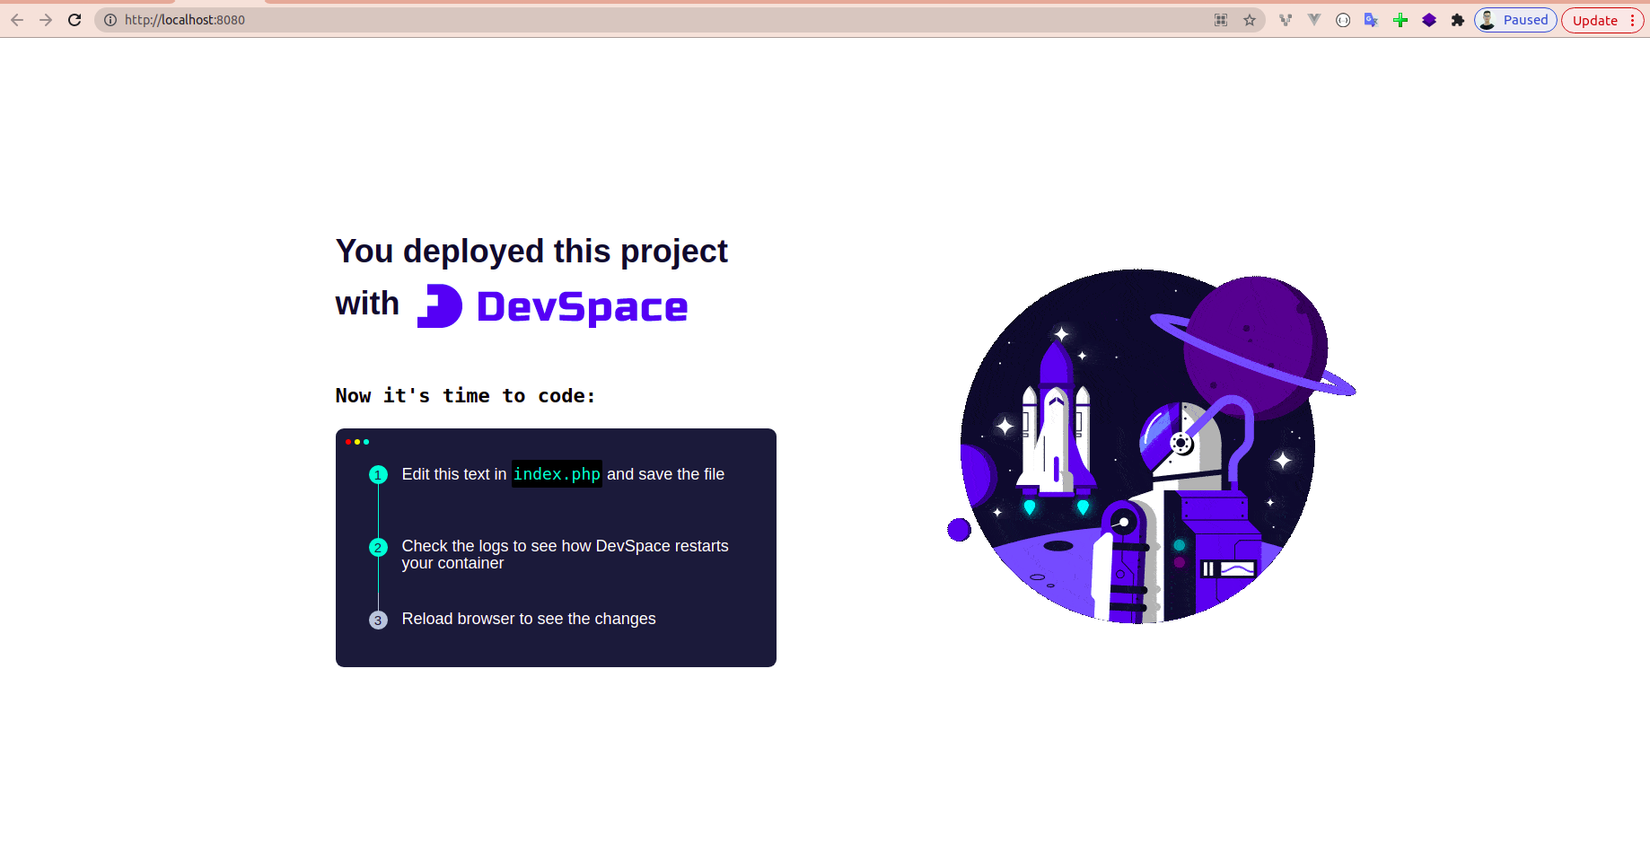
Bây giờ bạn có thể truy cập vào http://localhost:8080/ và xem thành quả 🏁
Customize devspace.yaml và deploy
- Customize
devspace.yaml
- Nội dung
imagestrong filedevspace.yaml:- image: image registry có thể thay thế bằng Dockerhub, Gitlab Registry, self-hosted Registry
- dockerfile: file Dockerfile để build image, file này được tạo ra khi init
DevSpacetheo ngôn ngữ ta lựa chọn
# This is a list of `images` that DevSpace can build for this project
# We recommend to skip image building during development (devspace dev) as much as possible
images:
  app:
    image: my-image-registry.tld/username/app
    dockerfile: ./Dockerfile
- Nội dung
deploymentstrongdevspace.yaml: Có thể thay đổi chart name, chart repo, containter image khi bạn muốn có thêm action deploy. Nếu chỉdevthì bạn không cần thay đổi gì
# This is a list of `deployments` that DevSpace can create for this project
deployments:
  app:
    # This deployment uses `helm` but you can also define `kubectl` deployments or kustomizations
    helm:
      # We are deploying this project with the Helm chart you provided
      chart:
        name: component-chart
        repo: https://charts.devspace.sh
      # Under `values` we can define the values for this Helm chart used during `helm install/upgrade`
      # You may also use `valuesFiles` to load values from files, e.g. valuesFiles: ["values.yaml"]
      values:
        containers:
          - image: my-image-registry.tld/username/app
        service:
          ports:
            - port: 80
- Deploy images, helm chart
devspace deploy
Chạy lệnh trên tất cả pipelines được định nghĩa trong deploy tại file devspace.yaml sẽ được thực thi, bao gồm build, push image và deploy helm chart
  # You can run this pipeline via `devspace deploy` (or `devspace run-pipeline deploy`)
  deploy:
    run: |-
      run_dependencies --all                            # 1. Deploy any projects this project needs (see "dependencies")
      ensure_pull_secrets --all                         # 2. Ensure pull secrets
      build_images --all -t $(git describe --always)    # 3. Build, tag (git commit hash) and push all images (see "images")
      create_deployments --all
Với yêu cầu và đăc thù riêng trong quá trình phát triển dự án. Bạn có thể thay đổi và chỉnh sửa trong file devspace.yaml, Devspace sẽ hot reloading luôn nhé 😄
Cá nhân mình thấyDevSpace hỗ trợ develop và deploy K8s rất hiệu quả, đón chờ các bài viết về DevSpace của mình ở các phần tiếp theo nhé

All rights reserved
