Automated UI Testing in iOS app
Bài đăng này đã không được cập nhật trong 4 năm
Các lập trình viên chắc hẳn đã rất quen thuộc với việc viết unit test, tuy nhiên không hẳn ai cũng đã từng viết UI test cho ứng dụng của mình. Bên cạnh unit test, UI test (integration test) cũng vô cùng quan trọng và là một phần không thể thiếu để tạo nên những sản phẩm tốt.
UI test cũng mang lại những lợi ích không thua kém gì unit test như:
- Giúp chúng ta giảm lượng thời gian thực thi manual test khi phải re-test lại các chức năng đã từng test trước đây
- Giúp test các view controller dễ dàng hơn
- Có thể mô tả chính xác các behaviors của app
- Tự động thực thi các testcase một cách trực quan trên thiết bị test.
Bài viết hôm nay sẽ giới thiệu với các bạn cách viết UI test cơ bản cho một demo app quản lý học sinh, link download starter prject ở đây.
KIT và Nimble framework
KIT framework cung cấp rất nhiều phương thức tiện dụng hỗ trợ cho việc test UI, và Nimble là framework giúp bạn diễn tả testcase dễ hiểu hơn.
Sử dụng cocoapods để cài hai framework này vào project:
target 'StudentsUITestTests' do
    inherit! :search_paths

    pod 'KIF'
    pod 'Nimble'
  end
Tạo helper class cho KIT framework
import KIF

extension XCTestCase {
  func tester(file : String = #file, _ line : Int = #line) -> KIFUITestActor {
    return KIFUITestActor(inFile: file, atLine: line, delegate: self)
  }

  func system(file : String = #file, _ line : Int = #line) -> KIFSystemTestActor {
    return KIFSystemTestActor(inFile: file, atLine: line, delegate: self)
  }
}

extension KIFTestActor {
  func tester(file : String = #file, _ line : Int = #line) -> KIFUITestActor {
    return KIFUITestActor(inFile: file, atLine: line, delegate: self)
  }

  func system(file : String = #file, _ line : Int = #line) -> KIFSystemTestActor {
    return KIFSystemTestActor(inFile: file, atLine: line, delegate: self)
  }
}
UI Test
Tạo file mới trong Test target và đặt tên là LoginTest. Class này phải được thừa kế từ KIFTestCase và các phương thức test đều được bằng đầu bằng từ khoá 'test'.
import KIF

class LoginTest: KIFTestCase {

  func testSomething() {
    tester().tapViewWithAccessibilityLabel("Sign in")
  }

}
Ta đã có thể chạy test case đầu tiên để xem quy trình hoạt động, tuy nhiên do chưa có view nào được đặt accessibility là 'Sign in' nên test fail. Bây giờ, hãy cùng bắt tay vào viết testcase cho demo app.
Các testcase sẽ được mô tả theo scenario sử dụng ngôn ngữ Gherkin. Ta sẽ viết ra các scenario bao gồm điều kiện bắt đầu, các bước thực hiện và kết quả mong đợi, bài viết này sẽ giới thiệu kiến thức cơ bản về test UI cho màn hình Login, ngoài ra KIF còn cung cấp rất nhiều các phương thức khác hỗ trợ cho việc test , các bạn có thể tìm hiểu thêm để hiểu sâu hơn về UI test.
Test Login screen
Scenario 1: Empty username và password
Scenario: Empty username and password
  Given I clear out the username and password fields
  When I tap "Login" button
  Then I expect to see alert "Username cannot be empty"
Sau khi có được scenario, ta cần chuyển scenario trên sang Swift, trong class LoginTest thêm vào function test login:
func testEmptyUsernameAndPassword() {
  clearOutUsernameAndPasswordFields()
  tapButton("Login")
  expectToSeeAlert("Username cannot be empty")
  tapButton("OK")
}
Trong function trên, ta lần lượt đưa ra các bước để tái hiện và kết quả mong đợi. Sau đó, ta cần triển khai các phương thức con như sau:
func clearOutUsernameAndPasswordFields() {
        tester().clearTextFromView(withAccessibilityLabel: "login.username")
        tester().clearTextFromView(withAccessibilityLabel: "login.password")
    }

    func tapButton(_ buttonName: String) {
        tester().tapView(withAccessibilityLabel: buttonName)
    }

    func expectToSeeAlert(_ name: String) {
        tester().waitForView(withAccessibilityLabel: name)
    }
KIF cung cấp rất nhiều phương thức như trên giúp hỗ trợ việc test trở nên dễ dàng hơn.
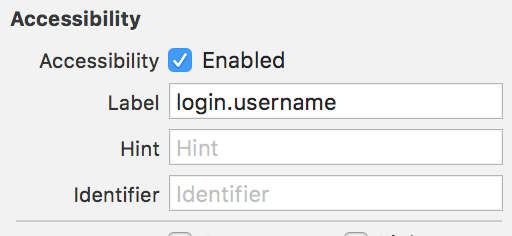
Ngoài ra, ta cần phải đặt accessibility name cho các textfield và button, trong Storyboard > Inspector > Accessibility > Label.
Chạy testcase lên, similator sẽ được mở ra và tự động thực hiện các bước theo như mô tả trong testcase, thú vị đúng không các bạn?
Hãy thực hiện một chút refactor để test class được rõ ràng hơn bằng cách đưa các steps trên vào file LoginSteps:
extension LoginTest {

    func clearOutUsernameAndPasswordFields() {
        tester().clearTextFromView(withAccessibilityLabel: "login.username")
        tester().clearTextFromView(withAccessibilityLabel: "login.password")
    }

    func tapButton(_ buttonName: String) {
        tester().tapView(withAccessibilityLabel: buttonName)
    }

    func expectToSeeAlert(_ name: String) {
        tester().waitForView(withAccessibilityLabel: name)
    }

}
Và bây giờ class LoginTest chỉ bao gồm các test case mà thôi.
Scenario 2: Empty password
Scenario: Empty password
  Given I clear out the username and password fields
  When I fill in username
  And I tap "Login" button
  Then I expect to see alert "Password cannot be empty"
Chuyển sang Swift:
func testEmptyPassword() {
  clearOutUsernameAndPasswordFields()
  fillInUsername()
  tapButton("Login")
  expectToSeeAlert("Password cannot be empty")
  tapButton("OK")
}
func fillInUsername() {
        tester().enterText("abc", intoViewWithAccessibilityLabel: "login.username")
    }
Cả hai testcase trên đều bắt đầu bằng phương thức clearOutUsernameAndPasswordFields() nên ta sẽ đưa nó vào function beforeEach() như sau:
override func beforeEach() {
        clearOutUsernameAndPasswordFields()
    }
Scenario 3: Sai username hoặc password
Scenario: Wrong username or password
  Given I clear out the username and password fields
  When I fill in username
  And I fill in wrong password
  And I tap "Login" button
  Then I expect to see alert "Username or password is incorrect"
Chuyển sang Swift như sau:
func testWrongUsernameOrPassword() {
  fillInUsername()
  fillInWrongPassword()
  tapButton("Login")
  expectToSeeAlert("Username or password is incorrect")
  tapButton("OK")
}
func fillInWrongPassword() {
  tester().enterText("wrongPassword", intoViewWithAccessibilityLabel: "login.password")
}
Scenario 4: Đúng username và password
Scenario: Correct username and password
  Given I clear out the username and password fields
  When I fill in username
  And I fill in correct password
  And I tap "Login" button
  Then I expect to go to home screen
Chuyển sang Swift:
func testCorrectUsernameAndPassword() {
  fillInUsername()
  fillInCorrectPassword()
  tapButton("Login")
  expectToGoToTopScreen()
}
func fillInCorrectPassword() {
  tester().enterText("correctPassword", intoViewWithAccessibilityLabel: "login.password")
}
func expectToGoToTopScreen() {
  // expect login screen to disappear
  tester().waitForAbsenceOfViewWithAccessibilityLabel("login.username")
  tester().waitForAbsenceOfViewWithAccessibilityLabel("login.password")
  tester().waitForAbsenceOfViewWithAccessibilityLabel("Login")

  // expect to see Top screen
  tester().waitForViewWithAccessibilityLabel("Add student")
}
Đến đây, bạn đã có thể hình dung được việc test UI được thực hiện như thế nào rồi đúng không, mặc dù UI test sẽ tốn khá nhiều thời gian để viết, tuy nhiên nó sẽ giúp bạn kiểm soát được chất lượng của sản phẩm về sau và việc maintain cũng trở nên dễ dàng hơn.
All rights reserved
