Automated testing for Terraform
Bài đăng này đã không được cập nhật trong 6 năm
Chắc hẳn trong thời gian gần đây khái niệm automated testing đã dần dần không còn xa lạ gì với giới dev chúng ta. Chúng ta thường nghe thấy automated testing cho backend hay frontend. Vậy còn trong infrastructure thì sao ? Liệu chúng ta có thể áp dụng kĩ thuật automated testing vào trong infrastructure không ?
Trong bài viết này, mình cùng các bạn sẽ cùng nhau tìm hiểu cách mà chúng ta áp dụng automated testing cho infrastructure, cụ thể hơn nữa sẽ là automated testing cho infrastructure as code (IaC). Tool mà mình sử dụng trong bài viết là Terraform. Nếu ai chưa biết về Terrafrom thì Terraform là 1 mã nguồn mở, hỗ trợ rất đắc lực cho việc "infrastructure as Code", được viết bằng Go bởi Hashicorp. Link repo mình sẽ đăt ở đây. Nếu chưa từng làm việc với Terraform thì bạn hãy dàng khoảng 5p để có thể làm quen với Terraform nhé. Sẽ rất thú vị đó !
Tại sao phải triển khai test cho infrastructure
Nếu như bạn đã là người trong thế giới Devops, bạn đã từng là người va vấp với nhiều dự án, bạn sẽ nhận ra được một vấn đề
"The Devops world is full of fear "
- Fear of outages
- Fear of security breaches
- Fear of data loss
- ...
Và tổng quan lại
- Fear of change

Vậy các devops team làm sao để đối mặt với changes.
- Uống say để quên sự đời 🍻
- Deploy ít đi cho đỡ lỗi (so tricky)
Oh no, lúc này automated test mới là solution. Automated test, không thần thánh hóa code của bạn, đơn giản nó giúp bạn tự tin rằng hệ thống infrastructure của bạn sẽ hoạt động được khi bạn deploy với những sự thay đổi
Static analysis
Static analysis là phương thức test mà không tác động đến môi trường. Không deploy lên một môi trường bất kí nào cả
Static analysis có thể đc chia làm 3 loại
- Complier/parser/intepreter: kiểm tra syntax của bạn trước khi Complier/parser/intepreter
- Linter: nâng cấp so với Complier/parser/intepreter. Ngoài việc kiểm tra syntax, linter sẽ có thêm chức năng bắt những lỗi phổ biến
- Dry-run: tiến hành chạy code của bạn "partially" để tính toán những sự tác động và thay đổi (plan) nhưng ko thực hiện việc deploy
Dưới đây sẽ là những tool, built-in CLI ví dụ cho Terraform
| Tool or Command | |
|---|---|
| Complier/parser/intepreter | terraform validate (built-in CLI) |
| Linter | - terraform validate - tflint -conftest |
| Dry-run | terraform plan |
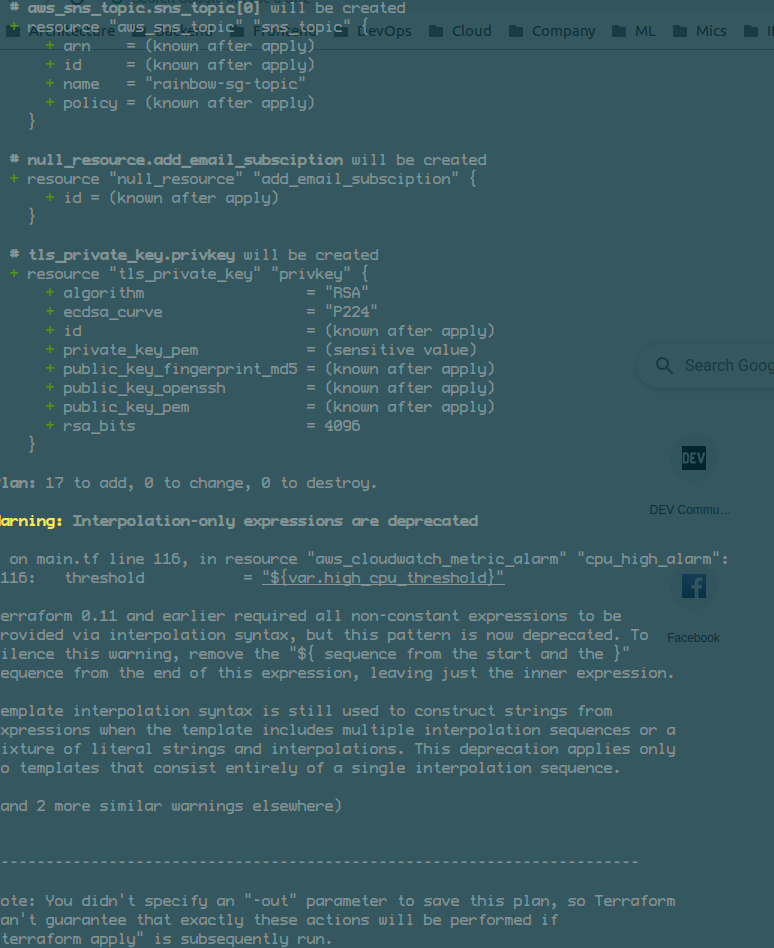
Với Static analysis, bạn chỉ mất một chút thời gian nhỏ để execute. Dưới đây là màn hình output
terraform validate: validate terraform syntax
![]()
terraform plan: show ra những resource nào sẽ change khi tiến hành deploy
Unit test
Unit test, về cơ bản, là việc test 1 đơn vị (unit) bằng cách cô lập đơn vị đó (isolation). Khái niệm unit có thể linh động tùy thuộc vào quyết định thống nhất của team.
Nghe khái niệm thì có vẻ khá là trừu tượng. Với backend hay frontend code, khái niệm unit có thể là function hay 1 class. Tương ứng như vậy, trong infrastructure, 1 unit có thể là module. Module này có thể 1 EC2 instance, 1 S3 bucket hay 1 VPC.
Với frontend code hay backend code, việc isolate code thì khá là dễ dàng bằng việc sử dụng stub, mock hay những kĩ thuật khác. Tuy nhiên, với module trong infrastructure thì đây lại là 1 câu chuyện khác. Bản chất của module hay purpose của 1 module chính là "talking to the world". 1 Lambda function sẽ có ouput là endpoint để có thể invoke function, 1 EC2 instance sẽ có ip address để có thể SSH, 1 Database instance sẽ có endpoint và credential để có thể connect. Nếu cố gắng tách biệt module này để test, chúng ta sẽ ko đạt được điều gì.
Do vậy, cách duy nhất để unit test infrastructure là deploy lên môi trường thật.
Note: Môi trường thật ở đây mình đề cập là môi trường sandbox, chứ ko phải dev, staging hay prod nhé
Chiến lược để thực hiện unit test sẽ như sau
- Deploy real infrastructure
- validate. Việc validate có thể bằng HTTP request, API call, SSH Commands ..
- Destroy the infrastructure
Để ví dụ cho unit test, mình sẽ thưc hiện việc test 1 module nhỏ. Module này sẽ tạo ra 1 EC2 instance, run httpd service ở port 80 và cho phép chúng ta access vào port 80 của instance từ mọi nơi.
Folder structure
. GoPath/src/ec2-unit-test
├── test
│   └── ec2_unit_test.go
├── main.tf
├── ouputs.tf
└── variables.tf
Module EC2 này sẽ 3 variables. Các variables này sẽ đc khai báo ở trong variables.tf
variable "aws_region" {
  description = "AWS region to launch servers."
  default     = "ap-southeast-2"
}

variable "image_id" {
  description = "The EC2 image ID to launch."
  type        = string
  default     = "ami-02a599eb01e3b3c5b"
}

variable "instance_type" {
  description = "EC2 instance type to be lauched. For e.g: t2.micro."
  default     = "t2.micro"
}
Ouput của mình sẽ là public_ip. Ouput này được định nghĩa ở file outputs.tf để có thể sử dụng về sau
output "public_ip" {
  value = aws_instance.example.public_ip
}
Phần logic chính của hệ thống infra nằm ở file main.tf.
provider "aws" {
  region = var.aws_region
}

# website::tag::1:: Deploy an EC2 Instance.
resource "aws_instance" "example" {
  # website::tag::2:: Run an Ubuntu 18.04 AMI on the EC2 instance.
  ami                    = var.image_id
  instance_type          = var.instance_type
  vpc_security_group_ids = [aws_security_group.instance.id]

  # website::tag::3:: When the instance boots, start a web server on port 80 that responds with "Hello, World!".
  user_data = <<EOF
#!/bin/bash
echo "Hello, World!" > index.html
nohup busybox httpd -f -p 80 &
EOF
}

# website::tag::4:: Allow the instance to receive requests on port 80.
resource "aws_security_group" "instance" {
  ingress {
    from_port   = 80
    to_port     = 80
    protocol    = "tcp"
    cidr_blocks = ["0.0.0.0/0"]
  }
}
Ở đây sẽ tạo ra 2 resources:
- Security group: secuirty group này sẽ cho phép mọi connection có thể connect đc port 80 ở EC2 instance
- EC2 instance: EC2 instance với AMI Id và instance type lấy từ variable, link security group đc tạo phía trên, sau đó tạo 1 file html đơn giản và chạy httpd ở port 80
Cuối cùng, khi access vào địa chỉ http://{public_ip}, mình sẽ thấy được dòng chữ "Hello, World!" .Chiến lược test của mình sẽ làm như sau:
- Deploy infrastructure
- Validate bằng cách dùng HTTP request đến
public_ip(public_ipđc get bằng câu lệnhterraform output). Expect của mình sẽ là nhận đc status code là 200 và response body là"Hello, World!" - Destroy infrastructure
Tools: Terratest, cũng đc viết bằng Go, bởi Gruntwork (Rất tiếc NodeJS chưa có package nào hỗ trợ test Terraform nhưng không sao, syntax của Go cũng không có gì là khó đọc cả)
- Khởi tạo 1 file go với suffix là
_testđể test library của Go có thể detect và execute được file test. Ở đây làec2_test.go
// file: ec2_test.go
package test

import (
	"fmt"
	"testing"
	"time"

	http_helper "github.com/gruntwork-io/terratest/modules/http-helper"

	"github.com/gruntwork-io/terratest/modules/terraform"
)

func TestTerraformAwsHelloWorldExample(t *testing.T) {
	t.Parallel()

	terraformOptions := &terraform.Options{
		// website::tag::1:: The path to where our Terraform code is located
		TerraformDir: "../examples/terraform-aws-hello-world-example",
	}

	// website::tag::5:: At the end of the test, run `terraform destroy` to clean up any resources that were created.
	defer terraform.Destroy(t, terraformOptions)

	// website::tag::2:: Run `terraform init` and `terraform apply`. Fail the test if there are any errors.
	terraform.InitAndApply(t, terraformOptions)

	// website::tag::3:: Run `terraform output` to get the IP of the instance
	publicIp := terraform.Output(t, terraformOptions, "public_ip")

	// website::tag::4:: Make an HTTP request to the instance and make sure we get back a 200 OK with the body "Hello, World!"
	url := fmt.Sprintf("http://%s:8080", publicIp)
	http_helper.HttpGetWithRetry(t, url, nil, 200, "Hello, World!", 30, 5*time.Second)
}
Terratest đã cung cấp đầy đủ tính năng để giúp chúng ta thực hiện flow ở trên: deploy -> validate -> destroy.
-
Excute
Để chạy test với go, chúng ta chạy lệnh sau
  cd test
  go test -v ec2_test.go
Kết quả cuối cùng thu được sẽ là như sau
![Unit Test Console With Terratest]()

Key takeway
- Sử dụng namespace để tránh resource conflict. Trong 1 module có thể xảy trường hợp tên cho 1 resource nhất đinh phải unique. Do đó khi design, bạn nên sử dụng tính năng
defaultcủa variable hoặcname_prefixcho resource của bạn. Trong quá trình test, chỉ cần pass variable của bạn vào phần terraform options - Nên split environment riêng cho phần unit test này (sandbox environment). Môi trường này sau mỗi lần execute test nên đc nuke toàn bộ.
- Khi design hệ thống infrastructure nên tiến hành chia nhỏ các module 1 cách hợp lí để dễ dàng unit test
- Unit test nên có running time ngắn (khoảng dưới 5p)
Tham khảo nhiều ví dụ hơn với Terratest tại đây
Integration test
Vậy còn với Integration test thì sao ?
Integration test, là việc test hoạt động của 1 nhóm các module riêng lẻ với nhau
Hãy bắt đầu setup 1 hệ thống CDN đơn giản bao gồm S3 + Cloudfront
Folder structure
. GoPath/src/s3-cdn-integration-test
├── cloudfront
│   ├── main.tf
│   ├── outputs.tf
│   └── variables.tf
├── s3
│   ├── main.tf
│   ├── outputs.tf
│   ├── terraform.tfstate
│   └── variables.tf
└── test
    ├── fixture
    │   └── build
    │       └── index.html
    └── s3_cloudfront_integration_test.go
-
Setup S3 webiste
variables.tf
variable "aws_region" { description = "AWS region to hosting your resources." default = "ap-southeast-2" type = string } variable "app" { description = "Name of your app." type = string } variable "stage" { description = "Stage where app should be deployed like dev, staging or prod." default = "dev" type = string } variable "bucket_regional_domain_name" { description = "S3 Bucker Regional Domain Name" type = string }- Logic của S3 module này sẽ tạo ra 1 bucket và turn on tính nắng host static website. File
main.tf
provider "aws" { region = var.aws_region } resource "aws_s3_bucket" "site_bucket" { bucket = "${var.app}-site-bucket--stage-${var.stage}" acl = "public-read" policy = <<EOF { "Version": "2008-10-17", "Statement": [ { "Sid": "PublicReadForGetBucketObjects", "Effect": "Allow", "Principal": { "AWS": "*" }, "Action": "s3:GetObject", "Resource": "arn:aws:s3:::${var.app}-site-bucket--stage-${var.stage}/*" } ] } EOF tags = { APP = "${var.app}" STAGE = "${var.stage}" } versioning { enabled = var.enable_versioning } website { index_document = "${var.index_page}" error_document = "${var.error_page}" } } # Sync artifact to s3 bucket resource "null_resource" "upload_web_resouce" { provisioner "local-exec" { command = "aws s3 sync ${var.artifact_dir} s3://${var.app}-site-bucket--stage-${var.stage}" } depends_on = ["aws_s3_bucket.site_bucket"] }- Ouput của module sẽ là
bucket_regional_domain_namecủa S3 bucket. Chúng ta sẽ dùng output này như là variable để pass vào input cho phần setup CDN. Fileoutputs.tf
output "bucket_regional_domain_name" { value = aws_s3_bucket.site_bucket.bucket_regional_domain_name description = "S3 bucket regional domain name" } -
Setup CDN với Cloudfront
- Module CDN này sẽ có những variables như sau. Đặc biệt,
bucket_regional_domain_namenày sẽ được lấy ra từ output của S3 module ở phía trên
variable "aws_region" { description = "AWS region to hosting your resources." default = "ap-southeast-2" type = string } variable "app" { description = "Name of your app." type = string } variable "stage" { description = "Stage where app should be deployed like dev, staging or prod." default = "dev" type = string } variable "bucket_regional_domain_name" { description = "S3 Bucker Regional Domain Name" type = string }- Logic của module CDN sẽ đơn giản là tạo mới 1 CDN, có orgin là S3 được tạo ở phía trên. Domain name của CDN này sẽ do AWS cung cấp. File
main.tf
provider "aws" { region = var.aws_region } resource "aws_cloudfront_origin_access_identity" "origin_access_identity" { comment = "" } resource "aws_cloudfront_distribution" "s3_distribution" { origin { domain_name = var.bucket_regional_domain_name origin_id = "s3-${var.app}--stage-${var.stage}" s3_origin_config { origin_access_identity = "${aws_cloudfront_origin_access_identity.origin_access_identity.cloudfront_access_identity_path}" } } enabled = true is_ipv6_enabled = true comment = "" default_root_object = "index.html" default_cache_behavior { allowed_methods = ["DELETE", "GET", "HEAD", "OPTIONS", "PATCH", "POST", "PUT"] cached_methods = ["GET", "HEAD"] target_origin_id = "s3-${var.app}--stage-${var.stage}" forwarded_values { query_string = false cookies { forward = "none" } } viewer_protocol_policy = "allow-all" min_ttl = 0 default_ttl = 3600 max_ttl = 86400 } restrictions { geo_restriction { restriction_type = "none" } } viewer_certificate { cloudfront_default_certificate = true } }- Output sẽ là
domain_namecủa Cloudfront để chúng ta có thể tiến hành test.
output "domain_name" { value = aws_cloudfront_distribution.s3_distribution.domain_name description = "CDN domain name" } - Module CDN này sẽ có những variables như sau. Đặc biệt,
Để implement test integration, chúng ta sẽ tiếp tục sử dụng Terratest
Chiến lược integration test sẽ như sau:
- Deploy s3 website module
- Get
bucket_regional_domain_namevariable - Deploy cdn module with
bucket_regional_domain_nameoutput from s3 website module as params - Validate cdn by calling HTTP request. Expectation is status code 200, body: "Hello, World!"
- Undeploy all environments (including s3 and cdn)
- Triển khai test file
package test

import (
	"testing"
	"time"

	http_helper "github.com/gruntwork-io/terratest/modules/http-helper"

	"github.com/gruntwork-io/terratest/modules/terraform"
)

func TestTerraformAwsHelloWorldExample(t *testing.T) {
	s3TerraformOpts := &terraform.Options{
		TerraformDir: "../s3",
		Vars: map[string]interface{}{
			"app":          "hello-world",
			"stage":        "dev",
			"index_page":   "index.html",
			"error_page":   "index.html",
			"artifact_dir": "/home/haidv/go/src/automated-testing-for-terraform/s3-cdn-integration-test/test/fixture/build", //FIXME: please resolve the path to build folder
		},
	}
	defer terraform.Destroy(t, s3TerraformOpts)
	terraform.InitAndApply(t, s3TerraformOpts)

	bucketRegionalDomainName := terraform.Output(t, s3TerraformOpts, "bucket_regional_domain_name")

	cdnTerraformOpts := &terraform.Options{
		TerraformDir: "../cloudfront",
		Vars: map[string]interface{}{
			"app":                         "hello-world",
			"stage":                       "dev",
			"bucket_regional_domain_name": bucketRegionalDomainName,
		},
	}
	defer terraform.Destroy(t, cdnTerraformOpts)
	terraform.InitAndApply(t, cdnTerraformOpts)

	url := terraform.Output(t, cdnTerraformOpts, "domain_name")
	http_helper.HttpGetWithRetry(t, url, nil, 200, "Hello, World!", 30, 15*time.Second)
}
- Excute test file
Ở đây, mình phải set timeout cho test vì mặc định test của go sẽ có timeout là 10 phút. Để tạo 1 Cloudfront hoàn chỉnh số thời gian này cần lâu hơn nên chúng ta cần override timeout ở đâygo test -v -timeout 99999s s3_cloudfront_integration_test.go
Và cuối cùng, các bạn sẽ nhìn thấy kết quả như phần unit test
End to end test
Với end-to-end test là 1 test khá phức tạp và mất nhiều thời gian. Nếu chúng ta áp dụng chiến lược của unit test và integration test vào end-to-end-test, chúng ta sẽ có thể mất đến hằng giờ để deploy, validate và destroy môi trường sandbox. Do đó, chiến lược này là hoàn toàn không khả thi.
Dưới đây là testing pyramid (kim tự tháp testing)

Để end-to-end test 1 cách hiệu quả và tiết kiệm thời gian nhất cũng như đáp ứng nguyên tắc của kim tự tháp testing, phương pháp tiếp cận sẽ như sau
- Deploy toàn bộ hệ thống và đảm bảo hệ thống này ổn định
- Mỗi khi 1 module đc change, chỉ thực hiện việc deploy module này
- Tiến hành chạy end-to-end test (concept sẽ giống với integration nhưng chúng ta ko destroy infra sau khi test)
Reference
All rights reserved
