Appium With Selenium Grid 4
Bài đăng này đã không được cập nhật trong 2 năm
Test automation việc chạy parallel là cần thiết với số lượng test case lớn. Với test automation UI, API việc setup chạy parallel khá là dễ dàng do PC hoặc laptop đã có sẵn server (chrome, firefox, Edge, safari,...) run test.
Nhưng khi test appium vấn đề lớn nhất là việc chuẩn bị môi trường run parallel là môi trường chạy parallel như nào để 2 hoặc nhiều thiết bị có thể cùng kết nối vào 1 server appium, hay làm cách nào để framework của mình có thể connect được nhiều server appium.
Chém gió đủ rồi đi vào giải quyết vấn đề thôi 
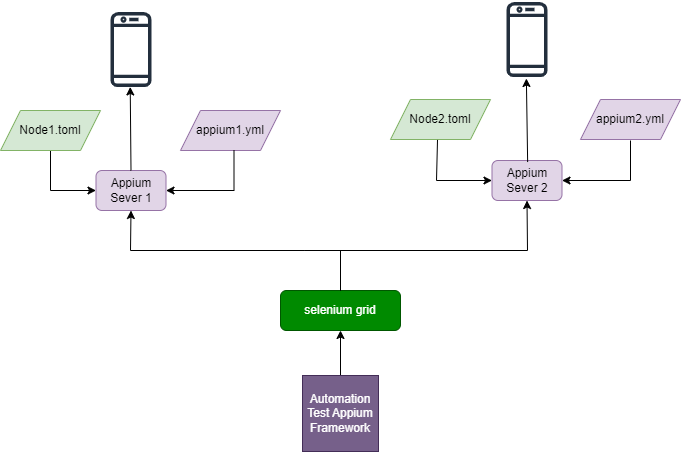
Mobile Device Lab Architecture

Ở ảnh phía trên chúng ta có 2 devices tương đương với 2 node. Mỗi 1 node config với một file ".toml". Mỗi 1 devices được điều khiển bằng 1 appium server và mỗi appium server được cấu hình bằng file ".xml". Tất cả các node connect với selenium grid (hub). Trong code, URL trình điều khiển sẽ là URL của Hub. HUB sẽ phân phối tất cả các yêu cầu đến các node/device, nhận phản hồi từ các node/device. Code test của chúng nó sẽ kết nối đến địa chỉ hub của selenium grid và thực hiện parallel theo từng dự án.
Pre-requisites
- Install appium >=2.0.0
- 2 devices (Android or iOS)
Install Selenium Grid for Appium Parallel Testing
Selenium Grid là một thành phần của Selenium và cho phép bạn mở rộng quy mô test bằng cách phân phối chúng trên một số device. Download selenium grid lastest về máy. selenium-server
Cấu hình appium config
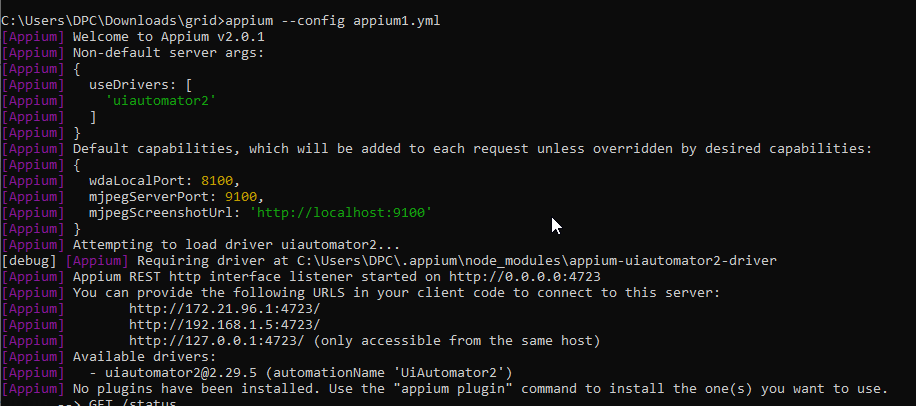
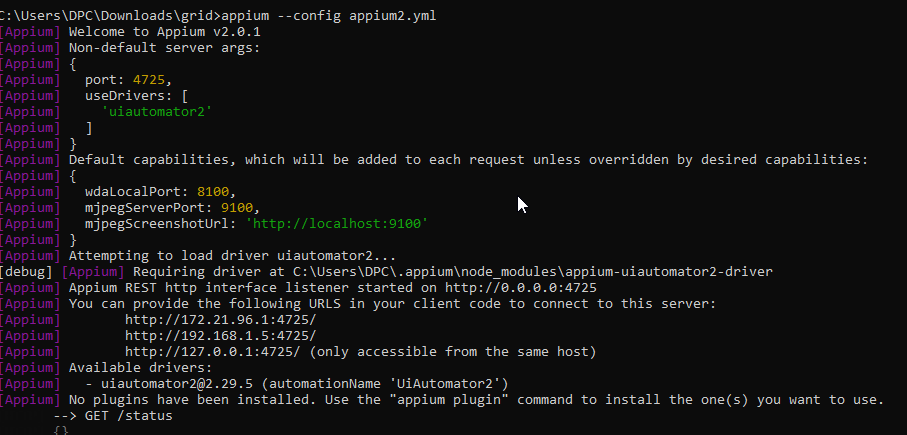
Ở đây chúng ta cần kết nối 2 devices nên cần 2 server appium. Mỗi server được cấu hình trên 1 file yaml để dễ dàng cho việc quản lý. Lưu ý mỗi server có port khác nhau để tránh gây xung đột.
Config Server Appium 1
# appium1.yml
server:
  port: 4723
  use-drivers:
    - uiautomator2
  default-capabilities:
    wdaLocalPort: 8100
    mjpegServerPort: 9100
    mjpegScreenshotUrl: "http://localhost:9100"
Config Server Appium 2
# appium2.yml
server:
  port: 4725
  use-drivers:
    - uiautomator2
  default-capabilities:
    wdaLocalPort: 8110
    mjpegServerPort: 9100
    mjpegScreenshotUrl: "http://localhost:9100"
Cấu hình Grid node
Mỗi 1 devices chúng ta cấu hình chúng bằng 1 file toml, trong file này mỗi file có port riêng ứng với số port trên node. URL ứng với server appium vừa tạo ở trên. Các thông số config tương ứng với capabilities khi kết nối devices với appium.
#node-emulator1.toml
[server]
port = 5559

[node]
detect-drivers = false

[relay]
url = "http://172.21.96.1:4723"
status-endpoint = "/status"
configs = [
    "1", "{\"platformName\": \"Android\", \"appium:platformVersion\": \"13\",\"appium:deviceName\": \"Pixel 4 API 33\", \"appium:automationName\": \"uiautomator2\"}"
]
#node-emulator2.toml
[server]
port = 5561

[node]
detect-drivers = false

[relay]
url = "http://172.21.96.1:4725"
status-endpoint = "/status"
configs = [
    "1", "{\"platformName\": \"Android\", \"appium:platformVersion\": \"12\",\"appium:deviceName\": \"Pixel 4 API 33\", \"appium:automationName\": \"uiautomator2\"}"
]
Lưu ý: Nên lưu tất cả các file vào cùng thư mục như hình bên dưới.

Tận hưởng thành quả
Mỗi một lệnh bên dưới là một session khác nhau. Vì vậy, cuối cùng chúng ta sẽ có 5 quy trình chạy cùng lúc: 2 máy chủ Appium, 2 Grid Node và 1 Grid Hub .
Run server appium 1
appium --config appium1.yml

Run server appium 2
appium --config appium2.yml

Run selenium grid hub
java -jar selenium-server-4.15.0.jar hub

Run selenium grid Node 1
java -jar selenium-server-4.15.0.jar node --config node-emulator1.toml

Run selenium grid Node 2
java -jar selenium-server-4.15.0.jar node --config node-emulator2.toml

Sau khi chạy cả 5 tiến trình ta truy cập http://localhost:4444 để tận hưởng thành quả
Tada 

Vậy là việc setup Grid đã thành công. Việc của các bạn bây giờ là kết nối Grid HUB với dự án của bạn và thực hiện parallel. Good luck 
Reference
https://appium.io/docs/en/2.1/guides/grid/ https://www.swtestacademy.com/appium-parallel-tests-on-multiple-emulators/
All rights reserved