API Authentication sử dụng JWT trong Laravel
Bài đăng này đã không được cập nhật trong 4 năm
Giới thiệu
Hôm nay mình xin giới thiệu tới các bạn một ví dụ về API Authentication trong Laravel sử dụng JWT. Đây là một ví dụ mà mình thấy khá hữu ích trong việc xác thực người dùng trong các ứng dụng web.
JSON Web Token là gì?
JSON Web Token (JWT) là một tiêu chuẩn mở (RFC 7519) định nghĩa một cách nhỏ gọn và an toàn để truyền tải thông tin giữa các bên một cách an toàn dưới dạng 1 đối tượng JSON . Các thông tin này được xác thực và có độ tin cậy cao vì nó có chứa chữ ký số (digital signature).
Câu hỏi đặt ra là khi nào bạn nên sử dụng JSON Web Tokens? Authentication. Khi người dùng đã đăng nhập vào hệ thống, thì những request tiếp theo của người dùng gửi lên sẽ phải bao gồm JWT token. Nếu JWT token đó có quyền thì người dùng mới được truy cập các dịch vụ, tài nguyên và tương tác với cơ sở dữ liệu. JSON Web Tokens là cách tốt nhất để trao đổi thông tin giữa các bên một cách an toàn. JWT cho phép tất cả các đặc tính này áp dụng cho API Authentication và thường được đặt trong HTTP Authorization headers.
Sử dụng JWT là cách tốt để áp dụng cơ chế bảo mật đối với các dịch vụ API RESTful mà có thể được sử dụng để truy cập vào cơ sở dữ liệu của bạn.
JSON Web Tokens hoạt động như thế nào?
Trong quá trình xác thực, người dùng đăng nhập thành công bằng cách sử dụng các thông tin của họ (email or username, password), JSON Web Token sẽ được trả lại và phải được lưu lại dưới local (thường là trong local storage, nhưng có lúc cookie cũng có thể được sử dụng) thay vì cách truyền thống là tạo ra một session trên server và trả lại cookie.
Bất cứ khi nào người dùng muốn truy cập vào route hoặc tài nguyên cần có quyền, họ phải gửi JWT trong Authorization header sử dụng Bearer schema như sau:
Authorization: Bearer <token>
Để có cái nhìn sâu sắc hơn về cấu trúc, cơ chế hoạt động, đặc điểm nổi trội của JWT, bạn có thể tìm hiểu thêm tại đây.
Cài đặt package JWT
composer require tymon/jwt-auth
Cập nhật file config/app.php
'providers' => [
	....
	Tymon\JWTAuth\Providers\JWTAuthServiceProvider::class,
],
'aliases' => [
	....
	'JWTAuth' => Tymon\JWTAuth\Facades\JWTAuth::class,
],
Bây giờ tiến hành publish file config JWT. Khi publish thành công, bạn sẽ thấy file config/jwt.php được tạo mới. Để publish file config trong Laravel, bạn chạy command line sau đây:
php artisan vendor:publish --provider="Tymon\JWTAuth\Providers\JWTAuthServiceProvider"
Để mã hóa token, chúng ta cần tạo ra secret key:
php artisan jwt:generate
Sau khi chạy command này, secret key sẽ được tự động lưu vào file config/jwt.php đã được tạo bên trên.
Thêm route
Trong bước này, chúng ta sẽ khai báo các route để đăng ký, đăng nhập và lấy thông tin người dùng bằng cách sử dụng token. File routes/api.php
Route::post('auth/register', 'UserController@register');
Route::post('auth/login', 'UserController@login');
Route::group(['middleware' => 'jwt.auth'], function () {
    Route::get('user-info', 'UserController@getUserInfo');
});
Các bước chính của bài viết này sẽ là tạo ra JWTs ở backend, truyền sang frontend, sau đó truyền token được tạo ra trong các request đến API. Ok, bây giờ mình sẽ tạo middleware để kiểm tra xem token có hợp lệ hay không và xử lý ngoại lệ nếu token hết hạn.
php artisan make:middleware VerifyJWTToken
Sử dụng middleware này, bạn có thể lọc các request và validate JWT token. Bây giờ, mở file VerifyJWTToken trong middleware của bạn lên, và code thôi: app/Http/Middleware/VerifyJWTToken.php
<?php

namespace App\Http\Middleware;

use Closure;
use JWTAuth;
use Tymon\JWTAuth\Exceptions\JWTException;
use Symfony\Component\HttpKernel\Exception\UnauthorizedHttpException;

class VerifyJWTToken
{
    /**
     * Handle an incoming request.
     *
     * @param  \Illuminate\Http\Request  $request
     * @param  \Closure  $next
     * @return mixed
     */
    public function handle($request, Closure $next)
    {
        try {
            $user = JWTAuth::toUser($request->input('token'));
        }catch (JWTException $e) {
            if($e instanceof \Tymon\JWTAuth\Exceptions\TokenExpiredException) {
                return response()->json(['token_expired'], $e->getStatusCode());
            }else if ($e instanceof \Tymon\JWTAuth\Exceptions\TokenInvalidException) {
                return response()->json(['token_invalid'], $e->getStatusCode());
            }else{
                return response()->json(['error'=>'Token is required']);
            }
        }
        return $next($request);
    }
}
Nội dung của middleware trên chỉ đơn giản là kiểm tra xem token mà request truyền lên có được JWTAuth xác minh hay không. Nếu không thì exception sẽ được xử lý đúng với trạng thái của nó. Giờ ta phải khai báo middleware trong Kernel để nó chạy trong tất cả các HTTP request. app/Http/Kernel.php
 protected $routeMiddleware = [
        ...
        'jwt.auth' => \App\Http\Middleware\VerifyJWTToken::class,
        ...
Tạo UserController
Tạo UserController đã khai báo trong route. app/Http/Controllers/UserController.php
<?php
namespace App\Http\Controllers;

use App\User;
use App\Http\Controllers\Controller;
use Illuminate\Http\Request;

class UserController extends Controller
{
    private $user;

    public function __construct(User $user){
        $this->user = $user;
    }
}
Tiếp theo, chúng ta cần viết 3 function register(), login(), getUserInfo() để xử lý các action đăng ký, đăng nhập, lấy thông tin chi tiết user.
Đăng ký
public function register(Request $request){
        $user = $this->user->create([
          'name' => $request->get('name'),
          'email' => $request->get('email'),
          'password' => Hash::make($request->get('password'))
        ]);

        return response()->json([
            'status'=> 200,
            'message'=> 'User created successfully',
            'data'=>$user
        ]);
    }
Đăng nhập
public function login(Request $request){
        $credentials = $request->only('email', 'password');
        $token = null;
        try {
           if (!$token = JWTAuth::attempt($credentials)) {
            return response()->json(['invalid_email_or_password'], 422);
           }
        } catch (JWTAuthException $e) {
            return response()->json(['failed_to_create_token'], 500);
        }
        return response()->json(compact('token'));
    }
Lấy thông tin user
public function getUserInfo(Request $request){
        $user = JWTAuth::toUser($request->token);
        return response()->json(['result' => $user]);
    }
Toàn bộ source code của UserController:
<?php
namespace App\Http\Controllers;

use App\Http\Controllers\Controller;
use App\User;
use Illuminate\Http\Request;
use JWTAuth;
use JWTAuthException;
use Hash;

class UserController extends Controller
{
    private $user;

    public function __construct(User $user){
        $this->user = $user;
    }

    public function register(Request $request){
        $user = $this->user->create([
          'name' => $request->get('name'),
          'email' => $request->get('email'),
          'password' => Hash::make($request->get('password'))
        ]);

        return response()->json([
            'status'=> 200,
            'message'=> 'User created successfully',
            'data'=>$user
        ]);
    }

    public function login(Request $request){
        $credentials = $request->only('email', 'password');
        $token = null;
        try {
           if (!$token = JWTAuth::attempt($credentials)) {
            return response()->json(['invalid_email_or_password'], 422);
           }
        } catch (JWTAuthException $e) {
            return response()->json(['failed_to_create_token'], 500);
        }
        return response()->json(compact('token'));
    }

    public function getUserInfo(Request $request){
        $user = JWTAuth::toUser($request->token);
        return response()->json(['result' => $user]);
    }
}
Kết quả
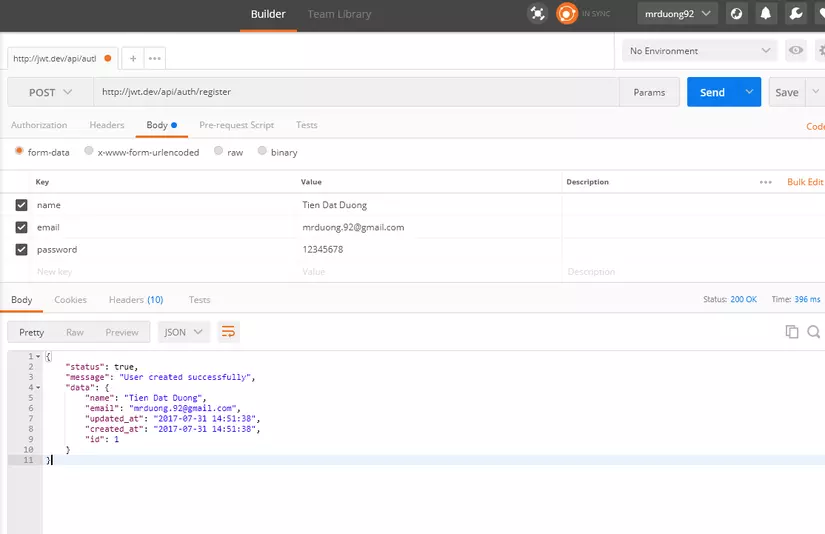
Nào, giờ chúng ta hãy check API response bằng Postman.
Đăng ký

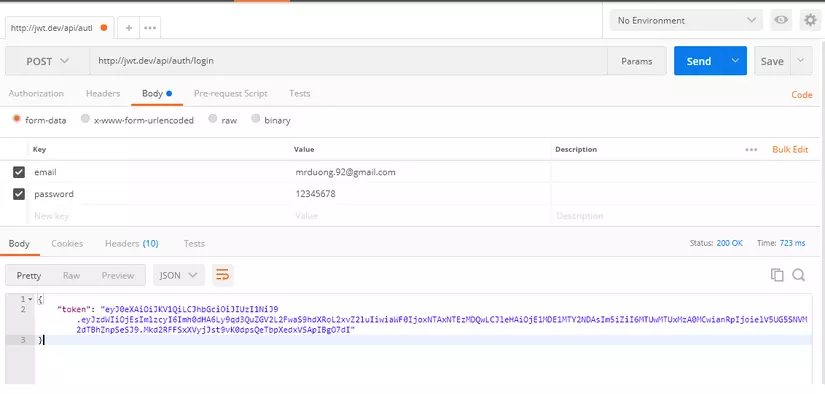
Đăng nhập
 Sau khi đăng nhập thành công, ta sẽ nhận được JWT token. Ví dụ của mình sẽ có dạng như này:
{
    "token": "eyJ0eXAiOiJKV1QiLCJhbGciOiJIUzI1NiJ9.eyJzdWIiOjEsImlzcyI6Imh0dHA6Ly9qd3QuZGV2L2FwaS9hdXRoL2xvZ2luIiwiaWF0IjoxNTAxNTEzMDQwLCJleHAiOjE1MDE1MTY2NDAsIm5iZiI6MTUwMTUxMzA0MCwianRpIjoielV5UG5SNVM2dTBhZnpSeSJ9.Mkd2RFFSxXVyjJst9vK0dpsQeTbpXedxVSApIBgO7dI"
}
Nếu bạn để ý kỹ thì JWT token mà chúng ta có được bao gồm 3 thành phần chính, phân cách nhau bởi dấu dot (.), đó là:
- Header
- Payload
- Signature
Bạn có thể tìm hiểu sâu hơn về 3 thành phần này của JWT Token tại bài viết đã có trên Viblo tại đây.
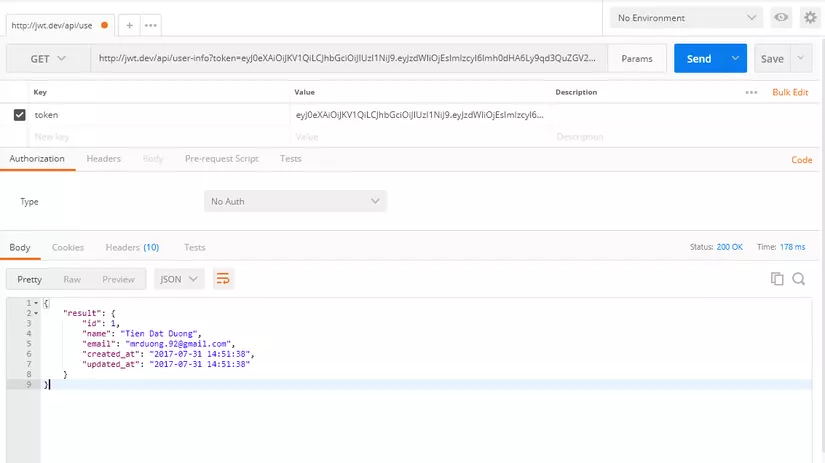
Lấy thông tin user
 Việc lấy thông tin user cũng rất đơn giản. Chúng ta chỉ cần truyền thêm token đã nhận được sau khi login để xác thực và nhận về thông tin user.
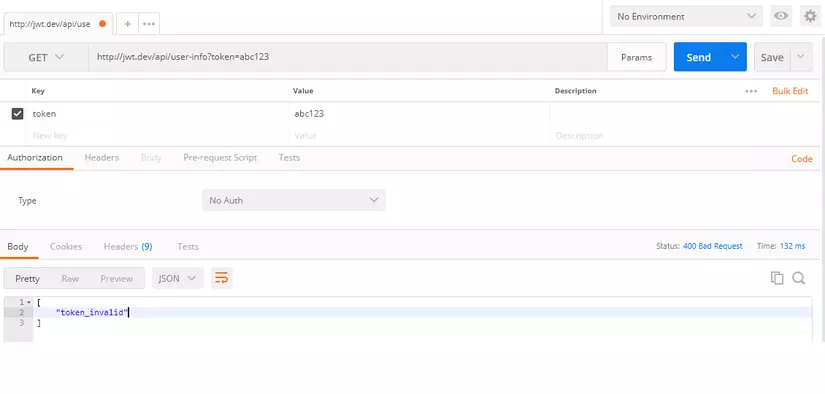
Nếu bạn truyền sai token, thì sẽ nhận được kết quả token_invalid như thế này:

Và như vậy, chúng ta đã có 1 REST API Services để xác thực người dùng với JWT trong Laravel 5.4.
Tham khảo: https://jwt.io/introduction/ https://github.com/tymondesigns/jwt-auth/wiki/Authentication https://viblo.asia/p/tim-hieu-ve-json-web-token-jwt-7rVRqp73v4bP https://viblo.asia/p/huong-dan-su-dung-jwt-token-voi-laravel-p1-WrJvYXjXkVO https://www.toptal.com/web/cookie-free-authentication-with-json-web-tokens-an-example-in-laravel-and-angularjs http://www.expertphp.in/article/api-authentication-using-jwt-in-laravel-5-4-tutorial-with-example
All rights reserved