[Android Wear]: Xây dựng Android Wear watch face!
Bài đăng này đã không được cập nhật trong 4 năm
Qua 2 bài viết đầu tiên về Android wear, đã có cái nhìn tổng quan cũng như cách xây dựng một ứng dụng cơ bản với Android wear. Bài viết này sẽ hướng dẫn chi tiết hơn về cách việc xây dựng Android watch face hiển thị dữ liệu theo thời gian thực. Tutorial về việc này sẽ chia làm nhiều part. Trước mắt chúng ta sẽ tìmf hiểu sơ lược về những khái niệm cơ bản, những cách thức để nhận nguồn dữ liệu cơ bản cần thiết cho yêu cầu của app.
Watch face
Watch face có thể hiểu là giao diện chính của Android Wear device. Nó cung cấp thông tin người dùng theo ngữ cảnh như thời gian, ngày tháng, thời tiết và nhiệt độ "trong nháy mắt" cho người dùng. Hơn nữa, các mặt đồng hồ cũng phải cung cấp cho các thông báo hệ thống, biểu tượng trạng thái ... Chúng ta sẽ tìm hiểu chi tiết hơn ở part sau.
The Weather Data
Chúng ta sẽ sử dụng Open Weather api để lấy dữ liệu về thời tiết. Đây là môt API khá chi tiết bao gồm các thông tin như mặt trời mọc, mặt trời lặn, nhiệt độ và thông tin thời tiết để hiển thị các icon trạng thái thời tiết.
Phone
Wear device không thể tự bản thân nó kết nối internet và lấy dữ liệu. Nó cần phải kết nối với device để gửi và nhận dữ liệu. Trong phần này chúng ta sẽ tạo 1 android service để làm việc với watch face app. Service sẽ kết nối đến API để lấy dữ liệu mới nhất về thời tiết và notify đến Wear device dể xử lý và hiển thị.
Tạo Watch face service
WatchFaceService là base class của Android watch faces. Có 2 kiểu WatchFace service có thể extend để tạo một custom watch face:
CanvasWatchFaceService sử dụng canvas để render watch face.
Gles2WatchFaceService support tính năng OpenGL ES 2.0 để render 3D.
Trong ứng dụng này chúng ta sẽ sử dụng CanvasWatchFaceService để render dữ liệu trong app.
Tạo class WeatherWatchFaceService kế thừa từ CanvasWatchFaceService trong wear module. Tạo subclass extends CanvasWatchFaceService.Engine.
public class WeatherWatchFaceService extends CanvasWatchFaceService {
    @Override
    public Engine onCreateEngine() {
        return new Engine();
    }

    private class Engine extends CanvasWatchFaceService.Engine {
    }
}
Override onDraw function và sử dụng canvas để draw lại current time ở giữa màn hình.
private class Engine extends CanvasWatchFaceService.Engine {

    Paint mTextPaint;
    Float mTextXOffset;
    Float mTextYOffset;

    @Override
    public void onCreate(SurfaceHolder holder) {
        super.onCreate(holder);

        // Create the Paint for later use
        mTextPaint = new Paint();
        mTextPaint.setTextSize(40);
        mTextPaint.setColor(Color.WHITE);
        mTextPaint.setAntiAlias(true);

        // In order to make text in the center, we need adjust its position
        mTextXOffset = mTextPaint.measureText("12:00") / 2;
        mTextYOffset = (mTextPaint.ascent() + mTextPaint.descent()) / 2;
    }

    @Override
    public void onDraw(Canvas canvas, Rect bounds) {
        canvas.drawText("12:00",
                bounds.centerX() - mTextXOffset,
                bounds.centerY() - mTextYOffset,
                mTextPaint);
    }
}
Configure AndroidManifest.xml
Step 1: Tạo file watch_face.xml trong xml folder!
<?xml version="1.0" encoding="UTF-8"?>
<wallpaper xmlns:android="http://schemas.android.com/apk/res/android" />
Step 2: Configure AndroidManifest.xml
Add a service element vào manifest file.
<manifest xmlns:android="http://schemas.android.com/apk/res/android"
    package="com.mycomany.mywatchface" >

    <uses-feature android:name="android.hardware.type.watch" />

    <uses-permission android:name="com.google.android.permission.PROVIDE_BACKGROUND" />
    <uses-permission android:name="android.permission.WAKE_LOCK" />

    <application
        android:allowBackup="true"
        android:icon="@drawable/ic_launcher"
        android:label="@string/app_name"
        android:theme="@android:style/Theme.DeviceDefault" >

        <service
            android:name=".WeatherWatchFaceService"
            android:label="Weather"
            android:allowEmbedded="true"
            android:permission="android.permission.BIND_WALLPAPER" >
            <meta-data
                android:name="android.service.wallpaper"
                android:resource="@xml/watch_face" />
            <meta-data
                android:name="com.google.android.wearable.watchface.preview"
                android:resource="@drawable/preview" />
            <meta-data
                android:name="com.google.android.wearable.watchface.preview_circular"
                android:resource="@drawable/preview_circular" />
            <intent-filter>
                <action android:name="android.service.wallpaper.WallpaperService" />
                <category android:name="com.google.android.wearable.watchface.category.WATCH_FACE" />
            </intent-filter>
        </service>
    </application>
</manifest>
Tiếp theo là...run app và xem kết quả nhận được.
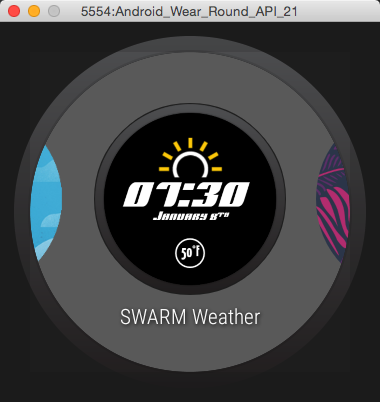
Tổng kết: Qua tutorial này chúng ta đã có những hiểu biết cơ bản vể việc sử dụng canvas render ra dữ liệu trong watch face. Trong bài viết sau sẽ lần lượt tiếp tục các bước tìm hiểu rõ hơn về The Watch Interface cũng như cách implement real time data.
All rights reserved
