Android - Chọn ảnh từ camera hoặc gallery và thực hiện cắt ảnh
Bài đăng này đã không được cập nhật trong 7 năm
Bài này mình dịch từ bài viết Android choosing Image from Camera / Gallery with Crop Functionality trên www.androidhive.info,các bạn có thể vào link này để xem bài viết đầy đủ.
GIỚI THIỆU
Việc chọn ảnh từ camera hay bộ sưu tập (gallery) là một tính năng hay thấy trong các ứng dụng hiện nay, ví dụ như một ứng dụng mạng xã hội cần một ảnh để làm profile cá nhân. Tuy nhiên đôi lúc người dùng không muốn lấy ảnh đầy đủ mà chỉ cần cắt và lấy ra khu vực nào đó trong ảnh thôi.
Vì vậy trong bài này, chúng ta sẽ cùng xây dựng màn hình profile của một ứng dụng mạng xã hội đơn giản, ở đây người dùng có thể chọn ảnh từ camera hoặc gallery, sau đó có thể thực hiện cắt và một số biến đổi khác.
Link demo (androidhive.info): https://www.youtube.com/watch?v=8CgZd1d9ujc
BẮT ĐẦU NÀO
1. uCrop - cropping library
Chúng ta sẽ sử dụng thư viện uCrop. Thư viện này được sử dụng rất phổ biến trong nhiều app và hoạt động tốt trên nhiều thiết bị/ hệ điều hành khác nhau.
Mặc dù thư viện này cung cấp chức năng cắt ảnh rất tốt, nhưng nó lại không cung cấp khả năng chọn ảnh từ camera hoặc gallery, nó chỉ nhận đầu vào là 1 bitmap và cho ra 1 bitmap sau khi đã cắt.
Vì vậy, chúng ta cần xây dựng một tính năng chọn ảnh và sử dụng tính năng cắt ảnh của uCrop.
2. Chuẩn bị
Trong bài này chúng ta sẽ cần những thứ sau:
- Dexter: Là một lib giúp việc request quyền ở Runtime trở nên đơn giản hơn
- ButterKnife: Lib giúp việc liên kết view với các đối tượng của nó trở nên dễ dàng hơn bằng các annotation thay vì phải dùng findViewById() như trước đây
- Glide: Là một lib giúp việc load ảnh vào view trở nên nhanh chóng nhờ vào các cơ chế như lưu cache, tự decode ảnh,...
- CircularImageView: Một image view dạng tròn, chúng ta sẽ dùng nó để hiển thị ảnh profile
- uCrop: Lib giúp xử lý việc cắt ảnh như đã nói ở trên
Tiến hành tạo một project mới với Basic Activity và thêm vào đoạn mã sau trong file build.gradle level app:
dependencies {

  //...

  //Butterknife
  implementation 'com.jakewharton:butterknife:8.8.1'
  annotationProcessor 'com.jakewharton:butterknife-compiler:8.8.1'

  //dexter permissions
  implementation "com.karumi:dexter:5.0.0"

  // circular imageview
  implementation 'com.mikhaellopez:circularimageview:3.2.0'

  //Glide
  implementation 'com.github.bumptech.glide:glide:4.7.1'
  implementation 'com.github.bumptech.glide:annotations:4.7.1'
  implementation('com.github.bumptech.glide:okhttp3-integration:4.0.0') {
      exclude group: 'glide-parent'
  }
  annotationProcessor 'com.github.bumptech.glide:compiler:4.7.1'

  // UCrop
  implementation 'com.github.yalantis:ucrop:2.2.2'
Nhớ thêm maven { url "https://jitpack.io" } vào build.gradle level project để tích hợp uCrop nha.
- Thêm resoure bằng cách tải thư mục res và thêm nó vào thư mục res trong project của bạn.
Bây giờ, nếu bạn run project lên, bạn sẽ nhận được giao diện như hình bên dưới:

3. Thêm các quyền và provider vào manifest
Bây giờ, giao diện đã xong, hãy xem làm thế nào thì có thể pick ảnh khi click vào profile image hoặc plus icon.
- Tạo xml file với tên file_paths.xml trong thư mục res -> xml, nếu bạn ko tìm thấy thư mục tên xml, tạo nó bằng cách click chuột phải vào res -> New -> Android Resource Directory và chọn loại là xml. Ở đây, chúng ta sẽ định nghĩa một FileProvider đường dẫn lưu ảnh từ camera vào cache thay vì lưu nó vào gallery.
file_paths.xml
    <paths>
        <external-cache-path
            name="cache"
            path="camera" />
    </paths>
- Mở AndroidManifest.xml để thêm các quyền, activity để cắt ảnh và FileProvider
AndroidManifest.xml
    //...

    <uses-permission android:name="android.permission.INTERNET" />
    <uses-permission android:name="android.permission.CAMERA" />
    <uses-permission android:name="android.permission.READ_EXTERNAL_STORAGE" />
    <uses-permission android:name="android.permission.WRITE_EXTERNAL_STORAGE" />

    //..
    <activity android:name=".ImagePickerActivity" />

    <!-- uCrop cropping activity -->
    <activity
        android:name="com.yalantis.ucrop.UCropActivity"
        android:screenOrientation="portrait"
        android:theme="@style/AppTheme.NoActionBar" />
    <!-- cache directory file provider paths -->
    <provider
        android:name="android.support.v4.content.FileProvider"
        android:authorities="${applicationId}.provider"
        android:exported="false"
        android:grantUriPermissions="true">
        <meta-data
            android:name="android.support.FILE_PROVIDER_PATHS"
            android:resource="@xml/file_paths" />
    </provider>
- Sử dụng Glide để hiển thị image, tạo một class với tên là MyGlideModule và annotate class với @GlideModule MyGlideModule.java
    import com.bumptech.glide.annotation.GlideModule;
    import com.bumptech.glide.module.AppGlideModule;

    @GlideModule
    public class MyGlideModule extends AppGlideModule {
    }
4. Bước tiếp theo, chúng ta sẽ xây dựng một Activity để thực hiện việc chọn và cắt ảnh
    public class ImagePickerActivity extends ApppCompatActivity {
        //...
    }
Thêm các biến cần thiết vào activity, các biến này dùng để xử lý việc chọn ảnh, tỉ lệ cắt, chất lượng ảnh,...và được truyền vào khi gọi activity
    /* Các key truyền khi gọi activity */
    // Key phương thức chọn ảnh là từ camera hay gallery
    public static final String EXTRA_IMAGE_PICKER_OPTION = "image_pciker_option";
    // Key tỉ lệ ảnh khung cắt
    public static final String EXTRA_ASPECT_RATIO_X = "aspect_ratio_x"; // Tỉ lệ rộng
    public static final String EXTRA_ASPECT_RATIO_Y = "aspect_ratio_y"; // Tỉ lệ cao
    // Key có khóa tỉ lệ hay không, nếu true tức là chỉ cắt ảnh theo tỉ lệ cho trước, ngược lại có thể cắt theo các tỉ lệ khác
    public static final String EXTRA_LOCK_ASPECT_RATIO = "lock_aspect_ratio";
    // Key chất lượng ảnh
    public static final String EXTRA_IMAGE_COMPRESSION_QUALITY = "compression_quality";
    // Key có giới hạn kích thước ảnh hay không, nếu true sẽ giới hạn theo chiều rộng và cao truyền vào, ngược lại thì không
    public static final String EXTRA_SET_BITMAP_MAX_WIDTH_HEIGHT = "set_bitmap_max_width_height";
    // Key chiều rộng tối đa
    public static final String EXTRA_BITMAP_MAX_WIDTH = "max_width";
    // Key chiều cao tối đa
    public static final String EXTRA_BITMAP_MAX_HEIGHT = "max_height";

    /* Định nghĩa các biến default khi không được truyền vào lúc gọi activity */
    private int ASPECT_RATIO_X = 16, ASPECT_RATIO_Y = 9, bitmapMaxWidth = 1000, bitmapMaxHeight = 1000;
    private boolean lockAspectRatio = false, setBitmapMaxWidthHeight = false;
    private int IMAGE_COMPRESSION = 80;

    /* Định nghĩa 2 loại request */
    public static final int REQUEST_IMAGE_CAPTURE = 0;
    public static final int REQUEST_IMAGE_GALLERY = 1;
Tiếp theo chúng ta sẽ xây dựng một interface có nhiệm vụ callback về sự lựa chọn của người dùng
    public interface PickerOptionListener {
        void onCameraSelected(); // Khi chọn là lấy ảnh từ camera
        void onGallerySelected(); // Khi chọn là lấy ảnh từ gallery
    }
Ở hàm onCreate() của activity, thực hiện việc lấy các params được truyền vào khi acvitiy được gọi
    ASPECT_RATIO_X = intent.getIntExtra(EXTRA_ASPECT_RATIO_X, ASPECT_RATIO_X);
    ASPECT_RATIO_Y = intent.getIntExtra(EXTRA_ASPECT_RATIO_Y, ASPECT_RATIO_Y);
    IMAGE_COMPRESSION = intent.getIntExtra(EXTRA_IMAGE_COMPRESSION_QUALITY, IMAGE_COMPRESSION);
    lockAspectRatio = intent.getBooleanExtra(EXTRA_LOCK_ASPECT_RATIO, lockAspectRatio);
    setBitmapMaxWidthHeight = intent.getBooleanExtra(EXTRA_SET_BITMAP_MAX_WIDTH_HEIGHT, setBitmapMaxWidthHeight);
    bitmapMaxWidth = intent.getIntExtra(EXTRA_BITMAP_MAX_WIDTH, bitmapMaxWidth);
    bitmapMaxHeight = intent.getIntExtra(EXTRA_BITMAP_MAX_HEIGHT, bitmapMaxHeight);

    // Xử lý request
    int request = intent.getIntExtra(EXTRA_IMAGE_PICKER_OPTION, REQUEST_IMAGE_GALLERY);
    if (request == REQUEST_IMAGE_CAMERA) {
        takeCameraImage();
    } else {
        takeGalleryImage();
    }
Tiếp theo, chúng ta sẽ đi xây dựng các hàm được dùng trong activity
    // Hàm này dùng để show ra dialog lựa chọn phương thức lấy ảnh cho user,trả về một callback là
    // PickerOptionListener
    public static void showImagePickerOptions(Context context, PickerOptionListener listener) {
        // setup the alert builder
        AlertDialog.Builder builder = new AlertDialog.Builder(context);
        builder.setTitle(context.getString(R.string.lbl_set_profile_photo));

        // Add chose item to dialog
        String[] animals = {context.getString(R.string.lbl_take_camera_picture), context.getString(R.string.lbl_choose_from_gallery)};
        builder.setItems(animals, (dialog, which) -> {
            switch (which) {
                case 0:
                    listener.onCameraSelected();
                    break;
                case 1:
                    listener.onGallerySelected();
                    break;
            }
        });

        // create and show the alert dialog
        AlertDialog dialog = builder.create();
        dialog.show();
    }

    // Hàm lấy ảnh từ camera
    private void takeCameraImage() {
        // Ở đây chúng ta thực hiện request quyền camera và ghi vào bộ nhớ
        // Quyền camera dùng để lấy ảnh và quyền ghi bộ nhớ dùng để lưu ảnh sau khi chụp từ camera vào bộ
        // nhớ của máy
        Dexter.withActivity(this)
                .withPermissions(Manifest.permission.CAMERA, Manifest.permission.WRITE_EXTERNAL_STORAGE)
                .withListener(new MultiplePermissionsListener() {
                    @Override
                    public void onPermissionsChecked(MultiplePermissionsReport report) {
                        if (report.areAllPermissionsGranted()) {
                            fileName = System.currentTimeMillis() + ".jpg";
                            Intent takePictureIntent = new Intent(MediaStore.ACTION_IMAGE_CAPTURE);
                            takePictureIntent.putExtra(MediaStore.EXTRA_OUTPUT, getCacheImagePath(fileName));
                            if (takePictureIntent.resolveActivity(getPackageManager()) != null) {
                                startActivityForResult(takePictureIntent, REQUEST_IMAGE_CAPTURE);
                            }
                        }
                    }

                    @Override
                    public void onPermissionRationaleShouldBeShown(List<PermissionRequest> permissions, PermissionToken token {
                        token.continuePermissionRequest();
                    }
                }).check();
    }
    // Hàm lấy ảnh từ gallery
    private void takeGalleryImage() {
        // Tương tự với việc lấy ảnh từ camera, chúng ta cũng cần request quyền trước khi thực hiện
        Dexter.withActivity(this)
                .withPermissions(Manifest.permission.CAMERA, Manifest.permission.WRITE_EXTERNAL_STORAGE)
                .withListener(new MultiplePermissionsListener() {
                    @Override
                    public void onPermissionsChecked(MultiplePermissionsReport report) {
                        if (report.areAllPermissionsGranted()) {
                            Intent pickPhoto = new Intent(Intent.ACTION_PICK,
                                    android.provider.MediaStore.Images.Media.EXTERNAL_CONTENT_URI);
                            startActivityForResult(pickPhoto, REQUEST_GALLERY_IMAGE);
                        }
                    }

                    @Override
                    public void onPermissionRationaleShouldBeShown(List<PermissionRequest> permissions, PermissionToken token) {
                        token.continuePermissionRequest();
                    }
                }).check();

    }
    // Xử lý result sau khi lấy ảnh và cắt ảnh
    protected void onActivityResult(int requestCode, int resultCode, Intent data) {
        switch (requestCode) {
            case REQUEST_IMAGE_CAPTURE:
                // Xử lý cho trường hợp sau khi lấy ảnh từ camera, nếu lấy thành công sẽ tiến hành cắt ảnh, ngược lại
                // sẽ trả về kết quả cancel
                if (resultCode == RESULT_OK) {
                    cropImage(getCacheImagePath(fileName));
                } else {
                    setResultCancelled();
                }
                break;
            case REQUEST_GALLERY_IMAGE:
                // Tương tự với trường hợp REQUEST_IMAGE_CAPTURE nhưng ở đây sẽ lấy ảnh từ gallery
                if (resultCode == RESULT_OK) {
                    Uri imageUri = data.getData();
                    cropImage(imageUri);
                } else {
                    setResultCancelled();
                }
                break;
            case UCrop.REQUEST_CROP:
                // Nhận và xử lý hình ảnh sau khi cắt xong, nếu cắt thành công sẽ trả về cho user là hình ảnh sau khi đã cắt, ngược
                // lại sẽ cancel kết quả trả về
                if (resultCode == RESULT_OK) {
                    handleUCropResult(data);
                } else {
                    setResultCancelled();
                }
                break;
            case UCrop.RESULT_ERROR:
                // Xử lý trong trường hợp cắt bị lỗi, log error và trả về cancel cho user
                final Throwable cropError = UCrop.getError(data);
                Log.e(TAG, "Crop error: " + cropError);
                setResultCancelled();
                break;
            default:
                setResultCancelled();
        }
    }

    // Xử lý hình ảnh sau khi thực hiện cắt, nếu data truyền vào null thì sẽ cancel kết quả,
    // ngược lại sẽ trả vể đường dẫn uri của hình ảnh và result OK
    private void handleUCropResult(Intent data) {
        if (data == null) {
            setResultCancelled();
            return;
        }
        final Uri resultUri = UCrop.getOutput(data);
        setResultOk(resultUri);
    }

    // Thực hiện trả về result OK cho đối tượng kèm theo là đường dẫn hình sau khi đã xử lý
    private void setResultOk(Uri imagePath) {
        Intent intent = new Intent();
        intent.putExtra("path", imagePath);
        setResult(Activity.RESULT_OK, intent);
        finish();
    }

    // Thực hiện trả về result CANCEL cho đối tượng, có thể là do ko thể cắt ảnh hoặc bất kỳ nguyên nhân vào khác
    private void setResultCancelled() {
        Intent intent = new Intent();
        setResult(Activity.RESULT_CANCELED, intent);
        finish();
    }

    // Thực hiện lấy đường dẫn hình lưu trong bộ nhớ cache với provider đã định nghĩa ở trên và fileName được truyền vào
    private Uri getCacheImagePath(String fileName) {
        File path = new File(getExternalCacheDir(), "camera");
        if (!path.exists()) path.mkdirs();
        File image = new File(path, fileName);
        return getUriForFile(ImagePickerActivity.this, getPackageName() + ".provider", image);
    }
    // Hàm gọi xử lý cắt ảnh
    private void cropImage(Uri sourceUri) {
        Uri destinationUri = Uri.fromFile(new File(getCacheDir(), queryName(getContentResolver(), sourceUri)));
        UCrop.Options options = new UCrop.Options();

        // Set chất lượng ảnh sau khi cắt
        options.setCompressionQuality(IMAGE_COMPRESSION);

        options.setToolbarColor(ContextCompat.getColor(this, R.color.colorPrimary));
        options.setStatusBarColor(ContextCompat.getColor(this, R.color.colorPrimary));
        options.setActiveWidgetColor(ContextCompat.getColor(this, R.color.colorPrimary));

        // Nếu là lock tỉ lệ thì sẽ gán tỉ lệ truyền vào
        if (lockAspectRatio)
            options.withAspectRatio(ASPECT_RATIO_X, ASPECT_RATIO_Y);

        // Nếu là lock kích thước thì sẽ gán max kích thước truyền vào
        if (setBitmapMaxWidthHeight)
            options.withMaxResultSize(bitmapMaxWidth, bitmapMaxHeight);

        // Start activity để tiến hành cắt ảnh, ảnh sau khi cắt xong sẽ được lưu ở cùng thư mục với ảnh truyền vào
        // tức là sẽ ghi đè lên ảnh đã truyền vào
        UCrop.of(sourceUri, destinationUri)
                .withOptions(options)
                .start(this);
    }

    // Lấy tên file thông qua uri của file
    private static String queryName(ContentResolver resolver, Uri uri) {
        Cursor returnCursor =
                resolver.query(uri, null, null, null, null);
        assert returnCursor != null;
        int nameIndex = returnCursor.getColumnIndex(OpenableColumns.DISPLAY_NAME);
        returnCursor.moveToFirst();
        String name = returnCursor.getString(nameIndex);
        returnCursor.close();
        return name;
    }
Sau khi đã xây dựng xong activity dùng để chọn ảnh và cắt ảnh, việc tiếp theo chúng ta cần làm là quay lại với MainActivity gọi nó và dùng thôi.
5. Thực hiện gọi lấy ảnh và cắt ảnh
Để hiển thị dialog chọn ảnh, chúng ta gọi phương thức ImagePickerActivity.showImagePickerOptions()
    ImagePickerActivity.showImagePickerOptions(this, new ImagePickerActivity.PickerOptionListener() {
        @Override
        public void onCameraSelected() {
            // Call camera
        }

        @Override
        public void onGallerySelected() {
            // Call gallery
        }
    });
Khi lựa chọn xong, bạn có thể gửi dữ liệu vào Intent theo sự lựa chọn. Ví dụ dưới đây, để pick 1 tấm hình từ gallery với tỉ lệ là 1x1
    Intent intent = new Intent(MainActivity.this, ImagePickerActivity.class);
    intent.putExtra(ImagePickerActivity.EXTRA_IMAGE_PICKER_OPTION, ImagePickerActivity.REQUEST_IMAGE_GALLERY);

    // Gán tỉ lệ cứng là 1x1
    intent.putExtra(ImagePickerActivity.EXTRA_LOCK_ASPECT_RATIO, true);
    intent.putExtra(ImagePickerActivity.EXTRA_ASPECT_RATIO_X, 1);
    intent.putExtra(ImagePickerActivity.EXTRA_ASPECT_RATIO_Y, 1);

    startActivityForResult(intent, REQUEST_IMAGE);
Bây giờ, chúng ta sẽ xem làm cách nào để thực hiện nó để gán ảnh vào profile. Mở MainActivity và call ImagePickerActivity khi tap vào profile image hoặc plus icon
Khai báo một số biến cần dùng:
    public static final int REQUEST_IMAGE = 100;

    @BindView(R.id.img_profile);
    ImageView imgProfile;
Vào onCreate() của MainActivity thực hiện một số config:
    // Khởi tạo ButterKnife
    ButterKnife.bind(this);

    // Setup cho toolbar
    Toolbar toolbar = findViewById(R.id.toolbar);
    setSupportActionBar(toolbar);
    getSupportActionBar().setDisplayHomeAsUpEnabled(true);
    getSupportActionBar().setTitle(null);

    // Load ảnh mặc định
    loadProfileDefault();
Hàm loadProfileDefault() dùng đề load ảnh mặc định:
    Glide.with(this)
        .load(R.drawable.baseline_account_circle_black_48)
        .into(imgProfile);
    imgProfile.setColorFilter(ContextCompat.getColor(this, R.color.profile_default_tint));
Xử lý sự kiện khi click vào profile image hoặc plus icon
    @OnClick({R.id.img_plus, R.id.img_profile})
    void onProfileImageClick() {
        showImagePickerOption();
    }
    private void showImagePickerOption() {
        ImagePickerActivity.showImagePickerOptions(this, new ImagePickerActivity.PickerOptionListener() {
            @Override
            public void onCameraSelected() {
                launchCamera();
            }

            @Override
            public void onGallerySelected() {
                launchGallery();
            }
        });
    }
Tiếp theo, chúng ta sẽ viết xử lý cho việc launchCamera() và launchGallery()
    public void launchCamera() {
        Intent intent = new Intent(MainActivity.this, ImagePickerActivity.class);
        intent.putExtra(ImagePickerActivity.REQUEST_CODE_TYPE, ImagePickerActivity.REQUEST_IMAGE_CAPTURE);

        // Gán tỉ lệ khóa là 1x1
        intent.putExtra(ImagePickerActivity.EXTRA_LOCK_ASPECT_RATIO, true);
        intent.putExtra(ImagePickerActivity.EXTRA_ASPECT_RATIO_X, 1);
        intent.putExtra(ImagePickerActivity.EXTRA_ASPECT_RATIO_Y, 1);

        startActivityForResult(intent, REQUEST_IMAGE);
    }

    public void launchGallery() {
        Intent intent = new Intent(MainActivity.this, ImagePickerActivity.class);
        intent.putExtra(ImagePickerActivity.REQUEST_CODE_TYPE, ImagePickerActivity.REQUEST_IMAGE_GALLERY);

        // Gán kích thước tối đa cho ảnh
        intent.putExtra(ImagePickerActivity.EXTRA_SET_BITMAP_MAX_WIDTH_HEIGHT, true);
        intent.putExtra(ImagePickerActivity.EXTRA_BITMAP_MAX_WIDTH, 480);
        intent.putExtra(ImagePickerActivity.EXTRA_BITMAP_MAX_HEIGHT, 640);

        startActivityForResult(intent, REQUEST_IMAGE);
    }
Cuối cùng là chúng ta sẽ đi xử lý cho ảnh vừa lấy được, vào hàm onActivityResult() thêm vào xử lý sau:
    if (requestCode == REQUEST_IMAGE) {
        if (resultCode == RESULT_OK) {
            Uri uri = data.getParcelableExtra("path");
            loadImageProfile(uri.toString());
        }
    }
Hàm loadImageProfile()
    Glide.with(this).load(url)
        .into(imgProfile);
    imgProfile.setColorFilter(ContextCompat.getColor(this, android.R.color.transparent));
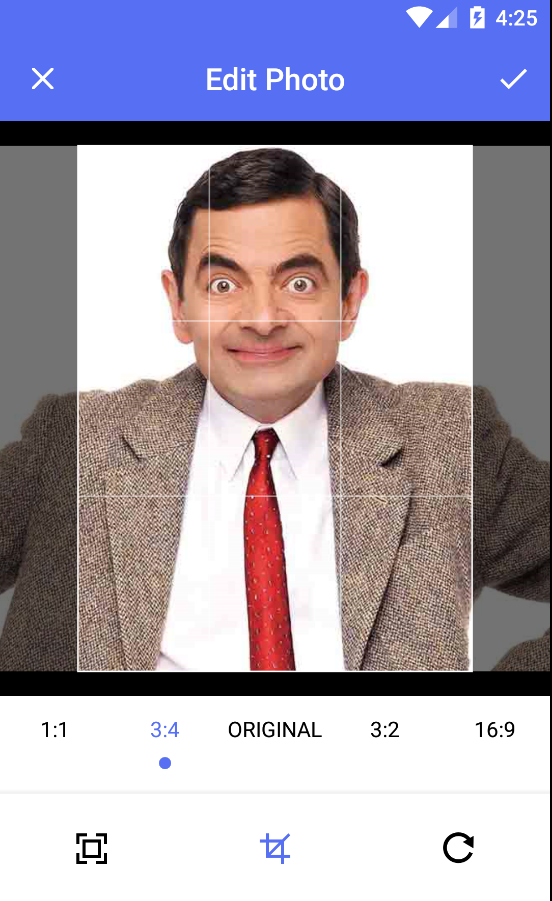
Sau khi chọn ảnh từ camera hoặc gallery bạn sẽ được chuyển qua màn hình bên dưới để thực hiện cắt, chỉnh sửa ảnh:
 Như vậy, thông qua bài viết trên mình đã giới thiệu đến các bạn cách xây dựng chức năng giúp người dùng chọn ảnh từ camera hoặc gallery sau đó thực hiện cắt và chỉnh sửa cho nó.
Nếu còn vấn đề gì thắc mắc thì hãy để comment lại cho mình nha, chúng ta sẽ cùng nhau trao đổi để làm sáng tỏ vấn đề hơn!
Link demo của mình: demo
All rights reserved
