Alamofire - Elegant networking in swift Part 2: Implement alamofire in the real project
Bài đăng này đã không được cập nhật trong 4 năm
Hôm này mình xin phép tiếp tục seri về Alamofire - thư viện phổ biến được viết cho iOS và OSX sử dụng ngôn ngữ Swift. Trong part 1 của seri này mình có viết về Alamofire, nó là gì, sử dụng thế nào... thì part 2 trong seri này mình sẽ hướng dẫn các bạn cách viết một network layer tách biệt (điều rất quan trọng khi bạn tham gia một dự án dù lớn hay nhỏ và nếu bạn là một người muốn viết code dễ hiểu, dễ maintain...)
Các bạn có thể tham khảo part 1 tại Part 1: Getting started
Trong part 2 này mình có sử dụng Alamofire để viết một netwwork layer tách biệt, sử dụng mô hình VIPER (VIEW - INTERACTOR - PRESENTER - ENTITY - ROUTING) đó là một mô hình được áp dụng khá phổ biến, code trong sáng, dễ hiểu, dễ maintain, nếu là một iOS developer thì thật tiếc nếu bạn không biết về nó Mô hình VIPER
1. Tạo single view application
- Mở Xcode từ thư mục /Applications
- Một cửa sổ xuất hiện
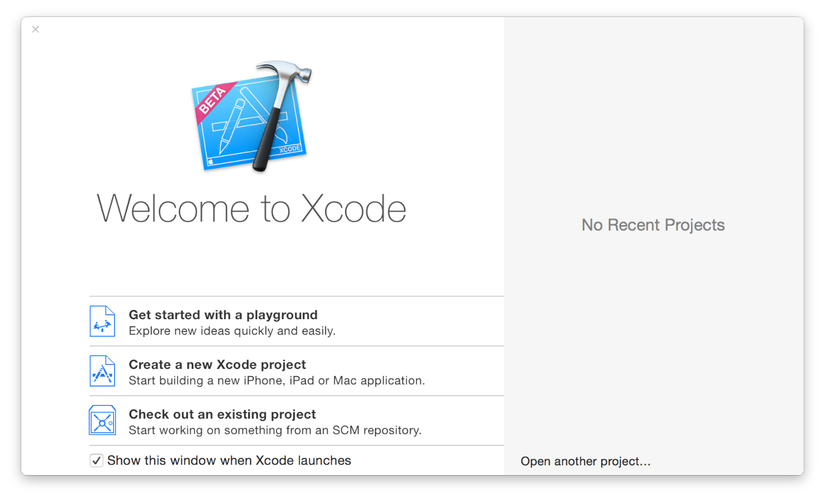
- Bạn cũng có thể tạo một single application theo các khác
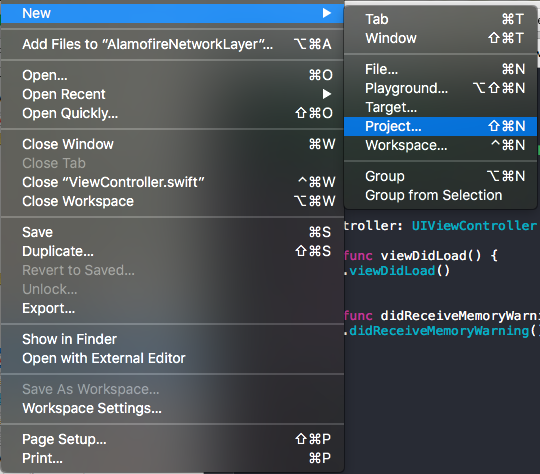
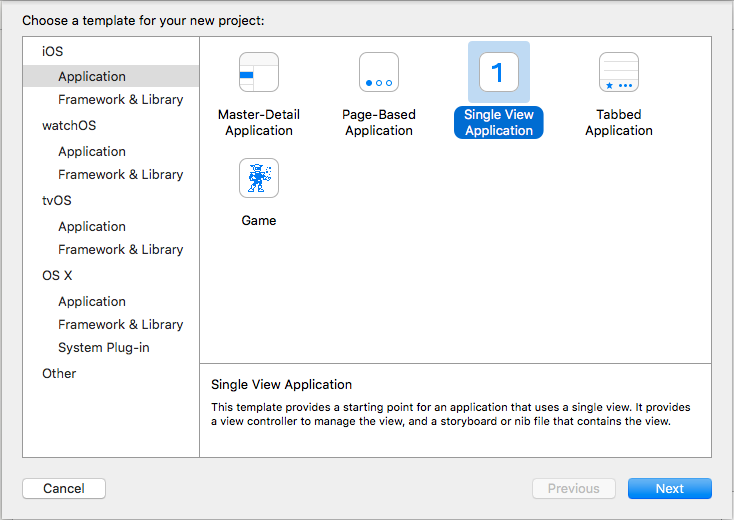 New/Project/Single View Application
- Đặt tên cho project (AlamofireNetworkLayer)
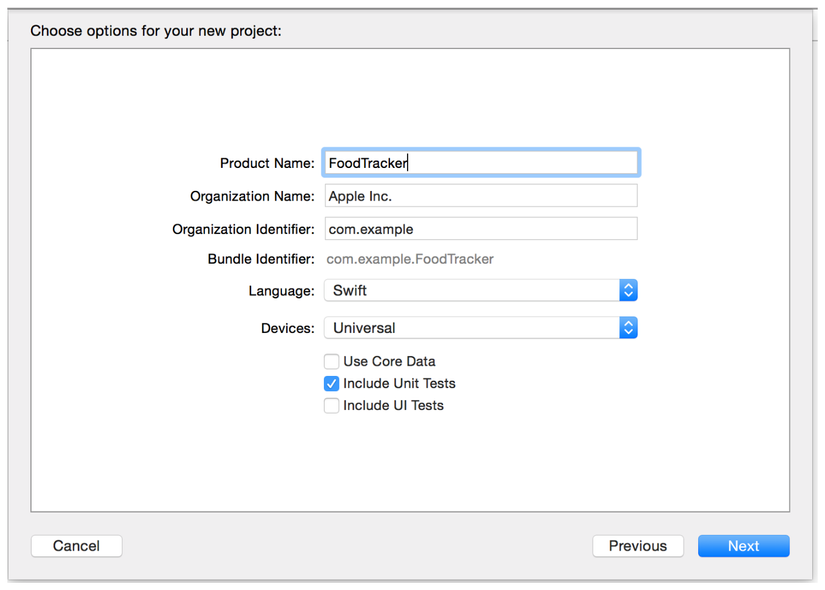
2. Sử dụng cocoa pod
- Cocoapod là gì? Cocoapod đơn giản là nơi quản lý các thư viện của bên thứ 3 sử dụng cho các dự án Swift và Objecttive C. Nếu như trước đây để có thể sử dụng được các thư viện từ bên thứ 3 thì developer phải tải trực tiếp từ github hoặc một nguồn nào đó về và cấu hình PATH tới thư viện đó, giờ đây khi có Pod thì developer không còn phải làm việc đó nữa, chỉ cần cài đặt và cấu hình Pod với một vài thao tác đơn giản. Bạn có thể tham khảo theo đường dẫn sau Cocoa pod
- Đầu tiên bạn cần cài gem sử dụng command line
$ sudo gem install cocoapods
- Sau khi cài đặt thành công bạn cần khởi tạo pod cho dự án của bạn. Mở command line và đi tới thư mục project của bạn rồi thực hiện
$ pod init
- Vậy là pod của bạn được tạo ra. Bước tiếp theo bạn thực hiện lệnh sau để tạo ra một workspace khác
$ pod install
- Khi pod install được thực hiện xong thì tại thư mục project của bạn sẽ có thể một workspace khác (màu icon khác với project bình thường lúc ban đầu tạo). Bạn đóng project hiện tại và mở workspace vừa tạo ra.
- Trong bài viết này tôi có sử dụng 2 thư viện là Alamofire và SwiftJSON nên nội dung file pod của tôi như sau:
platform :ios, '8.0'
use_frameworks!
target 'AlamofireNetworkLayer' do
    pod 'Alamofire'
    pod 'SwiftyJSON'
end
target 'AlamofireNetworkLayerTests' do
end
target 'AlamofireNetworkLayerUITests' do
end
- Bước cuối để có thể sử dụng các thư việc đó bạn cần thực hiện lệnh sau để tự động tải về và cấu hình PATH
$ pod install
-
Build và run
-
Tham khảo 2 thư viện trên github
3. Mô hình VIPER
-
Mình sẽ không nói sâu về mô hình này là gì và như thế nào. Các bạn có thể đọc tại Mô Hình VIPER
-
Khi có thể hiểu và áp dụng nó vào thực tế bạn sẽ thấy sức mạnh của mô hình này
-
Trong bài viết này mình sẽ hướng dẫn các bạn viết theo mô hình VIPER. Trước tiên cần hiểu VIPER là viết tắt của từ gì?
V: View (ViewController và các view control)
I: Interactor (thành phần tương tác với data)
P: Prenseter (Thành phần chính tương tác với View, Interactor và Routing)
E: Entity (các thực thể)
R: Routing (thực hiện nhiệm vụ chuyển đổi giữa các ViewController)
-
Vậy mình bắt đầu tạo các file có tên theo cấu trúc thư mục sau:
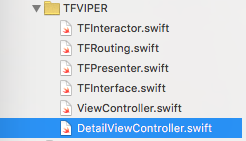
- Tạo action từ một button như sau:
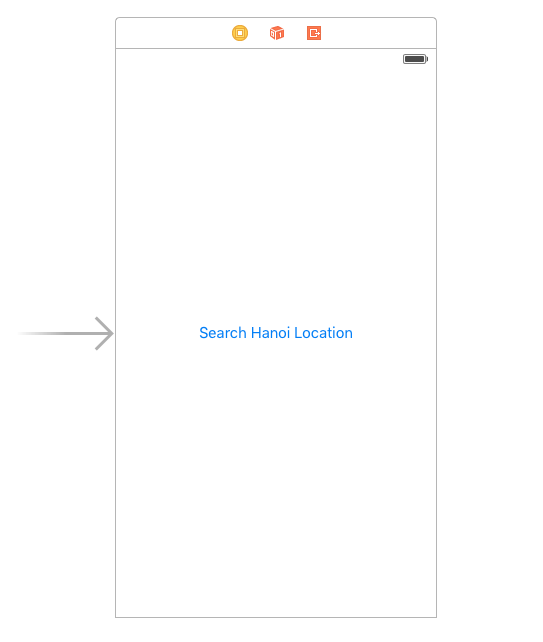
Tương ứng với action đó trong ViewController có nội dung như sau:
//
//  ViewController.swift
//  AlamofireNetworkLayer
//
//  Created by ngodacdu on 2/27/16.
//  Copyright © 2016 ngodacdu. All rights reserved.
//
import UIKit
class ViewController: UIViewController {

    override func viewDidLoad() {
        super.viewDidLoad()
    }

    override func didReceiveMemoryWarning() {
        super.didReceiveMemoryWarning()
    }

    @IBAction func didTouchUpInSideSearchButton(sender: AnyObject) {

    }
}
- Tạo interface (TFInterface) có nội dung như sau
//
//  TFInterface.swift
//  AlamofireNetworkLayer
//
//  Created by ngodacdu on 2/27/16.
//  Copyright © 2016 ngodacdu. All rights reserved.
//
import UIKit
protocol TFInterface {
    func didTouchUpInSideSearchButton(searchText: String)
}
Mục đích: func didTouchUpInSideSearchButton() được thực hiện khi người dùng nhấn vào action
- Tạo presenter (TFPresenter) có nội dung
//
//  TFPresenter.swift
//  AlamofireNetworkLayer
//
//  Created by ngodacdu on 2/27/16.
//  Copyright © 2016 ngodacdu. All rights reserved.
//
import UIKit
class TFPresenter: NSObject, TFInterface {
    func didTouchUpInSideSearchButton(searchText: String) {

    }
}
- Tạo một routing mục đích chuyển sang màn hình DetailViewController sau khi bạn lấy xong dữ liệu SearchLocation có nội dung như sau:
//
//  TFRouting.swift
//  AlamofireNetworkLayer
//
//  Created by ngodacdu on 2/27/16.
//  Copyright © 2016 ngodacdu. All rights reserved.
//

import UIKit

class TFRouting: NSObject {

    var viewController: ViewController?

    class var shareRouting: TFRouting {
        struct Static {
            static let instance = TFRouting()
        }
        return Static.instance
    }

    private func mainStoryboard() -> UIStoryboard {
        return UIStoryboard(name: "Main", bundle: nil)
    }

    func pushDetailViewController() {
        let detailViewController = mainStoryboard().instantiateViewControllerWithIdentifier("DetailViewController")
        if let currentDetailVC = detailViewController as? DetailViewController {
            viewController?.navigationController?.pushViewController(
                currentDetailVC,
                animated: true
            )
        }
    }

}
- Tạo một Interactor (TFInteractor)
//
//  TFInteractor.swift
//  AlamofireNetworkLayer
//
//  Created by ngodacdu on 2/27/16.
//  Copyright © 2016 ngodacdu. All rights reserved.
//

import UIKit

protocol TFInteractorOutput {
    func searchApiDidFinished(data: TFSearchLocationDto)
    func searchApiDidError(error: NSError)
}

protocol TFInteractorInput {
    func requestSearchApi(searchText: String)
}

class TFInteractor: NSObject, TFInteractorInput {

    var output: TFInteractorOutput?

    func requestSearchApi(searchText: String) {

    }

}
- Tạo Model, trong bài viết này mình không đi sâu vào các properties của phần model này nên các bạn có thể tham khảo trong project ở phần cuối bài.
- Trong bài viết này mình có sử dụng KEY và API về thông tin thời tiết của một địa điểm mà mình tìm kiếm. Các bạn có thể tham khảo worldweatheronline. Sau khi đọc bài viết xong bạn hãy tự tạo cho mình một KEY free và tự tìm hiểu các properties mình đã sử dụng trong phần Model nhé.
- Để project có thể hoạt động được thì chúng ta cần phải thực hiện setup vài thứ sau khi đã có tầng network.
4. Tạo network layer sử dụng Alamofire
- Tạo Api Path
//
//  TFApiPath.swift
//  todayweather
//
//  Created by ngodacdu on 2/21/16.
//  Copyright © 2016 ngodacdu. All rights reserved.
//

import Foundation
import Alamofire

/*
    - Bạn cần có một base url
    - Key bạn tạo từ website
*/
let URL = "http://api.worldweatheronline.com"
let WEATHER_ONLINE_KEY_API = "WorldWeatherKey"

/*
    - Số kết quả tìm kiếm trả về lớn nhất
    - Số ngày bạn muốn có thông tin thời tiết
*/
let SEARCH_NUM_RESULT = 5
let NUM_OF_DAY = 5

/*
    - Base URL
    - Path
    - Method
*/
public protocol TargetType {
    var baseURL: String { get }
    var path: String { get }
    var method: String { get }
}

private extension String {
    var URLEscapedString: String {
        return self.stringByAddingPercentEncodingWithAllowedCharacters(
            NSCharacterSet.URLHostAllowedCharacterSet()
        )!
    }
}

/*
    Gồm 2 API là search api và location weather api
*/
public enum API {
    case Search(String)
    case LocationWeather(String, String)
}

extension API: TargetType {

    public var baseURL: String {
        return URL
    }

    public var path: String {
        switch self {
        case .Search(let searchString):
            let query = "?query=\(searchString.stringByReplacingOccurrencesOfString(" ", withString: "+"))"
            let num = "&num_of_results=\(SEARCH_NUM_RESULT)"
            let format = "&format=json"
            let key = "&key=\(WEATHER_ONLINE_KEY_API)"
            return "\(baseURL)/free/v2/search.ashx" + query + num + format + key
        case .LocationWeather(let lat, let lon):
            let q = "?q=\(lat),\(lon)"
            let num = "&num_of_days=\(NUM_OF_DAY)"
            let format = "&format=json"
            let key = "&key=\(WEATHER_ONLINE_KEY_API)"
            return "\(baseURL)/free/v2/weather.ashx" + q + num + format + key
        }
    }

    public var method: String {
        switch self {
        case .Search:
            return "GET"
        case .LocationWeather:
            return "GET"
        }
    }

}
- Các bạn có thể parser data trả về theo cách sau (tham khảo)
//
//  TFJsonParser.swift
//  todayweather
//
//  Created by ngodacdu on 2/21/16.
//  Copyright © 2016 ngodacdu. All rights reserved.
//

import Foundation
import SwiftyJSON

class SSJsonParser: NSObject {

    class var sharedInstance : SSJsonParser {
        struct Static {
            static let instance : SSJsonParser = SSJsonParser()
        }
        return Static.instance
    }

    func parseJson(api : API, json : JSON) -> Any? {
        switch api {
        case .Search(_):
            return parserSearchLocationApi(json)
        case .LocationWeather(_, _):
            return parserLocationWeatherApi(json)
        }
    }

    //MARK: Search Location Api
    private func parserSearchLocationApi(json: JSON) -> [TFSearchLocationDto] {
        var searchLocations: [TFSearchLocationDto] = [TFSearchLocationDto]()
        if let searchApi: JSON = json["search_api"] {
            if let results = searchApi["result"].array {
                for result in results {
                    let searchLocation = TFSearchLocationDto()
                    if let firstAreaName: JSON = result["areaName"].array?.first {
                        searchLocation.areaName = firstAreaName["value"].string
                    }
                    if let firstRegion: JSON = result["region"].array?.first {
                        searchLocation.region = firstRegion["value"].string
                    }
                    if let firstWeatherUrl: JSON = result["weatherUrl"].array?.first {
                        searchLocation.weatherUrl = firstWeatherUrl["value"].string
                    }
                    searchLocation.latitude = result["latitude"].string
                    searchLocation.longitude = result["longitude"].string
                    if let firstCountry: JSON = result["country"].array?.first {
                        searchLocation.country = firstCountry["value"].string
                    }
                    searchLocation.population = result["population"].string
                    searchLocations.append(searchLocation)
                }
            }
        }
        return searchLocations
    }

    //MARK: Location Weather Api
    private func parserLocationWeatherApi(json: JSON) -> TFLocationWeatherDto {
        let locationWeatherDto = TFLocationWeatherDto()
        let data: JSON = json["data"]
        locationWeatherDto.dateWeathers = parserDateWeather(data["weather"])
        if let currentCondition = data["current_condition"].array?.first {
            locationWeatherDto.precipMM = currentCondition["precipMM"].string
            locationWeatherDto.temp_F = currentCondition["temp_F"].string
            locationWeatherDto.winddir16Point = currentCondition["winddir16Point"].string
            locationWeatherDto.winddirDegree = currentCondition["winddirDegree"].string
            locationWeatherDto.humidity = currentCondition["humidity"].string
            locationWeatherDto.cloudcover = currentCondition["cloudcover"].string
            locationWeatherDto.feelsLikeF = currentCondition["FeelsLikeF"].string
            locationWeatherDto.weatherCode = currentCondition["weatherCode"].string
            if let weatherIconUrl = currentCondition["weatherIconUrl"].array?.first {
                locationWeatherDto.weatherIconUrl = weatherIconUrl["value"].string
            }
            locationWeatherDto.temp_C = currentCondition["temp_C"].string
            locationWeatherDto.windspeedKmph = currentCondition["windspeedKmph"].string
            locationWeatherDto.windspeedMiles = currentCondition["windspeedMiles"].string
            locationWeatherDto.visibility = currentCondition["visibility"].string
            locationWeatherDto.feelsLikeC = currentCondition["FeelsLikeC"].string
            locationWeatherDto.observation_time = currentCondition["observation_time"].string
            if let weatherDesc = currentCondition["weatherDesc"].array?.first {
                locationWeatherDto.weatherDesc = weatherDesc["value"].string
            }
            locationWeatherDto.pressure = currentCondition["pressure"].string
        }
        return locationWeatherDto
    }

    private func parserDateWeather(json: JSON) -> [TFDateWeatherDto] {
        var dateWeathers: [TFDateWeatherDto] = [TFDateWeatherDto]()
        if let jsonArray = json.array {
            for dateJson in jsonArray {
                let dateWeather: TFDateWeatherDto = TFDateWeatherDto()
                dateWeather.date = dateJson["date"].string
                dateWeather.maxtempC = dateJson["maxtempC"].string
                dateWeather.mintempC = dateJson["mintempC"].string
                dateWeather.mintempF = dateJson["mintempF"].string
                dateWeather.hourlys = parserHourWeather(dateJson["hourly"])
                dateWeather.uvIndex = dateJson["uvIndex"].string
                dateWeather.astronomy = parserAstronomy(dateJson["astronomy"])
                dateWeather.maxtempF = dateJson["maxtempF"].string
                dateWeathers.append(dateWeather)
            }
        }
        return dateWeathers
    }

    private func parserHourWeather(json: JSON) -> [TFHourWeatherDto] {
        let hourWeatherDtos: [TFHourWeatherDto] = [TFHourWeatherDto]()
        if let jsonArray = json.array {
            for hourJson in jsonArray {
                let hourWeatherDto = TFHourWeatherDto()
                hourWeatherDto.winddirDegree = hourJson["winddirDegree"].string
                hourWeatherDto.pressure = hourJson["pressure"].string
                if let weatherIconUrl = hourJson["weatherIconUrl"].array?.first {
                    hourWeatherDto.weatherIconUrl = weatherIconUrl["value"].string
                }
                hourWeatherDto.chanceofremdry = hourJson["chanceofremdry"].string
                hourWeatherDto.windGustMiles = hourJson["WindGustMiles"].string
                hourWeatherDto.windChillF = hourJson["WindChillF"].string
                hourWeatherDto.visibility = hourJson["visibility"].string
                hourWeatherDto.time = hourJson["time"].string
                hourWeatherDto.dewPointF = hourJson["DewPointF"].string
                hourWeatherDto.chanceofsunshine = hourJson["chanceofsunshine"].string
                hourWeatherDto.chanceofrain = hourJson["chanceofrain"].string
                hourWeatherDto.chanceofwindy = hourJson["chanceofwindy"].string
                hourWeatherDto.windspeedMiles = hourJson["windspeedMiles"].string
                hourWeatherDto.chanceoffog = hourJson["chanceoffog"].string
                hourWeatherDto.windGustKmph = hourJson["WindGustKmph"].string
                hourWeatherDto.chanceofsnow = hourJson["chanceofsnow"].string
                hourWeatherDto.tempF = hourJson["tempF"].string
                hourWeatherDto.windspeedKmph = hourJson["windspeedKmph"].string
                hourWeatherDto.windChillC = hourJson["WindChillC"].string
                hourWeatherDto.heatIndexF = hourJson["HeatIndexF"].string
                hourWeatherDto.precipMM = hourJson["precipMM"].string
                hourWeatherDto.weatherCode = hourJson["weatherCode"].string
                hourWeatherDto.chanceofthunder = hourJson["chanceofthunder"].string
                if let weatherDesc = hourJson["weatherDesc"].array?.first {
                    hourWeatherDto.weatherDesc = weatherDesc["value"].string
                }
                hourWeatherDto.chanceofhightemp = hourJson["chanceofhightemp"].string
                hourWeatherDto.feelsLikeF = hourJson["FeelsLikeF"].string
                hourWeatherDto.chanceoffrost = hourJson["chanceoffrost"].string
                hourWeatherDto.winddir16Point = hourJson["winddir16Point"].string
                hourWeatherDto.heatIndexC = hourJson["HeatIndexC"].string
                hourWeatherDto.dewPointC = hourJson["DewPointC"].string
                hourWeatherDto.tempC = hourJson["tempC"].string
                hourWeatherDto.chanceofovercast = hourJson["chanceofovercast"].string
                hourWeatherDto.humidity = hourJson["humidity"].string
                hourWeatherDto.feelsLikeC = hourJson["FeelsLikeC"].string
                hourWeatherDto.cloudcover = hourJson["cloudcover"].string
            }
        }
        return hourWeatherDtos
    }

    private func parserAstronomy(json: JSON) -> TFAstronomyWeatherDto {
        let astronomy = TFAstronomyWeatherDto()
        astronomy.moonset = json["moonset"].string
        astronomy.moonrise = json["moonrise"].string
        astronomy.sunset = json["sunset"].string
        astronomy.sunrise = json["sunrise"].string
        return astronomy
    }

}
- Tạo network sử dụng alamofire
//
//  TFNetworkLayer.swift
//  todayweather
//
//  Created by ngodacdu on 2/21/16.
//  Copyright © 2016 ngodacdu. All rights reserved.
//

import Foundation
import Alamofire
import SwiftyJSON

typealias NetworkStartHandler = () -> ()
typealias NetworkErrorHandler = (NSError) -> ()
typealias NetworkFishHandler  = (Any?) -> ()

class SSNetworkLayer: NSObject {

    var start: NetworkStartHandler?
    var error: NetworkErrorHandler?
    var finish: NetworkFishHandler?

    var request: Request?
    var api: API!
    var parameters: [String : AnyObject]?
    var headers: [String : String]?

    func setStartHandler(start : NetworkStartHandler) {
        self.start = start
    }

    func setErrorHandler(error : NetworkErrorHandler) {
        self.error = error
    }

    func setFinishHandler(finish : NetworkFishHandler) {
        self.finish = finish
    }

    private func queryStringFromDictionary(parameters: [String : AnyObject]) -> String  {
        var parts: Array<String> = [String]()
        for (key,value) in parameters {
            let part: String = String(format: "%@=%@", key,value.description)
            parts.append(part)
        }
        let joinedString = (parts as NSArray).componentsJoinedByString("&")
        return joinedString.stringByAddingPercentEncodingWithAllowedCharacters(NSCharacterSet.URLPathAllowedCharacterSet())!
    }

    private func getMethod(api: API) -> Alamofire.Method {
        let requestMethod: Alamofire.Method
        switch api.method {
        case "POST":
            requestMethod = .POST
            break
        case "PUT":
            requestMethod = .PUT
            break
        default:
            requestMethod = .GET
            break
        }
        return requestMethod
    }

    //MARK: Request URL
    func requestApi(api api: API, parameters: [String : AnyObject]?, headers: [String : String]?) {
        self.api = api
        self.parameters = parameters
        self.headers = headers

        start?()

        Alamofire.request(
            getMethod(api),
            api.path,
            parameters: parameters,
            encoding: .JSON,
            headers: headers
            ).responseJSON { (response : Response<AnyObject, NSError>) -> Void in
                switch response.result {
                case .Success(let json):
                    let response = SSJsonParser.sharedInstance.parseJson(api, json: JSON(json))
                    self.finish?(response)
                    break
                case .Failure(let error):
                    self.error?(error)
                    break
                }
        }
    }

}
Vậy là chúng ta đã tạo xong được tầng network
5. Setup project để hoạt động
- ViewController thực hiện action
    var handler: TFInterface?

    @IBAction func didTouchUpInSideSearchButton(sender: AnyObject) {
        handler?.didTouchUpInSideSearchButton("Hanoi")
    }
- Presenter thực hiện action
class TFPresenter: NSObject, TFInterface {

    var input: TFInteractorInput?

    func didTouchUpInSideSearchButton(searchText: String) {
        input?.requestSearchApi(searchText)
    }

}

extension TFPresenter: TFInteractorOutput {

    func searchApiDidFinished(data: TFSearchLocationDto) {

    }

    func searchApiDidError(error: NSError) {

    }

}
- Interactor implement network layer
import UIKit

protocol TFInteractorOutput {
    func searchApiDidFinished(data: TFSearchLocationDto)
    func searchApiDidError(error: NSError)
}

protocol TFInteractorInput {
    func requestSearchApi(searchText: String)
}

class TFInteractor: NSObject, TFInteractorInput {

    var output: TFInteractorOutput?

    func requestSearchApi(searchText: String) {
        let network = SSNetworkLayer()
        weak var weakSelf = self
        network.setFinishHandler { (result) -> () in
            if let data = result as? TFSearchLocationDto {
                weakSelf?.output?.searchApiDidFinished(data)
            }
        }
        network.setErrorHandler { (error) -> () in
            weakSelf?.output?.searchApiDidError(error)
        }
        network.requestApi(
            api: .Search(searchText),
            parameters: nil,
            headers: nil
        )
    }

}
- Routing thực hiện push sang DetailViewController
import UIKit

class TFRouting: NSObject {

    var viewController: ViewController?

    class var shareRouting: TFRouting {
        struct Static {
            static let instance = TFRouting()
        }
        return Static.instance
    }

    private func mainStoryboard() -> UIStoryboard {
        return UIStoryboard(name: "Main", bundle: nil)
    }

    func pushDetailViewController() {
        let detailViewController = mainStoryboard().instantiateViewControllerWithIdentifier("DetailViewController")
        if let currentDetailVC = detailViewController as? DetailViewController {
            viewController?.navigationController?.pushViewController(
                currentDetailVC,
                animated: true
            )
        }
    }

}
- Trong AppDelegate thực hiện chuẩn bị
private func setupViewController() {
        if let rootViewController = window?.rootViewController as? ViewController {
            let presenter = TFPresenter()
            let interactor = TFInteractor()
            interactor.output = presenter
            presenter.input = interactor
            rootViewController.handler = presenter
        }
    }

    func application(application: UIApplication, didFinishLaunchingWithOptions launchOptions: [NSObject: AnyObject]?) -> Bool {

        setupViewController()

        return true
    }
Vậy là bạn đã hoàn thành project có sử dụng Alamofire và mô hình VIPER.
Ngoài ra nếu thắc mắc nào bạn có thể comment bên dưới hoặc tham khảo project tại Alamofire - Elegant networking in swift Part 2: Implement alamofire in the real project
All rights reserved