Phát triển game dựa trên game engine đa nền tảng cocos2d-x (P4) - Actions
Bài đăng này đã không được cập nhật trong 4 năm
Sau khi đã qua 3 bài giới thiệu về cocos2d-x, cũng như các thành phần cơ bản trong game :
- Phần 1 : https://viblo.asia/ThanhTa/posts/jaqG0lrxGEKw.
- Phần 2 : https://viblo.asia/ThanhTa/posts/NPVMaDb2RQOk.
- Phần 3 : https://viblo.asia/ThanhTa/posts/6BkGyK8XR5aV
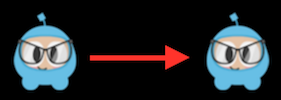
Kết thúc 3 phần, chúng ta đã nắm được phương thức tạo ra các thành phần trong game (Scene, Node, Sprite). Tại phần tiếp theo này chúng ta tiếp tục tìm hiểm về cách làm sao để gắn hành động cho Characters. Cocos2d-x cung cấp lớp Action, các đối tượng Action cho phép thanh đổi các thuộc tính của đối tượng Node trong 1 khoảng thời gian. Bất kì một đối tượng nào kế thừa từ lớp Node - ví dụ như Sprite, có thể thực hiện 1 đối tượng Action. Ví dụ, chúng ta có thể move một Sprite từ vị trí hiện tại tới một vị trí khác trong thời gian nào đó.
Ví dụ hành động MoveTo và MoveBy :
// Move sprite to position 50,10 in 2 seconds.
auto moveTo = MoveTo::create(2, Vec2(50, 10));
mySprite1->runAction(moveTo);

// Move sprite 20 points to right in 2 seconds
auto moveBy = MoveBy::create(2, Vec2(20,0));
mySprite2->runAction(moveBy);
Mỗi một hành động - move, rotate, scale, sẽ có 2 trạng thái đi kèm. Chúng ta có thể nhận thấy bằng 2 từ khoá, By và To. Điểm khác biệt giữa hai từ khoá này là gì ? Từ khoá By liên quan tới trạng thái hiện tại của Node. Từ khoá To là tuyệt đối, nghĩa là nó không quan tâm tới trạng thái hiện tại của Node. Chúng ta cùng quan sát ví dụ dưới để hiểu rõ hơn:
auto mySprite = Sprite::create("mysprite.png");
mySprite->setPosition(Vec2(200, 256));

// MoveBy - lets move the sprite by 500 on the x axis over 2 seconds
// MoveBy is relative - since x = 200 + 200 move = x is now 400 after the move
auto moveBy = MoveBy::create(2, Vec2(500, mySprite->getPositionY()));

// MoveTo - lets move the new sprite to 300 x 256 over 2 seconds
// MoveTo is absolute - The sprite gets moved to 300 x 256 regardless of
// where it is located now.
auto moveTo = MoveTo::create(2, Vec2(300, mySprite->getPositionY()));

// Delay - create a small delay
auto delay = DelayTime::create(1);

auto seq = Sequence::create(moveBy, delay, moveTo, nullptr);

mySprite->runAction(seq);

Action cơ bản, và cách sử dụng
Hành động cơ bản được hiểu là từng hành động riêng lẻ. Nghĩa là 1 Node sẽ chỉ thực hiện 1 hành động trong khoảng thời gian. Chúng ta sẽ cùng tìm hiểu qua các hành động riêng lẻ này.
Move
Di chuyển 1 Node trong 1 khoảng thời gian được định trước
auto mySprite = Sprite::create("mysprite.png");

// Move a sprite to a specific location over 2 seconds.
auto moveTo = MoveTo::create(2, Vec2(50, 0));

mySprite->runAction(moveTo);

// Move a sprite 50 pixels to the right, and 0 pixels to the top over 2 seconds.
auto moveBy = MoveBy::create(2, Vec2(50, 0));

mySprite->runAction(moveBy);
Rotate
Quay 1 Node theo chiều kim đồng hồ trong khoảng 2 giấy:
auto mySprite = Sprite::create("mysprite.png");

// Rotates a Node to the specific angle over 2 seconds
auto rotateTo = RotateTo::create(2.0f, 40.0f);
mySprite->runAction(rotateTo);

// Rotates a Node clockwise by 40 degree over 2 seconds
auto rotateBy = RotateBy::create(2.0f, 40.0f);
mySprite->runAction(rotateBy);

Scale
Thay đổi scale của 1 Node trong 2 giây:
auto mySprite = Sprite::create("mysprite.png");

// Scale uniformly by 3x over 2 seconds
auto scaleBy = ScaleBy::create(2.0f, 3.0f);
mySprite->runAction(scaleBy);

// Scale X by 5 and Y by 3x over 2 seconds
auto scaleBy = ScaleBy::create(2.0f, 3.0f, 3.0f);
mySprite->runAction(scaleBy);

// Scale to uniformly to 3x over 2 seconds
auto scaleTo = ScaleTo::create(2.0f, 3.0f);
mySprite->runAction(scaleTo);

// Scale X to 5 and Y to 3x over 2 seconds
auto scaleTo = ScaleTo::create(2.0f, 3.0f, 3.0f);
mySprite->runAction(scaleTo);
Fade In/Out
Thay đổi Opacity từ 0 tới 255. Và thực hiện hành động đảo ngược.
auto mySprite = Sprite::create("mysprite.png");

// fades in the sprite in 1 seconds
auto fadeIn = FadeIn::create(1.0f);
mySprite->runAction(fadeIn);

// fades out the sprite in 2 seconds
auto fadeOut = FadeOut::create(2.0f);
mySprite->runAction(fadeOut);

Tint
Thay đổi màu sắc của 1 Node.
auto mySprite = Sprite::create("mysprite.png");

// Tints a node to the specified RGB values
auto tintTo = TintTo::create(2.0f, 120.0f, 232.0f, 254.0f);
mySprite->runAction(tintTo);

// Tints a node BY the delta of the specified RGB values.
auto tintBy = TintBy::create(2.0f, 120.0f, 232.0f, 254.0f);
mySprite->runAction(tintBy);

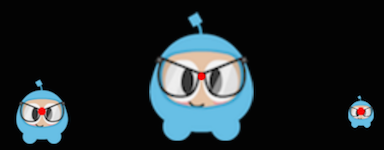
Animate
Với Animate, chúng ta có thể dễ dàng thay đổi nội dung hiển thị của đối tượng Sprite với một chu kỳ được thiết lập trước, từ đó tạo ra hiệu ứng chuyển động của Characters. Hiện tại có nhiều cách để tạo ra hiệu ứng, nhưng chúng ta sẽ bàn kỹ vấn đề này ở phần sau, thay vào đó cùng xem xét một ví dụ đơn giản dưới đây:
auto mySprite = Sprite::create("mysprite.png");

// now lets animate the sprite we moved
Vector<SpriteFrame*> animFrames;
animFrames.reserve(12);
animFrames.pushBack(SpriteFrame::create("Blue_Front1.png", Rect(0,0,65,81)));
animFrames.pushBack(SpriteFrame::create("Blue_Front2.png", Rect(0,0,65,81)));
animFrames.pushBack(SpriteFrame::create("Blue_Front3.png", Rect(0,0,65,81)));
animFrames.pushBack(SpriteFrame::create("Blue_Left1.png", Rect(0,0,65,81)));
animFrames.pushBack(SpriteFrame::create("Blue_Left2.png", Rect(0,0,65,81)));
animFrames.pushBack(SpriteFrame::create("Blue_Left3.png", Rect(0,0,65,81)));
animFrames.pushBack(SpriteFrame::create("Blue_Back1.png", Rect(0,0,65,81)));
animFrames.pushBack(SpriteFrame::create("Blue_Back2.png", Rect(0,0,65,81)));
animFrames.pushBack(SpriteFrame::create("Blue_Back3.png", Rect(0,0,65,81)));
animFrames.pushBack(SpriteFrame::create("Blue_Right1.png", Rect(0,0,65,81)));
animFrames.pushBack(SpriteFrame::create("Blue_Right2.png", Rect(0,0,65,81)));
animFrames.pushBack(SpriteFrame::create("Blue_Right3.png", Rect(0,0,65,81)));

// create the animation out of the frames
Animation* animation = Animation::createWithSpriteFrames(animFrames, 0.1f);
Animate* animate = Animate::create(animation);

// run it and repeat it forever
mySprite->runAction(RepeatForever::create(animate));
Easing
Easing là một hiệu ứng chuyển động giả lập tương tác vật lý một cách đơn giản. Nó được chỉ định gia tốc để chuyển động được mượt mà như thật. Dĩ nhiên, để tạo ra những tương tác vật lý thật thì nên tìm hiểu Box2D, vấn đề này sẽ được bàn đến trong những phần sau. Dưới đây là một số hiệu ứng chuyển động easing thông dụng:
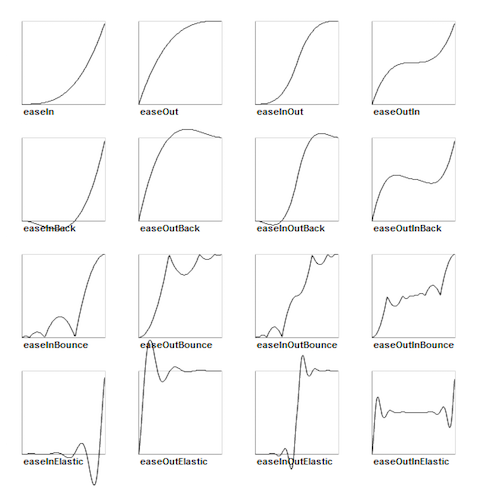
Cocos2d-x hỗ trợ hầu hết hiệu ứng chuyển động thông dụng trên. Chúng ta sẽ xem xét 1 ví dụ: Tạo hiệu ứng chuyện rới của một Sprite từ góc trên của màn hình và nảy lên khi chạm vào cạnh đối diện.
// create a sprite
auto mySprite = Sprite::create("mysprite.png");

// create a MoveBy Action to where we want the sprite to drop from.
auto move = MoveBy::create(2, Vec2(200, dirs->getVisibleSize().height -
 newSprite2->getContentSize().height));
auto move_back = move->reverse();

// create a BounceIn Ease Action
auto move_ease_in = EaseBounceIn::create(move->clone() );

// create a delay that is run in between sequence events
auto delay = DelayTime::create(0.25f);

// create the sequence of actions, in the order we want to run them
auto seq1 = Sequence::create(move_ease_in, delay, move_ease_in_back,
    delay->clone(), nullptr);

// run the sequence and repeat forever.
mySprite->runAction(RepeatForever::create(seq1));
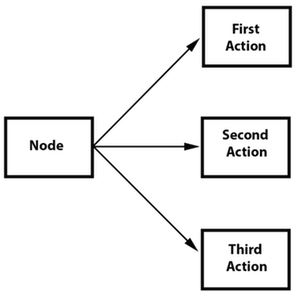
Sequences
Sequences là một tập hợp đối tượng Action được thực hiện một cách tuần tự. Nó có thể là tập hợp đối tượng Action, Funtion, thậm chí là Sequence. Cocos2d-x cung cấp đối tượng CalFunc cho phép bạn tạo một function() và truyền nó vào trong một Sequence. Nó cho phép thêm chức năng của bạn vào đối tượng Sequence bên cạnh những đối tượng Action mà Cocos2d-x cung cấp. Dưới đây là mô tả hoạt động của Sequence:

Ví dụ về Sequence:
auto mySprite = Sprite::create("mysprite.png");

// create a few actions.
auto jump = JumpBy::create(0.5, Vec2(0, 0), 100, 1);

auto rotate = RotateTo::create(2.0f, 10);

// create a few callbacks
auto callbackJump = CallFunc::create([](){
    log("Jumped!");
});

auto callbackRotate = CallFunc::create([](){
    log("Rotated!");
});

// create a sequence with the actions and callbacks
auto seq = Sequence::create(jump, callbackJump, rotate, callbackRotate, nullptr);

// run it
mySprite->runAction(seq);
Nhìn vào ví dụ trên ta có thể thấy hiệu ứng chuyển động được thực hiện lần lượt như sau: Jump -> callbackJump() -> Rotate -> callbackRotate()
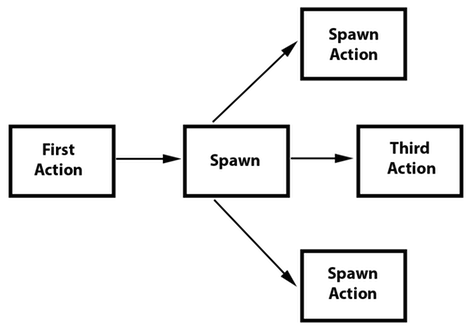
Spawn
Spawn rất giống với Sequence, sự khác biệt duy nhất là Spawn cho phép tất cả đối tượng Action được thực hiện tại cùng một thời điểm. Bạn có thể có bất kỳ đối tượng Action và thậm chí là đối tượng Spawn vào trong một Spawn.
Spawn tạo ra cùng một kết quả giống như goi liên tiếp phương thức runAction().Tuy nhiên, khi sử dụng Spawn với Sequence, nó sẽ giúp chúng ta có được nhưng hiệu ứng mong muốn.Ví dụ:
// create 2 actions and run a Spawn on a Sprite
auto mySprite = Sprite::create("mysprite.png");

auto moveBy = MoveBy::create(10, Vec2(400,100));
auto fadeTo = FadeTo::create(2.0f, 120.0f);
Khi sử dụng Spawn:
// running the above Actions with Spawn.
auto mySpawn = Spawn::createWithTwoActions(moveBy, fadeTo);
mySprite->runAction(mySpawn);
Khi thực hiện liên tiếp runAction()
// running the above Actions with consecutive runAction() statements.
mySprite->runAction(moveBy);
mySprite->runAction(fadeTo);
Tất cả ví dụ trên đều đưa lại cùng một kết quả. Tuy nghiên, Chúng có thể được tạo ra bằng cách thêm Spawn vào một Sequence. Cùng xem xét mô hình dưới đây:
// create a Sprite
auto mySprite = Sprite::create("mysprite.png");

// create a few Actions
auto moveBy = MoveBy::create(10, Vec2(400,100));
auto fadeTo = FadeTo::create(2.0f, 120.0f);
auto scaleBy = ScaleBy::create(2.0f, 3.0f);

// create a Spawn to use
auto mySpawn = Spawn::createWithTwoActions(scaleBy, fadeTo);

// tie everything together in a sequence
auto seq = Sequence::create(moveBy, mySpawn, moveBy, nullptr);

// run it
mySprite->runAction(seq);
Clone
Nếu bạn có một Action, bạn có thể sử dụng nó cho nhiều đối tượng Node bằng cách sử dụng phương thức clone(). Tại sao phải sử dụng clone? Những Actioncó một trạng thái trong. Khi nó được thực hiện, chúng thực hiện thay đổi giá trị những thuộc tính của đối tượng Node. Nếu không sử dụng clone(), bạn sẽ không chắc chắn có duy nhất một Action được đăng ký cho Node đó. Như vậy sẽ tạo ra những kết quả không mong muốn, giống như bạn không biết được chăc chắn rằng những thuộc tính nào được được thay đổi bởi Action. Cùng xem xét một ví dụ. Bạnn có một heroSprite và có vị trí hiện là (0,0). Nếu bạn thực hiện Action:
MoveBy::create(10, Vec2(400,100));
Kết quả đạt được là heroSprite sẽ thay đổi vị trí từ (0,0) thanh (400,100) trong khoảng 10 giây. Và điều quan trọng là Action đã lưu vị trí (400,100) vào trạng thái của nó. Bây giờ, bạn có emenySprite, với vị trí (200,200). Nếu bạn cũng thực hiện Action trước cho emenySprite:
MoveBy::create(10, Vec2(400,100));
Thì kết quả đạt được là emenySprite sẽ di chuyển từ vị trí (200,200) tới vị trí (800,200), chứ không phải vị trí (400,100). Nguyên nhân là do trước khi thực hiện Action cho emenySprite, thì Action đã có một trạng thái trong. Việc Clone một Action sẽ tránh được vấn đề trên.
// create our Sprites
auto heroSprite = Sprite::create("herosprite.png");
auto enemySprite = Sprite::create("enemysprite.png");

// create an Action
auto moveBy = MoveBy::create(10, Vec2(400,100));

// run it on our hero
heroSprite->runAction(moveBy);

// run it on our enemy
enemySprite->runAction(moveBy); // oops, this will not be unique!
// uses the Actions current internal state as a starting point.
Correctly, using clone()!:

C++ Javascript
// create our Sprites
auto heroSprite = Sprite::create("herosprite.png");
auto enemySprite = Sprite::create("enemysprite.png");

// create an Action
auto moveBy = MoveBy::create(10, Vec2(400,100));

// run it on our hero
heroSprite->runAction(moveBy);

// run it on our enemy
enemySprite->runAction(moveBy->clone()); // correct! This will be unique
Ở phần tiếp theo , chúng ta tìm hiểu chi tiết về việc tạo Animation cho Characters. Thank you for reading.
All rights reserved
