Xamarin-CallSever Part 1
Bài đăng này đã không được cập nhật trong 4 năm
Chào mọi người. Hôm nay mình sẽ bắt đầu với Xamarin qua một demo đơn giản dữ liệu với server.
Đầu tiên bạn tạo 1 project Xamarin Blank Portable.
Tiếp theo chúng ta sẽ tạo Models-Views-ViewModels Models/Employee.cs
    public class Employee
    {
        public int Id { get; set; }
        public string Name { get; set; }
        public string Department { get; set; }
    }
ViewModels/EmployeeViewModel
public class EmployeeViewModel : INotifyPropertyChanged
    {
        private List<Employee> _employeeList;
        public List<Employee> EmployeeList
        {
            get { return _employeeList; }
            set { _employeeList = value;
                OnPropertyChanged("EmployeeList");
            }
        }
        public MainViewModel()
        {
          // Chúng ta sẽ implement chỗ này sau.
        }

        public event PropertyChangedEventHandler PropertyChanged;
        protected virtual void OnPropertyChanged([CallerMemberName] string propertyName = null)
        {PropertyChanged?.Invoke(this, new PropertyChangedEventArgs(propertyName));
        }
    }
Ở đây chúng ta sẽ implement thêm INotifyPropertyChanged để định nghĩa class này dùng cho binding data và chúng ta cần kích hoạt sự kiện OnPropertyChanged trong mỗi property của chúng.
View/EmployeePage.xaml Ở thư mục View chúng ta tạo 1 view (Forms Xaml Page) để show list employee.
<?xml version="1.0" encoding="utf-8" ?>
<ContentPage xmlns="http://xamarin.com/schemas/2014/forms"
             xmlns:x="http://schemas.microsoft.com/winfx/2009/xaml"
             x:Class="Demo.Views.EmployeePage"
             sxmlns:ViewModels="clr-namespace:Demo.ViewModels;assembly=App5" >
    <ContentPage.BindingContext>
        <ViewModels:EmployeeViewModel/>
    </ContentPage.BindingContext>
    <Label Text="Hello" TextColor="Blue"/>
    <ListView ItemsSource="{Binding EmployeeList}" HasUnevenRows="True">
        <ListView.ItemTemplate>
            <DataTemplate>
                <ViewCell>
                    <StackLayout Orientation="Vertical" Padding="12,6" >
                        <Label Text="{Binding Name}" FontSize="Large"></Label>
                        <Label Text="{Binding Department}"   FontSize="Medium"
                               Opacity="0.6"
                               ></Label>
                    </StackLayout>
                </ViewCell>
            </DataTemplate>
        </ListView.ItemTemplate>
    </ListView>
</ContentPage>
Ở đây chúng ta sẽ tạo 1 list view để binding toàn bộ list employee trong EmployeeList của EmployeeViewModel. ListView Item sẽ có template gồm 2 label cho Name và Department. BindingContext sẽ được truyền trực tiếp từ ViewModels.EmployeeViewModel
    <ContentPage.BindingContext>
        <ViewModels:EmployeeViewModel/>
    </ContentPage.BindingContext>
Hoặc nếu bạn không thích xài kiểu này thì có thể binding trực tiếp trong code behind trong file EmployeePage.xaml.cs
     public partial class EmployeePage : ContentPage
    {
        public EmployeePage()
        {
            InitializeComponent();
            BindingContext = new EmployeeViewModel();
        }
    }
Mình không đề cập lắm về việc bạn nên dùng cách nào hoặc áp dụng binding như thế nào là hay ở đây. Cứ chạy đã rồi tính tiếp đã nhé. Đến đây chúng ta đã có các tầng Model, View và ViewModels rồi. Tiếp đến là vấn đề gọi và lấy dữ liệu từ sever. Mình trước tiên sẽ tạo 1 sever đơn giản với WebAPI để CRUD employee.
Tạo new project Asp Net Web Application và chọn Web API, ở đây bạn có thể add authentication hoặc remove là tùy bạn. Trong WebAPI chúng ta tạo class Employee
  public class Employee
    {
        public int Id { get; set; }
        public string Name { get; set; }
        public string Department { get; set; }
    }
Sau đấy add new controler và chọn WebAPI controler using Entity FrameWork. Chọn Model class là Employee và Data Context Class
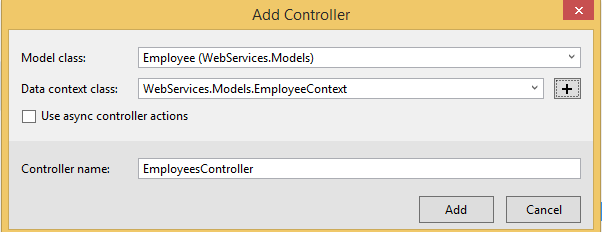
Sau đấy click OK thì nó tự generate Get, Put, Post ,Delete, Get All đầy đủ nhá. Như thế là đủ với 1 API đơn giản rồi. Sau đấy bạn có thể tạo thêm 1 Mvc Controler để thao tác với Employee database. Add new controler và chọn Mvc Controller with view using Entity FrameWork. Chọn Model class là Employee và Data Context Class
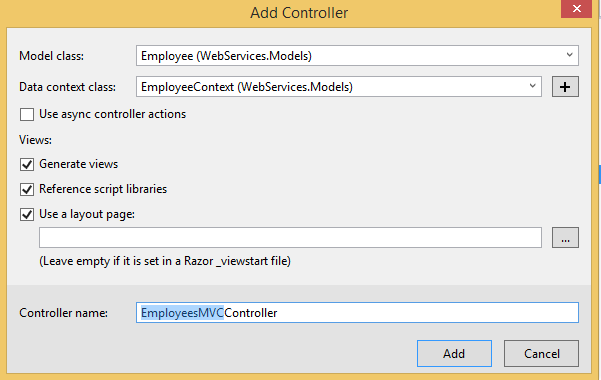
Tiếp theo bạn thử build và insert Employee để chúng ta có records khi get list ở phần tiếp theo với xamarin app. Xong web APi.
Quay trở lại Xamarin App. Tạo Services/EmployeeServices Bạn cần tạo 1 tầng service bao gồm các method để tạo requet Get, Put, Post đến sever và lấy response trả về.
Ở đây mình sẽ sử dụng "Plugin Rest Client". Tại xamarin portable app--> reference--> Manage Nuget Package--> tìm package Plugin Rest Client và install nó. Sau khi finished thì bạn sẽ nhìn thấy folder RestClient chứa file RestClient.cs như sau:
 public class RestClient<T>
    {
        private const string WebServiceUrl = 'exampleurl';

        public async Task<List<T>> GetAsync()
        {
            var httpClient = new HttpClient();

            var json = await httpClient.GetStringAsync(WebServiceUrl);

            var taskModels = JsonConvert.DeserializeObject<List<T>>(json);

            return taskModels;
        }

        public async Task<bool> PostAsync(T t)
        {
            var httpClient = new HttpClient();

            var json = JsonConvert.SerializeObject(t);

            HttpContent httpContent = new StringContent(json);

            httpContent.Headers.ContentType = new MediaTypeHeaderValue("application/json");

            var result = await httpClient.PostAsync(WebServiceUrl, httpContent);

            return result.IsSuccessStatusCode;
        }

        public async Task<bool> PutAsync(int id, T t)
        {
            var httpClient = new HttpClient();

            var json = JsonConvert.SerializeObject(t);

            HttpContent httpContent = new StringContent(json);

            httpContent.Headers.ContentType = new MediaTypeHeaderValue("application/json");

            var result = await httpClient.PutAsync(WebServiceUrl + id, httpContent);

            return result.IsSuccessStatusCode;
        }

        public async Task<bool> DeleteAsync(int id, T t)
        {
            var httpClient = new HttpClient();

            var response = await httpClient.DeleteAsync(WebServiceUrl + id);

            return response.IsSuccessStatusCode;
        }
    }
Package này đã hỗ trợ các method Get, Put, Post, Delete Async Task. Như thế là tuyệt cú mèo rồi. Trong đấy bạn cần thay đổi URL trỏ tơi Employee Sever vừa tạo trên nhé
private const string WebServiceUrl="c";
Đến đây các bạn sẽ thấy hơi chuối vì nếu cứ như vậy thì sao gọi các service khác như Admin hay Student...vv.v. Chúng ta sẽ improve chỗ này sau cho nó linh hoạt nhé. Tiếp tục, tạo Services/EmployeeServices
    public class EmployeeServices
    {
        public async Task<List<Employee>> GetEmplyees()
        {
            RestClient<Employee> restClient = new RestClient<Employee>();
            var employeeList = await restClient.GetAsync();
            return employeeList;
        }
    }
Giờ đã xong phần get all employees từ sever. Và việc cuối cùng là trong ViewModel chúng ta get dữ liệu list emplyees ra thôi. Tại EmployeeViewModel.cs
        public EmployeeViewModel()
        {
            InitializeDataAsync();
        }
        private async Task InitializeDataAsync()
        {
            var employeeService = new EmployeeServices();
            EmployeeList = await employeeService.GetEmplyees();
        }
Thế là xong. Rất đơn giản đúng không nào  Bên dưới là link các phần khác các bạn có thể tham khảo:
Part1: https://viblo.asia/RichardTran_NLong/posts/DzVkpoQKenW
Part2: https://viblo.asia/RichardTran_NLong/posts/PwRGgVqMvEd
Part3: https://viblo.asia/RichardTran_NLong/posts/PDOGqLdMvjx
All rights reserved
