Material Design trong Android
Bài đăng này đã không được cập nhật trong 4 năm
Material design là một hướng dẫn toàn bộ về góc nhìn, sự chuyển đông và tương tác về mặt thiết kế bất kể nền tảng và thiết bị. Material Design sử dụng các thành phần và hàm có thể áp dụng trên Android 5.0 ( API level 21).
Chúng ta sẽ sử dụng material design thông qua các yếu tố:
- material theme
- widget cho card và list
- tuỳ chỉnh shadow và view clipping
- vector drawable
- tuỳ chỉnh animation
Bài này mình sẽ giới thiệu 1 ví dụ nhỏ sử dụng material design, và sau đó các bạn hãy cảm nhận về design mới này.
-
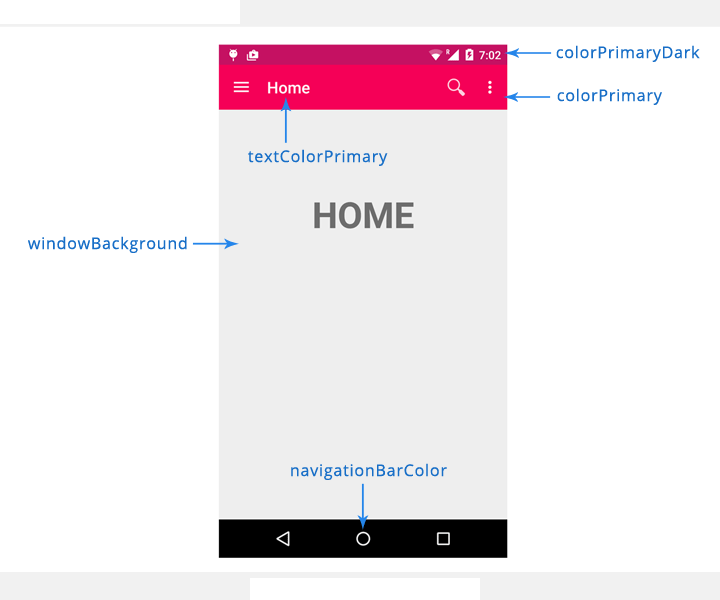
Tuỳ chỉnh màu của Material Design
Chúng ta dùng 5 trường chính trong tuỳ chỉnh theme:
-
Tạo Material Design Theme
Tạo các giá trị string sẽ dùng trong ví dụ:
strings.xml
<resources>
    <string name="app_name">Material Design</string>
    <string name="action_settings">Settings</string>
    <string name="action_search">Search</string>
    <string name="drawer_open">Open</string>
    <string name="drawer_close">Close</string>

    <string name="nav_item_home">Home</string>
    <string name="nav_item_friends">Friends</string>
    <string name="nav_item_notifications">Messages</string>

    <!-- navigation drawer item labels  -->
    <string-array name="nav_drawer_labels">
        <item>@string/nav_item_home</item>
        <item>@string/nav_item_friends</item>
        <item>@string/nav_item_notifications</item>
    </string-array>

    <string name="title_messages">Messages</string>
    <string name="title_friends">Friends</string>
    <string name="title_home">Home</string>
</resources>
Tạo các giá trị màu sẽ dùng:
    colors.xml
    <?xml version="1.0" encoding="utf-8"?>
    <resources>
        <color name="colorPrimary">#F50057</color>
        <color name="colorPrimaryDark">#C51162</color>
        <color name="textColorPrimary">#FFFFFF</color>
        <color name="windowBackground">#FFFFFF</color>
        <color name="navigationBarColor">#000000</color>
        <color name="colorAccent">#FF80AB</color>
    </resources>
Tạo các dimen:
    dimens.xml
    <resources>
        <!-- Default screen margins, per the Android Design guidelines. -->
        <dimen name="activity_horizontal_margin">16dp</dimen>
        <dimen name="activity_vertical_margin">16dp</dimen>
        <dimen name="nav_drawer_width">260dp</dimen>
    </resources>
Vào thư mục res/values-v21. Tạo 1 thư mục styles.xml với nội dung:
    styles.xml
    <resources>
        <style name="MyMaterialTheme" parent="MyMaterialTheme.Base">
            <item name="android:windowContentTransitions">true</item>
            <item name="android:windowAllowEnterTransitionOverlap">true</item>
            <item name="android:windowAllowReturnTransitionOverlap">true</item>
            <item name="android:windowSharedElementEnterTransition">@android:transition/move</item>
            <item name="android:windowSharedElementExitTransition">@android:transition/move</item>
        </style>
    </resources>
Chúng ta đã có style cơ bản cho Material Design. Mở file AndroidManifest, sửa thẻ android:theme sang theme mà bạn vừa tuỳ chỉnh.
Chạy thử app. Và bạn sẽ thấy notificaiton bar đã thay đổi màu :D
-
Thêm toolbar (Action Bar)
Tạo 1 file toolbar.xml trong layout. Với nội dung:
    <?xml version="1.0" encoding="utf-8"?>
    <android.support.v7.widget.Toolbar xmlns:android="http://schemas.android.com/apk/res/android"
        xmlns:local="http://schemas.android.com/apk/res-auto"
        android:id="@+id/toolbar"
        android:layout_width="match_parent"
        android:layout_height="wrap_content"
        android:minHeight="?attr/actionBarSize"
        android:background="?attr/colorPrimary"
        local:theme="@style/ThemeOverlay.AppCompat.Dark.ActionBar"
        local:popupTheme="@style/ThemeOverlay.AppCompat.Light" />
Bây giờ chúng ta mở main layout, và thêm toolbar với thẻ <include>
    <RelativeLayout xmlns:android="http://schemas.android.com/apk/res/android"
        xmlns:tools="http://schemas.android.com/tools"
        android:layout_width="match_parent"
        android:layout_height="match_parent"
        tools:context=".MainActivity">

        <LinearLayout
            android:layout_width="fill_parent"
            android:layout_height="wrap_content"
            android:layout_alignParentTop="true"
            android:orientation="vertical">

            <include
                android:id="@+id/toolbar"
                layout="@layout/toolbar" />
        </LinearLayout>
    </RelativeLayout>
Download button search tại đây: http://api.androidhive.info/images/ic_action_search.png
và thêm vào project.

Mở file menu_main.xml trong thư mục res/menu và thêm search button:
    <menu xmlns:android="http://schemas.android.com/apk/res/android"
        xmlns:app="http://schemas.android.com/apk/res-auto"
        xmlns:tools="http://schemas.android.com/tools"
        tools:context=".MainActivity">

        <item
            android:id="@+id/action_search"
            android:title="@string/action_search"
            android:orderInCategory="100"
            android:icon="@drawable/ic_action_search"
            app:showAsAction="ifRoom" />

        <item
            android:id="@+id/action_settings"
            android:title="@string/action_settings"
            android:orderInCategory="100"
            app:showAsAction="never" />
    </menu>
Giờ là lúc của MainActivity: extend activity từ ActionBarActivity, enable toolbar với lệnh setSupportActionBar(), override phương thức onCreateOptionsMenu() và onOptionsItemSelected():
    public class MainActivity extends ActionBarActivity {

        private Toolbar mToolbar;

        @Override
        protected void onCreate(Bundle savedInstanceState) {
            super.onCreate(savedInstanceState);
            setContentView(R.layout.activity_main);

            mToolbar = (Toolbar) findViewById(R.id.toolbar);

            setSupportActionBar(mToolbar);
            getSupportActionBar().setDisplayShowHomeEnabled(true);
        }

        @Override
        public boolean onCreateOptionsMenu(Menu menu) {
            // Inflate the menu; this adds items to the action bar if it is present.
            getMenuInflater().inflate(R.menu.menu_main, menu);
            return true;
        }

        @Override
        public boolean onOptionsItemSelected(MenuItem item) {
            // Handle action bar item clicks here. The action bar will
            // automatically handle clicks on the Home/Up button, so long
            // as you specify a parent activity in AndroidManifest.xml.
            int id = item.getItemId();

            //noinspection SimplifiableIfStatement
            if (id == R.id.action_settings) {
                return true;
            }

            return super.onOptionsItemSelected(item);
        }
    }
-
Thêm Navigation Drawer
Tạo 3 package activity, adapter, model và chuyển MainActiviy vào thư mục activity. Chúng ta sẽ sử dụng RecyclerView thay vì ListView nên cần khai báo trong gradle:
    dependencies {
        compile fileTree(dir: 'libs', include: ['*.jar'])
        compile 'com.android.support:appcompat-v7:22.0.0'
        compile 'com.android.support:recyclerview-v7:21.0.+'
    }
Trong model package, tạo 1 class với tên NavDrawerItem.java chứa các hàng của navigation drawer menu, với nội dung:
    private boolean showNotify;
    private String title;

    public NavDrawerItem() {
    }

    public NavDrawerItem(boolean showNotify, String title) {
        this.showNotify = showNotify;
        this.title = title;
    }

    public boolean isShowNotify() {
        return showNotify;
    }

    public void setShowNotify(boolean showNotify) {
        this.showNotify = showNotify;
    }

    public String getTitle() {
        return title;
    }

    public void setTitle(String title) {
        this.title = title;
    }
Tạo giao diện cho các navigation với nội dung chỉ là 1 text trong file nav_drawer_row.xml:
    <?xml version="1.0" encoding="utf-8"?>
    <RelativeLayout xmlns:android="http://schemas.android.com/apk/res/android"
        android:layout_width="match_parent"
        android:layout_height="wrap_content"
        android:clickable="true">

        <TextView
            android:id="@+id/title"
            android:layout_width="fill_parent"
            android:layout_height="wrap_content"
            android:paddingLeft="30dp"
            android:paddingTop="10dp"
            android:paddingBottom="10dp"
            android:textSize="15dp"
            android:textStyle="bold" />

    </RelativeLayout>
Tạo một layout chứa nội dung hiển thị của các navigaiton drawer:
    <RelativeLayout xmlns:android="http://schemas.android.com/apk/res/android"
        android:layout_width="match_parent"
        android:layout_height="match_parent"
        android:background="@android:color/white">

        <RelativeLayout
            android:id="@+id/nav_header_container"
            android:layout_width="match_parent"
            android:layout_height="140dp"
            android:layout_alignParentTop="true"
            android:background="@color/colorPrimary">

            <ImageView
                android:layout_width="70dp"
                android:layout_height="70dp"
                android:src="@drawable/ic_profile"
                android:scaleType="fitCenter"
                android:layout_centerInParent="true" />

        </RelativeLayout>

        <android.support.v7.widget.RecyclerView
            android:id="@+id/drawerList"
            android:layout_width="match_parent"
            android:layout_height="wrap_content"
            android:layout_below="@id/nav_header_container"
            android:layout_marginTop="15dp" />
    </RelativeLayout>
Và chúng ta cần 1 adapter để chứa dữ liệu hiển thị cho RecyclerView.
    public class NavigationDrawerAdapter extends 	RecyclerView.Adapter<NavigationDrawerAdapter.MyViewHolder> {
        List<NavDrawerItem> data = Collections.emptyList();
        private LayoutInflater inflater;
        private Context context;

        public NavigationDrawerAdapter(Context context, List<NavDrawerItem> data) {
            this.context = context;
            inflater = LayoutInflater.from(context);
            this.data = data;
        }

        public void delete(int position) {
            data.remove(position);
            notifyItemRemoved(position);
        }

        @Override
        public MyViewHolder onCreateViewHolder(ViewGroup parent, int viewType) {
            View view = inflater.inflate(R.layout.nav_drawer_row, parent, false);
            MyViewHolder holder = new MyViewHolder(view);
            return holder;
        }

        @Override
        public void onBindViewHolder(MyViewHolder holder, int position) {
            NavDrawerItem current = data.get(position);
            holder.title.setText(current.getTitle());
        }

        @Override
        public int getItemCount() {
            return data.size();
        }

        class MyViewHolder extends RecyclerView.ViewHolder {
            TextView title;

            public MyViewHolder(View itemView) {
                super(itemView);
                title = (TextView) itemView.findViewById(R.id.title);
            }
        }
    }
Và tất nhiên, sẽ cần 1 fragment cho Drawer với tên FragmentDrawer trong thư mục activity:
    public class FragmentDrawer extends Fragment {

        private static String TAG = FragmentDrawer.class.getSimpleName();

        private RecyclerView recyclerView;
        private ActionBarDrawerToggle mDrawerToggle;
        private DrawerLayout mDrawerLayout;
        private NavigationDrawerAdapter adapter;
        private View containerView;
        private static String[] titles = null;
        private FragmentDrawerListener drawerListener;

        public FragmentDrawer() {

        }

        public void setDrawerListener(FragmentDrawerListener listener) {
            this.drawerListener = listener;
        }

        public static List<NavDrawerItem> getData() {
            List<NavDrawerItem> data = new ArrayList<>();

            // preparing navigation drawer items
            for (int i = 0; i < titles.length; i++) {
                NavDrawerItem navItem = new NavDrawerItem();
                navItem.setTitle(titles[i]);
                data.add(navItem);
            }
            return data;
        }

        @Override
        public void onCreate(Bundle savedInstanceState) {
            super.onCreate(savedInstanceState);

            // drawer labels
            titles = getActivity().getResources().getStringArray(R.array.nav_drawer_labels);
        }

        @Override
        public View onCreateView(LayoutInflater inflater, ViewGroup container,
                                 Bundle savedInstanceState) {
            // Inflating view layout
            View layout = inflater.inflate(R.layout.fragment_navigation_drawer, container, false);
            recyclerView = (RecyclerView) layout.findViewById(R.id.drawerList);

            adapter = new NavigationDrawerAdapter(getActivity(), getData());
            recyclerView.setAdapter(adapter);
            recyclerView.setLayoutManager(new LinearLayoutManager(getActivity()));
            recyclerView.addOnItemTouchListener(new RecyclerTouchListener(getActivity(), recyclerView, 	new ClickListener() {
                @Override
                public void onClick(View view, int position) {
                    drawerListener.onDrawerItemSelected(view, position);
                    mDrawerLayout.closeDrawer(containerView);
                }

                @Override
                public void onLongClick(View view, int position) {

                }
            }));

            return layout;
        }

        public void setUp(int fragmentId, DrawerLayout drawerLayout, final Toolbar toolbar) {
            containerView = getActivity().findViewById(fragmentId);
            mDrawerLayout = drawerLayout;
            mDrawerToggle = new ActionBarDrawerToggle(getActivity(), drawerLayout, toolbar, 	R.string.drawer_open, R.string.drawer_close) {
                @Override
                public void onDrawerOpened(View drawerView) {
                    super.onDrawerOpened(drawerView);
                    getActivity().invalidateOptionsMenu();
                }

                @Override
                public void onDrawerClosed(View drawerView) {
                    super.onDrawerClosed(drawerView);
                    getActivity().invalidateOptionsMenu();
                }

                @Override
                public void onDrawerSlide(View drawerView, float slideOffset) {
                    super.onDrawerSlide(drawerView, slideOffset);
                    toolbar.setAlpha(1 - slideOffset / 2);
                }
            };

            mDrawerLayout.setDrawerListener(mDrawerToggle);
            mDrawerLayout.post(new Runnable() {
                @Override
                public void run() {
                    mDrawerToggle.syncState();
                }
            });

        }

        public static interface ClickListener {
            public void onClick(View view, int position);

            public void onLongClick(View view, int position);
        }

        static class RecyclerTouchListener implements RecyclerView.OnItemTouchListener {

            private GestureDetector gestureDetector;
            private ClickListener clickListener;

            public RecyclerTouchListener(Context context, final RecyclerView recyclerView, final 	ClickListener clickListener) {
                this.clickListener = clickListener;
                gestureDetector = new GestureDetector(context, new 	GestureDetector.SimpleOnGestureListener() {
                    @Override
                    public boolean onSingleTapUp(MotionEvent e) {
                        return true;
                    }

                    @Override
                    public void onLongPress(MotionEvent e) {
                        View child = recyclerView.findChildViewUnder(e.getX(), e.getY());
                        if (child != null && clickListener != null) {
                            clickListener.onLongClick(child, recyclerView.getChildPosition(child));
                        }
                    }
                });
            }

            @Override
            public boolean onInterceptTouchEvent(RecyclerView rv, MotionEvent e) {

                View child = rv.findChildViewUnder(e.getX(), e.getY());
                if (child != null && clickListener != null && gestureDetector.onTouchEvent(e)) {
                    clickListener.onClick(child, rv.getChildPosition(child));
                }
                return false;
            }

            @Override
            public void onTouchEvent(RecyclerView rv, MotionEvent e) {
            }
        }

        public interface FragmentDrawerListener {
            public void onDrawerItemSelected(View view, int position);
        }
    }
Tiếp theo, chỉnh sửa lại main layout của bạn cho chính xác:
    <android.support.v4.widget.DrawerLayout xmlns:android="http://schemas.android.com/apk/res/android"
        xmlns:app="http://schemas.android.com/apk/res-auto"
        xmlns:tools="http://schemas.android.com/tools"
        android:id="@+id/drawer_layout"
        android:layout_width="match_parent"
        android:layout_height="match_parent">

        <LinearLayout
            android:layout_width="match_parent"
            android:layout_height="match_parent"
            android:orientation="vertical">

            <LinearLayout
                android:id="@+id/container_toolbar"
                android:layout_width="match_parent"
                android:layout_height="wrap_content"
                android:orientation="vertical">

                <include
                    android:id="@+id/toolbar"
                    layout="@layout/toolbar" />
            </LinearLayout>

            <FrameLayout
                android:id="@+id/container_body"
                android:layout_width="fill_parent"
                android:layout_height="0dp"
                android:layout_weight="1" />

        </LinearLayout>

        <fragment
            android:id="@+id/fragment_navigation_drawer"
            android:name="/*your package*/.FragmentDrawer"
            android:layout_width="@dimen/nav_drawer_width"
            android:layout_height="match_parent"
            android:layout_gravity="start"
            app:layout="@layout/fragment_navigation_drawer"
            tools:layout="@layout/fragment_navigation_drawer" />

    </android.support.v4.widget.DrawerLayout>
Và thay đổi MainActivity của bạn:
        public class MainActivity extends ActionBarActivity implements FragmentDrawer.FragmentDrawerListener {

        private Toolbar mToolbar;
        private FragmentDrawer drawerFragment;

        @Override
        protected void onCreate(Bundle savedInstanceState) {
            super.onCreate(savedInstanceState);
            setContentView(R.layout.activity_main);

            mToolbar = (Toolbar) findViewById(R.id.toolbar);

            setSupportActionBar(mToolbar);
            getSupportActionBar().setDisplayShowHomeEnabled(true);

            drawerFragment = (FragmentDrawer)
                    getSupportFragmentManager().findFragmentById(R.id.fragment_navigation_drawer);
            drawerFragment.setUp(R.id.fragment_navigation_drawer, (DrawerLayout) findViewById(R.id.drawer_layout), mToolbar);
            drawerFragment.setDrawerListener(this);
        }

        @Override
        public boolean onCreateOptionsMenu(Menu menu) {
            // Inflate the menu; this adds items to the action bar if it is present.
            getMenuInflater().inflate(R.menu.menu_main, menu);
            return true;
        }

        @Override
        public boolean onOptionsItemSelected(MenuItem item) {
            // Handle action bar item clicks here. The action bar will
            // automatically handle clicks on the Home/Up button, so long
            // as you specify a parent activity in AndroidManifest.xml.
            int id = item.getItemId();

            //noinspection SimplifiableIfStatement
            if (id == R.id.action_settings) {
                return true;
            }

            return super.onOptionsItemSelected(item);
        }

        @Override
        public void onDrawerItemSelected(View view, int position) {

        }
    }
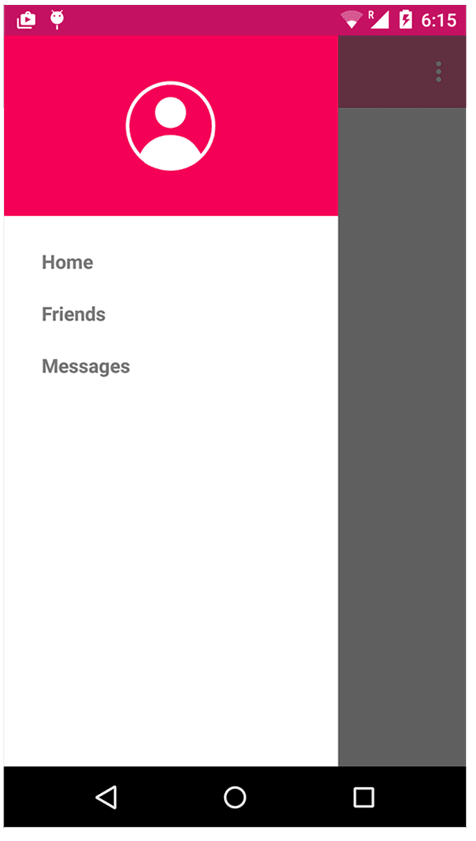
Khi chạy app, bạn đã có 1 giao diện dễ nhìn:
Và việc cuối cùng, chỉ là viết xử lí của bạn trong onDrawerItemSelected() khi bạn click vào drawer item.
All rights reserved
