Symfony2: Doctrine Model và Data Fixtures
Bài đăng này đã không được cập nhật trong 4 năm
Tiếp tục chuỗi bài viết giới thiệu về Symfony 2 framework thông qua việc xây dựng một trang blog đơn giản. Bài viết này sẽ trình bày về Model với việc sử dụng Doctrine 2 và Fixtures. Các bạn có thể tham khảo bài viết lần trước về validators, form và emailing tại đây
Tổng quan###
Bài viết này sẽ giới thiệu Model trong Symfony 2. Model sẽ được cài đặt sử dụng Doctrine 2 Object Relation Mapper(ORM). Doctrine 2 giúp chúng ta thao tác với object một cách dễ dàng. Và nó cũng cung cấp phương thức giúp thao tác với SQL gọi là Doctrine Query Language (DQL). Bên cạnh Doctrine 2, bài viết này cũng giới thiệu nguyên lý của Data Fixtures. Data Fixture là một cơ chế phổ biến cho việc dev and testing database với dữ liệu giả. Phần cuối của bài cũng sẽ trình bày phần tạo trang show blog.
Doctrine 2: Model###
Doctrine 2 cung cấp thư viện ORM cho phép chúng ta ánh xạ model với cơ sở dữ liệu tương ứng thông qua PHP PDO. Và Doctrine 2 cũng cho phép sử dụng nhiều engine khác nhau như MySQL, PostgreSQL và SQLite. Và ở trong chuỗi bài viết này chúng ta sẽ sử dụng MySQL cho việc lưu trữ dữ liệu.
Blog Entity####
Chúng ta bắt đầu tạo file Blog Entity class. Entity tôi đã giới thiệu với các bạn ở bài viết thông qua việc tạo Enquiry entity.
Mục đích của tạo entity là lưu giữ dữ liệu. Tuy nhiên, việc định nghĩa như này chưa đủ để dữ liệu ánh xạ với database.
Tạo file sau src/Blogger/BlogBundle/Entity/Blog.php
<?php
// src/Blogger/BlogBundle/Entity/Blog.php

namespace Blogger\BlogBundle\Entity;

class Blog
{
    protected $title;

    protected $author;

    protected $blog;

    protected $image;

    protected $tags;

    protected $comments;

    protected $created;

    protected $updated;
}
Như bạn đã thấy class trên khá đơn giản không kế thừa và các thuộc tính là protected và không có getter và setter.
Tuy nhiên, Doctrine 2 cung cấp task cho chúng ta thực hiện được việc này.
Trước khi thực hiện task, chúng ta cần thông báo cho Symfony 2 Blog entity đã được ánh xạ với database.
Chúng ta có thể chỉ định việc ánh xạ này thông qua formats YAML, PHP, XML và Annotations.
Trong bài viết này sẽ sử dụng Annotations.
Sửa lại class Blog như sau:
<?php
// src/Blogger/BlogBundle/Entity/Blog.php

namespace Blogger\BlogBundle\Entity;

use Doctrine\ORM\Mapping as ORM;

/**
 * @ORM\Entity
 * @ORM\Table(name="blog")
 */
class Blog
{
    /**
     * @ORM\Id
     * @ORM\Column(type="integer")
     * @ORM\GeneratedValue(strategy="AUTO")
     */
    protected $id;

    /**
     * @ORM\Column(type="string")
     */
    protected $title;

    /**
     * @ORM\Column(type="string", length=100)
     */
    protected $author;

    /**
     * @ORM\Column(type="text")
     */
    protected $blog;

    /**
     * @ORM\Column(type="string", length=20)
     */
    protected $image;

    /**
     * @ORM\Column(type="text")
     */
    protected $tags;

    protected $comments;

    /**
     * @ORM\Column(type="datetime")
     */
    protected $created;

    /**
     * @ORM\Column(type="datetime")
     */
    protected $updated;
}
Trên đây là một vài loại mapping. Chúng ta mới chỉ sử dụng một số lượng nhỏ mapping. Đầy đủ loại mapping bạn có thể xem chi tiết tại đây.
Ngoài ra, $comments ở trên không sử dụng annotations vì comments không phải là một thuộc tính của blog.
Code sau sẽ giải thích điều này.
<?php
// Create a blog object.
$blog = new Blog();
$blog->setTitle("symblog - A Symfony2 Tutorial");
$blog->setAuthor("dsyph3r");
$blog->setBlog("symblog is a fully featured blogging website ...");

// Create a comment and add it to our blog
$comment = new Comment();
$comment->setComment("Symfony2 rocks!");
$blog->addComment($comment);
Vì thế chúng ta thêm hàm addComment() và getComments() cho Blog model.
<?php
class Blog
{
    //.....

    protected $comments = array();

    public function addComment(Comment $comment)
    {
        $this->comments[] = $comment;
    }
    public function getComments()
    {
       return $this->comments;
    }

    //.....
}
Lúc này, chúng ta bắt đầu thực thi việc mapping với các thuộc tính của entity bằng cách sinh ra accessor như sau:
php app/console doctrine:generate:entities Blogger
Bạn sẽ nhận được thông báo Blog entity đã được cập nhật với accessor. Với mỗi lần chúng ta thay dổi ORM metadata cho class entity chúng ta cần chạy lại lệnh trên để sinh và thêm accessors cần thiết.
Lệnh trên sẽ không sửa đổi các accessors đã tồn tại vì vậy accessors đã có sẽ không bao giờ bị ghi đè.
Tạo trang show blog###
Route####
Chúng ta tạo route cho action show. Mỗi blog được định nghĩa bởi 1 ID duy nhất. Vì thế hãy tạo route như sau:
# src/Blogger/BlogBundle/Resources/config/routing.yml
BloggerBlogBundle_blog_show:
    pattern:  /{id}
    defaults: { _controller: BloggerBlogBundle:Blog:show }
    requirements:
        _method:  GET
        id: \d+
Tiếp theo tạo action show trong controller.
Tạo file src/Blogger/BlogBundle/Controller/BlogController.php có nội dung như sau:
<?php
// src/Blogger/BlogBundle/Controller/BlogController.php

namespace Blogger\BlogBundle\Controller;

use Symfony\Bundle\FrameworkBundle\Controller\Controller;

/**
 * Blog controller.
 */
class BlogController extends Controller
{
    /**
     * Show a blog entry
     */
    public function showAction($id)
    {
        $em = $this->getDoctrine()->getEntityManager();

        $blog = $em->getRepository('BloggerBlogBundle:Blog')->find($id);

        if (!$blog) {
            throw $this->createNotFoundException('Unable to find Blog post.');
        }

        return $this->render('BloggerBlogBundle:Blog:show.html.twig', array(
            'blog'      => $blog,
        ));
    }
}
Tiếp theo tạo view cho action show.
Tạo file src/Blogger/BlogBundle/Resouces/views/Blog/show.html.twig với nội dung như sau:
{# src/Blogger/BlogBundle/Resouces/views/Blog/show.html.twig #}
{% extends 'BloggerBlogBundle::layout.html.twig' %}

{% block title %}{{ blog.title }}{% endblock %}

{% block body %}
    <article class="blog">
        <header>
            <div class="date"><time datetime="{{ blog.created|date('c') }}">{{ blog.created|date('l, F j, Y') }}</time></div>
            <h2>{{ blog.title }}</h2>
        </header>
        <img src="{{ asset(['images/', blog.image]|join) }}" alt="{{ blog.title }} image not found" class="large" />
        <div>
            <p>{{ blog.blog }}</p>
        </div>
    </article>
{% endblock %}
Data Fixtures###
Chúng ta sử dụng fixtures để tạo dữ liệu giả. Để sử dụng fixtures chúng ta cần config Doctrine Fixture extention và bundle.
Doctrine Fixture extention và bundle không phải là thư việc chuẩn của symfony 2, vì thế chúng ta cần cài đặt chúng.
Mở file composer.json và thêm 2 dòng sau:
 "require": {
    // ...
    "doctrine/doctrine-fixtures-bundle": "dev-master",
    "doctrine/data-fixtures" : "dev-master"
}
Tiếp theo, cập nhật thay đổi.
php composer.phar update
Sau đó đăng ký DoctrineFixturesBundle vào trong kernel.
// app/AppKernel.php
public function registerBundles()
{
    $bundles = array(
        // ...
        new Doctrine\Bundle\FixturesBundle\DoctrineFixturesBundle(),
        // ...
    );
    // ...
}
Blog Fixture###
Bây giờ thì chúng ta có thể định nghĩa fixture cho blog. Tạo file src/Blogger/BlogBundle/DataFixtures/ORM/BlogFixtures.php và thêm nội dung sau:
<?php
// src/Blogger/BlogBundle/DataFixtures/ORM/BlogFixtures.php

namespace Blogger\BlogBundle\DataFixtures\ORM;

use Doctrine\Common\DataFixtures\FixtureInterface;
use Doctrine\Common\Persistence\ObjectManager;
use Blogger\BlogBundle\Entity\Blog;

class BlogFixtures implements FixtureInterface
{
    public function load(ObjectManager $manager)
    {
        $blog1 = new Blog();
        $blog1->setTitle('A day with Symfony2');
        $blog1->setBlog('Lorem ipsum dolor sit amet, consectetur adipiscing eletra electrify denim vel ports.\nLorem ipsum dolor sit amet, consectetur adipiscing elit. Morbi ut velocity magna. Etiam vehicula nunc non leo hendrerit commodo. Vestibulum vulputate mauris eget erat congue dapibus imperdiet justo scelerisque. Nulla consectetur tempus nisl vitae viverra. Cras el mauris eget erat congue dapibus imperdiet justo scelerisque. Nulla consectetur tempus nisl vitae viverra. Cras elementum molestie vestibulum. Morbi id quam nisl. Praesent hendrerit, orci sed elementum lobortis, justo mauris lacinia libero, non facilisis purus ipsum non mi. Aliquam sollicitudin, augue id vestibulum iaculis, sem lectus convallis nunc, vel scelerisque lorem tortor ac nunc. Donec pharetra eleifend enim vel porta.');
        $blog1->setImage('beach.jpg');
        $blog1->setAuthor('dsyph3r');
        $blog1->setTags('symfony2, php, paradise, symblog');
        $blog1->setCreated(new \DateTime());
        $blog1->setUpdated($blog1->getCreated());
        $manager->persist($blog1);

        $blog2 = new Blog();
        $blog2->setTitle('The pool on the roof must have a leak');
        $blog2->setBlog('Vestibulum vulputate mauris eget erat congue dapibus imperdiet justo scelerisque. Na. Cras elementum molestie vestibulum. Morbi id quam nisl. Praesent hendrerit, orci sed elementum lobortis.');
        $blog2->setImage('pool_leak.jpg');
        $blog2->setAuthor('Zero Cool');
        $blog2->setTags('pool, leaky, hacked, movie, hacking, symblog');
        $blog2->setCreated(new \DateTime("2011-07-23 06:12:33"));
        $blog2->setUpdated($blog2->getCreated());
        $manager->persist($blog2);

        $blog3 = new Blog();
        $blog3->setTitle('Misdirection. What the eyes see and the ears hear, the mind believes');
        $blog3->setBlog('Lorem ipsumvehicula nunc non leo hendrerit commodo. Vestibulum vulputate mauris eget erat congue dapibus imperdiet justo scelerisque.');
        $blog3->setImage('misdirection.jpg');
        $blog3->setAuthor('Gabriel');
        $blog3->setTags('misdirection, magic, movie, hacking, symblog');
        $blog3->setCreated(new \DateTime("2011-07-16 16:14:06"));
        $blog3->setUpdated($blog3->getCreated());
        $manager->persist($blog3);

        $blog4 = new Blog();
        $blog4->setTitle('The grid - A digital frontier');
        $blog4->setBlog('Lorem commodo. Vestibulum vulputate mauris eget erat congue dapibus imperdiet justo scelerisque. Nulla consectetur tempus nisl vitae viverra.');
        $blog4->setImage('the_grid.jpg');
        $blog4->setAuthor('Kevin Flynn');
        $blog4->setTags('grid, daftpunk, movie, symblog');
        $blog4->setCreated(new \DateTime("2011-06-02 18:54:12"));
        $blog4->setUpdated($blog4->getCreated());
        $manager->persist($blog4);

        $blog5 = new Blog();
        $blog5->setTitle('You\'re either a one or a zero. Alive or dead');
        $blog5->setBlog('Lorem ipsum dolor sit amet, consectetur adipiscing elittibulum vulputate mauris eget erat congue dapibus imperdiet justo scelerisque.');
        $blog5->setImage('one_or_zero.jpg');
        $blog5->setAuthor('Gary Winston');
        $blog5->setTags('binary, one, zero, alive, dead, !trusting, movie, symblog');
        $blog5->setCreated(new \DateTime("2011-04-25 15:34:18"));
        $blog5->setUpdated($blog5->getCreated());
        $manager->persist($blog5);

        $manager->flush();
    }

}
Chúng ta tạo từng object Blog và gán giá trị cho từng trường. Lúc này Doctrine 2 biết rằng vẫn chưa có gì cho object Entity.
Nó chỉ thực sự có khi chúng ta gọi $manager->persist($blog1), lúc này Doctrine 2 mới thực sự bắt đầu quản lý object entity. $manager là một instance của EntityManager.
Tiếp theo gọi lệnh $manager->flush() giúp tương tác với cơ sở dữ liệu và thực hiện tất cả các hành động mà đang được Doctrine 2 quản lý.
Đưa fixture vào database####
Chạy lệnh sau để load fixtures vào database:
php app/console doctrine:fixtures:load
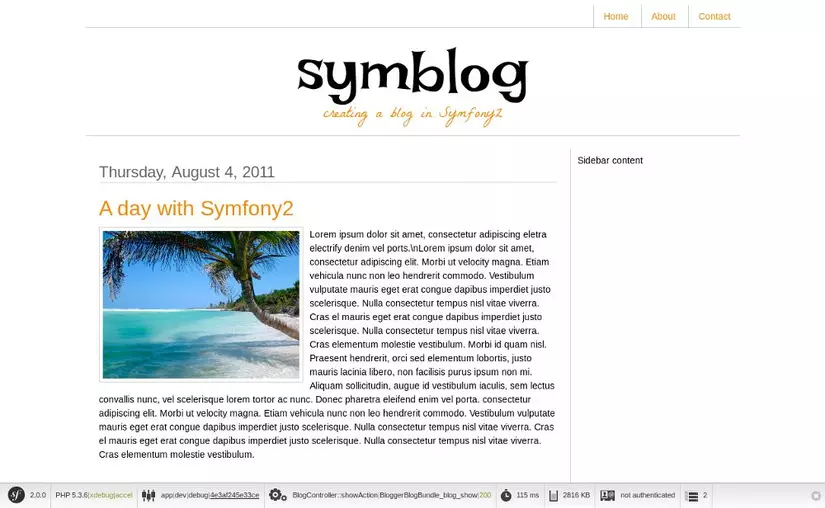
Thực sự fixtures đã được load thì trang show blog sẽ như sau:
Tổng Kết###
Bài viết trên đã trình bày một số nguyên lý về Doctrine 2 và cách định nghĩa data fixtures để lấy data test. Bài tiếp theo chúng ta sẽ cùng tìm hiểu nhiều hơn về model bằng cách thêm comment và các nguyên lý sử dụng Doctrine Migrations.
Download code tại đây
All rights reserved
