Xây dựng ứng dụng web với NodeJS + Express FrameWork + AngularJS - Phần 3
Bài đăng này đã không được cập nhật trong 8 năm
Tiếp tục cho chuỗi series "Xây dựng ứng dụng web với NodeJS + Express FrameWork + AngularJS", ở phần 3 này này mình sẻ hướng đẫn tiếp cách cài đặt Mysql, kết nối giữa Mysql vs Nodejs.
Để trực quan hơn thì đầu tiên chúng ta thêm một vài thư mục như sau:
|-projectnodejs
  |-public //Client
      |-modules
      |-src
          |-app.js
          |-index.html
      |-server
          |-api  //nơi định nghĩa routes
          |-models //chứa các object model kết nối và làm việc với database
  |-node_module
  |-index.js
  |-package-lock.json
  |-package.json
1. Tạo db và table
Các bạn có thể tham khảo thêm cách cài mysql vào máy tính của mình theo từng hệ điều hành khác nhau trên trang chủ của mysql. Ở bài viết này mình xin bỏ qua bước đó.
Tiếp đến là mình cần tạo một db với tên là nodejs_db, bảng users chứa các thông tin cơ bản của user như sau:
CREATE DATABASE `nodejs_db`;

USE `nodejs_db`;

CREATE TABLE `nodejs_db`.`users` ( `id` INT NOT NULL AUTO_INCREMENT ,
`name` VARCHAR(100) NOT NULL ,
`sex` VARCHAR(50) NOT NULL,
`birthday` DATE not null,
`address` varchar(200),
PRIMARY KEY (`id`)) ENGINE = InnoDB;

INSERT INTO `nodejs_db`.`users` (`id`, `name`, `sex`, `birthday`, `address`) VALUES ('1', 'Nguyen Van A', 'Nam', '1994-09-09', 'Tp.HCM');
INSERT INTO `nodejs_db`.`users` (`id`, `name`, `sex`, `birthday`, `address`) VALUES ('2', 'Pham Thanh B', 'Nam', '1999-09-03', 'Da Nang');
INSERT INTO `nodejs_db`.`users` (`id`, `name`, `sex`, `birthday`, `address`) VALUES ('3', 'Tran Anh D', 'Nam', '1999-01-02', 'Quang Nam');
INSERT INTO `nodejs_db`.`users` (`id`, `name`, `sex`, `birthday`, `address`) VALUES ('4', 'Nguyen Thi M', 'Nu', '1996-02-03', 'Ha Noi');
INSERT INTO `nodejs_db`.`users` (`id`, `name`, `sex`, `birthday`, `address`) VALUES ('5', 'Le My H', 'Nu', '1992-12-10', 'Quang Tri');
2. Tạo kết nối từ Nodejs đến Mysql
Trước hết chúng ta cần cài đặt package mysql bằng cách chạy lệnh sau tại thư mục gốc project: npm install mysql
Trong thư mục models chúng ta tạo file connection.js để thực hiện việc kết nối với database(cụ thể ở đây là mysql):
/connection.js
var mysql = require('mysql');

function Connection() {
  this.pool = null;

  this.init = function() {
    this.pool = mysql.createPool({
      connectionLimit: 10,
      host: 'localhost',
      user: 'root',
      password: '1234',
      database: 'nodejs_db',
      multipleStatements : true
    });
  };

  this.acquire = function(callback) {
    this.pool.getConnection(function(err, connection) {
      callback(err, connection);
    });
  };
}

module.exports = new Connection();
Lưu ý: Các thông tin như host, user, pass... có thể khác tùy theo cá nhân từng người lúc thiết lập mysql.
3. Tạo model User và thực hiện truy vấn tới database
Tại thư mục models chúng ta tạo file user.js bên dưới:
/user.js
var connection = require('./connection');

function User() {

  //Hàm này cho phép ta lấy lên toàn bộ thông tin của tất cả user có trong bảng.
  this.get = function(res) {
    console.log("Get all user");
    connection.acquire(function(err, con) {
      con.query('select * from users', function(err, result) {
        con.release();
        res.send(result);
      });
    });
  };
}
module.exports = new User();
4. UI hiển thị danh sách User
Tại file index.html và app.js trong thư mục /src chúng ta sửa lại để có thể hiện danh sách user như sau:
/index.html
<!DOCTYPE html>
<html>
<head>
  <meta charset="utf-8"/>
    <script src="../modules/angular/angular.js"></script>
    <script src="app.js"></script>
</head>
<body ng-app="myApp" ng-controller="myController">
  <h1>{{title}}</h1>
  <table>
    <th>id</th>
    <th>name</th>
    <th>birthday</th>
    <th>sex</th>
    <th>address</th>
    <tbody ng-repeat="user in listUsers">
      <tr>
        <td>{{user.id}}</td>
        <td>{{user.name}}</td>
        <td>{{user.birthday | date: "dd/MM/yyyy"}}</td>
        <td>{{user.sex}}</td>
        <td>{{user.address}}</td>
      </tr>
    </tbody>
  </table>
</body>
</html>
/app.js
var app = angular.module('myApp', []);

app.controller('myController', myController);

function myController($scope, $http) {
  $scope.title = 'Danh Sách User!!!';
  $scope.listUsers = [];

  $scope.getListUsers = function(){
    $http.get('/user').then(function(result) {
      $scope.listUsers = result.data;
    });
  }
  $scope.getListUsers();
}
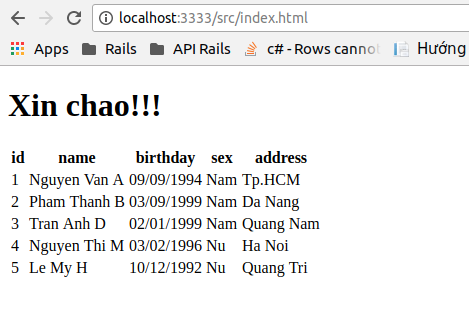
Trước khi chạy chúng ta cần fake vài record trong bảng user rồi sau đó mở terminal lên và chạy lệnh node index.js và kết quả sẽ được như hình dưới.
Vậy là xong, ở bài viết tiếp theo mình xin hướng dẫn các hàm làm việc còn lại với mysql như thêm, sửa xóa và sử dụng Single Page cho project. Bài viết không trách khỏi thiếu sót mong nhận được góp ý của tất cả mọi người. Cảm ơn các bạn đã dành thời gian theo dõi bài viết.
All rights reserved
