Xây dựng ứng dụng API bằng Node.js
Bài đăng này đã không được cập nhật trong 7 năm
1. Mở đầu
Xin chào các bạn, ở bài viết này chúng ta sẽ cùng tìm hiểu về cách xây dựng một ứng dụng trả về API đơn giản bằng Node.js nhé, và cụ thể là sử dụng framework Express, CSDL là mongoDB. Kết quả sau bài viết này đó là có một ứng dụng web API bao gồm các chức năng CRUD.
2. Đối tượng tham gia
Các bạn hiểu được cơ bản về APIs và kiến thức JavaScript cơ bản. Trong bài có sử dụng ES6 tuy nhiên nó không quá phức tạp. Và điều cuối cùng là các bạn mới sử dụng framework Express.
3. Init project
3.1 Init npm
Đầu tiên các bạn tạo 1 thư mục bất kì và mở thư mục đó lên. Thư mục mình tạo trong bài sẽ là api_express nhé:
mkdir api_express && cd api_express
sau đó chạy:
npm init
để khởi tạo gói npm, hãy điền đầy đủ thông tin cho app hoặc bạn có thể auto ấn enter nhé để nó tự điền nhé. Khi quá trình này hoàn tất nó sẽ sinh ra file package.json.
3.2 Cài đặt framework Express
Tiếp đến là cài đặt framework Express cho app:
npm install --save express mongodb@2.2.16 body-parser
3.3 Cài đặt nodemon
nodemon sẽ giúp mình theo dõi các thay đổi đối với ứng dụng của mình bằng cách xem các tệp đã thay đổi và tự động khởi động lại máy chủ.
npm install --save-dev nodemon
và thêm đoạn sau vào file package.json
// package.json
  "scripts": {
    "dev": "nodemon server.js"
  },
ok chúng mình đã cài đặt những thứ cần thiết, và giờ bạn hãy tạo file server.js và xây dựng app thôi.
4. Tạo file server.js
Sau khi tạo file server.js bạn hãy require những thư viện mà ta sẽ sử dụng vào file server.js và khai báo cổng cho app nhé:
const express        = require('express');
const MongoClient    = require('mongodb').MongoClient;
const bodyParser     = require('body-parser');
const app            = express();

const port = 8000;

app.listen(port, () => {
  console.log('We are live on ' + port);
});
Nếu bạn chạy script run npm run dev ( hoặc node server.js nếu k cài Nodemon) và ra We are live on port 8000 trên terminal thì bạn đã thành công rồi đó!
5. Tổ chức thư mục
Hầu hết các tutorial đều hướng dẫn config routes trong file routes.js tuy nhiên trong bài viết này, sẽ chia nhỏ ra các tệp vào các thư mục, module hóa để có thể dễ quản lý hơn khi ứng dụng phình to ra.
các bạn hãy chạy theo câu lệnh sau để có thể tạo được cấu trúc như này nhé. > app > routes > index.js and note_routes.js.
mkdir app
cd app
mkdir routes
cd routes
touch index.js
touch note_routes.js
6. Xây dựng api
6.1 Routes đầu tiên
Đầu tiên hãy viết 1 hàm rỗng trong file not_routes.js và export nó ra:
// routes/note_routes.js
module.exports = function(app, db) {
};
Bạn hãy export file đó vào index.js:
// routes/index.js
const noteRoutes = require('./note_routes');
module.exports = function(app, db) {
  noteRoutes(app, db);
};
Và export routes vào file server.js để có routes.
// server.js
const express        = require('express');
const MongoClient    = require('mongodb').MongoClient;
const bodyParser     = require('body-parser');
const app            = express();
const port = 8000;
require('./app/routes')(app, {});
app.listen(port, () => {
  console.log('We are live on ' + port);
});
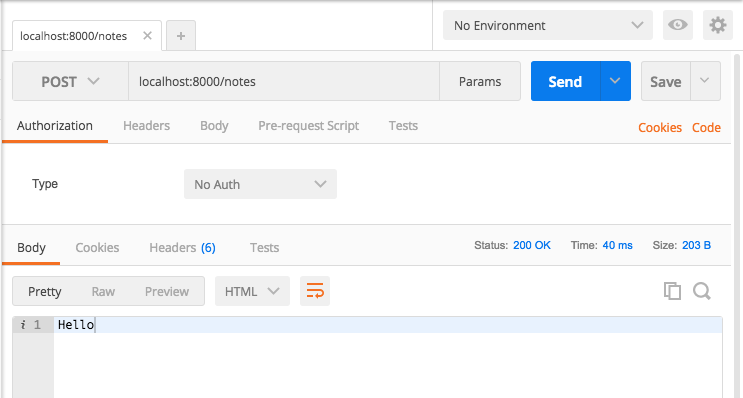
Để kiểm tra xem những dòng trên vẫn chạy ổn bạn hãy thay đổi file note_routes.js, như dưới đây và dùng postman để test xem ok không nhé:
// note_routes.js
module.exports = function(app, db) {
  app.post('/notes', (req, res) => {
    // You'll create your note here.
    res.send('Hello')
  });
};
Dùng postman với url: localhost:8000/notes, method là post nhé. nếu trả về Hello thì những dòng code của bạn vẫn chạy ổn rồi.
6.2 Database
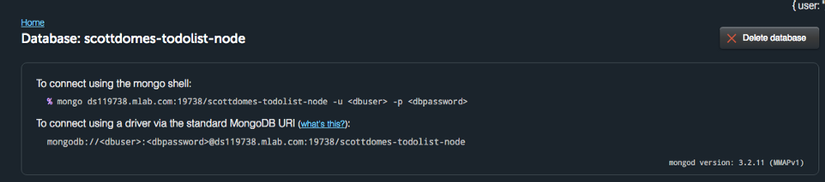
Bước tiếp theo hãy connect tới database. Cách nhanh nhất là bạn hãy connect tới CSDL thông qua https://mlab.com/ , nó có kích thước nhỏ, free và dễ sử dụng. Sau đó bạn hãy thêm add User để sử dụng nhé.
 sau đó lấy url:
 Tạo file
 db.js để config
mkdir config
cd config
touch db.js
và thêm vào đó
module.exports = {
  url : YOUR URL HERE
};
trong file server sửa lại như sau:
// server.js
const express        = require('express');
const MongoClient    = require('mongodb').MongoClient;
const bodyParser     = require('body-parser');
const db             = require('./config/db');
const app            = express();
const port = 8000;
app.use(bodyParser.urlencoded({ extended: true }));
MongoClient.connect(db.url, (err, database) => {
  if (err) return console.log(err)
  require('./app/routes')(app, database);
  app.listen(port, () => {
    console.log('We are live on ' + port);
  });
})
Bây giờ app của bạn có thể connect với database rồi nhé.
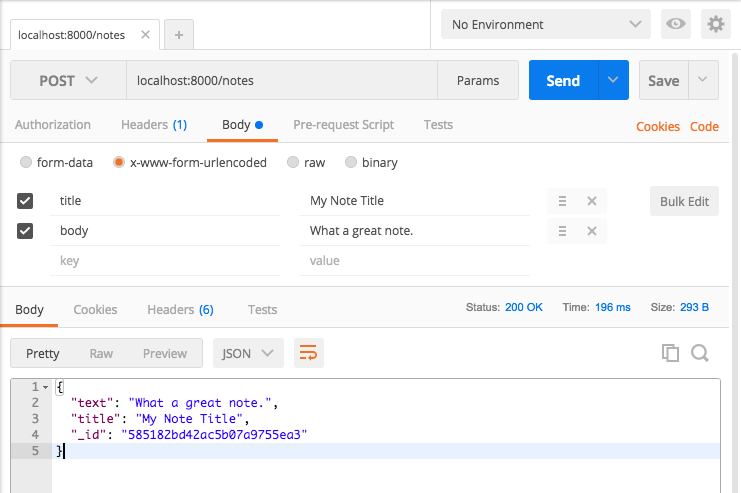
6.3 Thêm mới 1 bản ghi vào Database
Toàn bộ file node_routes sẽ xử lý như sau:
// note_routes.js
module.exports = function(app, db) {
  const collection =
  app.post('/notes', (req, res) => {
    const note = { text: req.body.body, title: req.body.title };
    db.collection('notes').insert(note, (err, result) => {
      if (err) {
        res.send({ 'error': 'An error has occurred' });
      } else {
        res.send(result.ops[0]);
      }
    });
  });
};
và hãy thử request lại với postman nhé:
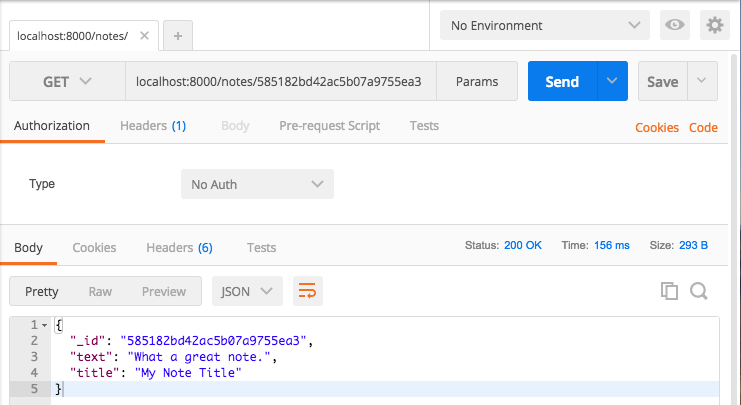
6.4 Xem một bản ghi
Muốn xem 1 bản ghi bạn phải truyền vào url id của bản ghi đó localhost:8000/notes/585182bd42ac5b07a9755ea3 . Vì vậy trong routes ta cũng phải khai báo có biến id để node js hiểu:
// tạo 1 routes khác
var ObjectID = require('mongodb').ObjectID;
module.exports = function(app, db) {
  app.get('/notes/:id', (req, res) => {
    const id = req.params.id;
    const details = { '_id': new ObjectID(id) };
    db.collection('notes').findOne(details, (err, item) => {
      if (err) {
        res.send({'error':'An error has occurred'});
      } else {
        res.send(item);
      }
    });
  });
và kết quả khi test sẽ được như vậy:
6.5 Xóa một bản ghi
  app.delete('/notes/:id', (req, res) => {
    const id = req.params.id;
    const details = { '_id': new ObjectID(id) };
    db.collection('notes').remove(details, (err, item) => {
      if (err) {
        res.send({'error':'An error has occurred'});
      } else {
        res.send('Note ' + id + ' deleted!');
      }
    });
  });
6.6 Update một bản ghi
// note_routes.js
// ...
  app.put('/notes/:id', (req, res) => {
    const id = req.params.id;
    const details = { '_id': new ObjectID(id) };
    const note = { text: req.body.body, title: req.body.title };
    db.collection('notes').update(details, note, (err, result) => {
      if (err) {
          res.send({'error':'An error has occurred'});
      } else {
          res.send(note);
      }
    });
  });
// ...
All rights reserved
