Xây dựng một ứng dụng Restful API đơn giản với Rails 5 (Phần 1)
Bài đăng này đã không được cập nhật trong 5 năm
Giới thiệu
Sau một thời gian tìm hiểu về API trong Rails thì mình đã xây dựng được một ứng dụng đơn giản để có cái nhìn cơ bản về API. Và bài viết này nhằm mục đích ghi lại những gì mình đã tìm hiểu và làm được để ghi nhớ cho bản thân và chia sẻ cho các bạn mới bắt đầu với API.
Ở phần 1 này mình sẽ bắt đầu với việc xây dựng một ứng dụng CRUD để trả về dữ liệu dạng JSON để làm quen với cấu trúc Restful API. Ở phần 2 mình sẽ áp dụng Serializer để xây dựng các response cho ứng dụng, phần này mình sẽ viết ở bài sau.
Môi trường:
- Ruby 2.5.1
- Rails 5.2.4.1
- MySQL
Bắt đầu
Khởi tạo project
rails new my_post_api --api -T
Cấu hình Gemfile
source "https://rubygems.org"
git_source(:github) { |repo| "https://github.com/#{repo}.git" }

ruby "2.5.1"

gem "rails", "~> 5.2.4", ">= 5.2.4.1"
gem "mysql2"
gem "puma", "~> 3.11"

gem "bootsnap", ">= 1.1.0", require: false

group :development, :test do
  gem "byebug", platforms: [:mri, :mingw, :x64_mingw]
end

group :development do
  gem "listen", ">= 3.0.5", "< 3.2"
  gem "spring"
  gem "spring-watcher-listen", "~> 2.0.0"
end

gem "tzinfo-data", platforms: [:mingw, :mswin, :x64_mingw, :jruby]
Sau đó chúng ta chạy lệnh bundle install để cài đặt các gem.
Cấu hình file config/database.yml
default: &default
  adapter: mysql2
  encoding: utf8
  pool: 5
  username: root
  password: yourpassword
  socket: /var/run/mysqld/mysqld.sock

development:
  <<: *default
  database: my_post_api_dev

test:
  <<: *default
  database: my_post_api_test

production:
  <<: *default
  database: my_post_api_product
Sau khi đã cấu hình cho database chúng ta cần chạy lệnh rails db:create để tạo database.
Xây dựng model và controller
Tạo model
Chúng ta chạy lệnh sau để khởi tạo model Post cho project với 2 thuộc tính là title và content
rails g model Post title:string content:text
Sau đó chạy lệnh rails db:migrate để tạo bảng trong DB.
Thêm validation cho model Post để bắt lỗi nào.
# app/models/post.rb

class Post < ApplicationRecord
  validates :title, :content, presence: true
end
Bây giờ đã có model rồi, công việc tiếp theo đó là phải tạo dữ liệu mẫu để sử dụng. Ở đây mình sử dụng gem faker để seed dữ liệu.
Thêm gem faker vào Gemfile sau đó chạy bundle install.
[...]
group :development, :test do
  gem "byebug", platforms: [:mri, :mingw, :x64_mingw]
  gem "faker"
end
[...]
Thêm vào file db/seeds.rb để tạo dữ liệu mẫu.
5.times do
  Post.create(title: Faker::Book.title, content: Faker::Lorem.sentence)
end
Cuối cùng, chạy rails db:seed để import dữ liệu vào DB.
Route
config/route.rb
Rails.application.routes.draw do
  namespace :api do
    namespace :v1 do
      resources :posts
    end
  end
end
Tạo controller
Khởi tạo app/controllers/api_controller.rb. Controller này sẽ dùng ở phần 2 của bài viết này, nhưng mình khởi tạo sẵn để dùng.
class ApiController < ActionController::API
end
Tạo app/controllers/api/v1/posts_controller.rb
class Api::V1::PostsController < ApplicationController
  def index
  end
end
Xây dựng các phương thức cho controller
index
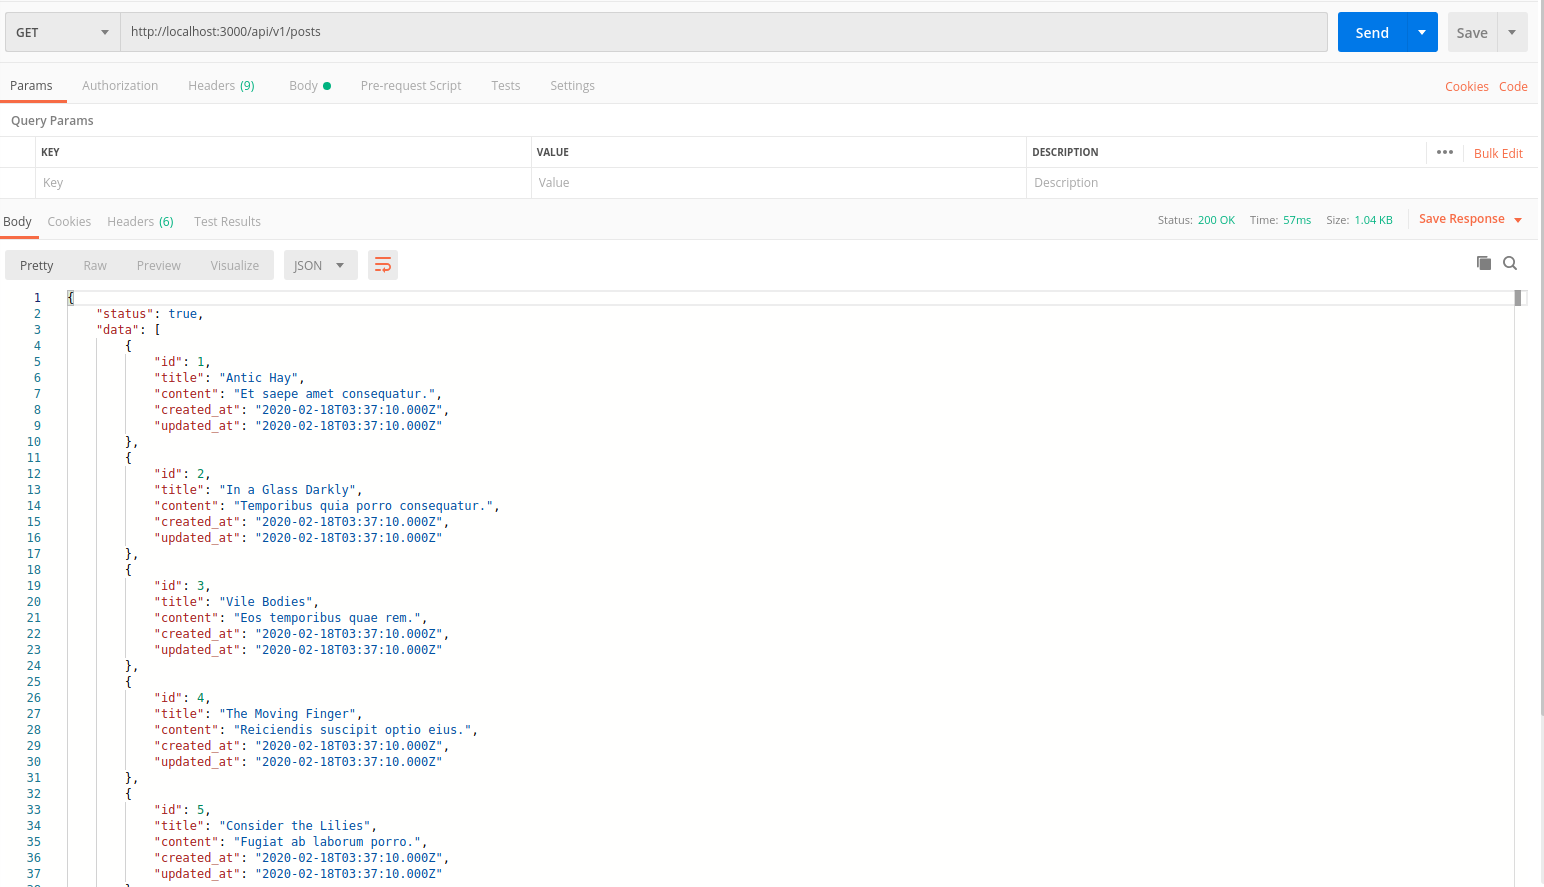
API này trả về danh sách tất cả các Post dưới dạng JSON
def index
    @posts = Post.order('created_at DESC')
    render json: {
      status: true,
      data: @posts
    },
    status: :ok
end
Bây giờ chúng ta chạy server với lệnh rails s để test API này với Postman

show
API này trả về 1 post tương ứng với id dưới dạng json
class Api::V1::PostsController < ApplicationController
  before_action :load_post, only: %i(show)

    [...]

  def show
    render json: {
      status: true,
      data: @post
    },
    status: :ok
  end

  private

  def load_post
    @post = Post.find_by id: params[:id]
    return if @post
    render json: {
      status: false,
      message: 'Not found'
    },
    status: :not_found
  end
end
Test với postman

Không tìm thấy record

create
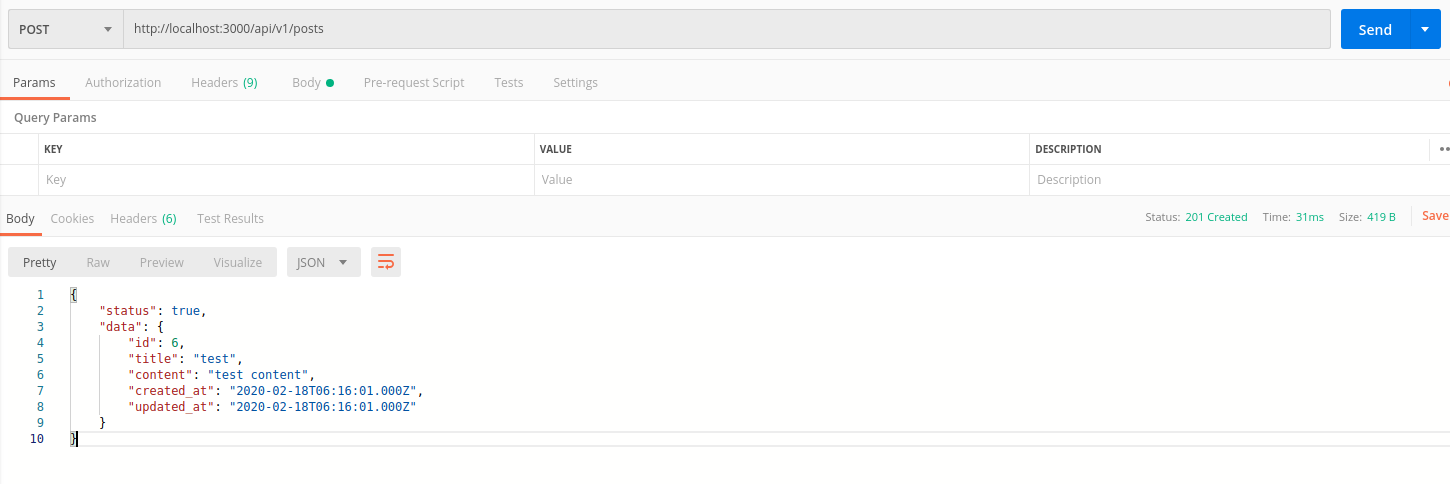
API tạo record và lưu vào DB, sau đó trả về record đó dưới dạng JSON
class Api::V1::PostsController < ApplicationController
  before_action :load_post, only: %i(show)

   [...]

  def create
    @post = Post.new post_params
    if @post.save
      render json: {
        status: true,
        data: @post
      },
      status: :created
    else
      render json: {
        status: false,
        error: @post.errors
      },
      status: :unprocessable_entity
    end
  end

  private

  def post_params
    params.permit :title, :content
  end

 [...]

end
Để test với postman mình sẽ đổi lại type từ GET thành POST.
Ở tab Headers chúng ta sẽ thêm Key: Content-Type có Value: application/json
Ở tab Body ta thêm data để test:
{
	"title": "Test post title",
    "content": "Test post content"
}

update
API cập nhật record tương ứng với id
class Api::V1::PostsController < ApplicationController
  before_action :load_post, only: %i(show update)

  [...]

  def update
    if @post.update_attributes post_params
      render json: {
        status: true,
        data: @post
      },
      status: :ok
    else
      render json: {
        status: false,
        error: @post.errors
      },
      status: :unprocessable_entity
    end
  end

  [...]

 end
Để test phương thức update phần data sẽ tương tự như create, chỉ đổi method POST thánh PUT

delete
API xóa 1 record tương ứng với id ra khỏi DB
class Api::V1::PostsController < ApplicationController
  before_action :load_post, only: %i(show update destroy)

  [...]

  def destroy
    @post.destroy
    render json: {
      status: true,
      data: @post
    },
    status: :ok
  end

  [...]

 end
Chúng ta đổi method thành DELETE để test với postman

Tổng kết
Như vậy là mình đã tạo xong 1 RESTful API cơ bản rồi. Hi vọng qua bài viết này thì các bạn có thể nắm được cách tạo ra một ứng dụng API đơn giản. Ở bài viết tiếp theo chúng ta sẽ sử dụng Serializer để tạo response format thay vì viết riêng cho từng action như hiện tại.
Hẹn các bạn ở bài viết sau!
All rights reserved