Xây dựng một app gọi video với ReactJs và NodeJs - Bài 1
Bài đăng này đã không được cập nhật trong 5 năm
Xin chào các bạn, tự dưng một ngày đẹp trời muốn làm 1 cái app gọi video. Well, ngoài code thì cũng chẳng có gì làm nên bắt tay vào thôi. Để làm được demo này thì bạn sẽ phải tìm hiểu về một số thứ sau (không phải master đâu nha, cơ bản thôi là được rồi):
- ReactJS
- NodeJS
- WebRTC
- SocketIO
WebRTC
ReactJS, NodeJS, SocketIO thì chắc mình sẽ không nói nữa, mọi người có lẽ cũng khá quen thuộc với nó rồi. Còn WebRTC là gì? WebRTC (Web Real-Time Communication) là tập hợp các giao thức truyền thông cho phép trình duyệt giao tiếp với nhau realtime (thời gian thực). Về bản chất, WebRTC là tập hợp các chuẩn và giao thức cho phép trình duyệt web thực hiện trực tiếp các tính năng truyền thông đa phương tiện thời gian thực như gọi điện, truyền hình, truyền dữ liệu, gửi tin nhắn bằng các APIs Javascripts. Các bạn có thể đọc thêm ở đây:
- https://www.html5rocks.com/en/tutorials/webrtc/basics/
- https://viblo.asia/p/gioi-thieu-ve-webrtc-va-huong-tiep-can-media-server-maGK7k3MKj2
Bắt đầu
Nếu các bạn đọc những bài trước của mình thì mình build structure khá là phức tạp, phân chia nhiều thư mục, sử dụng redux-saga để xử lý side effect, thì lần này mình sẽ làm đon giản thôi. Sẽ có 1 trang để tạo room hoặc nhập code room, và 1 trang để hiển thị các user đang gọi video cho nhau.
Tạo project với create-react-app
npx create-react-app reactjs-video-call
Sau đó sẽ tạo file routes trong src
import React from 'react';
import { Switch, Route } from 'react-router-dom';
import Home from '../views/home';
import Room from '../views/room';

const Routes = () => (
    <Switch>
        <Route
            exact
            path='/'
            component={Home}
        />
        <Route
            exact
            path='/room/:code'
            component={Room}
        />
    </Switch>
);

export default Routes;
Để làm giao diện thì vẫn sử dụng thư viện quen thuộc ant design
import { BrowserRouter as Router, useHistory } from 'react-router-dom';
import 'antd/dist/antd.css';
import Routes from './routes';
import './App.scss';

const App = () => {
  const history = useHistory();
  return (
    <div className="App">
      <Router history={history}>
        <Routes />
      </Router>
    </div>
  )
}

export default App;
Trang chủ
Giao diện trang chủ thì mình làm rất đơn giản thôi, chỉ là có 1 nút tạo phòng và 1 ô input để nhập room code cho ai muốn join. Còn bạn muốn làm đẹp và xịn thì hãy tự custom theo ý mình nhé 
import React, { useState } from 'react';
import { Row, Col, Input } from 'antd';
import axios from 'axios';

const Home = (props) => {
    const apiUrl = process.env.REACT_APP_API_URL;
    const { history } = props;
    const [roomCode, setRoomCode] = useState('');

    const onCreateRoom = () => {
        axios.post(`${apiUrl}/create-room`).then((res) => {
            history.push(`/room/${res.data.code}`);
        });
    }

    const onJoinRoom = () => {
            axios.get(`${apiUrl}/get-room/${roomCode}`).then((res) => {
                history.push(`/room/${res.data.code}`);
        }).catch(err => {
            console.log(err);
        });
    }

    return (
        <>
            <Row style={{ height: '100%' }}>
                <Col span={24}>
                    <button
                        className='button__primary'
                        onClick={onCreateRoom}
                        style={{ marginBottom: '30px' }}
                    >
                        Create Room
                     </button>

                    <Input
                        style={{
                            display: 'block',
                            width: '500px',
                            height: '40px',
                            marginBottom: '10px'
                        }}
                        onChange={(input) => setRoomCode(input.target.value)}
                        name='room-code'
                    />
                    <button
                        className='button__primary'
                        onClick={onJoinRoom}
                    >
                        Join Room
                     </button>
                </Col>
                <Col span={24}>

                </Col>
            </Row>
        </>
    )
};

export default Home;
Ở đây là mình đang đưa cho các bạn đoạn code hoàn chỉnh của mình rồi. Và để cho đoạn code này hoàn thiện thì chúng ta cần đi xây dựng thêm tính năng tạo và join vào phòng. Còn giao diện của mình chỉ trông thế này thôi:
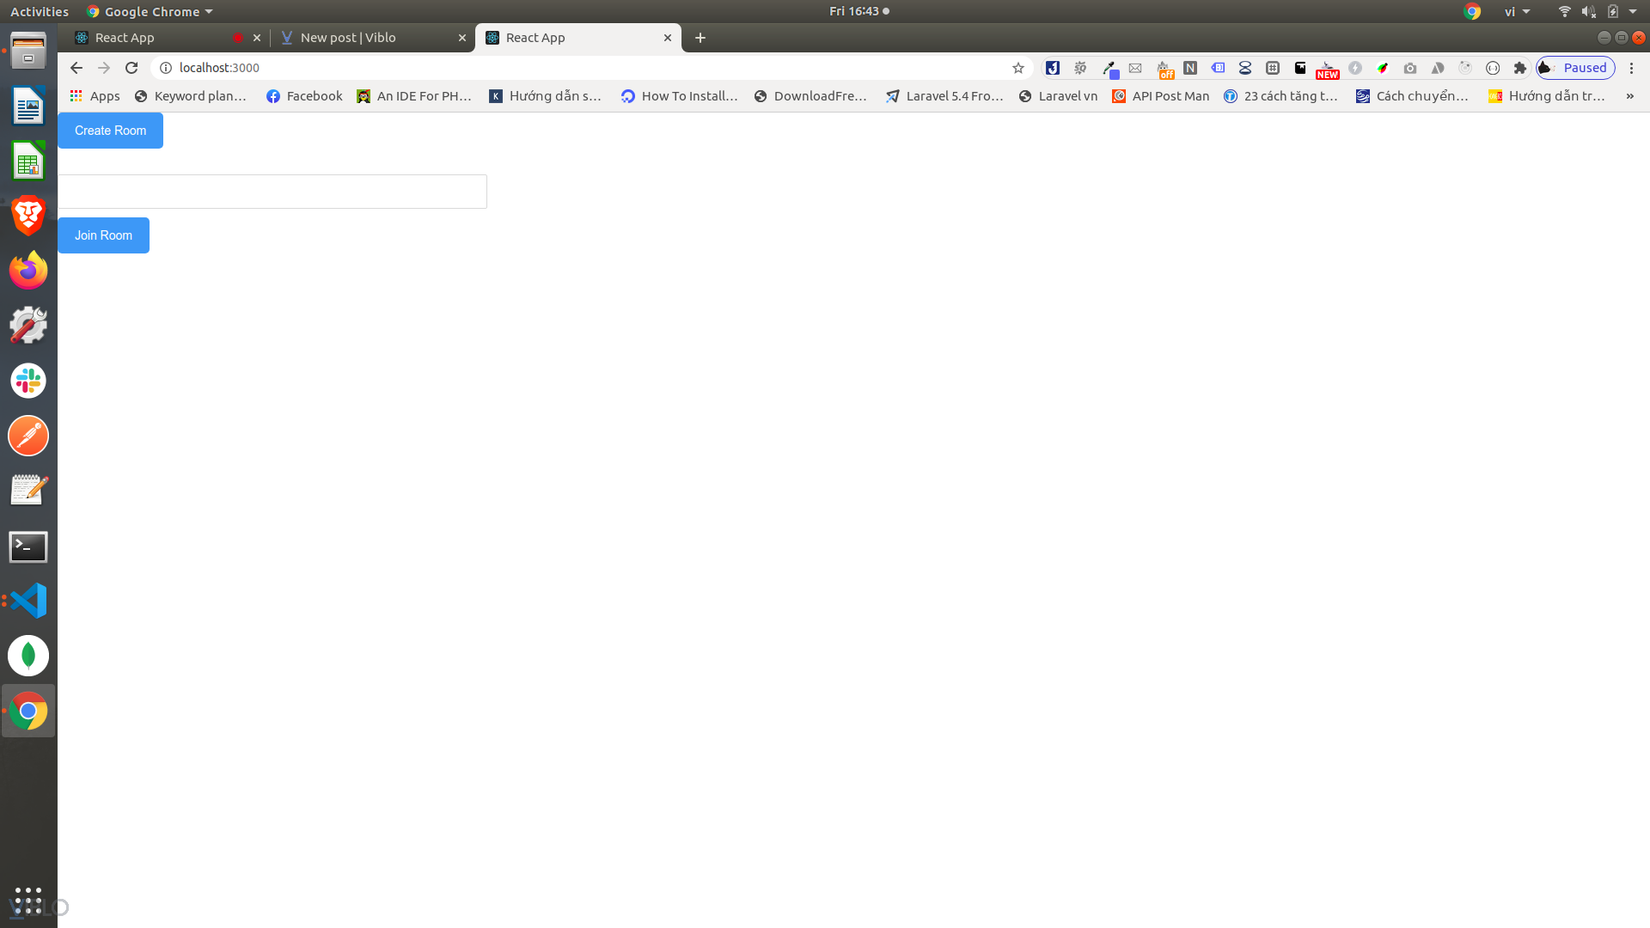
Tạo và tham gia vào phòng
Và giờ chúng ta sẽ tạo 1 project NodeJS để làm backend. Đầu tiên chạy câu lệnh
npm init
Và cứ next đến hết luôn cũng nhé . Lúc này bạn sẽ có 1 file package.json những nó sẽ không giống mình ở dưới đâu nhé, kia là mình đã có cài thêm các package. Và mình có sử dụng thêm nodemon để giám sát sự thay đổi của file, điều này sẽ giúp mình không phải chạy lại start mỗi khi muốn build code mới mà nodemon sẽ tự quan sát và biết để tự chạy lại giúp mình.
{
  "name": "demo-video-call",
  "version": "1.0.0",
  "description": "",
  "main": "index.js",
  "scripts": {
    "test": "echo \"Error: no test specified\" && exit 1",
    "dev": "nodemon --watch './src/**/*.ts' --exec 'ts-node' ./src/server.ts",
    "start": "ts-node ./src/server.ts"
  },
  "author": "",
  "license": "ISC",
  "dependencies": {
    "@types/mongoose": "^5.7.36",
    "@types/node": "^14.14.2",
    "cors": "^2.8.5",
    "dotenv": "^8.2.0",
    "express": "^4.17.1",
    "mongoose": "^5.10.11",
    "socket.io": "^2.3.0",
    "ts-node": "^9.0.0",
    "typescript": "^4.0.3"
  }
}
{
    "compilerOptions": {
      "sourceMap": true,
      "target": "es2017",
      "outDir": "./dist",
      "baseUrl": "./src",
      "esModuleInterop":true,
      "allowSyntheticDefaultImports": true
    },
    "include": [
      "src/**/*.ts"
    ],
    "exclude": [
      "node_modules"
    ]
}
PORT=7000
DB_CONNECT=LINK_CONNECT_MONGO_DB
Và từ giờ tất cả các file mình sẽ đều đưa vào trong src nhé
Đầu tiên thì chúng ta sẽ tạo 1 file server.ts, nó tương tự như file index vậy, khởi nguồn của hạnh phúc và khổ đau đều bắt nguồn từ đây. Và chúng ta sẽ cần connect được với DB trước đã
import mongoose from 'mongoose';
import dotenv from 'dotenv';

dotenv.config();

mongoose.connect(
    process.env.DB_CONNECT,
    { useUnifiedTopology: true, useNewUrlParser: true },
    () => console.log('DB Connected')
  );
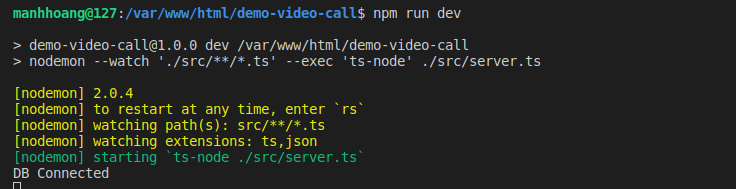
Giờ hãy chạy
npm run dev
Và đây là kết quả bạn có thể thấy được
Giờ tạo thêm 1 file nữa nào
import express from "express";
import dotenv from "dotenv";
import path from "path";
import { createServer, Server } from "http";

dotenv.config();

export class ChatServer {
    private app: express.Application;
    private port: string;
    private server: Server;

    constructor() {
        this.createApp();
        this.config();
        this.createServer();
        this.listen();
    }

    private createApp(): void {
        this.app = express();
        this.app.use(express.static(path.join(__dirname, "../public")));
    }

    private config(): void {
        this.port = process.env.PORT;
        this.app.set('port', this.port);
    }

    private listen = async () => {
        this.server.listen(this.port);
    };

    private createServer(): void {
        this.server = createServer(this.app);
    }

    public getApp(): express.Application {
        return this.app;
    }
}
Lần này các bạn sẽ thấy mình biết phức tạp hơn lần trước. Nhưng cá nhân mình thấy viết thế này về sau nếu cần mở rộng sẽ tiện và clear hơn. Và nếu cho bạn nào chưa biết thì ở đây mình đang dùng typescript nhé. Nếu các bạn nhìn vào constructor thì thể có thể thấy mình khởi tạo app từ express, sau đó gán port trong .env vào biến port rồi set cho app port đó, sau đó create server từ app, cuối cùng là lắng nghe port đó.
Và giờ chúng ta cần tạo model room
const mongoose = require('mongoose');
const Schema = mongoose.Schema;

const RoomSchema = new Schema({
    _id: Schema.Types.ObjectId,
    code: {
        type: String,
        required: true,
        max: 10
    },
    status: {
        type: Number,
        required: true
    }
});

module.exports = mongoose.model('Room', RoomSchema);
sau khi có model rồi thì hãy tạo route nhé
import * as express from 'express';
import * as path from 'path';
import mongoose from 'mongoose';
import Room from "../models/Room";

export class Routes {
    private app: express.Application;
    private rootFolder: String;

    constructor(app) {
        this.app = app;
    }

    private createRoom(): void {
        this.app.post('/create-room', async (request, response) => {
            let roomCode = await this.makeRandomString(5);
            let checkRoomCodeExist = await Room.find({ code: roomCode }).exec();

            while (checkRoomCodeExist.length) {
                checkRoomCodeExist = await this.makeRandomString(5);
                checkRoomCodeExist = await Room.find({ code: roomCode }).exec();
            }

            const room = await new Room({
                _id: new mongoose.Types.ObjectId(),
                code: roomCode,
                status: 1
            });

            try {
                const newRoom = await room.save();
                await response.send(newRoom);
            } catch (err) {
                response.status(400).send(err);
            }
        });
    }

    private getRoom(): void {
        this.app.get('/get-room/:code', async (request, response) => {
            const roomCode = request.params.code;
            const room = await Room.findOne({ code: roomCode }).exec();

            if (!room) {
                return response.status(400).send({
                    'message': 'not found'
                });
            }

            return response.status(200).send(room);
        })
    }

    private makeRandomString = function(length) {
        let firstString  = '';
        let secondString = '';
        const characters = 'ABCDEFGHIJKLMNOPQRSTUVWXYZabcdefghijklmnopqrstuvwxyz0123456789';
        const charactersLength = characters.length;

        for ( let i = 0; i < length; i++ ) {
            firstString += characters.charAt(Math.floor(Math.random() * charactersLength));
        }

        for ( let i = 0; i < length; i++ ) {
            secondString += characters.charAt(Math.floor(Math.random() * charactersLength));
        }

        return `${firstString}-${secondString}`;
     }

    public getRoutes(): void {
        this.createRoom();
        this.getRoom();
    }
}
Về việc tạo room thì mình sẽ tạo 2 random string rồi ghép lại, sau đó kiêm tra xem code đó đã có trên DB chưa, nếu có rồi thì tiếp tục chạy lại quá trình tạo mã đó lại lần nữa, nếu chưa thì tạo room và trả về thông tin đó. Còn getRoom() thì chắc cũng không có quá nhiều điều để nói
Và giờ file server.ts của chúng ta sẽ trông như này:
import mongoose from 'mongoose';
import dotenv from 'dotenv';
import cors from 'cors';
import { ChatServer } from './chat-server';
import { Routes } from './routes/index';


dotenv.config();

mongoose.connect(
    process.env.DB_CONNECT,
    { useUnifiedTopology: true, useNewUrlParser: true },
    () => console.log('DB Connected')
  );

let app = new ChatServer().getApp();
app.use(cors());
const routes = new Routes(app);

routes.getRoutes();

export default app;
Mình phải dùng cors vì 2 url khác nhau sẽ vướng phải policy của google
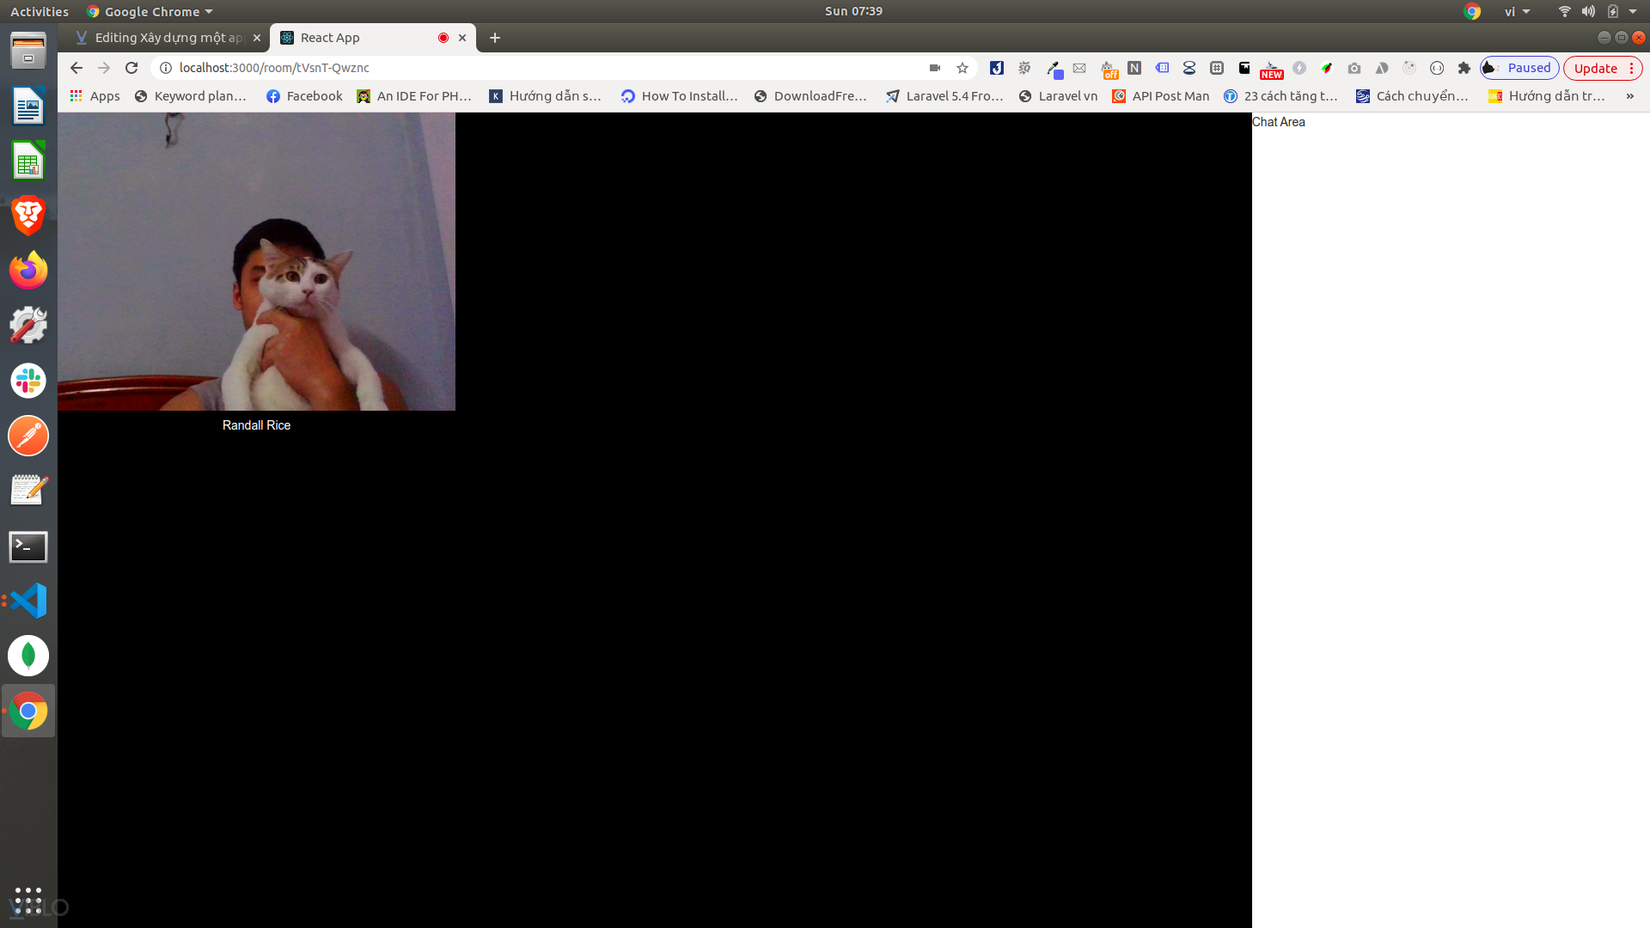
Tạo view room
import React, { useEffect, useRef, useState } from 'react';
import { Row, Col } from 'antd';
import * as Chance from 'chance';
import Video from './video';
import './room.scss';

const Room = (props) => {
    const chance = new Chance();
    const { history } = props;
    const [userDetail] = useState({
        id: chance.guid(),
        name: chance.name(),
    });
    const refVideo = useRef();
    const roomCode = props.match.params.code;

    useEffect(() => {
        const video = refVideo.current;
        navigator.mediaDevices
            .getUserMedia({ video: true, audio: true })
            .then((stream) => {
                refVideo.current.srcObject = stream;
            });
    }, []);

    return (
        <>
            <Row style={{ height: '100%' }}>
                <Col span={18} className='room__video-container'>
                    <Row>
                        <Col style={{ marginBottom: '20px' }} span={8}>
                            <video className='room__video-container--user-video' muted ref={refVideo} autoPlay playsInline />
                            <div className='room__video-container--user-name'>{userDetail.name}</div>
                        </Col>
                    </Row>
                </Col>
                <Col span={6} className='room__left-bar'>
                    Chat Area
                </Col>
            </Row>

        </>
    )
};

export default Room;
Giao diện này thì mình làm cũng khá đơn giản thôi, gồm 1 vùng hiển thị video của những user đang trong phòng và 1 vùng để chat. Hiện tại thì mình sẽ đi làm tính năng video trước, sau đó thì quay lại phần chat sau. Đầu tiên thì mình cần phân biệt các user với nhau, nhưng mà mình chỉ làm đơn giản nên là sẽ không có hệ thống đăng nhập rồi xác nhận xem ai đang đăng nhập, mà sẽ dùng package là chance. Đây không phải là 1 package hỗ trợ làm đăng nhập mà nó sẽ giúp chúng ta tạo những dữ liệu tĩnh 1 cách ngẫu nhiên. Ở đây thì với mỗi lần Component được khởi tạo thì sẽ tạo ra 1 user với name và id, nghĩa là khi bạn f5 cũng sẽ làm cho user hiện tại của bạn biến mất và thay vào đó là user mới. Tiếp tới chúng ta sẽ custom lại DOM của thẻ video chút bằng việc lấy dữ liệu từ cam máy của chúng ta và thay thế vào. Wala, mặt của bạn đã xuất hiện trên màn hình rồi (phải thuê con mồn lèo làm diễn viên mà mặt nó chẳng có tí cảm xúc gì, chán  )
)
Ok, tạm thời đến đây thôi, mình phải đưa con trong ảnh đi khám chứ mấy hôm nay nó cứ hắt hơi liên tục. Ở bài viết lần này thì chưa có sự xuất hiện của socket.io. Bài sau thì mình sẽ làm về việc các users khác sẽ join vào. See ya later.
All rights reserved
