Xây dựng form Multiple File Upload sử dụng gem cocoon và CarrierWave
Bài đăng này đã không được cập nhật trong 4 năm
Lời mở đầu
Ở Tutorial này mình sẽ hướng dẫn các bạn xây dựng form upload 1 lúc nhiều ảnh sử dụng kỹ thuật nested attributes .
Ích lợi của tutorial này :
- Upload nhiều file cùng lúc
- Thêm hoặc remove input fields một cách thoải mái
- Xem các ảnh trước khi được upload
- Khi xảy ra lỗi có thể lưu lại cái field đã nhập hay cái ảnh đã chọn.
Chuẩn bị
Ta có 2 bảng như sau :
    class Image < ApplicationRecord
  belongs_to :target, polymorphic: true

  mount_uploader :image, ImageUploader,
    reject_if: proc{ |param| param[:image].blank? && param[:image_cache].blank? &&
    param[:id].blank? }, allow_destroy: true
end

    class Project < ApplicationRecord
  belongs_to :category

      has_many :images

      accepts_nested_attributes_for :images, allow_destroy: true
Gem
gem "carrierwave" gem "cocoon" // hỗ trợ nested form
Config
    app/assets/js/application.js
//= require cocoon
Chúng ta bắt tay vào code
Chúng ta lấy params ở view như sau :
 // Projects_Controller
 def project_params
    params.require(:project).permit images_attributes: [:id, :image, :image_cache, :_destroy]
  end
Tiếp theo ở view ta tạo 1 view là new.htmt.erb:
    <%= form_for @project do |f| %>
    ...

    <div class="form-group">
      <%= f.label :images, class: "col-md-4 control-label"%>
      <div class="col-md-4">
        <table class="user-photo-form">
          <%= f.fields_for :images do |image| %>
            <%= render "image_fields", f: image %>
          <% end %>
          <%= link_to_add_association (t "add_a_photo"), f, :images, class: "btn btn-default" %>
        </table>
      </div>
    </div>

    ...
    <% f.submit "Save "%>
Sau đó ta tạo 1 Partial _image_fields.html.erb (image là 1 trường của bảng 1 images )
    <tr class="nested-fields"> // class này dùng để gem cocoon nhận biết đây là phần để nó append vào mỗi khi ấn nút
  <td>
    <%= f.file_field :image %>
    <%= f.hidden_field :image_cache, value: f.object.image_cache %>
  </td>
  <td class="thumb"> // để js nhận biết append vào các preview image
    <% if f.object.image.url.present? %>
      <%= image_tag f.object.image.url %>
    <% end %>
  </td>
  <td>
    <%= link_to_remove_association (t "remove"), f %>
  </td>
</tr>
Phần cuối cùng , chúng ta chỉ cần tạo 1 file project.js.coffee như sau :
$ ->
  onAddFile = (event) ->
    file = event.target.files[0]
    url = URL.createObjectURL(file)
    thumbContainer = $(this).parent().siblings('td.thumb')
    if thumbContainer.find('img').length == 0
      thumbContainer.append '<img src="' + url + '" />'
    else
      thumbContainer.find('img').attr 'src', url

  $('input[type=file]').each ->
    $(this).change onAddFile
  $('body').on 'cocoon:after-insert', (e, addedPartial) ->
    $('input[type=file]', addedPartial).change onAddFile
    // Nói vs cocoon nơi để insert partial
  $('a.add_fields').data 'association-insertion-method', 'append'
  $('a.add_fields').data 'association-insertion-node', 'table.user-photo-form tbody'
Vậy là xong , rất đơn giản phải ko  )
)
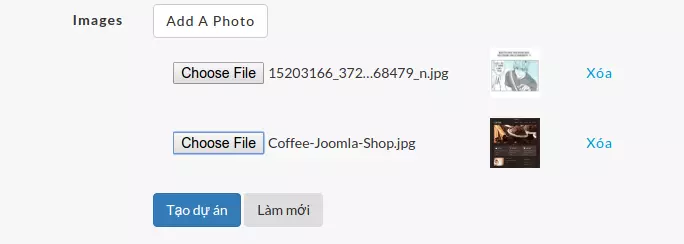
Đây là hình ảnh về các phần mình vừa demo phía trên .
Kết Luận
Đây là 1 ví dụ đơn giản để làm submit nhiều form cho 1 view , nó có nhiều ứng dụng vào thực để và dễ dàng cấu hình và thay đổi như ý ta muốn .
Cảm ơn các bạn đã xem tutorial của mình 
Nguồn
http://www.liooo.engineer/blog/2014/11/22/building-multiple-file-upload-form-in-rails-way/
All rights reserved
