Xây dựng extension để check timesheet trên WSM (P2)
Bài đăng này đã không được cập nhật trong 8 năm
Ở phần 1 mình đã build ra được 2 API để check timesheet & submit form request rồi Giờ ta sẽ build phần Client cho user sử dụng
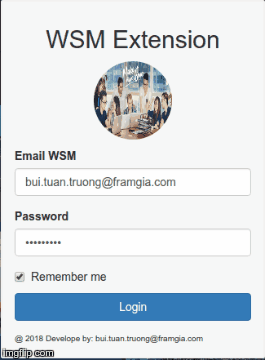
1. Tạo form login
Form login mình sẽ có 1 input nhập email framgia, 1 input nhập password & 1 checkbox để lưu thông tin user (mình sẽ dùng localStorage để lưu phần này). Validate mình sẽ dùng FormBuilder
Trước tiên ta sẽ tạo component login-form bằng lệnh ng g component login-form. Ở file login-form.component.ts vừa được tạo, ta cần khởi tạo 1 FormBuilder
import {FormGroup, FormBuilder, Validators} from '@angular/forms';
export class LoginFormComponent implements OnInit {
    loginForm: FormGroup;

    constructor(fb: FormBuilder) {
        this.loginForm = fb.group({
            'email': [this.userInfo.email, Validators.email],
            'password': [this.userInfo.password, Validators.minLength(6)],
            'save_info': [this.userInfo.save_info]
        });
    }

    checkError(field: string, errorCode: string) {
        return this.loginForm.controls[field].hasError(errorCode) && this.loginForm.controls[field].touched;
    }
}
Ở đây mình có khai báo thêm 1 function checkError giúp cho việc hiển thị lỗi khi form bị invalid. Đầu vào sẽ là tên field & mã lỗi. Mình sẽ dùng ở phần HTML
<form [formGroup]="loginForm" (ngSubmit)="performLogin(loginForm.value)" [@flyInOut]>
    <div class="form-group" [ngClass]="{'has-error': checkError('email', 'email')}">
        <label for="email_wsm">Email WSM</label>
        <input type="email" class="form-control" id="email_wsm" placeholder="Email WSM" [formControl]="loginForm.controls['email']">
        <span *ngIf="checkError('email', 'email')" class="help-block">You must add an email.</span>
    </div>
    <div class="form-group" [ngClass]="{'has-error': checkError('password', 'minlength')}">
        <label for="password">Password</label>
        <input type="password" class="form-control" id="password" placeholder="Password" [formControl]="loginForm.controls['password']">
        <span *ngIf="checkError('password', 'minlength')" class="help-block">Min length 6.</span>
    </div>
    <div class="checkbox"><label><input type="checkbox" [formControl]="loginForm.controls['save_info']"> Remember me</label></div>
    <button type="submit" [disabled]="loginForm.invalid" class="btn btn-primary btn-login">Login</button>
</form>
OK. Vậy là đã có được hình hài của form rồi. Giờ ta sẽ phải xử lí việc submit form
Khi submit form ta sẽ gửi thông tin mà user vừa nhập lên API Login ở phần 1 ta đã build. Để call API ta sẽ cần phải dùng đến service của ng2
// File api.service.ts
@Injectable()
export class ApiService {
    private DOMAIN = 'http://127.0.0.1:3000/';
    private URL_CHECK_DATE = this.DOMAIN + 'check_il_le';

    constructor(private http: HttpClient) {}

    performLogin(formData: string) {
        return this.http.post(this.URL_CHECK_DATE, formData)
            .pipe(
                tap(data => data, error => error.error.message),
            );
    }
}
Ở đây hàm performLogin sẽ có đầu vào là dữ liệu form mà user vừa nhập. Sau đó ta dùng hàm http.post của ng2 để gọi API. Hàm này sẽ trả về một Observable. Ta sẽ cần dùng hàm pipe để tách data & error
Hàm service này ta sẽ gọi khi mà submit form. Vì thế ta sẽ cần thêm 1 hàm xử lí submit form ở trong file login-form.component.ts
// File login-form.component.ts
performLogin(value: any) {
    this.apiService.performLogin(value).subscribe(response => {
        this.listDate = response;
        this.userInfo = value;
    });
}
Thế là ta đã xong được phần login & check IL LE cho user rồi. Thông tin những ngày IL LE của user sẽ được lưu trong biến listDate. Tiếp theo ta sẽ show thông tin này ra để user có thể chọn & tạo form request
2. Tạo form request
Ta sẽ cần 1 component để show ra thông tin IL LE của user. Tương tự như component login-form ở đầu bài. Ta sẽ tạo component list-date bằng command: ng g component list-date
Ta sẽ check nếu biết listDate vừa nãy có giá trị thì ta sẽ hiển thị component list-date lên & ẩn component login-form đi. Còn không thì ngược lại
// File login-form.component.html
<div id="login-form-container" *ngIf="!listDate">
    <form> ... </form>
</div>
<list-date [listDate]="listDate" [userInfo]="userInfo" *ngIf="listDate" (myEvent)="logout()"></list-date>
Ta có thể thấy component list-date sẽ có 2 biến Input (listDate & userInfo) & 1 biến Output để xử lí việc logout. Vậy thì trong list-date.component.ts ta cũng sẽ phải khai báo 3 biến tương ứng
import {Component, OnInit, Input, Output, EventEmitter} from '@angular/core';
export class ListDateComponent implements OnInit {
    TYPE_REQUEST_IL = 1;
    TYPE_REQUEST_LE = 14;

    @Output() myEvent = new EventEmitter();
    @Input() listDate = {
        day_IL: [],
        day_LE: [],
    };
    @Input() userInfo = {
        email: "",
        password: "",
    };

    typeRequest = this.TYPE_REQUEST_IL;
    changeTab(tab) {
        this.typeRequest = tab;
    }
}
Đầu tiên ta sẽ hiển thị 2 tab IL LE cho user nhìn cái đã
// File list-date.component.html
<tabset>
    <tab heading="Day IL" id="list_IL" (select)="changeTab(TYPE_REQUEST_IL)">
        <ul class="list-group">
            <li class="list-group-item"
                [ngClass]="{'active': il == currentDate}"
                *ngFor="let il of listDate.day_IL; let i = index" (click)="selectDate(il)">
                {{il}}
            </li>
        </ul>
    </tab>
    <tab heading="Day LE" id="list_LE" (select)="changeTab(TYPE_REQUEST_LE)">
        <ul class="list-group">
            <li class="list-group-item"
                [ngClass]="{'active': le == currentDate}"
                *ngFor="let le of listDate.day_LE; let i = index" (click)="selectDate(le)">
                {{le}}
            </li>
        </ul>
    </tab>
</tabset>
Tiếp theo ta sẽ phải cho user lựa chọn lí do cho form request của mình. Ta sẽ cho user chọn 1 trong những lí do mà ta đã fix sẵn hoặc 1 textarea để user có thể tự mình điền nội dung
// File list-date.component.ts
currentReason = "";
reasonTxt = "";
listReason = {
    "IL": [
        "Sorry I'm late. Traffic was unusually bad today.",
        "I apologize for being late. I had to drop off my wife at work. It took longer than I thought."
    ],
    "LE": [
        "I have to leave a little early today. Is this ok if I finish my work at home?",
        "I have a terrible headache. Is this ok if I leave early today?",
    ]
};

changeTab(tab) {
    ...
    this.reasonSelect = this.listReason.IL;
    if (tab == this.TYPE_REQUEST_LE) {
        this.reasonSelect = this.listReason.LE
    }
}

// File list-date.component.html
<select class="form-control" (change)="selectReason($event.target.value)" *ngIf="isRandomReason">
    <option value="">- Select Reason -</option>
    <option *ngFor="let reason of reasonSelect" value="{{reason}}" [selected]="currentReason == reason">{{reason}}</option>
</select>

<textarea [(ngModel)]="reasonTxt" cols="30" rows="5" class="form-control" *ngIf="!isRandomReason"></textarea>
<button class="btn btn-primary col-xs-12 mgT15" (click)="submitRequest()" [disabled]="currentDate == ''">Submit Request</button>
Vậy là ta đã có được chức năng cơ bản rồi. Phần submit form request các bạn dùng service của ng2 làm tương tự như ở phần login-form nhé
Để build ra product ta sẽ chạy command ng build -prod -dop=false. ngCli sẽ tự build ra file js, html vào folder dist cho chúng ta
3. Build extension
3.1: Khai báo file Manifest.json
1 extension chrome sẽ phải cần có file manifest.json. File này để khai báo những info, permission, background cho ext của chúng ta. Các bạn có thể xem bài hướng dẫn chi tiết của Google tại đây
Extension của mình sẽ chỉ dùng những tính năng khá cơ bản. Dưới đây là file manifest.json của mình trong ext này
{
  "manifest_version": 1,
  "name": "Check IL LE on WSM",
  "description": "This extension will check time IL/LE in WSM. It's auto run 1 time per day at 12:00 PM",
  "version": "1.0",
  "browser_action": {
    "default_icon": "assets/img/favicon.png",
    "default_popup": "index.html"
  },
  "permissions": [
    "activeTab",
    "storage",
    "https://test-puppeteer-d10cn2btt.c9users.io:8080/check_il_le",
    "webNavigation"
  ],
  "background": {
    "persistent": true,
    "scripts": [
      "moment.min.js",
      "background.js"
    ]
  },
  "icons": {
    "48": "assets/img/favicon.png"
  }
}
Mình sẽ giải thích một vài thông số lạ lạ
permission: Hẳn là đọc lên đã biết ý nghĩa của nó là thế nào rồi phải không. Nhưng ở đây mình có define 1 tham sốhttps://test-puppeteer-d10cn2btt.c9users.io:8080/check_il_le. Do ext của mình sẽ auto check vào lúc 12:00 PM hàng ngày. Việc check này sẽ được thực hiện bằng cách gọi ajax lên APIcheck_il_lenên mình phải khai báo domain gọi ajax để tránh Cross Domainbackground: là những đoạn xử lí logic ngầm của ext. Ở đây mình dùng để thực hiện việc auto check timesheet đã nói ở trên. Và logic này được viêt vào trong filebackground.js. Mninhf phải khai báomoment.min.jsphía trên để có thể dùng được trong file background
3.2: Xử lí auto check timesheet
Việc auto check này sẽ được thực hiện vào lúc 12:00 PM hàng ngày khi user mở 1 tab mới. Và nó sẽ chỉ check 1 lần để tránh spam. Thông tin user để login sẽ được mình lưu vào localStorage (tất nhiên user đã login 1 lần & chọn chức năng remember)
Chrome có cung cấp cho ta 1 API check tab được mở thông qua webNavigation
chrome.webNavigation.onCompleted.addListener(function (details) {
}
Bên trong sẽ là phần xử lí logic của mình
// File background.js
let userInfo = localStorage.user_info;
let today = moment().format('YYYY-MM-DD');

const HOUR_RUN = "12:00:00";
const URL_CHECK_TIME = 'https://test-puppeteer-d10cn2btt.c9users.io:8080/check_il_le';

// check run only 1 time per day
if (typeof localStorage.run_bg != "undefined" && localStorage.run_bg == today) {
    return false;
}

// check isset userInfo
if (typeof userInfo == "undefined") {
    return false;
}

// run after 12:00 PM
if (moment().diff(moment().format('YYYY-MM-DD ' + HOUR_RUN)) < 0) {
    return false;
}

userInfo = JSON.parse(userInfo);
let data = "email=" + userInfo.email + "&password=" + userInfo.password;

let xhr = new XMLHttpRequest();
xhr.withCredentials = true;

xhr.addEventListener("readystatechange", function () {
    if (this.readyState === 4) {
        let response = JSON.parse(this.responseText);
        let unreadItemCount = response.day_IL.length + response.day_LE.length;
        if (unreadItemCount > 0) {
            chrome.browserAction.setBadgeText({text: '' + unreadItemCount});
        }

        localStorage.run_bg = moment().format('YYYY-MM-DD');
    }
});

xhr.open("POST", URL_CHECK_TIME);
xhr.setRequestHeader("content-type", "application/x-www-form-urlencoded");
xhr.setRequestHeader("cache-control", "no-cache");

xhr.send(data);
Ta chỉ cần move những file mình đã khai báo ở trong file manifest.json vào folder dist mà ta build ra ở trên là xong
Dưới đây là ảnh demo & source code của mình
https://github.com/d10cn2btt/wsm-puppeteer
Bài viết còn nhiều thiếu sót. Rất mong nhận được phản hồi & góp ý
All rights reserved
