Xây dựng Circle Control sử dụng SwiftUI
Bài đăng này đã không được cập nhật trong 6 năm
Ở sự kiện WWDC 2019 vừa diễn ra, Apple đã giới thiệu một framework để xử lý thiết kế giao diện theo phong cacsh mới. Bài viết này giới thiệu về SwiftUI framework.
SwiftUI là bộ công cụ giao diện người dùng cho phép thiết kế các ứng dụng theo cách declarative. SwiftUI cho phép chúng ta thực hiện giao diện trông như thế nào và hoạt động ra sao, và nó chỉ ra cách làm cho điều đó xảy ra khi người dùng tương tác với nó.
Trong bài viết này, chúng ta sẽ từng bước xây dựng Circle UI Control sử dụng SwiftUI, với mục địch giúp người đọc làm quen với framework này. Giao diện của chương trình demo là một màn hình trong ứng dụng Apple Card
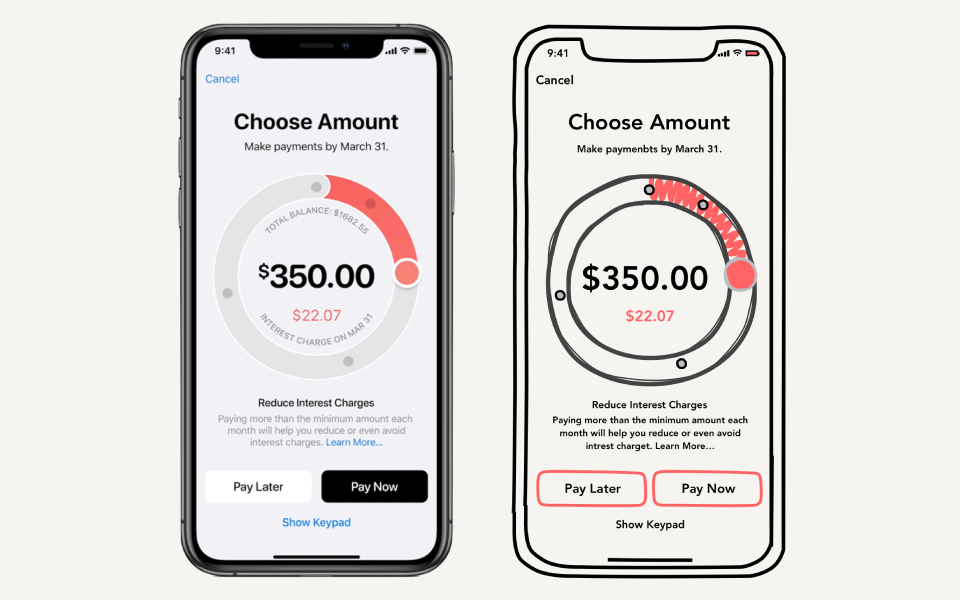
Các thành phần giao diện trong chương trình
Chương trình sẽ gồm các thành phần giao diện sau:
- Navigation View
var body: some View {
    let body = GeometryReader { geometry in
        self.createBody(size: geometry.size).edgesIgnoringSafeArea(.vertical)
    }

    let leadingBarItem = Button(action: { }) {
        Text("Cancel")
    }

    return NavigationView {
        body.navigationBarItems(leading: leadingBarItem)
    }.colorScheme(.light)
}
- Phần nội dụng của chương trình
private func createBody(size: CGSize) -> some View {
    let circleRadius = size.height / 2.0
    let buttonWidth = (size.width - 3.0 * 16.0) / 2.0

    return ZStack {
        Color.background.edgesIgnoringSafeArea(.vertical)
        VStack(alignment: .center) {
            // Placeholder for future declarations of the control, labels and buttons
        }.padding(.top, 32.0)
    }
}
- Các Label trong ứng dụng
private func createTitle() -> some View {
    return Group {
        Text("Choose Amount")
            .font(.system(.largeTitle))
            .fontWeight(.heavy)
        Text("Make payments by March 31.")
            .font(.system(.headline))
            .fontWeight(.regular)
    }
}
- Các Button trong chương trình
private func createButtons(width: CGFloat) -> some View {
    return Group {
        HStack(spacing: 16.0) {
            Button(action: { }) {
                Text("Pay Later")
                    .font(.system(.headline))
                    .fontWeight(.bold)
                    .foregroundColor(Color.black)
            }
            .frame(width: width, height: 50.0)
            .background(Color.white)
            .cornerRadius(12.0)

            Button(action: { }) {
                Text("Pay Now")
                    .font(.system(.headline))
                    .fontWeight(.bold)
                    .foregroundColor(Color.white)
            }
            .frame(width: width, height: 50.0)
            .background(Color.black)
            .cornerRadius(12.0)
        }.padding(.top, 24.0)

        Button(action: { }) {
            Text("Show Keypad")
                .font(.system(.headline))
                .fontWeight(.semibold)
                .foregroundColor(Color.blue)
        }.padding(.top, 12.0)
    }
}
Xây dựng Circel UI Control
Cấu trúc dữ liệu
Đầu tiên ta sẽ định nghĩa một struct cho custom UI cần tạo tên là CircleControl
struct CircleControl: View {
    // body...
}
Circle control sẽ nhận dữ liệu từ người dùng, sau đó tính toán và hiển thị. Ta sẽ định nghĩa cấu trúc dữ liệu Segment để lưu trữ dữ liệu này.
struct Segment: Equatable {

    let color: Color
    let amount: Double
    let title: String
    let description: String
}
Ta sẽ tạo một đối tượng để lưu trữ trạng thái của Segment được chọn
@State var selectedSegment: Segment?
@State được sử dụng nhằm mục đích thay đổi label mô tả mỗi khi người dùng nhập dữ liệu vào Circle Control.
private func createDescription() -> some View {
    return Group {
        Text(selectedSegment?.title ?? "")
            .font(.system(.headline))
            .fontWeight(.semibold)
        Group {
            Text(selectedSegment?.description ?? "")
                .font(.system(.subheadline))
                .fontWeight(.regular)
                .foregroundColor(Color.gray.opacity(0.9))
                +
            Text(" Learn More...")
                .font(.system(.subheadline))
                .fontWeight(.regular)
                .foregroundColor(Color.blue)
        }
        .multilineTextAlignment(.center)
        .lineLimit(3)
    }
}
Thuộc tính này sẽ được dùng để tính toán các giá trị hiện thị sau khi một Segment được chọn.
 private func createCircleControl(radius: CGFloat) -> some View {
     let totalBalance: Double = 1682.55
     let segments: [Segment] = [
         Segment(
             color: Color.red.opacity(0.8),
             amount: 175.0,
             title: "Reduce Interest Charges",
             description: "Paying more than the minimum amount each\nmonth will help you reduce or even avoid\ninterest charges."),
         Segment(
             color: Color.yellow.opacity(0.8),
             amount: 672.37,
             title: "Start a 3-Month Payment Plan",
             description: "Pay the suggested amount every month and\nyour balance could be paid off in just three\nmonths."),
         Segment(
             color: Color.green.opacity(0.8),
             amount: 1180.78,
             title: "Pay February Balance",
             description: "Paying your monthly statement balance helps\nkeep you financially healthy and avoid interest\ncharges.")
     ]

     let circleControl = CircleControl(totalBalance: totalBalance, segments: segments, selectedSegment: $selectedSegment)

     return circleControl
         .frame(width: radius, height: radius)
         .padding(16.0)
 }
Các thành phần giao diện
Các thành phần giao diện cơ bản của Circle Control được định nghĩa bằng đoạn code dưới đây:
private func createBody(size: CGSize) -> some View {
    let controlRadius = size.width / 2.0
    return ZStack {
        createOuterCircle(radius: controlRadius)
        createInnerCircle(radius: controlRadius)
        createProgressArc(radius: controlRadius)
        createTopArc(radius: controlRadius)
        createPoints(radius: controlRadius)
        createControlPoint(radius: controlRadius)
        createCurrentValueText(radius: controlRadius)
    }
}
Để tính toán segment được chọn ta sẽ dụng hàm xử lý sau:
private func currentSegment() -> Segment? {
    return segments.last { $0.amount <= currentValue } ?? segments.first
}
Để tính toán segment gần nhất có thể dược chọn ta sử dụng hàm xử lý sau:
private func nearestSegmentPoint(value: Double) -> Segment? {
    let magnetCoef = min(totalBalance * 0.025, 50.0)
    return segments.first { ($0.amount < value + magnetCoef) && ($0.amount > value - magnetCoef) }
}
Để tính toán được giá trị trên vòng tròn progress arc, ta cần phải tính góc trên vòng tròn dựa trên dữ liệu người dùng nhập vào.
 https://images.viblo.asia/3439f134-f43f-4d7a-ab75-a3a2d849cc7f.png
Và dựa vào góc này để tính tọa độ x, y của chấm tròn trên vòng tròn progress arc.
 angle = valuePosition / totalBalance * 2 * .pi - .pi / 2
 let x = center.x + radius * cos(angle)
 let y = center.y + radius * sin(angle)
Do Circle control nhận xử lý từ người dùng thông qua thao tác kéo thả, nên ta cần phải tạo hiệu ứng để thác tác kéo thả không bị giật
let dragGesture = DragGesture(minimumDistance: 10.0).onChanged { value in
    self.change(value: value, radius: radius)
}

// where change(value: value, radius: radius) - handler of pan gesture.
Group {
    // group contents
}.gesture(dragGesture)

Khi người dùng kéo tay, ta cần phải tính góc mới sau khi người dùng dừng hoặc thả tay. Để tính giá trí mới ta cần thực hiện theo các bước sau:
- Tính vector từ vị trí thả tay đến tâm của đường tròn
- Tính giá trị góc ở vị trí thả tay
- Tính toán giá trị hiển thị mới
let vector = CGVector(dx: value.location.x - radius, dy: value.location.y - radius)
let angle = atan2(vector.dy, vector.dx) + .pi / 2.0
let fixedAngle = angle < 0.0 ? angle + 2.0 * .pi : angle
let currentValue = Double(fixedAngle) / (2.0 * .pi) * totalBalance
Ngoài ra trong quá trình người dùng thay đổi giá trị trên Circle Control, giá trị này có thể đi qua các giá trị biên giữa các segment. Nên ta cần phải đảm bảo giá trị hiện tại luôn nằm trong khoảng min và max của đường tròn.
if let segment = nearestSegmentPoint(value: currentValue) {
    self.currentValue = segment.amount
    segmentDidChange?(segment)
} else {
    self.currentValue = currentValue.rounded(.toNearestOrAwayFromZero)
    if self.currentValue > totalBalance - 50.0 {
        self.currentValue = totalBalance
    }
}
self.currentValue = max(0, self.currentValue)

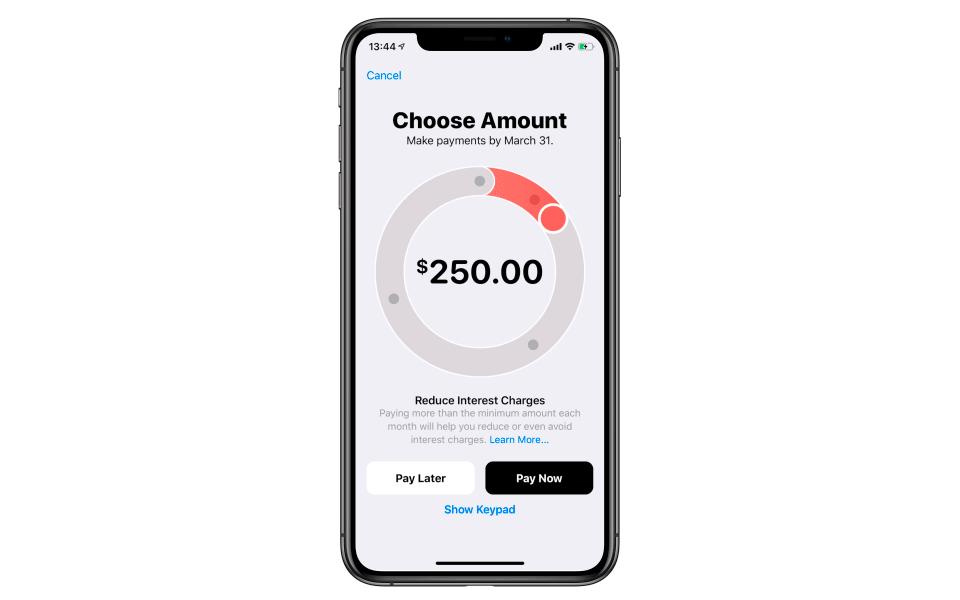
Sau khi ghép tất cả các đoạn code trên, phân giao diện của chương trình sẽ thay đổi dựa trên giá trị của thuộc tính @State.
Ta sẽ có thành phẩm như hình dưới đây:
Nguồn tham khảo
All rights reserved
