Xây dựng app chat realtime với VueJS - NodeJS - Express - SocketIO
Bài đăng này đã không được cập nhật trong 4 năm
Mở đầu
Từ lâu mình đã ấp ủ tự mình làm được một app chat để chat với bạn bè. Do dạo này nghỉ dịch, mình có nhiều thời gian để học thêm công nghệ mới và trong đó có Vuejs. Học thì phải đi đôi với hành nên mình vừa thực hành Vuejs tiện thể thực hiện dự định của mình luôn.
Mình sẽ viết lại quá trình mà mình thực hành với project App chat realtime với Vue - Nodejs - Express - SocketIO. Các bạn cùng học và thực hành với mình nhé.
Series này sẽ có các phần:
- Cài đặt môi trường phát triển VueJS, NodeJS, Express, SocketIO và xây dựng login.
- Phát triển tính năng chat private chat group.
- Hoàn chỉnh backend server, kết nối MongoDB, thêm các tính năng Authen và lưu trữ tin nhắn.
- Deploy sản phẩm lên Netlify và Heroku.
Và hôm nay chúng ta sẽ đến với phần đầu tiên của series này.
I. Cài đặt môi trường
Frontend
Với VueJS mình sử dùng Vue CLI để tạo project.
Trước hết, các bạn cần cài đặt Vue CLI bằng npm.
$ npm install --global vue-cli
Tạo project với Vue CLI.
$ vue create <tên-project>
  > Chọn Defalut ([Vue2] babel, eslint)
Cài đặt thư viện cần thiết.
Để việc phát triển app nhanh chóng, mình sẽ sử dụng thư việc component dành cho VueJS là Vuetify
$ vue add vuetify
  > Chọn Defalut
$ yarn add vuex vue-router axios vue-axios socket.io-client
Chạy project
$ vue serve
Cấu hình các thư viện
- Vuetify
Khi chạy vue add vuetify là vue đã tự động config.
- Vuex
store/store.js
import Vue from "vue";
import Vuex from "vuex";

Vue.use(Vuex);

const store = new Vuex.Store({
  state: {},
  mutations: {},
  actions: {},
  getters: {},
});

export default store;
main.js
...
import store from "./store/store";

Vue.config.devtools = true;
new Vue({
  ...
  store,
  ...
}).$mount("#app");
- Vue Router
routes/router.js
import Vue from "vue";
import VueRouter from "vue-router";

Vue.use(VueRouter);

const routes = [];

const router = new VueRouter({
  routes,
});

export default router;
main.js
...
import router from "./routes/router";

new Vue({
  ...
  router,
  ...
}).$mount("#app");
- Dotenv - Khởi tạo biến môi trường
.env và .env.default
VUE_APP_BACKEND_SERVER=http://localhost:4000
configs/constants.js
export const BACKEND_SERVER =
  process.env.VUE_APP_BACKEND_SERVER || "http://localhost:4000";
Backend
Với NodeJS - Express mình sẽ tạo project từ đầu.
Các bạn tạo thư mục mới với tên project, và mở thư mục đó lên với terminal và làm theo các bước sau:
Khởi tạo
$ yarn init -y
Cài đặt thư viện
$ yarn add express cors dotenv socket.io

$ yarn add --dev nodemon @babel/cli @babel/core @babel/node @babel/preset-env babel-plugin-module-resolver
Cấu trúc project
server
├── node_modules
├── src
|   ├── configs
|   |   └── constants.js
|   └── server.js
├── .babelrc.js
├── .env
├── .env.default
├── jsconfig.json
├── nodemon.json
├── package.json
└── yarn.lock
Thiết lập các công cụ phát triển
- Nodemon - Tự động reload server khi có thay đổi code
nodemon.json
{
  "watch": ["src"],
  "ext": ".js",
  "ignore": [],
  "exec": "babel-node ./src/server.js"
}
- Babel + jsconfig + absolute path
.babelrc.js
const path = require("path");
const jsConfig = require("./jsconfig.json");

module.exports = {
  presets: ["@babel/preset-env"],
  sourceMaps: true,
  plugins: [
    [
      "module-resolver",
      {
        root: [path.resolve(jsConfig.compilerOptions.baseUrl)],
      },
    ],
  ],
};
jsconfig.json
{
  "compilerOptions": {
    "module": "commonjs",
    "target": "es6",
    "baseUrl": "src"
  },
  "exclude": ["node_modules"],
  "include": ["src"]
}
- Dotenv - Khởi tạo biến môi trường
.env và .env.default
PORT=4000
src/configs/constants.js
import dotenv from "dotenv";
dotenv.config();

export const PORT = process.env.PORT || 4000;
Thiết lập script trong package.json
"scripts": {
  "dev": "nodemon",
  "start": "node build/server.js",
  "build": "babel ./src -d ./build",
}
Code file server
server.js
import express from "express";
import cors from "cors";

import { PORT } from "configs/constants";

const app = express();

app.use(cors());
app.use(express.json());
app.use(express.urlencoded({ extended: false }));

app.get("/", (req, res) => {
  res.json({ message: "Welcome" });
});

app.listen(PORT, () => {
  console.log("Server is running at PORT", PORT);
});
Chạy server
$ yarn dev
Như vậy đã xong phần setup project, các bạn thử chạy cả backend lẫn frontend
$ yarn serve
$ yarn dev
Sau đó mở trình duyệt và vào địa chỉ http://localhost:8080 và http://localhost:4000 xem được chưa nhé.
Tiếp theo mình sẽ đến phần coding.
II. Cấu hình socket
Cấu hình socket phía client
socket/socket.js
import { io } from "socket.io-client";

import { BACKEND_SERVER } from "@/configs/constants";

const socket = io(BACKEND_SERVER, { autoConnect: false });

function createWebSocketPlugin(socket) {
  return (store) => {
    store.$socket = socket;
    // Thêm các socket event listening
  };
}

// Plugin lưu giá trị nhận được từ Socket vào Vuex store
export const websocketPlugin = createWebSocketPlugin(socket);

export default socket;
store/store.js
...
import { websocketPlugin } from "../socket/socket";

const store = new Vuex.Store({
  plugins: [websocketPlugin],
  ...
})
Cấu hình socket phía server
configs/socket.js
import socketIO from "socket.io";

const createSocketIO = (httpServer) => {
  const io = socketIO(httpServer, {
    allowEIO3: true,
    cors: {
      origin: true,
      credentials: true,
    },
  });

  io.on("connect", (socket) => {});
};

export default createSocketIO;
Các bạn sửa lại toàn bộ file server.js như sau:
server.js
import express from "express";
import cors from "cors";
import { createServer } from "http";
// other
import { PORT } from "configs/constants";
import createSocketIO from "configs/socket";
// config
const app = express();
const httpServer = createServer(app);
createSocketIO(httpServer);
// middlewares
app.use(cors());
app.use(express.json());
app.use(express.urlencoded({ extended: false }));

app.get("/", (req, res) => {
  res.json({ message: "Welcome" });
});

httpServer.listen(PORT, () => {
  console.log("Server is running at PORT", PORT);
});
III. Xây dựng tính năng Login
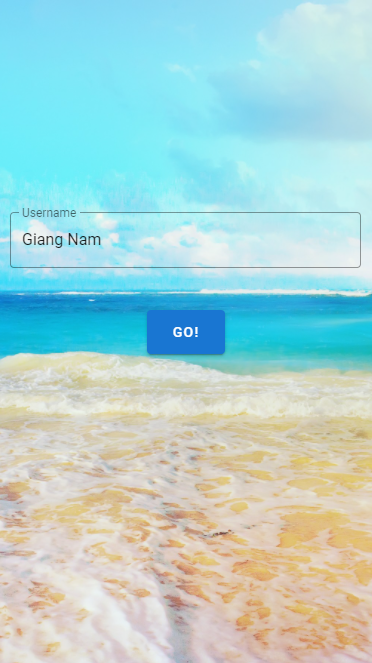
Với phần 1 của series này mình sẽ làm 2 màn hình: Login và Home. Khi vào app, màn hình Login sẽ hiện ra yêu cầu người dùng nhập Tên, sau khi nhập tên xong thì sẽ chuyển sang trang Home là trang chat chính.
Cụ thể workflow login như sau

-
Nhập tên người dùng, sau đó client connect với socket phía server và gửi thông thin username. Ở phía server khi connect sẽ emit event "USER_INFO", gửi thông tin username và socketId về phía client
-
Phía client socket listening event "USER_INFO", chờ khi socket gửi thông tin user xuống thì lưu vào Vuex store sau đó redirect sang trang Home.
Client
pages/Home.vue
<template>
  <p>Home</p>
</template>
pages/Login.vue
<template>
  <v-main class="main">
    <v-form @submit.prevent="login">
      <v-container>
        <v-row justify="center">
          <v-col cols="12" sm="8" md="6">
            <v-text-field
              v-model="form.username"
              label="Username"
              placeholder="Username"
              :rules="formRules.username"
              required
              outlined
            ></v-text-field>
          </v-col>
        </v-row>
        <v-row justify="center">
          <v-btn color="primary" type="submit" elevation="2" large>Go!</v-btn>
        </v-row>
      </v-container>
    </v-form>
  </v-main>
</template>

<script>
  import socket from "@/socket/socket";

  export default {
    data() {
      return {
        formRules: {
          username: [(v) => !!v || "Username is required"],
        },
        form: {
          username: "",
        },
      };
    },
    methods: {
      login() {
        const { username } = this.form;
        if (!username.length) return;
        socket.auth = { username };
        socket.connect();
      },
    },
    computed: {
      user() {
        return this.$store.getters.user;
      },
    },
    watch: {
      // Khi có user tức là Login thành công => redirect sang trang Home
      user(newValue, oldValue) {
        if (!oldValue && newValue) {
          this.$router.push("/");
        }
      },
    },
  };
</script>

<style scoped>
  .main {
    background-image: url("https://www.wallpaperbetter.com/wallpaper/555/606/469/sea-sky-beach-2K-wallpaper.jpg");
    background-repeat: no-repeat;
    background-size: cover;
    background-position: center;
  }
  .container {
    margin-top: 200px;
  }
</style>
App.vue
<template>
  <v-app>
    <router-view></router-view>
  </v-app>
</template>

<style>
  html,
  body {
    height: 100vh;
    width: 100vw;
    overflow: hidden;
  }
</style>
store/store.js
...
const store = new Vuex.Store({
  plugins: [websocketPlugin],
  state: {
    user: null,
  },
  mutations: {
    setUser(state, user) {
      state.user = user;
    },
  },
  actions: {
    LOGIN({ commit }, user) {
      commit("setUser", user);
    },
  },
  getters: {
    user(state) {
      return state.user;
    },
  },
});
...
socket/socket.js
...
function createWebSocketPlugin(socket) {
  return (store) => {
    store.$socket = socket;
    // Khi socket server gửi thông tin user về thì lưu vào Vuex store
    socket.on("USER_INFO", (user) => store.dispatch("LOGIN", user));
  };
}
...
routes/router.js
...
import Home from "@/pages/Home";
import Login from "@/pages/Login";

import store from "@/store/store";
...
const routes = [
  {
    name: "Home",
    path: "/",
    component: Home,
  },
  {
    name: "Login",
    path: "/login",
    component: Login,
  },
];
...
router.beforeEach((to, from, next) => {
  if (to.name !== "Login" && !store.state.user) next({ name: "Login" });
  else if (to.name === "Login" && store.state.user) next({ name: "Home" });
  else next();
});
...
Server
Khi user được kết nối, sẽ gửi lại thông tin user về phía client
configs/socket.js
const createSocketIO = (httpServer) => {
  ...
  io.on('connect', (socket) => {
    // User
    const user = {
      socketId: socket.id,
      username: socket.handshake.auth.username,
    }

    // when connected, send user info to user
    socket.emit('USER_INFO', user)

  })
}
Lời kết
OK có lẽ mình nên tạm dừng ở đây, ban đầu mình định làm chat private ở phần này nhưng bài đã quá dài rồi.
Các bạn có thể tham khảo source code của mình tại đây, mình đã làm xong phần chat private rồi nhé.
server: https://github.com/pika-3kw/chatme_server/tree/part1
client: https://github.com/pika-3kw/chatme_webapp/tree/part1
Rất mong các bạn ửng hộ để mình có động lực viết tiếp các phần sau.
All rights reserved
