Xây dựng API sử dụng Laravel và GraphQL
Bài đăng này đã không được cập nhật trong 4 năm
Chắc hẳn các bạn đã từng nghe về GraphQL GraphQL là một trong những đứa con của facebook được facebook tạo ra từ năm 2012 và được giới thiệu trước công chúng trong sự kiện React.js Conf 2015 nếu các bạn vẫn chưa biết hoặc muốn hiểu rõ hơn về GraphQL thì có thể tham khảo bài viết tổng quát GraphQL tại ĐÂY bây giờ chúng ta bắt đầu xây dựng một API sử dụng Laravel và GraphQL
Cài đặt và cấu hình GraphQL
Để cài đặt GraphQL chúng ta cần có sẳn một project Laravel sau đó mở file composer.json và thêm vào package sau :
    "require": {
        "folklore/graphql": "~1.0.0"
    },
Sau đó chạy lệnh :
$ composer install
Hoặc
$ composer update
Sau khi Composer update xong ta tiếp tục chạy lệnh :
$ php artisan
Đối với Laravel 5.X chúng ta thêm một service vào provider trong file *app/config/app.php *
Folklore\GraphQL\ServiceProvider::class
Và đăng ký một aliases :
'GraphQL' => Folklore\GraphQL\Support\Facades\GraphQL::class
Và chạy lệnh :
$ php artisan
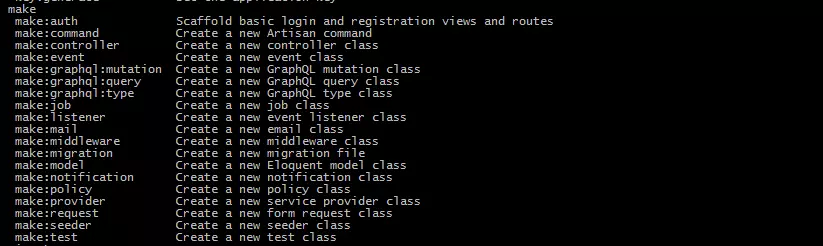
Nếu như các phương thức GraphQL xuất hiện như trong hình thì chúng ta đã cài đặt GraphQL thành công :
 Trong GraphQL gồm có 1 node root là viewer, gồm các lớp :
- Connections: kết nối đến database
- Felds: mô tả các fields trong node
- Types: mô tả kiểu dữ liệu của field
- Queries: mô tả cách truy vấn graph
- Mutations: mô tả cách cập nhật graph
Bây giờ chúng ta bắt đầu vào việc tạo một UserType: để tạo UserType chúng ta chạy lệnh sau :
$ php artisan make:graphql:type UserType
Sau khi chạy lệnh thành sẽ xuất hiện một thư mục App một thư mục GraphQL/Type/UserType.php . Chúng ta bắt đầu mô tả các kiểu dữ liệu của User như sau:
class UserType extends BaseType
{
    protected $attributes = [
        'name' => 'User',
        'description' => 'A type'
    ];

    public function fields()
    {
        return [
            'id' => [
                'type' => Type::nonNull(Type::int())
            ],
            'name' => [
                'type' => Type::nonNull(Type::string())
            ],
            'email' => [
                'type' => Type::nonNull(Type::string())
            ],
            'created_at' => [
                'type' => Type::nonNull(Type::string())
            ],
            'updated_at' => [
                'type' => Type::nonNull(Type::string())
            ]
        ];
    }
}
Tiếp theo chúng ta tạo một UserQuery bằng cách chạy lệnh :
$ php artisan make:graphql:query UserQuery
Thư mục GraphQL/Query/UserQuery.php sẽ được tự động ra. tiếp tục chúng ta config như sau :
class UsersQuery extends Query {

    protected $attributes = [
        'name'  => 'User',
    ];

    public function type()
    {
        return Type::listOf(GraphQL::type('user'));
    }

    public function args()
    {
        return [
            'ids'   => [
                'name' => 'ids',
                'type' => Type::listOf(Type::int()),
            ],
        ];
    }

    public function resolve($root, $args, SelectFields $fields)
    {
        $select = $fields->getSelect();
        $with = $fields->getRelations();

        return User::where('id', '=', $args['id'])->with($with)->select($select)->get();
    }

}
Tiếp tục chúng ta tạo file Mutation bằng cách gõ lệnh :
$ php artisan make:graphql:mutation CreateUserMutation
Thư mục GraphQL/Mutation/CreateUserMutation.php sẽ được tự động ra. tiếp tục chúng ta config như sau :
class CreateUserMutation extends Mutation
{
    protected $attributes = [
        'name' => 'CreateUser',
        'description' => 'User mutation'
    ];

    public function type()
    {
        return GraphQL::type('User');
    }

    public function args()
    {
        return [
            'name' => [
                'type' => Type::nonNull(Type::string()),
                'rules' => ['required']
            ],
            'email' => [
                'type' => Type::nonNull(Type::string()),
                'rules' => ['required', 'email', 'unique:users']
            ],
            'password' => [
                'type' => Type::nonNull(Type::string()),
                'rules' => ['required', 'min:6']
            ]
        ];
    }

    public function resolve($root, $args, $context, ResolveInfo $info)
    {

        $user = new User();
        $user->fill($args);
        $user->password = bcrypt($args['password']);
        $user->save();
        return $user;
    }
}
Như vậy công việc tạo GraphQL đã hoàn tất bước cuối cùng là tiến thành config file config/graphql.php như sau :
 'schemas' => [
        'default' => [
            'query' => [
                'user' => App\GraphQL\Query\UserQuery::class,
            ],
            'mutation' => [
                'createUser' => App\GraphQL\Mutation\CreateUserMutation::class,
            ],
            // 'middleware' => []
        ],
    ],

    // The types available in the application. You can then access it from the
    // facade like this: GraphQL::type('user')
    //
    // Example:
    //
    'types' => [
        App\GraphQL\Type\UserType::class,
    ],
Như vầy chúng ta đã tiến hành xong các bước để thiết lập GraphQL bây giờ chúng ta truy cập Vào đường dẫn sau:
localhost/blog/public/graphiql
Giao diện xuất hiện:
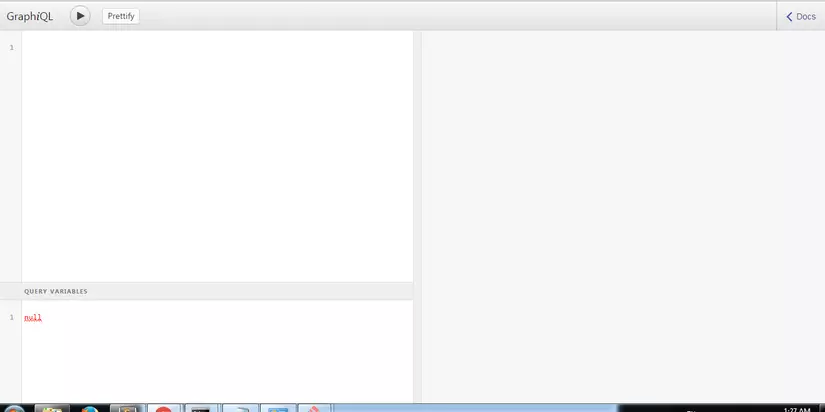 Đây chính là giao diện hiển thị của GraphQL . Bây giờ chúng ta sẽ bắt đầu viết một câu truy vấn đơn giản:
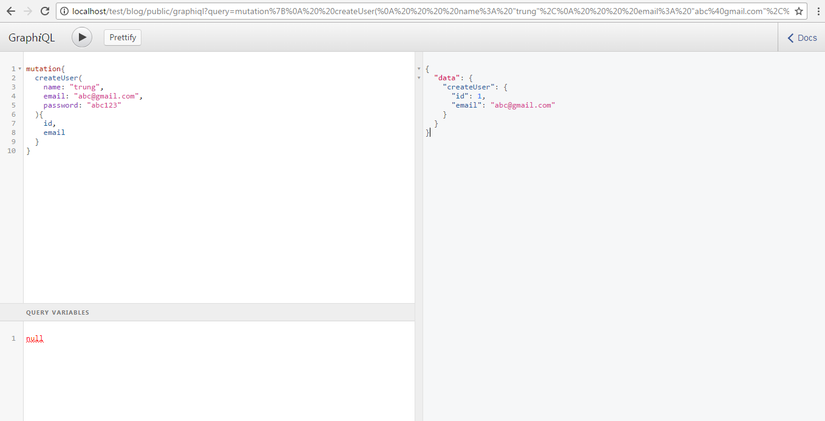
mutation {
    createUser (
        name: "test",
        email: "test@gmail.com",
        password: "test123"
    ){
        id,
        email
    }
}
Khi nhấn submit kết quả sẽ trả về như trong hình thì chúng ta đã thành công trong việc tạo truy vấn bằng GraphQL :
 Để truy ngược lại chúng ta làm như sau :
query {
    user(id: 1) {
        name,
        email
    }
}

All rights reserved
