Xây dựng API sử dụng JWT
Bài đăng này đã không được cập nhật trong 5 năm
JWT Authentication là gì?
JSON Web Token (JWT) Authentication là một cách thức nhỏ gọn và an toàn để thể hiện claims được chuyển giao giữa client và server. Các claims trong JWT được mã hóa dưới dạng JSON và được sử dụng làm trọng tải cho cấu trúc JSON Web Signature (JWS) hoặc là bản rõ của cấu trúc SON Web Encryption (JWE), cho phép các claims được kỹ thuật số hóa hay được bảo vệ toàn vẹn với một Message Authentication Code (MAC) và/hoặc encrypted.
Xây dựng ứng dụng
Bài viết dưới đây là một ví dụ trong việc tạo một ứng dụng Rails API sử dụng JWT. Bài sẽ tập trung chủ yếu vào chức năng login và authorizing/authenticating sử dụng JWT.
1. Tạo ứng dụng
Các thư viện cần thiết:
- Ruby 2.5.1
- Rails 5.2.1
- PostgreSQL
- Insomnia / Postman
Bảng REST API
| URL / ENDPOINT | VERB | DESCRIPTION |
|---|---|---|
| /auth/login | POST | Generate token |
| /users | POST | Create user |
| /users | GET | Return all users |
| /users/{username} | GET | Return user |
| /users/{username} | PUT | Update user |
| /users/{username} | DELETE | DELETE |
Chạy lệnh sau trên terminal:
rails new rails-jwt --api
Thêm gem JWT và bcrypt:
# Use Json Web Token (JWT) for token based authentication
gem 'jwt'
# Use ActiveModel has_secure_password
gem 'bcrypt', '~> 3.1.7'
Tiếp theo chạy lệnh bundle install
2. Chỉnh sửa routes
# config/routes.rb
Rails.application.routes.draw do
  resources :users, param: :_username
  post '/auth/login', to: 'authentication#login'
  get '/*a', to: 'application#not_found'
end
3. Tạo class JWT
class JsonWebToken
  SECRET_KEY = Rails.application.secrets.secret_key_base. to_s

  def self.encode(payload, exp = 24.hours.from_now)
    payload[:exp] = exp.to_i
    JWT.encode(payload, SECRET_KEY)
  end

  def self.decode(token)
    decoded = JWT.decode(token, SECRET_KEY)[0]
    HashWithIndifferentAccess.new decoded
  end
end
SECRET_KEY là key để encode và decode token. Trong đoạn code trên, ta gán một khoá bí mật được tạo bởi rails vào trong SECRET_KEY. Bằng cách như trên, ta có thể giảm thiểu một số đoạn code cho việc encode và decode. Các hàm encode và decode trên đã được khai báo static để có thể linh động trong việc encode và decode mà không cần phải khởi tạo đối tượng JsonWebToken.
Hàm self.encode có 2 tham số là payload và exp. Payload là một đối tượng key-value để lưu dữ liệu cần encode. Exp để lưu thời gian mà token sẽ hết hạn. Nếu không truyền exp thì sẽ mặc định là 24h.
Trong hàm self.decode, ta sẽ decode token và lấy giá trị đầu gán vào biến decoded. Giá trị đầu chứa payload mà ta đã encode và giá trị thứ hai chứa thông tin về thuật toán được sử dụng để encode và decode token.
4. Tạo hàm authorize_request
class ApplicationController < ActionController::API

  def not_found
    render json: { error: 'not_found' }
  end

  def authorize_request
    header = request.headers['Authorization']
    header = header.split(' ').last if header
    begin
      @decoded = JsonWebToken.decode(header)
      @current_user = User.find(@decoded[:user_id])
    rescue ActiveRecord::RecordNotFound => e
      render json: { errors: e.message }, status: :unauthorized
    rescue JWT::DecodeError => e
      render json: { errors: e.message }, status: :unauthorized
    end
  end
end
Hàm authorize_request chịu trách nhiệm xác thực request của user. Đầu tiên, ta cần lấy token trong header với khoá "Authorization". Với token này, ta có thể decode và lấy được payload. Trong ví dụ này, ta định nghĩa user_id trong payload. Khi chạy hàm decode, nó sẽ trả về JWT::DecodeError nếu có lỗi như token hết hạn, token bị thiếu hoặc không đúng định dạng,... Sau khi ta có user_id từ payload, ta sẽ tìm user theo id và gán vào biến current_user. Nếu user không tồn tại, nó sẽ trả về ActiveRecord::RecordNotFound cùng error message và http status code.
5. Tạo model User
Chạy lệnh:
rails g model user name:string username:string email:string password_digest:string
Thêm validate cho user:
class User < ApplicationRecord
  has_secure_password
  mount_uploader :avatar, AvatarUploader
  validates :email, presence: true, uniqueness: true
  validates :email, format: { with: URI::MailTo::EMAIL_REGEXP }
  validates :username, presence: true, uniqueness: true
  validates :password,
            length: { minimum: 6 },
            if: -> { new_record? || !password.nil? }
end
6. Tạo user controller
Chạy lệnh:
rails g controller users
Thêm các hàm CRUD:
class UsersController < ApplicationController
  before_action :authorize_request, except: :create
  before_action :find_user, except: %i[create index]

  # GET /users
  def index
    @users = User.all
    render json: @users, status: :ok
  end

  # GET /users/{username}
  def show
    render json: @user, status: :ok
  end

  # POST /users
  def create
    @user = User.new(user_params)
    if @user.save
      render json: @user, status: :created
    else
      render json: { errors: @user.errors.full_messages },
             status: :unprocessable_entity
    end
  end

  # PUT /users/{username}
  def update
    unless @user.update(user_params)
      render json: { errors: @user.errors.full_messages },
             status: :unprocessable_entity
    end
  end

  # DELETE /users/{username}
  def destroy
    @user.destroy
  end

  private

  def find_user
    @user = User.find_by_username!(params[:_username])
    rescue ActiveRecord::RecordNotFound
      render json: { errors: 'User not found' }, status: :not_found
  end

  def user_params
    params.permit(
      :avatar, :name, :username, :email, :password, :password_confirmation
    )
  end
end
Trong JWT, không có cách nào để vô hiệu hoá token, tuy nhiên, ta có thể dùng 1 trong số các cách sau để làm chức năng logout:
- Xoá token khỏi client, nhưng token vẫn có hiệu lực. Nên đặt thời gian hết hạn ngắn cho các token.
- Thêm token vào sổ đen, khi token được thêm vào sổ đen, token vẫn còn hiệu lực nhưng ta vẫn có thể từ chối truy cập đối với token này.
7. Chạy thử với Postman
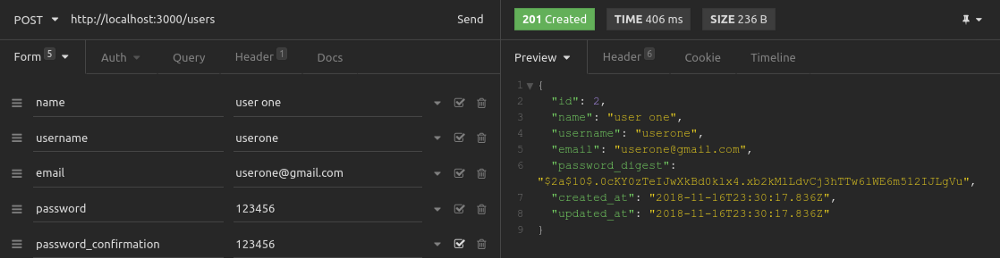
Create User:
Login:

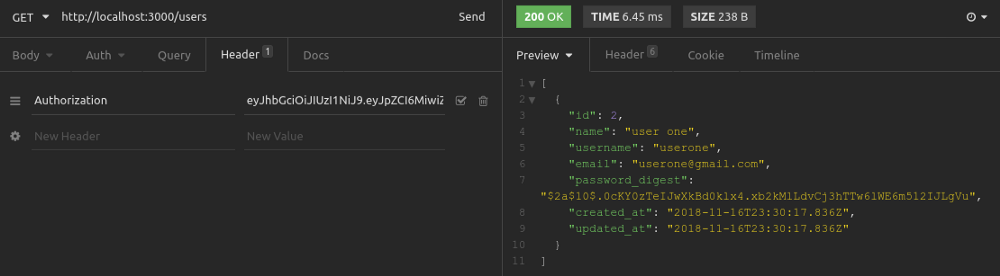
Get all user:
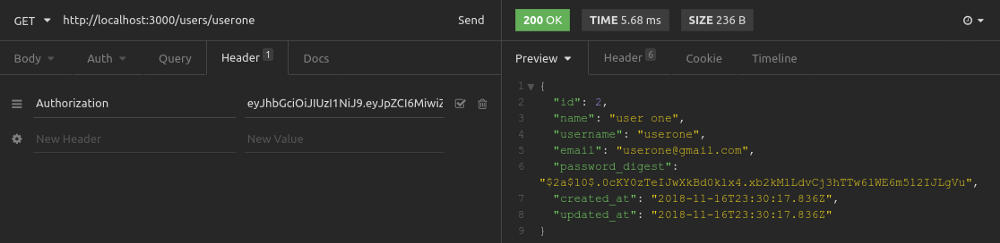
Get user:
Hi vọng rằng hướng dẫn trên có thể giúp bạn xây dựng được ứng dụng Rails API sử dụng JWT của mình. Thanks for reading!
All rights reserved
