Xây dựng api cho sample app với grape
Bài đăng này đã không được cập nhật trong 3 năm
Hướng dẫn này mô tả cách xây dựng 1 số api cơ bản cho sample_app sử dung Grape
I. Cài đặt
Thêm gem:
gem "grape"
gem "grape_on_rails_routes"
gem "grape-entity"
- grape: Hỗ trợ để viết api https://github.com/ruby-grape/grape
- grape_on_rails_routes : Xem các routes api https://github.com/syedmusamah/grape_on_rails_routes
- grape-entity: Hỗ trợ việc xử lý các attributes ở response trả về https://github.com/ruby-grape/grape-entity
Nhớ chạy bundle install để thêm gem vào nhé 
II. Build api trả về danh sách users
Sau khi cài đặt thì giờ chúng ta xây dựng 1 api trả về danh sách users
B1: Tạo thư mục api và base
Định nghĩa 1 thư mục api trong folder controller
mkdir -p app/controllers/api
Tiếp đến chúng ta xây dựng 1 file base trong folder api
touch app/controllers/api/base.rb
Sau đó chúng ta thêm đoạn code này vào base.rb
module API
  class Base < Grape::API
    mount API::V1::Base
    # mount API::V2::Base (next version)
  end
end
mount API::V1::Base : Đây là đường dẫn để tìm api, có bao nhiêu api ta sẽ viết hết trong Base của V1
Khai báo routes:
mount API::Base, at: "/"
Các bạn có thể để ý thấy rằng mọi thứ đều bắt đầu từ base.rb
Chú ý: Các bạn phải thêm đoạn code này vào file inflections.rb
# config/initializers/inflections.rb
ActiveSupport::Inflector.inflections(:en) do |inflect|
  inflect.acronym "API"
end
Nếu k server sẽ báo lỗi
/home/vu.thi.ngoc/Projects/sample_app/config/routes.rb:3:in `block in <main>': uninitialized constant API (NameError)
Did you mean?  Api
B2: Thêm version cho api
Tiếp đến ta define một version api có tên là V1
# controllers/api/v1/base.rb
module API
  module V1
    class Base < Grape::API
      mount V1::Users
      # mount API::V1::AnotherResource
    end
  end
end
mount V1::Users : Khai báo đường dẫn
Để lấy danh sách users chúng ta sẽ định nghĩa 1 class Users trong v1
# controllers/api/v1/users.rb
module API
  module V1
    class Users < Grape::API
      prefix "api"
      version "v1", using: :path
      format :json

      resource :users do
        desc "Return all users"
        get "", root: :users do
          users = User.all
          present users
        end
      end
    end
  end
end
Ở đây
version ‘v1’, using: :path: chỉ định version của API.format: json:nói với các API rằng chúng ta chỉ sử dụng định dạng JSON.prefix: api: hiểu đơn giản thì các path của chúng ta sẽ bắt đầu với /api. Nếu bạn chưa quên thì trong routes.rb chúng ta đã set route như này:mount API::Base, at: "/"Với prefix như trên chúng ta sẽ truy cập vào API theo đường dẫn /api.resource :users: nói rằng chúng ta sẽ sử dụng user routesdesc ‘Return all users’: mô tả api sẽ trả về gìget do …end: cái này thì khá cơ bản rồi, nó cũng giống như trong controller bình thường.
B3: Kiểm tra routes
Chạy rails grape:routes để nhìn toàn bộ các api có trong hệ thống, ở đây ta đã implement api trả về danh sách các users
GET | /api/:version/users(.json) | v1 | Return all users
B4: Chạy kiểm tra kết quả
Dùng postman, chọn phương thức GET với đường dẫn localhost:3000/api/v1/users , chọn Send và nhìn kết quả trả về dưới dạng
[
    {
        "id": 1,
        "name": "admin",
        "email": "admin@sa.com",
        "created_at": "2020-09-28T04:31:45.741Z",
        "updated_at": "2020-09-29T03:08:56.596Z",
        "password_digest": "$2a$12$WlS2CtP5TIvJEVE4Gn9sQuexqTxRB8KSMoUq7DhVH.ufeet3foyP2",
        "remember_digest": "$2a$12$T9W6yDKhgDcU5evfp0M2HOzecCEyyJP4942bLse77ppS63ZLA1MTm",
        "admin": true,
        "activation_digest": "$2a$12$tBO3ucVUe1HHJduKIWf/pe4F8E8ayWseNiPsRqyY17WNkndTbLNfS",
        "activated": true,
        "activated_at": "2020-09-28T04:31:45.000Z",
        "reset_digest": null,
        "reset_sent_at": null
    },
    {
        "id": 2,
        "name": "Fr. Efrain Lebsack",
        "email": "test1@sa.com",
        "created_at": "2020-09-28T04:31:46.932Z",
        "updated_at": "2020-09-29T03:02:46.427Z",
        "password_digest": "$2a$12$zslwRliHClDLBeAR4bunUe2rSOOm0IqQ624/9ZcTjFiXX5ZGgiV46",
        "remember_digest": "$2a$12$0wdlrqbQKQRNvds4qMB3qutOo7i9q31unL2OaARGoJei5P3LYV5Te",
        "admin": false,
        "activation_digest": "$2a$12$wVtB1ngTBir2yFl4C63zGuSEAE9hmRXkHn/anuDKmF/Xs8tmWiuc2",
        "activated": false,
        "activated_at": "2020-09-28T04:31:46.000Z",
        "reset_digest": null,
        "reset_sent_at": null
    },...
  ]
là thành công rồi đó, ta đã lấy được danh sách các user có trong hệ thống
III. Xử lý response
Trong bài toán thực tế ít khi api trả về toàn bộ thông tin user như bên trên, 1 số trường sẽ k cần thiết phải trả về hay muốn custom trường trả về thì sẽ ntn. Giờ là lúc ta xử lý các entity với grape-entity. grape-entity cho phép chúng ta định nghĩa các thuộc tính nào trả về.
Giả sử cần trả về danh sách user chỉ bao gồm tên và email
# app/controllers/api/entities/user.rb
module API
  module Entities
    class User < Grape::Entity
      expose :name
      expose :email
    end
  end
end
Sửa 1 chút phần api users, thêm with: API::Entities::User để lọc các giá trị trả về
resource :users do
  desc "Return all users"
  get "", root: :users do
    users = User.all
    present users, with: API::Entities::User
  end
end
Nhìn kết quả trả về
[
    {
        "name": "admin",
        "email": "admin@sa.com"
    },
    {
        "name": "Fr. Efrain Lebsack",
        "email": "test1@sa.com"
    },
  ..
 ]
vậy là đã xong rồi đó 
IV. Build api trả về user detail
# app/controllers/api/v1/users.rb
module API
  module V1
    class Users < Grape::API
        ...
        desc "Return a user"
        params do
          requires :id, type: String, desc: "ID of the user"
        end
        get ":id", root: "user" do
          user = User.find params[:id]
          present user, with: API::Entities::User
        end
      end
    end
  end
end
Gọi api localhost:3000/api/v1/users/1 sẽ trả về thông tin của user có Id là 1
{
    "name": "admin",
    "email": "admin@sa.com"
}
Nếu gọi 1 ID quá lớn không tồn tại thì sao? localhost:3000/api/v1/users/1111
Sẽ bị lỗi ngay lập tức
ActiveRecord::RecordNotFound (Couldn't find User with 'id'=1111):
V. Xử lý lỗi và ngoại lệ
Chúng ta sẽ tạo 1 module là default chứa tất cả các code dùng chung cho tất cả api hoặc 1 số
module API
  module V1
    module Defaults
      extend ActiveSupport::Concern

      included do
        prefix "api"
        version "v1", using: :path
        format :json

        rescue_from ActiveRecord::RecordNotFound do |e|
          error_response(message: e.message, status: 404)
        end

        rescue_from :all do |e|
           if Rails.env.development?
            raise e
          else
            error_response(message: e.message, status: 500)
          end
        end
      end
    end
  end
end
Dùng rescue để bắt 1 số ngoại lệ
Thay đổi users.rb: Thêm include API::V1::Defaults, nếu nó dc dùng cho tất cả các api trong v1 ta có thể include vào base.rb
module API
  module V1
    class Users < Grape::API
      include API::V1::Defaults

      resource :users do
        desc "Return all users"
        get "", root: :users do
          users = User.all
          present users, with: API::Entities::User
        end

        desc "Return a user"
        params do
          requires :id, type: String, desc: "ID of the user"
        end
        get ":id", root: "user" do
          user = User.find params[:id]
          present user, with: API::Entities::User
        end
      end
    end
  end
end
Giờ chúng ta thử gọi api user detail vs 1 ID không tồn tại localhost:3000/api/v1/users/1111
Kết quả trả về, mặc định lỗi sẽ trả về ntn
{
    "error": "Couldn't find User with 'id'=1111"
}
Chúng ta có thể kiểm soát các lỗi và custom chúng để trả về lỗi theo ý của mình
# app/controllers/api/error_formatter.rb
module API
  module ErrorFormatter
    def self.call message, backtrace, options, env, original_exception
      {response_type: "loi roi do", response: message}.to_json
    end
  end
end
Ta thêm nó vào base tổng để dùng cho toàn bộ api
# app/controllers/api/base.rb
module API
  class Base < Grape::API
    error_formatter :json, API::ErrorFormatter

    mount API::V1::Base
  end
end
Nếu chỉ override lỗi cho chỉ riêng V1 thì add vào base.rb của v1 error_formatter :json, API::ErrorFormatter
Giờ chúng ta nhìn message lỗi sau khi custom:
{
    "response_type": "loi roi do",
    "response": "Couldn't find User with 'id'=1111122"
}
VI. Xác thực người dùng sử dụng JWT (Json web token)
JWT là gì ?
JWT là một phương tiện đại diện cho các yêu cầu chuyển giao giữa hai bên Client – Server , các thông tin trong chuỗi JWT được định dạng bằng JSON . Trong đó chuỗi Token phải có 3 phần là header , phần payload và phần signature được ngăn bằng dấu “.” Vậy theo lý thuyết trên thì mình sẽ có một chuỗi Token như sau :
header.payload.signature
Đọc thêm tại : https://viblo.asia/p/json-web-token-jwt-la-gi-3Q75wWOG5Wb
Tại sao lại cần sử dụng jwt
Ví dụ ta yêu cầu Server lấy User có Id là 01 như sau [GET] localhost:8080/users/01 hoặc xóa [DELETE] localhost:8080/users/01. Ở đây nếu chúng ta không sử dụng bất kì phương thức nào để bảo mật API thì tất cả các User khác điều có thể gọi tới các Request này để lấy thông tin hoặc xoá User 01 và Server sẽ thực hiện yêu cầu mà không cần biết yêu cầu này có phải là của User 01 hay không . Điều này rất nguy hiểm , các hacker có thể xóa hết dữ liệu hoặc đánh cắp thông tin người dùng bằng cách truy cập vào các URL này , cho nên ta cần một phương pháp nào đó để Server xác định được yêu cầu đó là của User01 thì Server mới thực hiện , vì vậy ta sẽ sử dụng JWT
Cách thức hoạt động JWT
Bước 1 : Người dùng yêu cầu đăng nhập với Username , Password
Bước 2 : Server nhận được yêu cầu và kiểm tra Username , Password nếu đúng sẽ gửi cho người dùng một chuỗi JWT
Bước 3 Người dùng sẽ dùng JWT này kèm theo các yêu cầu kế tiếp
Bước 4: Server sẽ nhận yêu cầu và kiểm tra chuổi JWT , nếu chuỗi hợp lệ thì sẽ thực hiện yêu cầu
Bạn có thể đọc thêm về jwt tại đây https://viblo.asia/p/tai-sao-phai-su-dung-json-web-token-jwt-de-bao-mat-api-maGK787AZj2
Xây dựng thư viện JWT Authentication
- Đầu tiên chúng ta thêm gem jwt vào Gemfile
gem "jwt"
Vì chúng ta sử dụng encode và decode JWT khá nhiều, nên sẽ thuận tiện hơn nếu viết một class bao gồm các chức năng đó.
- Tạo 1 file với đường dẫn
lib/authentication.rb - Sau đó thêm đường dẫn autoload trong config/application.rb
config.autoload_paths << Rails.root.join('lib')
Trong class authentication ta định nghĩa 2 method chịu trách nhiệm tạo jwt từ thông tin người dùng và decode để giải mã jwt
# lib/authentication.rb
require "jwt"

class Authentication
  ALGORITHM = "HS256"

  class << self
    def encode payload
      JWT.encode(payload, ENV["AUTH_SECRET"], ALGORITHM)
    end

    def decode token
      JWT.decode(token, ENV["AUTH_SECRET"], true, {algorithm: ALGORITHM}).first
    end
  end
end
Encode phục vụ để mã hóa trả về jwt
JWT.encode: method này có 3 đối số
- Dữ liệu ở dạng băm, chúng ta sẽ mã hóa trong JWT
- Chìa khóa cho thuật toán băm của bạn
- Các loại thuật toán băm Ví dụ:
payload = {name: "sophie"}
secret_key = "masd82348$asldfja"
algorithm = "HS256"

JWT.encode(payload, secret_key, algorithm)
=> "esdiva23euihrusdfcnkjz2snciusdhuihr7480y2qikjh8"
Chúng ta sẽ tạo secret_key bằng cách nào ?
Sử dụng module Digest có sẵn từ Ruby để tạo khóa bí mật. Chúng ta sẽ tạo khóa trên rails console, thêm nó vào môi trường của chúng ta dưới dạng một biến môi trường ENV["AUTH_SECRET"]. Chúng ta sẽ sử dụng Figaro để đảm bảo rằng biến môi trường không bị đẩy lên GitHub.
irb(main):002:0> Digest::SHA256.digest('ngocvu')
=> "\x83\xAF6$\xDA^\x9B\nL%\x1F,q\xF4;}\xF1\x1F\x9B)3\x17}m\x98\x8C\x80\xDA\xB7\xAE\xF2\\"
Trong file application.yml (file này lưu biến môi trường k dc đẩy lên github đâu nha)
AUTH_SECRET: "\x83\xAF6$\xDA^\x9B\nL%\x1F,q\xF4;}\xF1\x1F\x9B)3\x17}m\x98\x8C\x80\xDA\xB7\xAE\xF2\\"
Decode phục vụ để giải mã
Phương thức này có ba đối số:
- JWT muốn giải mã,
- Khóa bí mật của thuật toán băm
- Các loại thuật toán băm
Thường chúng ta encode Authentication.encode({user_id: user.id}) đầu vào là user_id và giải mã decode để lấy user_id
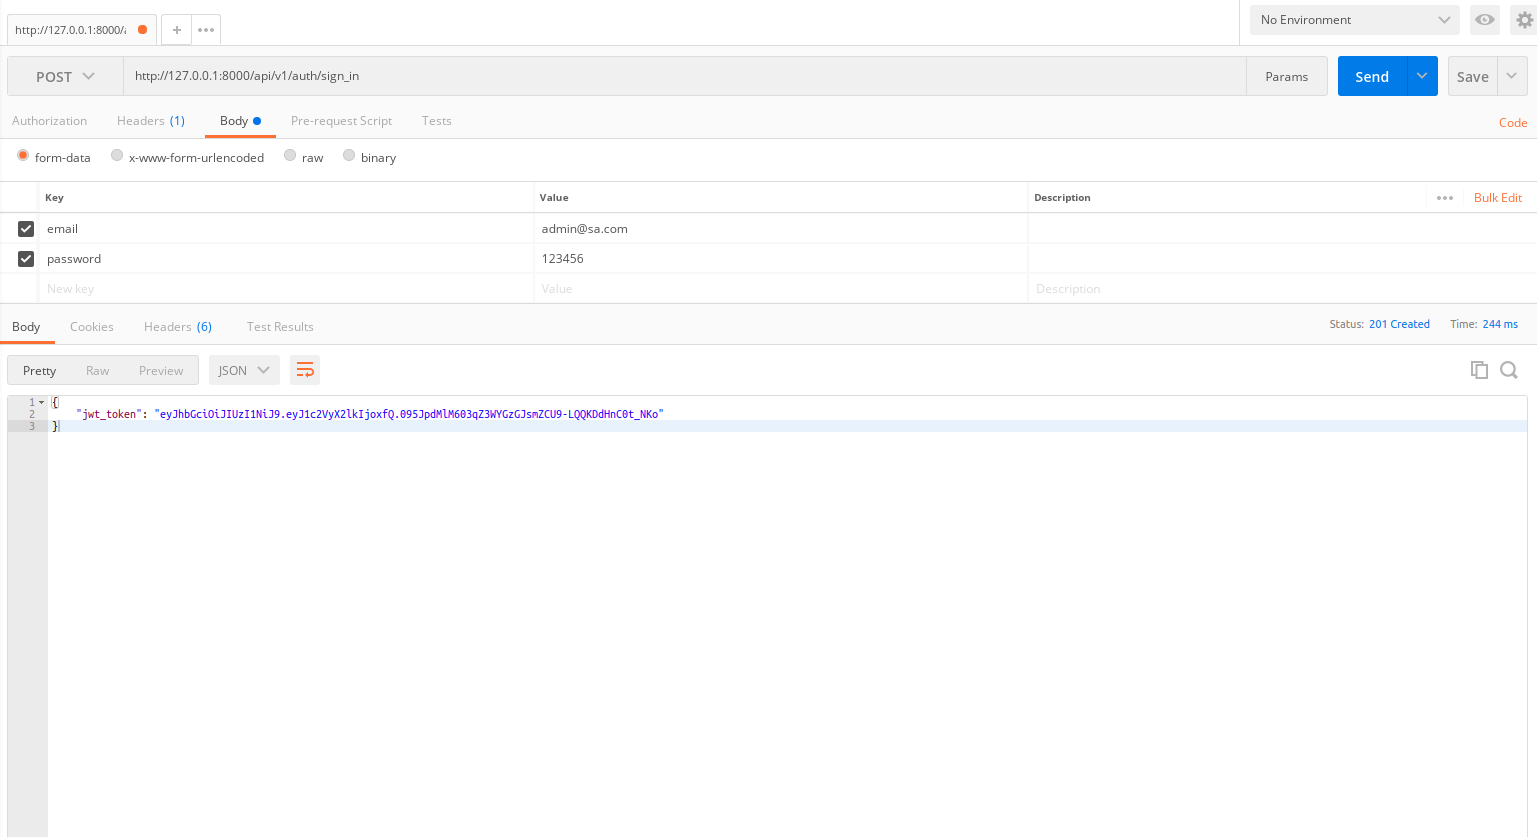
Login trả về JWT
Ta định nghĩa
module API
  module V1
    class Auth < Grape::API
      include API::V1::Defaults

      helpers do
        def represent_user_with_token user
          present jwt_token: Authentication.encode({user_id: user.id})
        end
      end

      resources :auth do
        desc "Sign in"
        params do
          requires :email
          requires :password
        end

        post "/sign_in" do
          user = User.find_by email: params[:email]
          if user&.authenticate params[:password]
            represent_user_with_token user
          else
            error!("Invalid email/password combination", 401)
          end
        end
      end
    end
  end
end
trong base v1: thêm mount V1::Auth
module API
  module V1
    class Base < Grape::API
      mount V1::Users
      mount V1::Auth
      # mount API::V1::AnotherResource
    end
  end
end

User đăng nhập mới lấy được danh sách user
Ở usesr.rb trước khi vào các action ta xác thực user trước bằng hàm authenticate_user!
# app/controllers/api/v1/users.rb
module API
  module V1
    class Users < Grape::API
      include API::V1::Defaults

      before do
        authenticate_user!
      end

      resource :users do
        desc "Return all users"
        get "", root: :users do
          users = User.all
          present users, with: API::Entities::User
        end

        desc "Return a user"
        params do
          requires :id, type: String, desc: "ID of the user"
        end
        get ":id", root: "user" do
          user = User.find params[:id]
          present user, with: API::Entities::User
        end
      end
    end
  end
end
function authenticate_user! sẽ được dùng ở nhiều nơi nên ta định nghĩa trong defaults.rb
module API
  module V1
    module Defaults
      extend ActiveSupport::Concern
      #....
      included do
        helpers do
          def authenticate_user!
            token = request.headers["Jwt-Token"]
            user_id = Authentication.decode(token)["user_id"] if token
            @current_user = User.find_by_id user_id
            unless @current_user
              api_error!("You need to log in to use the app", "failure", 401, {})
            end
          end
        end
      end
    end
  end
end
Hàm authenticate_user! sẽ decode jwt-token để lấy dc user_id sau đó sẽ tìm kiếm trong database. nếu user đó không tồn tại thì sẽ báo lỗi
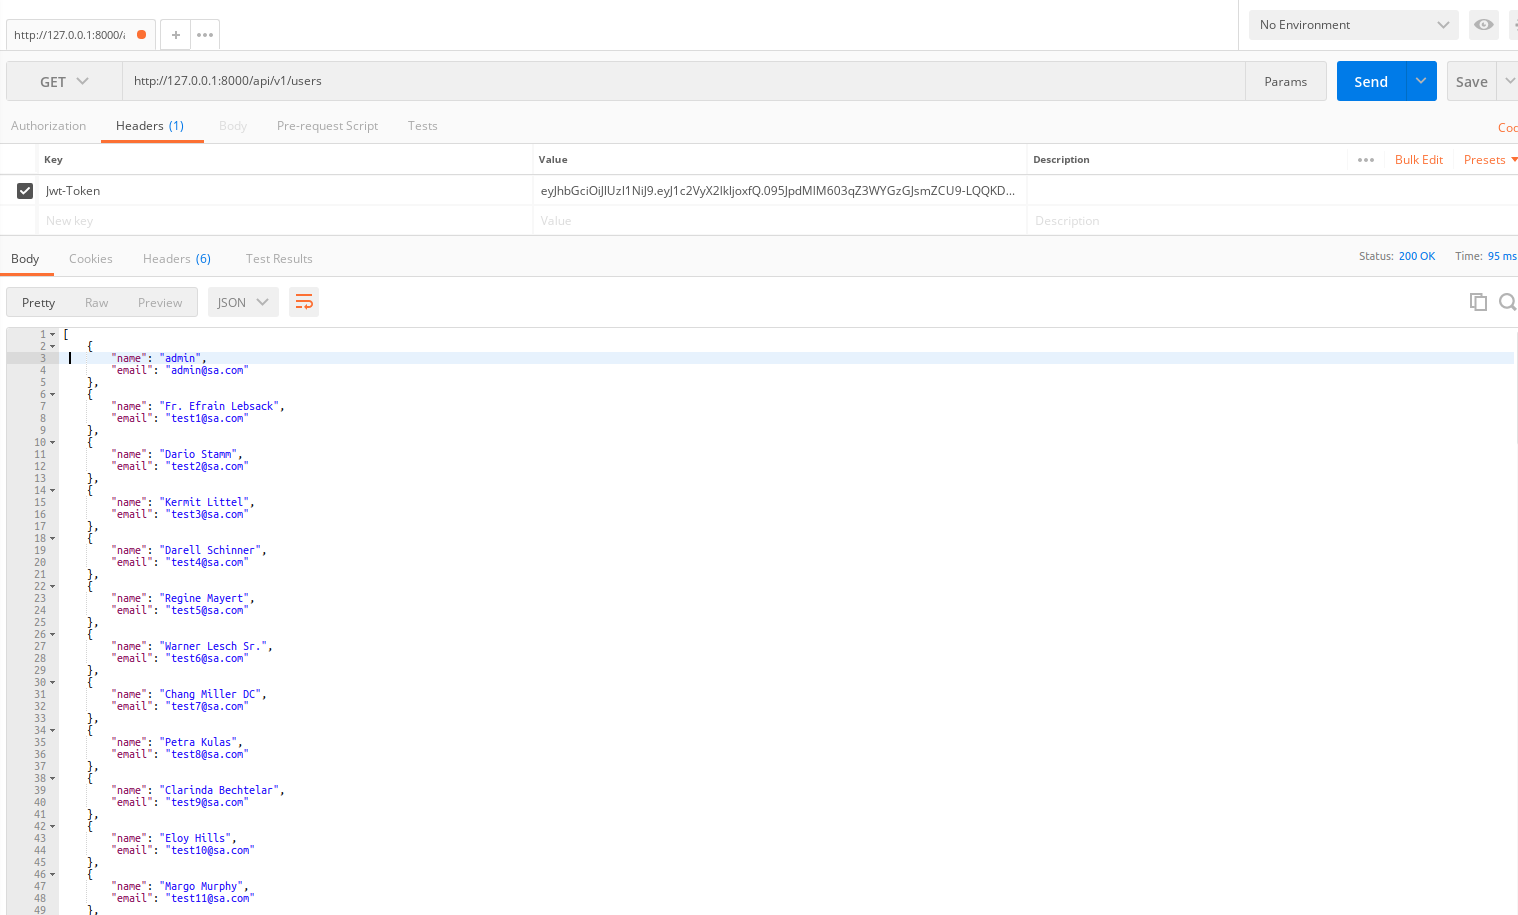
Giờ ta chạy lại ta cần gắn jwt-token vào header thì ms lấy được danh sách user nha 

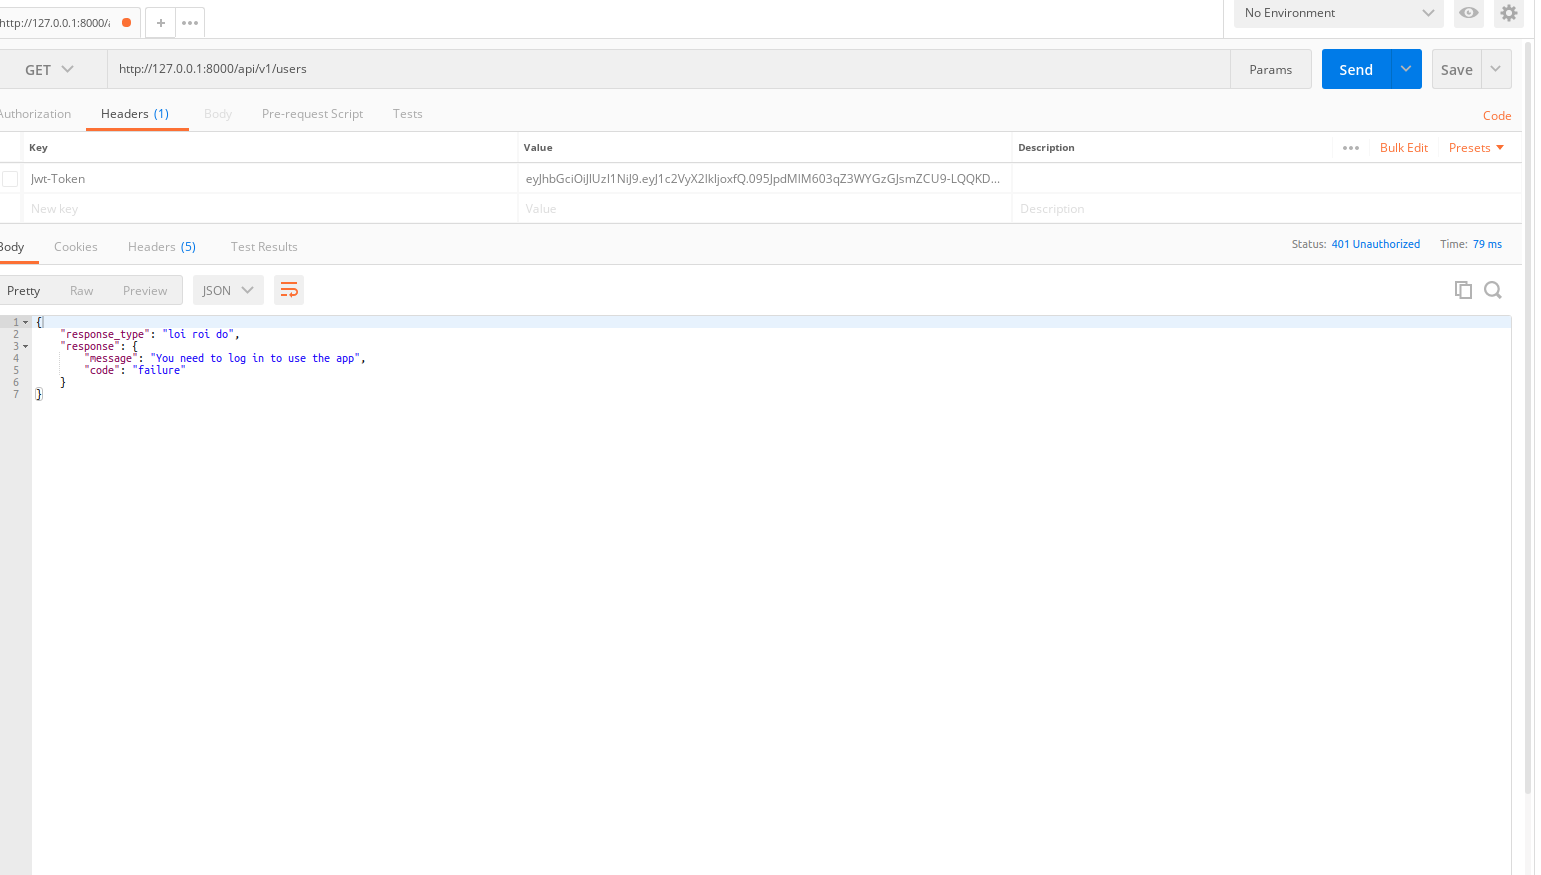
Thử không truyền lên jwt-token xem hệ thống báo gì nhé

Tất nhiên không chết rồi, chúng ta đã bắt lỗi api_error!("You need to log in to use the app", "failure", 401, {})
References
All rights reserved