Xây dựng 1 ứng dung CRUD đơn giản với rails và react-js (phần 2)
Bài đăng này đã không được cập nhật trong 6 năm
Disable Turbolinks
Bây giờ chúng ta phải bật React router lên và chạy, cần vô hiệu hóa Turbolinks, vì nó gây rắc rối đối với chức năng quay lại trang trước.
Trong Gemfile, chúng ta xóa:
# Turbolinks makes navigating your web application faster. Read more: https://github.com/turbolinks/turbolinks
gem 'turbolinks', '~> 5'
Và sau đó chạy bundle.
Ở trong app/assets/javascripts/application.js xóa:
//= require turbolinks
Cuối cùng, ở trong app/views/layouts/application.html.erb, xóa:
<%= stylesheet_link_tag    'application', media: 'all', 'data-turbolinks-track': 'reload' %>
<%= javascript_include_tag 'application', 'data-turbolinks-track': 'reload' %>
Thêm một vài style css
Hiện tại trông giao diện ứng dụng có vẻ khá lởm, vì vậy phải thêm 1 tí css cho đẹp trai. Tạo file App.css:
touch app/javascript/components/App.css
Và thêm vào như bên dưới:
@import url("https://fonts.googleapis.com/css?family=Roboto:400,700,300,400italic");
@import url("https://fonts.googleapis.com/css?family=Maven+Pro:400,500,700");

body, html, div, blockquote, img, label, p, h1, h2, h3, h4, h5, h6, pre, ul, ol, li, dl, dt, dd, form, a, fieldset, input, th, td {
  margin: 0;
  padding: 0;
}

ul, ol {
  list-style: none;
}

body {
  font-family: Roboto;
  font-size: 16px;
  line-height: 28px;
}

header {
  background: #f57011;
  height: 60px;
}

header h1, header h1 a{
  display: inline-block;
  font-family: "Maven Pro";
  font-size: 28px;
  font-weight: 500;
  color: white;
  padding: 14px 5%;
  text-decoration: none;
}

header h1 a:hover {
  text-decoration: underline;
}

.grid {
  display: grid;
  grid-gap: 50px;
  grid-template-columns: 25% auto;
  margin: 25px auto;
  width: 90%;
  height: calc(100vh - 145px);
}

.eventList {
  background: #f6f6f6;
  padding: 16px;
}

.eventList h2 {
  font-size: 20px;
  padding: 8px 6px 10px;
}

.eventContainer {
  font-size: 15px;
  line-height: 35px;
}

.eventContainer h2 {
  margin-bottom: 10px;
}

.eventList li:hover, a.active {
  background: #f8e5ce;
}

.eventList a {
  display: block;
  color: black;
  text-decoration: none;
  border-bottom: 1px solid #dddddd;
  padding: 8px 6px 10px;
  outline: 0;
}

.eventList h2 > a {
  color: #236fff;
  font-size: 15px;
  float: right;
  font-weight: normal;
  border-bottom: none;
  padding: 0px;
}

.eventForm {
  margin-top: 15px;
}

label > strong {
  display: inline-block;
  vertical-align: top;
  text-align: right;
  width: 100px;
  margin-right: 6px;
  font-size: 15px;
}

input, textarea {
  padding: 2px 0 3px 3px;
  width: 400px;
  margin-bottom: 15px;
  box-sizing: border-box;
}

input[type="checkbox"] {
  width: 13px;
}

button[type="submit"] {
  background: #f57011;
  border: none;
  padding: 5px 25px 8px;
  font-weight: 500;
  color: white;
  cursor: pointer;
  margin: 10px 0 0 106px;
}

.errors {
  border: 1px solid red;
  border-radius: 5px;
  margin: 20px 0 35px 0;
  width: 513px;
}

.errors h3 {
  background: red;
  color: white;
  padding: 10px;
  font-size: 15px;
}

.errors ul li {
  list-style-type: none;
  margin: 0;
  padding: 8px 0 8px 10px;
  border-top: solid 1px pink;
  font-size: 12px;
  font-weight: 0.9;
}

button.delete {
  background: none !important;
  border: none;
  padding: 0 !important;
  margin-left: 10px;
  cursor: pointer;
  color: #236fff;
  font-size: 15px;
  font-weight: normal;
  margin: 3px 0 0 0;
  text-decoration: none;
}

button.delete:hover {
  text-decoration: underline;
}

h2 a {
  color: #236fff;
  font-size: 15px;
  font-weight: normal;
  margin: 3px 12px 0 12px;
  text-decoration: none;
}

h2 a:hover {
  text-decoration: underline;
}

.form-actions a {
  color: #236fff;
  font-size: 15px;
  margin: 3px 12px 0 12px;
  text-decoration: none;
}

.form-actions a:hover {
  text-decoration: underline;
}

input.search {
  width: 92%;
  margin: 15px 2px;
  padding: 4px 0 6px 6px;
}
Sau đó import style ở trong file App.js:
import './App.css';
Sau đó chúng ta sửa component <Editor> như sau:
render() {
  ...
  return (
    <div>
      <Header />
      <div className="grid">
        <EventList events={events} />
        <PropsRoute path="/events/:id" component={Event} event={event} />
      </div>
    </div>
  );
}
<EventList> component:
render() {
  return (
    <section className="eventList">
      <h2>Events</h2>
      <ul>{this.renderEvents()}</ul>
    </section>
  );
}
Và ở component <Event>:
const Event = ({ event }) => (
  <div className="eventContainer">
    ...
  </div>
);
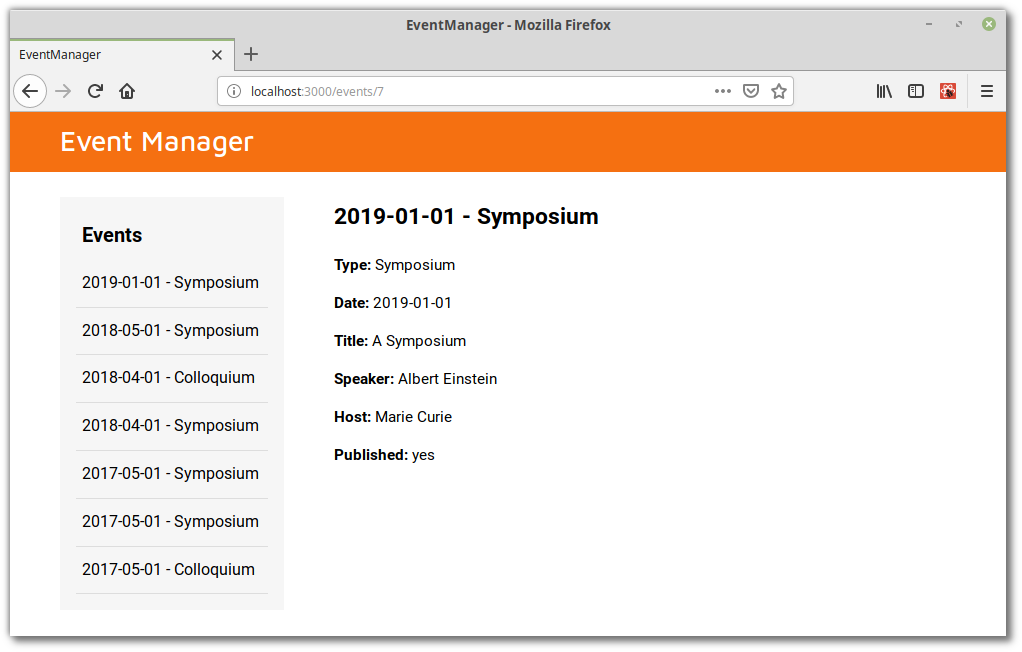
Bây giờ trông giao diện ứng dụng có vẻ khá ổn:
Thêm calss vào Event được chọn
Bây giờ sẽ rất tốt nếu thêm một dấu hiệu cho thấy người dùng đã chọn một event. Đó không phải là điều khó khăn. Trong trong <Editor> component để một activeID prop hoạt động đến thành phần <EventList>.
<EventList events={events} activeId={Number(eventId)} />
Ở trong component <EventList>, sử dụng nó vào class active khi render ra danh sách các event
renderEvents() {
  const { activeId, events } = this.props;
  events.sort((a, b) => new Date(b.event_date) - new Date(a.event_date));

  return events.map(event => (
    <li key={event.id}>
      <Link to={`/events/${event.id}`} className={activeId === event.id ? 'active' : ''}>
        {event.event_date}
        {' - '}
        {event.event_type}
      </Link>
    </li>
  ));
}
...
EventList.propTypes = {
  activeId: PropTypes.number,
  events: PropTypes.arrayOf(PropTypes.object),
};

EventList.defaultProps = {
  activeId: undefined,
  events: [],
};
Chúng ta đã thêm một số css cho link active, vì vậy khi bạn nhấp vào 1 event, các chi tiết của event sẽ được hiển thị và event sẽ được tô sáng tương ứng
Tạo một event
Hãy bắt đầu trong component <Editor>:
import React from 'react';
...
import { Switch } from 'react-router-dom';
import EventForm from './EventForm';

class Editor extends React.Component {
  ...

  render() {
    ...

    return (
      <div>
        <Header />
        <div className="grid">
          <EventList events={events} activeId={Number(eventId)} />
          <Switch>
            <PropsRoute path="/events/new" component={EventForm} />
            <PropsRoute path="/events/:id" component={Event} event={event} />
          </Switch>
        </div>
      </div>
    );
  }
}
Tại đây, chúng ta giới thiệu <Switch> component, sẽ xuất ra <Route> đầu tiên phù hợp với đường link. Điều này rất thiết thực, vì chúng ta không muốn form tạo mới Event và component <Event> hiển thị cùng một lúc.
Chúng ta sẽ thêm một link để hiển thị trên component <EventList>:
render() {
  return (
    <section className="eventList">
      <h2>
        Events
        <Link to="/events/new">New Event</Link>
      </h2>
      <ul>{this.renderEvents()}</ul>
    </section>
  );
}
Bây giờ, hãy tạo ra component <EventForm>:
touch app/javascript/components/EventForm.js
Và thêm vào như sau:
import React from 'react';

class EventForm extends React.Component {
  constructor(props) {
    super(props);

    this.handleSubmit = this.handleSubmit.bind(this);
  }

  handleSubmit(e) {
    e.preventDefault();
    console.log('submitted');
  }

  render() {
    return (
      <div>
        <h2>New Event</h2>
        <form className="eventForm" onSubmit={this.handleSubmit}>
          <div>
            <label htmlFor="event_type">
              <strong>Type:</strong>
              <input type="text" id="event_type" name="event_type" />
            </label>
          </div>
          <div>
            <label htmlFor="event_date">
              <strong>Date:</strong>
              <input type="text" id="event_date" name="event_date" />
            </label>
          </div>
          <div>
            <label htmlFor="title">
              <strong>Title:</strong>
              <textarea cols="30" rows="10" id="title" name="title" />
            </label>
          </div>
          <div>
            <label htmlFor="speaker">
              <strong>Speakers:</strong>
              <input type="text" id="speaker" name="speaker" />
            </label>
          </div>
          <div>
            <label htmlFor="host">
              <strong>Hosts:</strong>
              <input type="text" id="host" name="host" />
            </label>
          </div>
          <div>
            <label htmlFor="published">
              <strong>Publish:</strong>
              <input type="checkbox" id="published" name="published" />
            </label>
          </div>
          <div className="form-actions">
            <button type="submit">Save</button>
          </div>
        </form>
      </div>
    );
  }
}

export default EventForm;
Validate field ở trong form
Bâu giờ, hãy thêm một vài validation để chắc chắc rằng các field được điền trước khi submit. Tất cả các action sẽ được đặt ở trong component <EventForm>.
import React from 'react';
import PropTypes from 'prop-types';

class EventForm extends React.Component {
  constructor(props) {
    super(props);

    this.state = {
      event: props.event,
      errors: {},
    };

    this.handleSubmit = this.handleSubmit.bind(this);
    this.handleInputChange = this.handleInputChange.bind(this);
  }

  handleSubmit(e) {
    e.preventDefault();
    const { event } = this.state;
    const errors = this.validateEvent(event);
    if (!this.isEmptyObject(errors)) {
      this.setState({ errors });
    } else {
      console.log(event);
    }
  }

  validateEvent(event) {
    const errors = {};

    if (event.event_type === '') {
      errors.event_type = 'You must enter an event type';
    }

    if (event.event_date === '') {
      errors.event_date = 'You must enter a valid date';
    }

    if (event.title === '') {
      errors.title = 'You must enter a title';
    }

    if (event.speaker === '') {
      errors.speaker = 'You must enter at least one speaker';
    }

    if (event.host === '') {
      errors.host = 'You must enter at least one host';
    }

    console.log(event);
    return errors;
  }

  isEmptyObject(obj) {
    return Object.keys(obj).length === 0;
  }

  handleInputChange(event) {
    const { target } = event;
    const { name } = target;
    const value = target.type === 'checkbox' ? target.checked : target.value;

    this.setState(prevState => ({
      event: {
        ...prevState.event,
        [name]: value,
      },
    }));
  }

  renderErrors() {
    const { errors } = this.state;

    if (this.isEmptyObject(errors)) {
      return null;
    }

    return (
      <div className="errors">
        <h3>The following errors prohibited the event from being saved:</h3>
        <ul>
          {Object.values(errors).map(error => (
            <li key={error}>{error}</li>
          ))}
        </ul>
      </div>
    );
  }

  render() {
    return (
      <div>
        <h2>New Event</h2>
        {this.renderErrors()}
        <form className="eventForm" onSubmit={this.handleSubmit}>
          <div>
            <label htmlFor="event_type">
              <strong>Type:</strong>
              <input
                type="text"
                id="event_type"
                name="event_type"
                onChange={this.handleInputChange}
              />
            </label>
          </div>
          <div>
            <label htmlFor="event_date">
              <strong>Date:</strong>
              <input
                type="text"
                id="event_date"
                name="event_date"
                onChange={this.handleInputChange}
              />
            </label>
          </div>
          <div>
            <label htmlFor="title">
              <strong>Title:</strong>
              <textarea
                cols="30"
                rows="10"
                id="title"
                name="title"
                onChange={this.handleInputChange}
              />
            </label>
          </div>
          <div>
            <label htmlFor="speaker">
              <strong>Speakers:</strong>
              <input type="text" id="speaker" name="speaker" onChange={this.handleInputChange} />
            </label>
          </div>
          <div>
            <label htmlFor="host">
              <strong>Hosts:</strong>
              <input type="text" id="host" name="host" onChange={this.handleInputChange} />
            </label>
          </div>
          <div>
            <label htmlFor="published">
              <strong>Publish:</strong>
              <input
                type="checkbox"
                id="published"
                name="published"
                onChange={this.handleInputChange}
              />
            </label>
          </div>
          <div className="form-actions">
            <button type="submit">Save</button>
          </div>
        </form>
      </div>
    );
  }
}

EventForm.propTypes = {
  event: PropTypes.shape(),
};

EventForm.defaultProps = {
  event: {
    event_type: '',
    event_date: '',
    title: '',
    speaker: '',
    host: '',
    published: false,
  },
};

export default EventForm;
Tạo ra file helpers.js :
mkdir app/javascript/helpers
touch app/javascript/helpers/helpers.js
Và thêm vào như sau:
export const isEmptyObject = obj => Object.keys(obj).length === 0;

export const validateEvent = (event) => {
  const errors = {};

  if (event.event_type === '') {
    errors.event_type = 'You must enter an event type';
  }

  if (event.event_date === '') {
    errors.event_date = 'You must enter a valid date';
  }

  if (event.title === '') {
    errors.title = 'You must enter a title';
  }

  if (event.speaker === '') {
    errors.speaker = 'You must enter at least one speaker';
  }

  if (event.host === '') {
    errors.host = 'You must enter at least one host';
  }

  return errors;
}
Và sau đó đặt vào <EventForm> component.
import { isEmptyObject, validateEvent } from '../helpers/helpers';

handleSubmit(e) {
  e.preventDefault();
  const { event } = this.state;
  const errors = validateEvent(event);
  if (!isEmptyObject(errors)) {
    this.setState({ errors });
  } else {
    console.log(event);
  }
}

renderErrors() {
  const { errors } = this.state;

  if (isEmptyObject(errors)) {
    return null;
  }
  ...
}
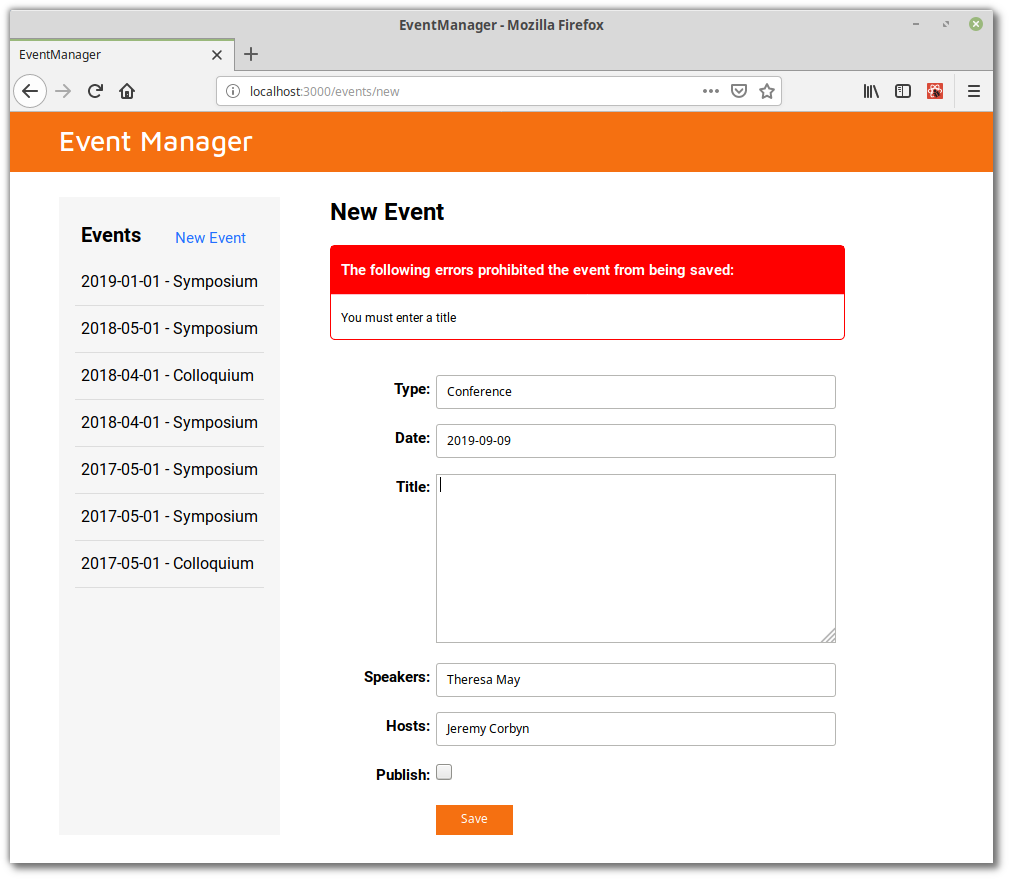
Bây giờ nếu cố gắng gửi 1 form mà không được điền đúng, bạn sẽ nhìn thấy một vài lỗi:
Lưu một Event
Để thực hiện lưu một event vào DB, chúng ta sẽ cần một callback function ở trong <EventForm> component
Ở trong <Editor> component:
class Editor extends React.Component {
  constructor(props) {
    ...
    this.addEvent = this.addEvent.bind(this);
  }

  componentDidMount() { ... }

  addEvent(newEvent) {
    axios
      .post('/api/events.json', newEvent)
      .then((response) => {
        alert('Event Added!');
        const savedEvent = response.data;
        this.setState(prevState => ({
          events: [...prevState.events, savedEvent],
        }));
        const { history } = this.props;
        history.push(`/events/${savedEvent.id}`);
      })
      .catch((error) => {
        console.log(error);
      });
  }

  render() {
    ...

    return (
      <div>
        <Header />
        <div className="grid">
          <EventList events={events} activeId={Number(eventId)} />
          <Switch>
            <PropsRoute path="/events/new" component={EventForm} onSubmit={this.addEvent} />
            <PropsRoute path="/events/:id" component={Event} event={event} />
          </Switch>
        </div>
      </div>
    );
  }
}

Editor.propTypes = {
  match: PropTypes.shape(),
  history: PropTypes.shape({ push: PropTypes.func }).isRequired,
};
Như bạn có thể thấy, chúng ta đã định nghĩa một method addEvent, nhận một đối tượng mới newEvent và thực hiện yêu cầu tới API để tạo ra một event trong DB. Nếu yêu cầu đó thành công, nó sẽ thêm event mới vào trong DB. Nó cũng sẽ sử dụng đối tượng history do React Router cung cấp để thay đổi url của event mới được tạo.
Cũng lưu ý rằng chúng ta đang chuyển phương thức addEvent vào component <EventForm> dưới dạng gọi lại. Bây giờ việc cần làm là đặt nó vào trong <EventForm> component.
handleSubmit(e) {
  e.preventDefault();
  const { event } = this.state;
  const errors = validateEvent(event);

  if (!isEmptyObject(errors)) {
    this.setState({ errors });
  } else {
    const { onSubmit } = this.props;
    onSubmit(event);
  }
}
...
EventForm.propTypes = {
  event: PropTypes.shape(),
  onSubmit: PropTypes.func.isRequired,
};
Bây giờ khi cố lưu một event vào cơ sở dữ liệu, bạn sẽ nhận được một alert cho việc lưu thành công. Hãy thử ở trên trình duyệt của các bạn nhé
Ở bài viết sau mình sẽ hướng dẫn xóa và update một event trong DB và một số thú vị khi làm việc với React. Cảm ơn các bạn đã đọc bài viết của mình.
All rights reserved
