Xây dựng 1 ứng dung CRUD đơn giản với rails và react-js
Bài đăng này đã không được cập nhật trong 6 năm
Hầu hết các ứng dụng web cần duy trì dữ liệu ở dạng này hay dạng khác. Khi làm việc với ngôn ngữ server, thường là một công việc đơn giản. Nhưng khi chúng ta làm việc với một framework javascript tích hợp bên phía front-end, mọi việc bắt đầu phức tạp hơn 1 chút.
Trong hướng dẫn này tôi sẽ trình bày cách xây dựng API JSON bằng Ruby On Rails sau đó xây dựng giao diện bằng React để tương tác với API. Ứng dụng mà tôi sẽ xây dựng là một trình quản lí event, cho phép bạn tạo và quản lí các event.
Ứng dụng sẽ có chức năng CRUD cơ bản và sẽ thêm 1 vài tính năng bổ sung (chẳng hạn như đặt lịch và tìm kiếm). Để tích hợp React vào làm front-end ở trong rails, tôi sẽ sử dụng gem Webpacker, nó sẽ xuất hiện dưới dạng package Javascript mặc định của rails 6.
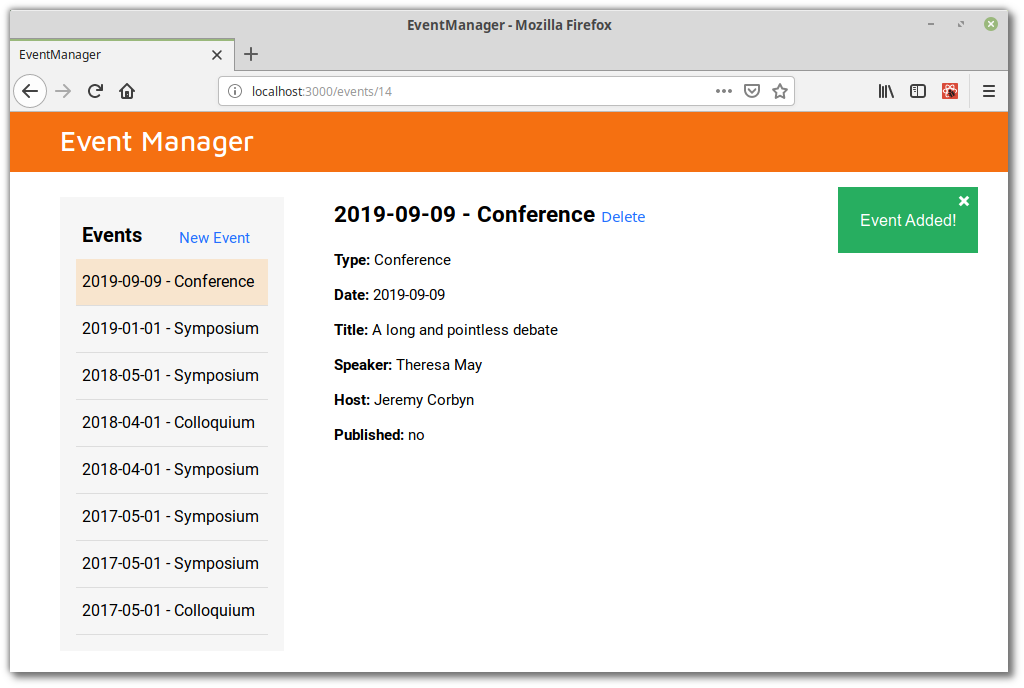
Đây là giao diện khi ứng dụng đã hoàn thành
Điều kiện đầu tiên
Để làm theo, bạn sẽ cần cả Ruby và Node được cài sẵn trên máy tính của bạn
Đối với hướng dẫn này tôi sẽ sử dụng Ruby 2.6 và Rails 5.2.2, Node phiên bản 10.15.0. Hệ điều hành là Linux Mint, vì vậy mọi lệnh liên quan đến hướng dẫn sẽ chạy được với các điều kiện trên, nếu không, bạn cần nghiên cứu cách để thực hiện được trên máy tính của bạn.
Xây dựng API
Điều đầu tiên cần làm là tạo một ứng dụng rails và xây dựng một ứng dụng rails mới
gem install rails
rails new event-manager
Tùy thuộc vào hệ điều hành của bạn, bạn có thể cần phải cài đặt thư viện libsqlite3-dev, rails mặc định sử dụng SQLite làm cơ sở dữ liệu lưu trữ data
sudo apt-get install libsqlite3-dev
Model
Tiếp theo, đến đường dẫn của project và tạo model Event
rails g model Event \
event_type:string \
event_date:date \
title:text \
speaker:string \
host:string \
published:boolean
Tạo database và bảng:
rake db:create
rake db:migrate
Cuối cùng, tạo file seed để create một số data thử nghiệm. Bạn có thể làm điều này bằng cách tạo tệp db/seeds/events.json và thêm nội dung sau vào tệp:
[
  {
    "event_type": "Symposium",
    "event_date": "2018-05-01",
    "title": "A Social-Neuroscience Perspective on Empathy",
    "speaker": "Albert von Bezold, Jules Cotard, Marian Diamond",
    "host": "Alcmaeon of Croton",
    "published": true
  },
  {
    "event_type": "Colloquium",
    "event_date": "2018-04-01",
    "title": "The Neuroscience of Restorative Justice",
    "speaker": "Albert Einstein",
    "host": "Stephen Hawking",
    "published": true
  },
  {
    "event_type": "Symposium",
    "event_date": "2018-04-01",
    "title": "Cognitive Development Theory",
    "speaker": "Francis Glisson, Ragnar Granit, Nils-Åke Hillarp",
    "host": "David H. Hubel, Herbert Jasper",
    "published": true
  },
  {
    "event_type": "Symposium",
    "event_date": "2017-05-01",
    "title": "The Neuroscience of Moral Decision Making in Ethics",
    "speaker": "Michel Jouvet, Bernard Katz, Emil Kraepelin",
    "host": "Lawrence C. Katz",
    "published": true
  },
  {
    "event_type": "Symposium",
    "event_date": "2017-05-01",
    "title": "Ovariectomy Effect on Hippocampus Spatial Memory",
    "speaker": "Rita Levi-Montalcini, John C. Lilly, Horace Winchell Magoun",
    "host": "Mondino de Luzzi, Walle Nauta",
    "published": true
  },
  {
    "event_type": "Colloquium",
    "event_date": "2017-05-01",
    "title": "Left Brain Vs Right Brain how does this impact learning",
    "speaker": "Aristides Leão",
    "host": "Louis Lapicque",
    "published": true
  }
]
Và sau đó sửa file db/seeds.rb như sau:
json = ActiveSupport::JSON.decode(File.read('db/seeds/events.json'))
json.each do |record|
  Event.create!(record)
end
Chạy lệnh rake db:seed. Start rails console và chắc chắn rằng bạn đã có 1 vài data để thử nghiệm:
rails c
Running via Spring preloader in process 32213
Loading development environment (Rails 5.2.2)
irb(main):001:0> Event.all.count
   (0.3ms)  SELECT COUNT(*) FROM "events"
=> 6
Controller
Trong bước tiếp theo, chúng ta sẽ tạo controller để trả về events đáp ứng các request gọi lên API. Chúng ta sẽ tạo controller và thư mục riêng với namespace, điều này sẽ làm mã code của chúng ta đẹp hơn cách tạo controller thông thường, và cho phép tạo bộ định tuyến riêng cho API.
mkdir app/controllers/api
touch app/controllers/api/events_controller.rb
Tiếp theo, bạn cần cài đặt gem responders. Nó sẽ cung cấp cho chúng ta method respond_with để giữ cho controller trông ngắn gọn và sạch. Method này đã từng là một phần của Rails core, nhưng nó đã chuyển qua một gem riêng kể từ Rails 4.2
Thêm vào trong file Gemfile:
gem 'responders'
Và sau đó chạy lệnh bundle
Tiếp theo, chúng ta thêm code vào trong app/controllers/api/events_controller.rb. Chú ý đặt tên namespace api
class Api::EventsController < ApplicationController
  respond_to :json

  def index
    respond_with Event.order(event_date: :DESC)
  end

  def show
    respond_with Event.find(params[:id])
  end

  def create
    respond_with :api, Event.create(event_params)
  end

  def destroy
    respond_with Event.destroy(params[:id])
  end

  def update
    event = Event.find(params['id'])
    event.update(event_params)
    respond_with Event, json: event
  end

  private

  def event_params
    params.require(:event).permit(
      :id,
      :event_type,
      :event_date,
      :title,
      :speaker,
      :host,
      :published
    )
  end
end
Chúng ta đã bắt đầu định nghĩa dữ liệu trả về khi nhận được request. Sau đó chúng ta xác định các method của controller đáp ứng các yêu cầu CRUD, sau đó kết thúc bằng việc định nghĩa các parameters trả về.
Lưu ý rằng việc dùng phương thức respond_with cho phép chúng ta trả dữ liệu về dưới dạng JSON. Nếu không có method này, bạn có thể viết code như sau:
def index
  respond_to do |format|
    format.json { render json: Event.order(event_date: :DESC) }
  end
end
Điều đó sẽ làm cho bạn phải code nhiều hơn
Điều cuối cùng chúng ta cần làm đối với các controller là thay đổi phương thức forgery protection ở trong app/controllers/application_controller.rb:
class ApplicationController < ActionController::Base
  protect_from_forgery with: :null_session
end
Routes
Hãy sửa file routes ở trong config/routes.rb:
Rails.application.routes.draw do
  namespace :api do
    resources :events, only: %i[index show create destroy update]
  end
end
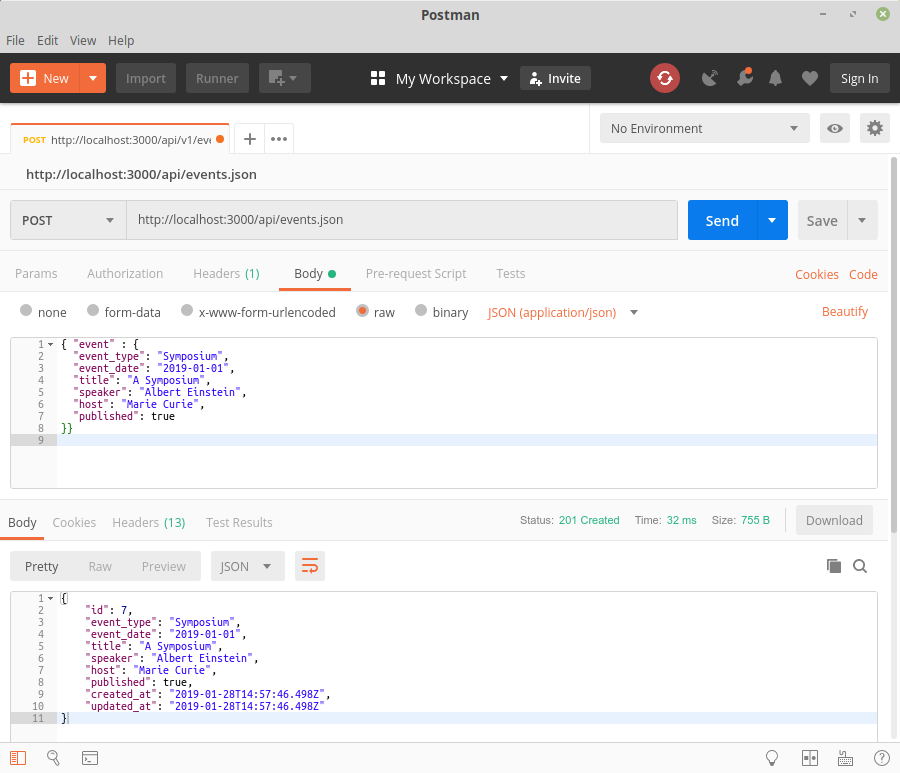
và sau đó, bạn có thể bật rails server lên bằng lệnh rails s và truy cập vào end-point của API dưới link: http://localhost:3000/api/events.json
Bạn cũng có thể test nó bằng postman
Đặt request type là POST cho url http://localhost:3000/api/events.json, header Content-Type sẽ là application/json, dưới Body > raw, nhập
{ "event" : {
  "event_type": "Symposium",
  "event_date": "2019-01-01",
  "title": "A Symposium",
  "speaker": "Albert Einstein",
  "host": "Marie Curie",
  "published": true
}}
Cài đặt Webpacker
Tiếp theo chúng ta sẽ cài đặt gem Webpacker. Điều này sẽ cho phép chúng ta sử dụng webpack, tiền xử lí Javascript và bundler, để quản lí ứng dụng, giống như Javascript của rails.
Thêm nó vào trong Gemfile, và chạy lệnh bundle để cài đặt
gem 'webpacker', '>= 4.0.x'
Sau đó, chúng ta cần phải cài đặt Yarn:
npm i -g yarn
và chạy:
yarn add @rails/webpacker@next
để lấy bản release mới nhất của webpacker
Cuối cùng chạy lệnh:
bundle exec rails webpacker:install
Cấu hình Webpacker
Hãy tạo một controller tên là site với action index không có gì, nó sẽ tạo ra trang root của ứng dụng
touch app/controllers/site_controller.rb
mkdir app/views/site
touch app/views/site/index.html.erb
Ở trong app/controllers/site_controller.rb:
class SiteController < ApplicationController
  def index; end
end
Ở trong app/views/site/index.html.erb:
<div id="root"></div>
và ở trong config/routes.rb
Rails.application.routes.draw do
  root 'site#index'

  namespace :api do
    resources :events, only: %i[index show create destroy update]
  end
end
Chúng ta sẽ cần thêm javascript_pack_tag ở trong section <head> của app/views/layouts/application.html.erb:
<%= javascript_pack_tag 'application' %>
Thêm React app
Nó rất dễ để cài đặt:
bundle exec rails webpacker:install:react
Trình cài đặt sẽ thêm tất cả các phụ thuộc liên quan bằng cách sử dụng yarn, tạo các thay đổi cần thiết ở trong file cấu hình, và thử tạo một React component ở trong app/javascript/packs
Sau đó, những gì bạn cần làm là thêm <%= javascript_pack_tag 'hello_react' %> ở trên đầu của file app/views/layouts/application.html.erb, refresh lại page, bạn sẽ nhìn thấy dòng chữ Hello React
Tại thời điểm này, có thể chọc vào ứng dụng để xem file nào mà Webpacker đã tạo ra / sửa đổi. Hãy xem qua file package.json để thấy được những gì đã được cài đặt
Scaffolding the Event Manager
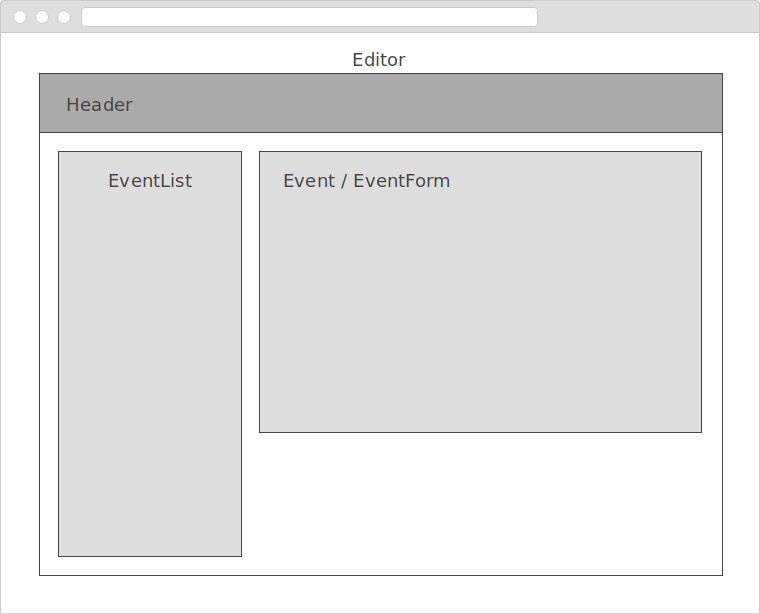
Tiếp theo, chúng ta cần suy nghĩ cấu trúc UI của ứng dụng. Chúng ta sẽ bắt đầu với <Editor> component sẽ chứa các component con:
- Một
<Header>component để hiển thị title của ứng dụng - Một
<EventList>component để hiển thị danh sách các events - Một
<Event>component để hiển thị một event riêng rẽ - Một
<EventForm>component để cho phép chúng ta tạo và sửa event
Mọi thứ ở trên sẽ trông giống như frame sau:
Fetching Events
Hãy bắt đầu bằng cách tạo ra tất cả các tệp và thư mục chúng ta sẽ cần ở trong phần này:
mkdir app/javascript/components
touch app/javascript/components/{App.js,Editor.js,Header.js,EventList.js}
Tiếp theo, cài đặt axios, một Promise dựa trên HTTP client mà chúng ta sẽ sử dụng cho việc fetch các events từ phía backend:
yarn add axios
Xóa <%= javascript_pack_tag 'hello_react' %> ở trên đầu của file layout, và thay đổi app/javascript/packs/application.js:
import React from 'react';
import { render } from 'react-dom';
import App from '../components/App';

document.addEventListener('DOMContentLoaded', () => {
  render(<App />, document.querySelector('#root'));
});
Bây giờ bạn có thể bắt đầu xây dựng ứng dụng React. Hãy bắt đầu ở trong App.js, nơi chúng ta sẽ render ra <Editor> component.
import React from 'react';
import Editor from './Editor';

const App = () => (
  <div>
    <Editor />
  </div>
);

export default App;
Và hãy sửa code ở trong Editor.js:
import React from 'react';
import axios from 'axios';
import Header from './Header';
import EventList from './EventList';

class Editor extends React.Component {
  constructor(props) {
    super(props);

    this.state = {
      events: null,
    };
  }

  componentDidMount() {
    axios
      .get('/api/events.json')
      .then(response => this.setState({ events: response.data }))
      .catch((error) => {
        console.log(error);
      });
  }

  render() {
    const { events } = this.state;
    if (events === null) return null;

    return (
      <div>
        <Header />
        <EventList events={events} />
      </div>
    );
  }
}

export default Editor;
Chúng ta đã định nghĩa thuộc tính events ở trong state. Sau đó chúng ta sử dụng componentDidMount lifecycle hook để fetch events từ API. Ở trong render method chúng ta cần chắc chắn rằng không có gì được render ra khi events không fetch được. Tuy nhiên, khi chúng đã được fetch về, chúng ta sẽ render ra ở trong <EventList> component.
Ở trong Header.js:
import React from 'react';

const Header = () => (
  <header>
    <h1>Event Manager</h1>
  </header>
);

export default Header;
Không có gì đang diễn ra ở đây. Chúng ra chỉ hiển thị 1 tiêu đề
Trong EventList.js sửa như sau:
import React from 'react';
import PropTypes from 'prop-types';

class EventList extends React.Component {
  renderEvents() {
    const { events } = this.props;
    events.sort(
      (a, b) => new Date(b.event_date) - new Date(a.event_date),
    );

    return events.map(event => (
      <li key={event.id}>
        {event.event_date}
        {' - '}
        {event.event_type}
      </li>
    ));
  }

  render() {
    return (
      <section>
        <h2>Events</h2>
        <ul>{this.renderEvents()}</ul>
      </section>
    );
  }
}

EventList.propTypes = {
  events: PropTypes.arrayOf(PropTypes.object),
};

EventList.defaultProps = {
  events: [],
};

export default EventList;
Ở đây chúng ta có phương thức renderEvents trả về 1 danh sách cái events được sắp xếp để hiển thị trong render method. Chú ý rằng chúng ta đã xây dựng 1 vài xác nhận prop đơn giản để đảm bảo rằng các component được thông qua 1 mảng
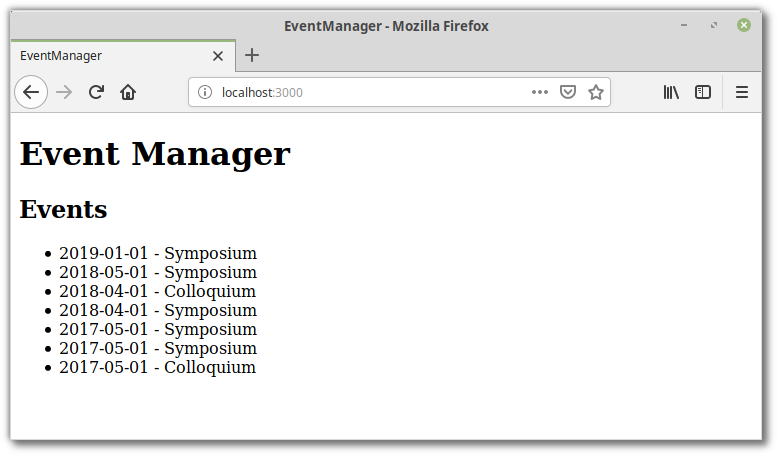
Bạn mở http://localhost:3000 bạn sẽ nhìn thấy danh sách các events được hiển thị ra
Thêm React Devtools, ESLint và webpack-dev-server
Bây giờ chúng ta phải viết 1 chút javascript, đây là 1 thời điểm tốt để chúng ta cài đặt 1 vài công cụ trong quá trình phát triển để đảm bảo chất lượng mã code. Hãy bắt đầu với ESLint:
yarn add eslint --dev
Và sau đó thêm Airbnb config:
yarn add eslint-config-airbnb --dev
Tiếp theo, tìm những gì phụ thuộc còn lại là:
npm info "eslint-config-airbnb@latest" peerDependencies
Outputs:
{
  eslint: '^4.19.1 || ^5.3.0',
  'eslint-plugin-import': '^2.14.0',
  'eslint-plugin-jsx-a11y': '^6.1.1',
  'eslint-plugin-react': '^7.11.0'
}
Thêm 3 package cuối cùng vào phần devDependencies của package.json và chạy yarn:
"devDependencies": {
  "eslint": "^5.12.1",
  "eslint-config-airbnb": "^17.1.0",
  "eslint-plugin-import": "^2.14.0",
  "eslint-plugin-jsx-a11y": "^6.1.1",
  "eslint-plugin-react": "^7.11.0",
  "webpack-dev-server": "^3.1.14"
}
Tạo ra 1 file .eslintrc.js ở trong thư mục root của project và thêm:
module.exports = {
  extends: 'airbnb',
  rules: {
    'react/jsx-filename-extension': [1, { extensions: ['.js', '.jsx'] }],
    'no-console': 0,
    'no-alert': 0,
  },
};
Điều này sẽ cho Eslint sử dụng bộ quy tắc Airbnb mà chúng ta vừa cài đặt. Nó cũng sẽ cho phép các tệp js có chứa đuôi JSX.
Bạn có thẻ chạy ESLint từ terminal:
./node_modules/.bin/eslint app/javascript
hay như một npm script:
"scripts": {
  "lint": "eslint app/javascript"
}
Nhưng để có kết quả tốt nhất, bạn có thể tích hợp nó vào trình soạn thảo của mình như SublimeText3 với SublimeLinter, SublimeLinter-eslint và ESLint-Formatter để đạt hiệu quả cao.
Ngoài ra, khi xem xét công cụ, bạn có thể muốn dành một phút để xem công cụ dành cho các nhà phát triển React. Những thứ này cho phép bạn kiểm tra hệ thống phân cấp thành phần React, bao gồm các component props và state và có sẵn dưới dạng extention của trình duyệt dưới dạng 1 ứng dụng độc lập

Và cuối cùng, để mang lại trải nghiệm tốt hơn cho nhà phát triển, hãy khởi động máy chủ phát triển webpack đi kèm với gem Webpacker. Để làm điều này, hãy mở một thiết bị đầu cuối thứ 2 (puma nên được chạy trong lần đầu tiên) và từ thư mục root của dự án, hãy chạy:
./bin/webpack-dev-server
Bây giờ, bất cứ khi nào thay đổi với file app/javascript/packs/*.js, webpack sẽ tự động tải lại trình duyệt để match ra kết quả
Hiển thị Event
Tiếp theo, hãy làm cho danh sách Event có thể click được khi người dùng chọn 1 event, chi tiết của nó sẽ được hiển thị trên màn hình. Đối với điều này, chúng ta sẽ cần React router, sẽ thay đổi URL để phản ảnh tới event hiện tại
yarn add react-router-dom
và sau đó hãy sửa 1 chút file config.routes.rb:
Rails.application.routes.draw do
  root to: redirect('/events')

  get 'events', to: 'site#index'
  get 'events/new', to: 'site#index'
  get 'events/:id', to: 'site#index'
  get 'events/:id/edit', to: 'site#index'

  namespace :api do
    resources :events, only: %i[index show create destroy update]
  end
end
Trong dòng đầu tiên, chúng ta chỉ ra root route tới http://localhost:3000/events, đây hoàn toàn là vì lí do thẩm mỹ. Tuy nhiên, trong 4 dòng tiếp theo, bạn có thể thấy rằng chúng ta đang thông báo cho rails về các route chúng ta sẽ sử dụng cho ứng dụng React của mình. Điều này rất quan trọng, vì nếu không, nếu người dùng yêu cầu bất kì route nào trong số này, rails sẽ không biết và trả về 404. Làm theo cách này có nghĩa là rails có phục để phục vụ ứng dụng React và xem nó hoạt động ra sao để hiển thị
Sau đó thêm router vào app/javascript/packs/application.js :
import React from 'react';
import { render } from 'react-dom';
import { BrowserRouter } from 'react-router-dom';
import App from '../components/App';

document.addEventListener('DOMContentLoaded', () => {
  render(
    <BrowserRouter>
      <App />
    </BrowserRouter>,
    document.querySelector('#root'),
  );
});
Đoạn ở trong <BrowserRouter> component, sử dụng API lịch sử của HTML5 để giữ cho giao diện người dùng đồng bộ với URL
Sửa ở trong file App.js :
import React from 'react';
import { Route } from 'react-router-dom';
import Editor from './Editor';

const App = () => (
  <div>
    <Route path="/events/:id?" component={Editor} />
  </div>
);

export default App;
Thay vì hiển thị trực tiếp thành phần <Editor>, giờ đây chúng ta sử dụng component <Route> để render nó. Vì chúng ta đặt phần :id là 1 phần của tùy chọn route (do dấu ?) và đường gốc của chúng ta tại /events, điều kiện này sẽ luôn luôn như vậy
Bằng cách thực hiện này, chúng ta sẽ có quyền truy cập vào các thông số URL trong thành phần <Editor>, điều này sẽ có ích để xác định event nào sẽ được xử lí
Tiếp theo, chúng ta sẽ cần một component <Event> để hiển thị event
touch app/javascript/components/Event.js
Và sau đó thêm vào file đó:
import React from 'react';
import PropTypes from 'prop-types';

const Event = ({ event }) => (
  <div>
    <h2>
      {event.event_date}
      {' - '}
      {event.event_type}
    </h2>
    <ul>
      <li>
        <strong>Type:</strong>
        {' '}
        {event.event_type}
      </li>
      <li>
        <strong>Date:</strong>
        {' '}
        {event.event_date}
      </li>
      <li>
        <strong>Title:</strong>
        {' '}
        {event.title}
      </li>
      <li>
        <strong>Speaker:</strong>
        {' '}
        {event.speaker}
      </li>
      <li>
        <strong>Host:</strong>
        {' '}
        {event.host}
      </li>
      <li>
        <strong>Published:</strong>
        {' '}
        {event.published ? 'yes' : 'no'}
      </li>
    </ul>
  </div>
);

Event.propTypes = {
  event: PropTypes.shape(),
};

Event.defaultProps = {
  event: undefined,
};

export default Event;
Tiếp theo, hãy làm cho danh sách các events có thể click được. Khi click, sẽ điều hướng tới /events/:id
import { Link } from 'react-router-dom';
...
renderEvents() {
  ...
  return events.map(event => (
    <li key={event.id}>
      <Link to={`/events/${event.id}`}>
        {event.event_date}
        {' - '}
        {event.event_type}
      </Link>
    </li>
  ));
}
Ở đây, chúng ra đang sử dụng component React route's <Link> để tạo route
Để hiển thị event ở đúng vị trí, chúng ta cần sử dụng một route khác. Trong thành phần <Editor>
...
import PropTypes from 'prop-types';
import PropsRoute from './PropsRoute';
import Event from './Event';

class Editor extends React.Component {
  ...
  render() {
    const { events } = this.state;
    if (events === null) return null;

    const { match } = this.props;
    const eventId = match.params.id;
    const event = events.find(e => e.id === Number(eventId));

    return (
      <div>
        <Header />
        <EventList events={events} />
        <PropsRoute path="/events/:id" component={Event} event={event} />
      </div>
    );
  }
}

Editor.propTypes = {
  match: PropTypes.shape(),
};

Editor.defaultProps = {
  match: undefined,
};

export default Editor;
Nếu bạn nhìn vào method render, bạn sẽ nhận thấy chúng ta đang sử dụng component mới là <PropsRoute>
Điều này là do khi người dùng chọn một event, chúng ta sẽ chuyển event đó tới component <Event> để nó có thể hiển thị thông tin của event đó. Thật không may, React Router không dễ dàng cung cấp một phương thức chuyển các props tới một route, vì vậy phần còn lại chúng ta phải tự làm
Hãy tạo ra các component:
touch app/javascript/components/PropsRoute.js
Và thêm code như sau:
import React from 'react';
import { Route } from 'react-router-dom';
import PropTypes from 'prop-types';

const renderMergedProps = (component, ...rest) => {
  const finalProps = Object.assign({}, ...rest);
  return React.createElement(component, finalProps);
};

const PropsRoute = ({ component, ...rest }) => (
  <Route {...rest} render={routeProps => renderMergedProps(component, routeProps, rest)} />
);

PropsRoute.propTypes = {
  component: PropTypes.func.isRequired,
};

export default PropsRoute;
Và bây giờ khi click vào link, sẽ hiển thị event chính xác

Vì bài viết dài quá nên sẽ cắt làm 2 phần, mình xin phép viết tiếp ở phần sau nhé các bạn 
All rights reserved
