Xây dựng 1 RESTful API cơ bản trên Rails 5
Bài đăng này đã không được cập nhật trong 6 năm
Rails là 1 framework dùng để xây dựng các ứng dụng web, ngoài ra Rails còn hỗ trợ để build các ứng dụng API. Hiện nay, ở phiên bản Rails 5 thì gem rails-api đã được tích hợp vào trong Rails, vì vậy để build được 1 app API với Rails rất đơn giản, nhưng trong bài viết này mình chỉ tạo với Rails thuần mà thôi. Bây giờ thì chúng ta sẽ cùng nhau xây dựng 1 ứng dụng Rails API cơ bản, ứng dụng đó là my_post.
Chuẩn bị
Để có thể build được ứng dụng của chúng ta, thì đầu tiên các bạn cần phải cài đặt Ruby 2.2.2 trở lên và Rails 5.
ruby -v
-> ruby 2.4.2p198 (2017-09-14 revision 59899) [x86_64-linux]
rails -v
-> Rails 5.1.7
Các bạn có thể tham khảo hướng dẫn cài đặt tại đây https://gorails.com/setup/ubuntu/14.04
Cài đặt project
Để tạo được project API thì chúng ta thêm tùy chọn --api vào command line khi khởi tạo như sau:
rails new my_post --api
Như vậy thì project của chúng ta đã được tạo thành công.
Xây dựng API
Cấu hình Mysql
Theo mặc định thì khi tạo mới 1 ứng dụng rails thì database sẽ là sqlite3, vì vậy chúng ta sẽ cấu hình lại ứng dụng để có thể sử dụng được Mysql.
Đầu tiên chúng ta sẽ thay thế dòng gem "sqlite3" bằng dòng gem "mysql2", ">= 0.3.18", "< 0.5 ở trong file: Gemfile
source "https://rubygems.org"

git_source(:github) do |repo_name|
  repo_name = "#{repo_name}/#{repo_name}" unless repo_name.include?("/")
  "https://github.com/#{repo_name}.git"
end


gem "rails", "~> 5.1.7"
gem "mysql2", ">= 0.3.18", "< 0.5"
gem "puma", "~> 3.7"

group :development, :test do
  gem "byebug", platforms: [:mri, :mingw, :x64_mingw]
end

group :development do
  gem "listen", ">= 3.0.5", "< 3.2"
  gem "spring"
  gem "spring-watcher-listen", "~> 2.0.0"
end

gem "tzinfo-data", platforms: [:mingw, :mswin, :x64_mingw, :jruby]
Sau đó đừng quên chạy lệnh: bundle install nhé.
Tiếp theo chúng ta sẽ sửa lại file: config/database.yml như sau:
default: &default
  adapter: mysql2
  encoding: utf8
  pool: 5
  username: root
  password: your_pass
  socket: /var/run/mysqld/mysqld.sock

development:
  <<: *default
  database: my_post_dev

test:
  <<: *default
  database: my_post_test

production:
  <<: *default
  database: my_post_product
Chúng ta cần chạy lệnh này rails db:create để tạo database cho project
Ok. Vậy là chúng ta đã cấu hình xong Mysql cho project, bây giờ chúng ta cùng đi tới các bước tiếp theo
Khởi tạo Model
Chúng ta sẽ tạo model Post như sau:
rails g model Post title:string body:text
Sau khi chạy lệnh trên thì chúng ta đã tạo được 1 model Post
class CreatePosts < ActiveRecord::Migration[5.1]
  def change
    create_table :posts do |t|
      t.string :title
      t.text :body

      t.timestamps
    end
  end
end
Tiếp theo chúng ta migrations để tạo bảng trong DB
rails db:migrate
Chúng ta sẽ validate các trường của model Post
# app/models/post.rb

class Post < ApplicationRecord
  validates :title, :body, presence: true
end
Tiếp theo chúng ta sẽ seed dữ liệu vào DB:
Bạn phải thêm gem "faker" vào gemfile và chạy bundle install
# Gemfile

[...]
group :development, :test do
  gem "byebug", platforms: [:mri, :mingw, :x64_mingw]
  gem "faker"
end
[...]
Ta sẽ tạo 5 bản ghi mẫu trong file db/seeds như sau:
# db/seeds
5.times do
  Post.create(title: Faker::Book.title, body: Faker::Lorem.sentence)
end
Chạy rails db:seed để import data vào db
Khởi tạo Controller
Chúng tạo sẽ tạo thư mục mới /app/controllers/api/v1 với file posts_controller.rb
class Api::V1::PostsController < ApplicationController
  def index

  end
end
Cấu hình lại file config/routes.rb như sau:
Rails.application.routes.draw do
  namespace 'api' do
    namespace 'v1' do
      resources :posts
    end
  end
end
Xây dựng phương thức index
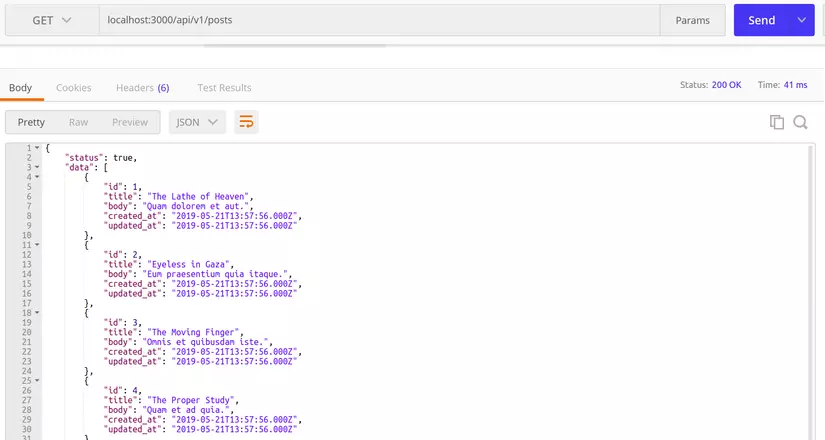
API này sẽ trả về danh sách tất cả Posts dưới dạng JSON
class Api::V1::PostsController < ApplicationController
  def index
    @posts = Post.order('created_at DESC')
    render json: {
      status: true,
      data: @posts
    },
    status: :ok
  end
end
Bây giờ chúng ta cùng test trên Postman nào

Xây dựng phương thức show
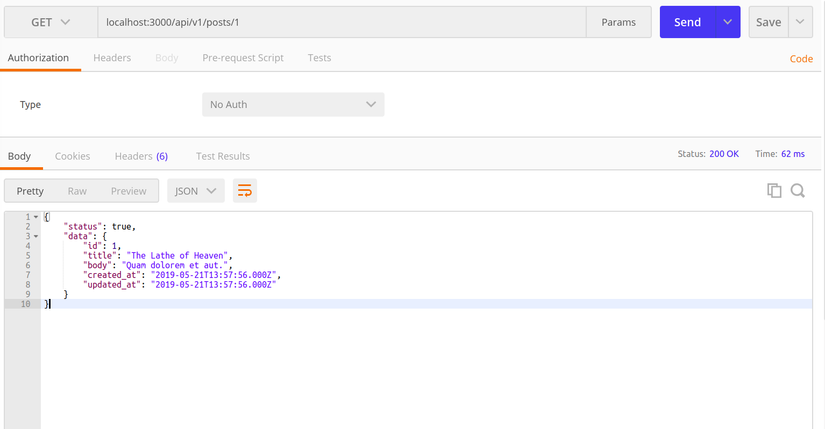
API này sẽ trả về 1 bản ghi Post dưới dạng JSON
class Api::V1::PostsController < ApplicationController
  before_action :load_post, only: %i(show)

  def index
    @posts = Post.order('created_at DESC')
    render json: {
      status: true,
      data: @posts
    },
    status: :ok
  end

  def show
    render json: {
      status: true,
      data: @post
    },
    status: :ok
  end

  private

  def load_post
    @post = Post.find_by id: params[:id]
    return if @post
    render json: {
      status: false,
      message: 'Not found'
    },
    status: :not_found
  end
end
Kết quả như sau:

Trong trường hợp không tìm thấy Post

Xây dựng phương thức create
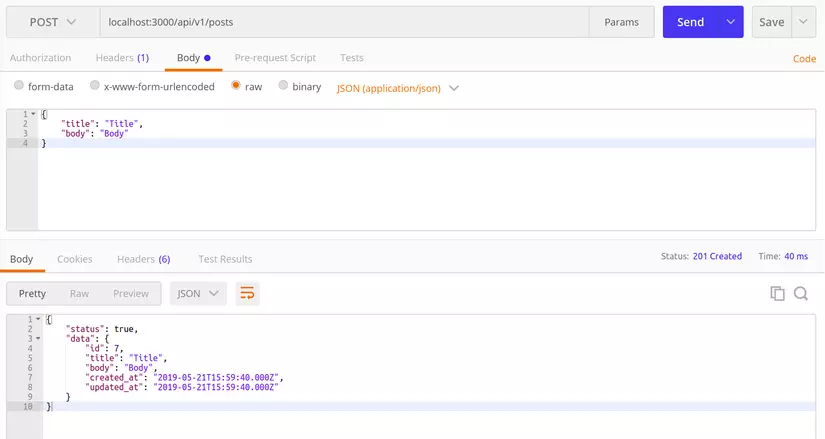
API này sẽ tạo 1 bản ghi được lưu vào DB và trả về bản ghi đó dạng JSON
class Api::V1::PostsController < ApplicationController
  before_action :load_post, only: %i(show)

  def index
    @posts = Post.order('created_at DESC')
    render json: {
      status: true,
      data: @posts
    },
    status: :ok
  end

  def show
    render json: {
      status: true,
      data: @post
    },
    status: :ok
  end

  def create
    @post = Post.new post_params

    if @post.save
      render json: {
        status: true,
        data: @post
      },
      status: :created
    else
      render json: {
        status: false,
        error: @post.errors
      },
      status: :unprocessable_entity
    end
  end

  private

  def post_params
    params.permit :title, :body
  end

  def load_post
    @post = Post.find_by id: params[:id]
    return if @post
    render json: {
      status: false,
      message: 'Not found'
    },
    status: :not_found
  end
end
Chúng ta cùng test nào.
Chú ý trong postman chúng ta sẽ đổi lại type từ GET thành POST nhé
Bên tab Headers chúng ta sẽ tạo Key: Content-Type có Value: application/json
        Key                   Value
        Content-Type          application/json
Bên tab Body chúng ta sẽ tạo data như sau:
{
	"title": "Title",
	"body": "Body"
}

Xây dựng phương thức update
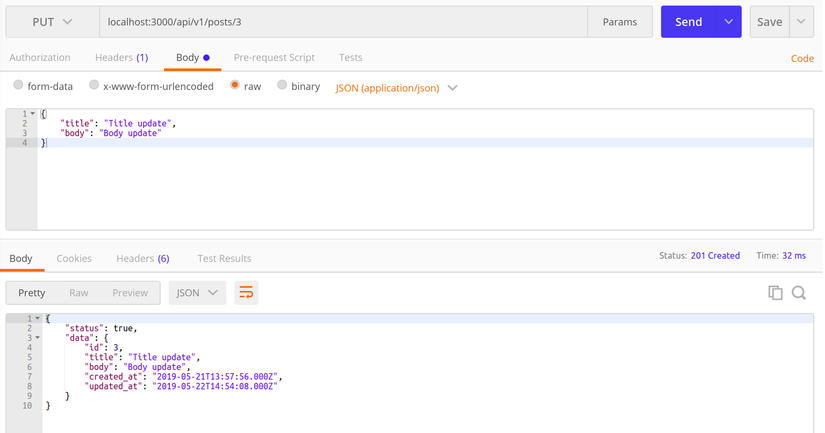
API cập nhật 1 bản ghi trong DB
class Api::V1::PostsController < ApplicationController
  before_action :load_post, only: %i(show update)

  def index
    @posts = Post.order('created_at DESC')
    render json: {
      status: true,
      data: @posts
    },
    status: :ok
  end

  def show
    render json: {
      status: true,
      data: @post
    },
    status: :ok
  end

  def create
    @post = Post.new post_params

    if @post.save
      render json: {
        status: true,
        data: @post
      },
      status: :created
    else
      render json: {
        status: false,
        error: @post.errors
      },
      status: :unprocessable_entity
    end
  end

  def update
    if @post.update_attributes post_params
      render json: {
        status: true,
        data: @post
      },
      status: :created
    else
      render json: {
        status: false,
        error: @post.errors
      },
      status: :unprocessable_entity
    end
  end

  private

  def post_params
    params.permit :title, :body
  end

  def load_post
    @post = Post.find_by id: params[:id]
    return if @post
    render json: {
      status: false,
      message: 'Not found'
    },
    status: :not_found
  end
end
Test phương thức update thì phần data tương tự như create, còn type thì chúng ta sẽ để là PUT nhé

Xây dựng phương thức delete
API xóa 1 bản ghi khỏi DB
class Api::V1::PostsController < ApplicationController
  before_action :load_post, only: %i(show update destroy)

  def index
    @posts = Post.order('created_at DESC')
    render json: {
      status: true,
      data: @posts
    },
    status: :ok
  end

  def show
    render json: {
      status: true,
      data: @post
    },
    status: :ok
  end

  def create
    @post = Post.new post_params

    if @post.save
      render json: {
        status: true,
        data: @post
      },
      status: :created
    else
      render json: {
        status: false,
        error: @post.errors
      },
      status: :unprocessable_entity
    end
  end

  def update
    if @post.update_attributes post_params
      render json: {
        status: true,
        data: @post
      },
      status: :updated
    else
      render json: {
        status: false,
        error: @post.errors
      },
      status: :unprocessable_entity
    end
  end

  def destroy
    @post.destroy
    render json: {
      status: true,
      data: @post
    },
    status: :ok
  end

  private

  def post_params
    params.permit :title, :body
  end

  def load_post
    @post = Post.find_by id: params[:id]
    return if @post
    render json: {
      status: false,
      message: 'Not found'
    },
    status: :not_found
  end
end
Khi test chúng ta chú ý đổi lại type thành DELETE nhé

Như vậy là chúng ta đã tạo xong 1 RESTful API cơ bản rồi. Hi vọng qua bài viết này thì bạn có thể nắm được cách tạo ra một ứng dụng API đơn giản, chúc các bạn thành công!
Tài liệu tham khảo
https://jee-appy.blogspot.com/2016/03/how-to-make-rest-api-in-rails.html https://jee-appy.blogspot.com/2016/03/how-to-make-rest-api-in-rails-part-2.html https://www.youtube.com/watch?v=QojnRc7SS9o&t=348s
All rights reserved