Xây dựng 1 Chat Box với angularjs và firebase
Bài đăng này đã không được cập nhật trong 4 năm
Xây dựng 1 Chat Box với angularjs và firebase
Giới thiệu:
- Angularjs là gì:
AngularJS là một framework có cấu trúc cho các ứng dụng web động. Nó cho phép bạn sử dụng HTML như là ngôn ngữ mẫu và cho phép bạn mở rộng cú pháp của HTML để diễn đạt các thành phần ứng dụng của bạn một cách rõ ràng và súc tích. Hai tính năng cốt lõi: Data binding và Dependency injection của AngularJS loại bỏ phần lớn code mà bạn thường phải viết. Nó xảy ra trong tất cả các trình duyệt, làm cho nó trở thành đối tác lý tưởng của bất kỳ công nghệ Server nào.
Các bạn có thể tìm hiểu về
angularjsthêm ở : https://angular.io/ - Firebase là gì:
Firebase là một dịch vụ lưu trữ cơ sở dữ liệu thời gian thực hoạt động trên nền tảng đám mây được cung cấp bởi Google nhằm giúp các lập trình phát triển nhanh các ứng dụng bằng cách đơn giản hóa các thao tác với cơ sở dữ liệu.
Các bạn có thể tìm hiểu về
firebasethêm ở: https://firebase.google.com/?hl=vi
Setup
Như mình đã giới thiệu sơ quả về firebase bên trên: nó dùng để lưu trữ cơ sở dữ liệu nên việc đầu tiên là mình cần tạo 1 project trên firebase và setup môi trường databse cho chúng
- Tạo Project : https://console.firebase.google.com/u/0/?hl=vi Nhập nhưng thông tin cần thiết như:
- Click
Add Project - Điền thông tin
Project Name, Country - Click
Create Project - Sau khi tạo thành công bạn sẽ nhận được:
apiKey, authDomain, databaseURL - Note: Nếu khi hoàn thành các bạn bị báo lỗi permission Clinet thì có thể thay đổi config ở database trên firebase
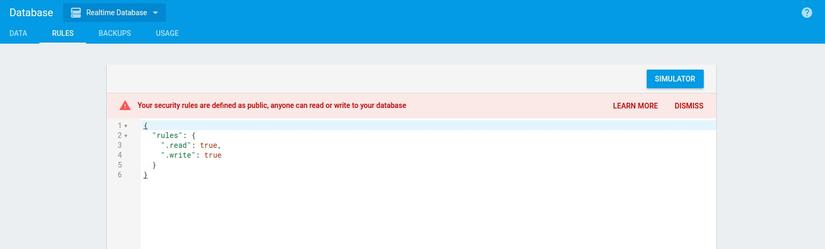 Cho phép quyền đọc và ghi khi không cần authentication
- Tạo 1 project với Ruby và setup môi trường angularjs
rails new "chat-box"rails generate controller chat index- import 1 số framework vào như:
material design, 'angularjs'
#application.html
  <head>
    <!-- Import Angular JS -->
    <script src="http://cdnjs.cloudflare.com/ajax/libs/angular.js/1.1.5/angular.min.js"></script>
    <%= stylesheet_link_tag    'application' %>
    <%= javascript_include_tag 'application' %>
    <link rel="stylesheet" href="https://cdnjs.cloudflare.com/ajax/libs/materialize/0.97.5/css/materialize.min.css">
    <!-- Compiled and minified JavaScript for Material Design -->
    <script src="https://cdnjs.cloudflare.com/ajax/libs/materialize/0.97.5/js/materialize.min.js"></script>
    <!-- Import Material Icons -->
    <link href="https://fonts.googleapis.com/icon?family=Material+Icons" rel="stylesheet">
    <!-- Import AngularFire -->
    <script src="http://cdn.firebase.com/js/client/2.1.2/firebase.js"></script>
    <script src="http://cdn.firebase.com/libs/angularfire/1.0.0/angularfire.min.js"></script>
  </head>
- tạo
ng-app = "chat-app"vàng-controller='"ChatCtrl'
<div ng-app="chat-app">
  <div class="messages" ng-controller="ChatCtrl as vm">
    //code....
  </div>
</div>
- Tạo form html
1, với các input
name,messagevà button 'send' 2, định nghĩa các model attributes:ng-model="vm.name",ng-message="vm.message"3, và định nghĩa function click cho button send:ng-click="vm.saveMessage()"4, chúng ta sẽ disbale button khi người dùng không nhập nội dung message và nameng-disable="!vm.message || !vm.name"
  <body>
    <div ng-app="chatApp">
      <div class="messages" ng-controller="chatCtrl as vm">
        <div class="row" style="background-color:#3F51B5; padding:25px; width:100%; min-width:100%;">
          <div class="container">
            <div class="col s4">
              <input type="text" ng-model="vm.name" class="form-control" placeholder="Name">
            </div>
            <div class="col s4">
              <input type="text" ng-model="vm.message" class="form-control" placeholder="Message">
            </div>
            <div class="col s4" style="margin-top:10px;">
              <button class="btn btn-info" ng-disabled="!vm.message || !vm.name" ng-click="vm.saveMessage()">Send Message</button>
            </div>
          </div>
        </div>
      </div>
    </div>
  </body>
OK vậy là đã xong html. Giờ chúng ta bắt đầu viết code angularjs
- Viết code angularjs
chat.js1, định nghĩa module và add modulefirebase
var app = angular.module('chatApp', ['firebase']);
2, inject biến $firebaseArray
app.controller('chatCtrl', ['$firebaseArray', function($firebaseArray){
  #code...
}]);
3, Kết nối tới service của firebase, url chính là databaseURL lúc chúng ta tạo Project trên firebase
var ref = new Firebase('https://box-chat-11.firebaseio.com');
4, //Lấy toàn bộ dữ liệu trong database trên Firebase, biến nó thành 1 array các object trong javascript
var app = angular.module('chatApp', ['firebase']); //Tạo 1 module của angular, inject module firebase vào
app.controller('chatCtrl', ['$firebaseArray', '$filter',
  function($firebaseArray, $filter) {
  var vm = this;
  //Kết nối tới service của firebase, url ở đây là url app của bạn ở bước trên nhé
  var ref = new Firebase('https://box-chat-11.firebaseio.com');
  var sync = $firebaseArray(ref);
  vm.chatMessages = sync; //Lấy toàn bộ dữ liệu trong database trên Firebase, biến nó thành 1 array các object trong javascript
  vm.saveMessage = function() {
    if (vm.name && vm.message) {
      vm.dateTime = $filter('date')(new Date(), 'dd/MM/yyyy:HH:mm:ss');
      vm.chatMessages.$add({ name: vm.name, message: vm.message, dataTime: vm.dateTime });
      vm.message = null;
    } else {
      // Get Lost
    }
  }
}]);
5, Hiển thị message
index.html
<div class="row form-group container box-chat" ng-repeat="row in vm.chatMessages">
  <div class="box-chat-inner">
    <p class="message">{{row.message}}</p>
    <p class="name">{{row.name}}</p>
    <p class="time">{{row.dateTime}}</p>
  </div>
</div>
6, Thêm css vào cho đẹp hơn chat.scss
body {
  background-color: #333;
}

.box-chat-inner {
  display: block;
  position: relative;
  background: #fff;
  color: #333;
  text-align: left;
  box-shadow: 0 2px 2px rgba(0,0,0,.1);
  padding: 10px 15px;

  &:before {
    content: "";
    width: 0;
    height: 0;
    border-top: 10px solid transparent;
    border-bottom: 10px solid transparent;
    border-right:10px solid #fff;
    position: absolute;
    left: 0;
    margin-left: -10px;
    top: 8px;
  }

  .name {
    font-size: 18px;
    color: #222;
    font-weight: bold;
    display: block;
    margin-top: 10px;
    margin-bottom: 0;
  }

  .message {
    font-size: 13px;
    display: block;
    margin-top: 0;
    margin-bottom: 5px;
    font-style: italic;
  }

  .time {
    font-size: 12px;
    font-weight: 300;
    align-self: flex-end;
    color: #666;
    margin-top: 0;
  }
}

.box-chat:nth-of-type(odd) {
  background: transparent;

  .box-chat-inner {
    .name {
      color: #3F51B5;
      text-align: right;
    }

    .time {
      text-align: right;
    }

    &:after {
      content: "";
      width: 0;
      height: 0;
      position: absolute;
      right: 0;
      top: 8px;
      margin-right: -10px;
      border-top: 10px solid transparent;
      border-bottom: 10px solid transparent;
      border-left: 10px solid #fff;
    }

    &:before {
      display: none;
    }
  }
}
6, Vậy là đã xong và tận hưởng thành quả nào!!!
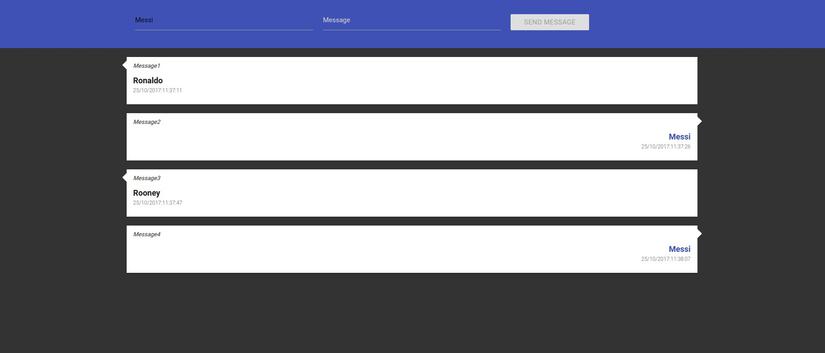
Kết Luận
mình đã giới thiệu cũng như hoàn thành xong boxchat với angular và firebase khá đơn giản và ngắn gọn. Các bạn có thể tham khảo thêm ở: https://console.firebase.google.com/ Cảm ơn mọi người đã theo dõi
All rights reserved
