Web push notification
Bài đăng này đã không được cập nhật trong 5 năm
Notification là những thông báo từ những application được hiển thị trên các thiết bị của người dùng(Phone, Browser) ngay cả khi application đó không được chạy. Bài viết này chúng ta sẽ tìm hiểu cơ chế push notification trên các trình duyệt (Push notification on the web)  .
.
Push Notifications on the web
Push notification giúp các application trên browsers tăng tương tác với user hơn, từ những việc như thông báo tới user những thông báo quan trọng, chuyển hướng user tới site nếu notification được click, hoặc những notification popup được thêm những action button giúp user có thể thao tác ngay trên đó mà không cần chuyến hướng tới website.
Concepts
- Notifications API:
APIđược sử dụng để hiển thị các notification tới phía người dùng - Push API: hỗ trợ các phương thức đăng ký
appvớibrowserpush service và nhận cácpush messagestrong service worker - Push service: Một hệ thống có nhiệm vụ chuyển hướng các
push messagestừservertới cácclients(browsers) thông qua Web Push Protocol. Mỗibrowserđều có hỗ trợpush servicecủa riêng nó. - Service worker: Ở bài post trước mình đã nói về
service worker, nhiệm vụ củaservice workerở đây là được chạy ở background, xử lý cácpush messagesnhận được từserver.
Flow
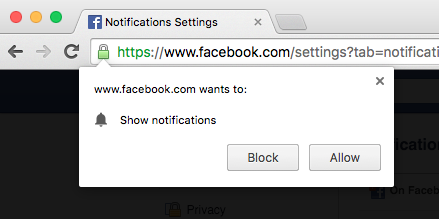
Để thực hiện push notification trên browser, ta cần phải yêu cầu quyền từ phía user(cung cấp bởi Notification API):
Notification.requestPermission(function(status) {
    console.log('Notification permission status:', status);
});
Sau khi trang web được grant permission, ảnh trên minh họa luồng thực hiện cho push notification:
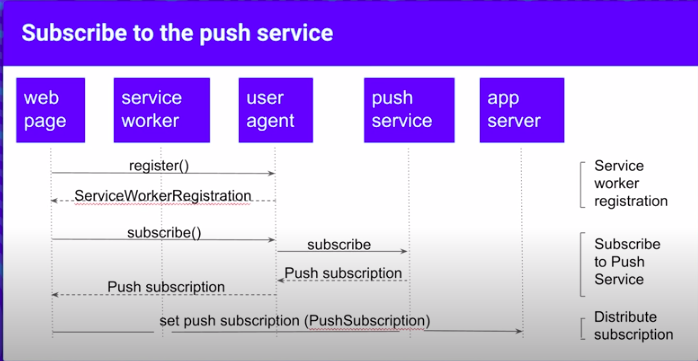
- Trước tiên, trang web cần register Service worker
- Nếu
registerthành công,browsersẽ trả về mộtServiceWorkerRegistrationobject. - Tiếp đó, webpage cần phải
subscribetớibrowser push service:
if ('serviceWorker' in navigator) {
  navigator.serviceWorker.register('sw.js').then(function(reg) {
    console.log('Service Worker Registered!', reg);

    reg.pushManager.getSubscription().then(function(sub) {
        console.log('Subscription object: ', sub.endpoint);
      }
    });
  })
   .catch(function(err) {
    console.log('Service Worker registration failed: ', err);
  });
}
1 subcription object được trả về có dạng:
{
"endpoint":"https://fcm.googleapis.com/fcm/send/dpH5lCsTSSM:APA91bHqjZxM0VImWWqDRN7U0a3AycjUf4O-byuxb_wJsKRaKvV_iKw56s16ekq6FUqoCF7k2nICUpd8fHPxVTgqLunFeVeB9lLCQZyohyAztTH8ZQL9WCxKpA6dvTG_TUIhQUFq_n",
"keys": {
    "p256dh":"BLQELIDm-6b9Bl07YrEuXJ4BL_YBVQ0dvt9NQGGJxIQidJWHPNa9YrouvcQ9d7_MqzvGS9Alz60SZNCG3qfpk=",
    "auth":"4vQK-SvRAN5eo-8ASlrwA=="
    }
}
endpoint URL trả về sẽ khác nhau với mỗi browser, là định danh của browser đó, được sử dụng cho việc route tới đúng browser khi gửi push message.
Khi push message được gửi đi từ server, nó sẽ được gửi tới endpoint URL này, được encrypted với keys (trong subcription object) và được push service gửi đúng tới browser thông qua định danh ở endpoint URL:

service worker xử lý các push event mỗi khi có push message tới, hiển thị tới user.
FCM push notification
Register service worker
Đầu tiên cần phải register service worker cho trang web của chúng ta với browser:
if ('serviceWorker' in navigator) {
   navigator.serviceWorker.register('./firebase-messaging-sw.js');
}
File firebase-messagin-sw.js phải đặt setting ở ngoài thư mục root trên server. Trong Rails có thể đặt trong thư mục public.
Set up firebase
Cần set up firebase ở code javascript của webpage. Ở đây mình xử lý trong Rails.
- Cài đặt
firebaselibrary quayarn:
$ yarn add firebase
- Init firebase:
// app/javascripts/packs/application.js
import * as firebase from 'firebase/app';
import 'firebase/messaging';

// init firebase
var firebaseConfig = {
  apiKey: 'xxxxxxxxxxxxxxxxxxxxxxx,
  authDomain: 'app_name.firebaseapp.com',
  databaseURL: 'https://app_name.firebaseio.com',
  projectId: 'app_name',
  storageBucket: 'app_name.appspot.com',
  messagingSenderId: "111111111111",
  appId: "1:11111111111:web:d34d1206a3553c2b92f648",
  measurementId: "XXXXXXXXXXXXX"
};
firebase.initializeApp(firebaseConfig);

const messaging = firebase.messaging();
Phần firebaseConfig bạn có thể xem tại đây.
- Get
FCM token:
// Yêu cầu permission từ user, sau đó lấy log ra token
messaging.requestPermission().then(function() {
  return messaging.getToken();
}).then(function(token) {
  console.log(token);
})
token ở đây là chuỗi token trong endpoint URL format ở trên, có nhiệm vụ định danh browser hiện tại.
"endpoint":"https://fcm.googleapis.com/fcm/send/dpH5lCsTSSM:APA91bHqjZxM0VImWWqDRN7U0a3AycjUf4O-byuxb_wJsKRaKvV_iKw56s16ekq6FUqoCF7k2nICUpd8fHPxVTgqLunFeVeB9lLCQZyohyAztTH8ZQL9WCxKpA6dvTG_TUIhQUFq_n"
Sau khi log ra token, ta sẽ gửi token này về server, sau đó server sẽ khởi tạo message muốn gửi và gửi push message này tới firebase.
Ở đây mình lấy token được log ra và gửi luôn tới firebase.
- Server setup
Phía
servercần tương tác để gửipush messagetớifirebase. TrongRailsmình sẽ dùng gem fcm (hoặc bạn có thể test trực tiếp qua REST API)
gem 'fcm'
firebase cần FCM_SERVER_KEY để xác định application của bạn, có thể lấy tại đây (Project credentials => Server key)
tạo FCM_COMPOSER tiến hành gửi message:
FCM_COMPOSER = FCM.new(ENV['FCM_SERVER_KEY'])

tokens = [
"eXOGKT9WlA7u-OlZyRb_9U:APA91bFYctmLOiwTYfFR-UGMmx7CeOChxjzEBA4klZcgrAtJDGDSHPU8_6LAhgqq4LPA5zkH_7clNQ7K3Oti87G0izuln7S-RImOrgnK16DrIW7aJteBP3X5uEz9FeNk8a_2jRVKXu5-"
]

message = {
    "notification": {
        "title": "Hello world"
    },
    "data": {
        "url": "https://viblo.asia/p/service-worker-Az45b4bOZxY"
    }
}

FCM_COMPOSER.send(tokens, message)
- Receive message:
Ta cần xử lý hai trường hợp khi nhận message: Ở
foregroundvàbackground.
Ở foreground(khi user đang truy cập webpage), ta có thể nhận được message data và sử dụng Notification API để hiển thị popup notification tới user, thông qua hàm callback:
messaging.onMessage((payload) => {
      console.log('Message received. ', payload);

      // Notification API hiển thị noti
});
Khi user trong trạng thái background(bật tab khác hoặc app khác), message tới được xử lý ở service worker qua callback:
// ./firebase-messageing-sw.js
// version firebase ở đây phải đúng với firebase ở yarn
importScripts('https://www.gstatic.com/firebasejs/7.16.0/firebase-app.js');
importScripts('https://www.gstatic.com/firebasejs/7.16.0/firebase-messaging.js');

// init firebase
var firebaseConfig = {
  apiKey: 'xxxxxxxxxxxxxxxxxxxxxxx,
  authDomain: 'app_name.firebaseapp.com',
  databaseURL: 'https://app_name.firebaseio.com',
  projectId: 'app_name',
  storageBucket: 'app_name.appspot.com',
  messagingSenderId: "111111111111",
  appId: "1:11111111111:web:d34d1206a3553c2b92f648",
  measurementId: "XXXXXXXXXXXXX"
};
firebase.initializeApp(firebaseConfig);

const messaging = firebase.messaging();

messaging.setBackgroundMessageHandler(function(payload) {
    console.log("Message: " + payload.data.url);
    console.log("Message: " + payload.notification.title);

  return self.registration.showNotification("Hello", { body: "world" });
})
Lưu ý, khi handle message ở background(service worker), nếu message gửi tới có chứa trường notification thì browser sẽ hiện thì popup thông báo mặc định của nó mà không qua hàm setBackgroundMessageHandler, còn lại nếu message chỉ chứa data thì sẽ xử lý bình thường.
Trên đây là tìm hiểu của mình về web push notification. Cảm ơn mọi người đã theo dõi! 
All rights reserved
