Vuejs: Vue-Cli - Một vài ví dụ về vuejs sử dụng vue-cli
Bài đăng này đã không được cập nhật trong 7 năm
Giới thiệu
Xin chào các bạn, như chúng ta đã biết thì hiện nay Vue.js là một trong những framework JavaScript tốt nhất và nhiều người cho rằng Vue sẽ dần thay thế cho Angular và React trong tương lai. Hôm nay mình sẽ tạo một vài ví dụ đơn giản với Vue-CLI.
Link github: https://github.com/phanvankhoi/vue-cli-example/tree/vue-cli-example
Ứng dụng có kết hợp giữa VueCLI và sử dụng Webpack, cùng bắt đầu nào!
1. Vue-CLI
Các công cụ dòng lệnh (CLI – Command Line Interface) hiện là những tính năng không thể thiếu cho một framework, nó giúp xây dựng các template một cách nhanh chóng. Nếu bạn đã làm việc với framework PHP Laravel thì có thể biết đến artisan, còn với Vue.js có công cụ Vue-CLI cũng giúp bạn xây dựng một ứng dụng mẫu rất nhanh chỉ với vài dòng lệnh.
Cài đặt Vue-cli
Trước tiên, chúng ta cần cài đặt Vue-CLI thông qua npm hoặc yarn, đầu tiên chúng ta kiểm tra xem máy đã cài đặt Node.js chưa và npm hoặc yarn đã được cập nhật phiên bản cuối chưa:
node -v
npm -v
npm install npm@latest -g
Tiếp theo, cài đặt Vue-CLI thôi:
npm install -g vue-cli
hoặc thông qua yarn
yarn add -global vue-cli
2. Xây dựng ứng dụng mẫu đầu tiên bằng Vue-cli
Vue-cli cho phép bạn xây dựng nhanh một ứng dụng mẫu thông qua câu lệnh vue init webpack
.
vue init webpack vue-cli-example
Sau đó, thực hiện chạy ở chế độ dev
npm run dev
Khi đó, một tab trong trình duyệt sẽ được tự động bung ra với địa chỉ http://localhost:8080 với màn hình như sau:
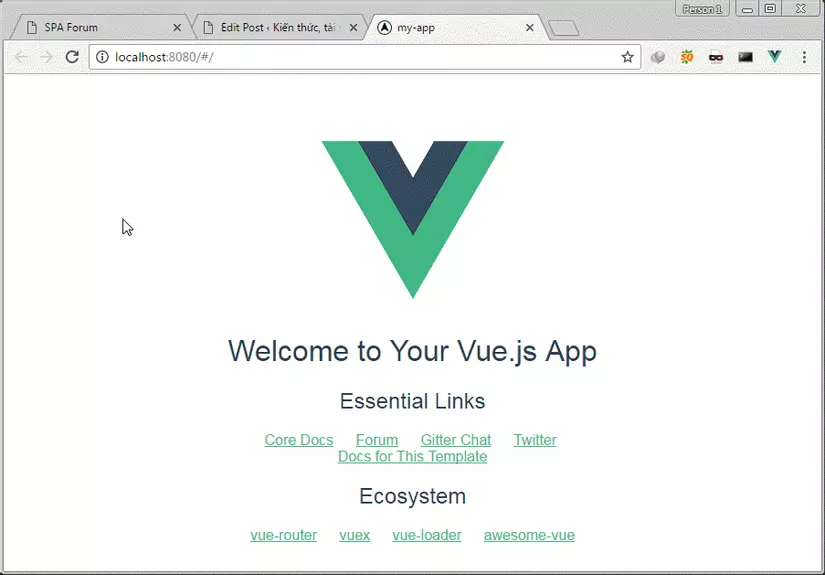
Viết code từ ứng dụng mẫu Vue
Như vậy chúng ta đã tạo ra một ứng dụng mẫu Vue.js và có cài đặt sẵn vue-router.
Trong thư mục src có các thành phần như sau:
- File main.js: đây chính là nơi ứng dụng Vue bắt đầu chạy.
- File App.vue: là component được dùng để render cho trang index.html.
- Thư mục assets: chứa các tài nguyên được chèn vào trang như ảnh, file nhạc…
- components: chứa các component được thiết kế để module hóa ứng dụng Vue, giúp tái sử dụng và bảo trì mã nguồn tốt hơn.
- router: thư mục chứa các router thực hiện trong ứng dụng.
Ví dụ: tạo ra thêm một đường dẫn /contact để ra trang liên hệ, /news để ra trang tin tức. Tìm đến file router/index.js và thêm vào như sau:
import Vue from 'vue'
import Router from 'vue-router'
import HelloWorld from '@/components/HelloWorld'
import Contact from '@/components/Contact'
import News from '@/components/News'

Vue.use(Router)

export default new Router({
  routes: [
    {
      path: '/',
      name: 'HelloWord',
      component: HelloWord
    },
    {
      path: '/contact',
      name: 'Contact',
      component: Contact
    },
    {
      path: '/news',
      name: 'News',
      component: News
    }
  ]
})
Trong thư mục components tạo hai file Contact.vue và News.vue, Contact.vue có nội dung như sau:
// Contact.vue

<template>
  <div class="hello">
    <h1>{{ msg }}</h1>
    <h2>Contact page</h2>
    <router-link to="/contact">Contact</router-link>
    <router-link to="/news">News</router-link>
    <h2>
      {{ message }}
    </h2>
  </div>
</template>

<script>
export default {
  name: 'hello',
  data () {
    return {
      msg: 'Welcome to Your Vue.js App',
      message: 'See again',
    }
  }
}
</script>

<style>
h1, h2 {
  font-weight: normal;
}

a {
  color: #42b983;
}
</style>
Và file News.vue:
// News.vue

<template>
  <div class="hello">
    <h1>{{ msg }}</h1>
    <h2>News page</h2>
    <router-link to="/contact">Contact</router-link>
    <router-link to="/news">News</router-link>
  </div>
</template>

<script>
export default {
  name: 'hello',
  data () {
    return {
      msg: 'Welcome to Your Vue.js App'
    }
  }
}
</script>

<!-- Add "scoped" attribute to limit CSS to this component only -->
<style scoped>
h1, h2 {
  font-weight: normal;
}

a {
  color: #42b983;
}
</style>
Thay đổi nội dung file HelloWord như sau:
// HelloWord.vue

<template>
  <div class="hello">
    <h1>{{ msg }}</h1>
    <h2>Essential Links</h2>
    <ul>
      <li>
        <router-link to="/contact">Contact</router-link>
      </li>
      <li>
        <router-link to="/news">News</router-link>
      </li>
    </ul>
</template>

<script>
export default {
  name: 'HelloWorld',
  data () {
    return {
      msg: 'Welcome to Your Vue.js App'
    }
  }
}
</script>

<!-- Add "scoped" attribute to limit CSS to this component only -->
<style scoped>
h1, h2 {
  font-weight: normal;
}
ul {
  list-style-type: none;
  padding: 0;
}
li {
  display: inline-block;
  margin: 0 10px;
}
a {
  color: #42b983;
}
</style>
Xong, vào địa chỉ http://localhost:8080 và xem thành quả bước đầu nào.
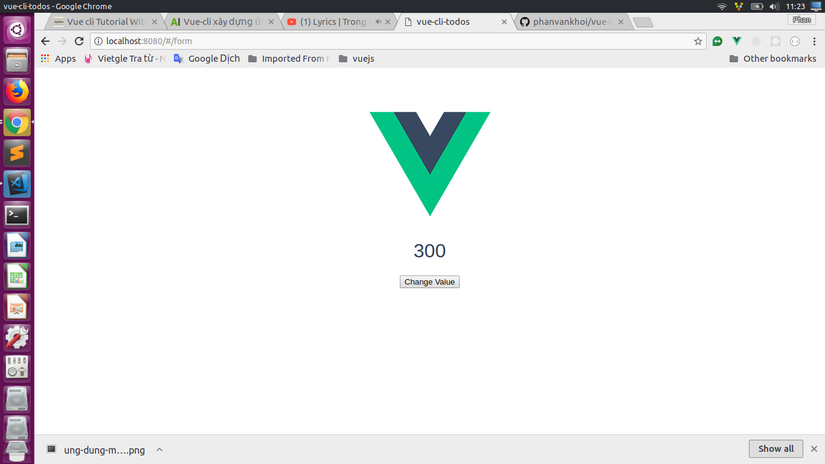
3. Ví dụ với form
Sử dụng Event Binding trong Vue
Nếu bạn muốn thay đổi giá trị khi click vào một botton ta bắt đầu như sau:
Trong components chúng ta tiếp tục tạo file Form.vue
// Form.vue

<template>
   <div>
      <h1>
          {{ price }}
      </h1>
      <button @click="clicking()">Change Value</button>
  </div>
</template>

<script>
   export default {
   data() {
         return {
            price: 200
         };
      },
   methods: {
      clicking() {
         this.price = this.price + 100;
      }
   }
  }
</script>
Sửa lại file router/index.js:
// index.js

import Vue from 'vue'
import Router from 'vue-router'
import HelloWorld from '@/components/HelloWorld'
import Contact from '@/components/Contact'
import News from '@/components/News'
import Form from '@/components/Form'

Vue.use(Router)

export default new Router({
  routes: [
    {
      path: '/',
      name: 'HelloWorld',
      component: HelloWorld
    },
    {
      path: '/contact',
      name: 'Contact',
      component: Contact
    },
    {
      path: '/news',
      name: 'News',
      component: News
    },
    {
      path: '/form',
      name: 'Form',
      component: Form
    }
  ]
})
Chỉnh lại một chút file HelloWord.vue
<template>
  <div class="hello">
    <h1>{{ msg }}</h1>
    <h2>Essential Links</h2>
    <ul>
      <li>
        <router-link to="/contact">Contact</router-link>
      </li>
      <li>
        <router-link to="/news">News</router-link>
      </li>
    </ul>
    <h2>Form</h2>
    <ul>
      <li>
        <router-link to="/form">Form</router-link>
      </li>
    </ul>
  </div>
</template>

<script>
export default {
  name: 'HelloWorld',
  data () {
    return {
      msg: 'Welcome to Your Vue.js App'
    }
  }
}
</script>

<!-- Add "scoped" attribute to limit CSS to this component only -->
<style scoped>
h1, h2 {
  font-weight: normal;
}
ul {
  list-style-type: none;
  padding: 0;
}
li {
  display: inline-block;
  margin: 0 10px;
}
a {
  color: #42b983;
}
</style>
Kết quả:
Xử lý với nhập user
Trong components, ta tạo một file FormUser.vue với nội dung như sau:
<template>
   <div class="container">
      <div class="panel panel-primary">
         <div class="panel-heading">
            <h3 class="panel-title">Add User</h3>
         </div>
         <div class="panel-body">
            <form>
               <div class="form-group">
                  <label for="name">Name</label>
                  <input type="text" class="form-control" placeholder="Name" v-model="name">
               </div>
               <div class="form-group">
                  <label for="email">Email</label>
                  <input type="text" class="form-control" placeholder="Email" v-model="email">
               </div>
               <button type="submit" class="btn btn-primary">Submit</button>
            </form>
         </div>
      </div>
      <div class="panel panel-success">
         <div class="panel-body">
            My Name is : {{ name }}
            <br>
            My Email is : {{ email }}
         </div>
      </div>
   </div>
</template>

<script>
   export default {

   data () {
      return {
           name: '',
           email: ''
      }
   }
}
</script>
Sửa lại file router/index.js
import Vue from 'vue'
import Router from 'vue-router'
import HelloWorld from '@/components/HelloWorld'
import Contact from '@/components/Contact'
import News from '@/components/News'
import Form from '@/components/Form'
import FormUser from '@/components/FormUser'

Vue.use(Router)

export default new Router({
  routes: [
    {
      path: '/',
      name: 'HelloWorld',
      component: HelloWorld
    },
    {
      path: '/contact',
      name: 'Contact',
      component: Contact
    },
    {
      path: '/news',
      name: 'News',
      component: News
    },
    {
      path: '/form',
      name: 'Form',
      component: Form
    },
    {
      path: '/user',
      name: 'FormUser',
      component: FormUser
    }
  ]
})
Kết quả:
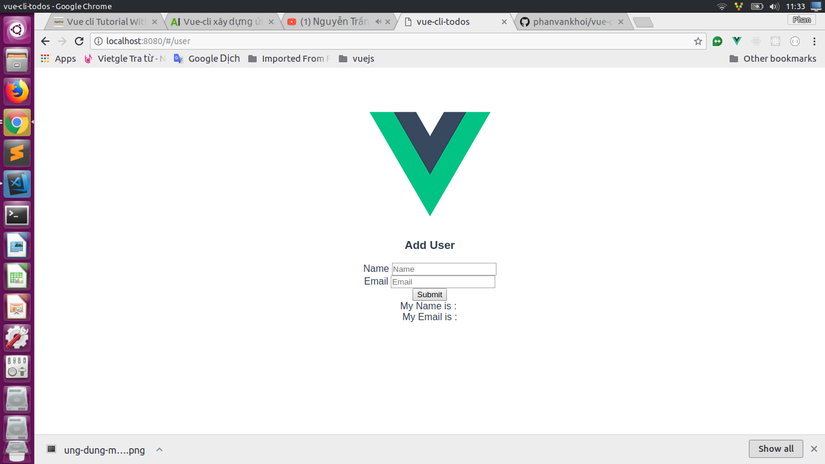 Các bạn thử nhập và xem thành quả của mình nhé.
4. Lời kết
Với công cụ vue-cli chúng ta có thể tạo ra các ứng dụng mẫu Vue thực sự nhanh chóng và chỉ cần chú tâm vào việc viết code các trang, tính năng cần thực hiện. Ngay cả các file cấu hình cho npm, yarn hay webpack cũng được tự động tạo ra, chúng ta chỉ việc cài đặt thêm các gói thư viện cần thiết và thực hiện viết code.
Nguồn tham khảo:
All rights reserved
