Vuejs server side rendering với vue router and vuex.
Bài đăng này đã không được cập nhật trong 7 năm
Xin Chào các bạn! Ở bài viết trước mình có giới thiệu và demo một ví dụ đơn giản vue ssr, các bạn có thể tham khảo lại ở đây. Bài viết hôm nay mình sẽ nói về Vuejs server side rendering với vue router and vuex. Như tiêu đề thì trước khi đọc bài viết này các bạn nên có hiểu biết cơ bản về Vue router và Vuex.
1. Khởi tạo và install các package cần thiết.
Trước tiên chúng ta cần cài package vue-cli để init project và file webpack.config.js cho vue nhờ template webpack-simple.
#install vue-cli
npm install -g vue-cli
#create project using webpack-simple
vue init webpack-simple vue-ssr
Tiếp theo chúng ta cần cài đặt tất cả các package của template webpack-simple.
#go to project folder
cd vue-cli
#install dependencies
npm install
Bây giờ chúng ta đã có một project vuejs để bắt đầu config ssr. Nhưng trước gi cài bắt đầu config ssr thì ta phải các đặt các package sau:
#install vue-server-render, vue-router, vuex,express and webpack-merge
npm install vue-server-renderer vue-router vuex express webpack-merge --save
trong đó: vue-server-render: Thư viên Vue cho SSR. vue-router: Thư viện Vue để xây dựng trang SPA. express: Framework of Nodejs. webpack-merge: Chúng ta dùng để merge hai config webpack.
2. Config
1. Webpack configuration.
Chúng ta cần hai file webpack config, một để build file entry client file và một để build entry server file. Template webpack-simple sẽ tạo file webpack.config.js, chúng ta sẽ dùng file nay để build entry client file bằng cách đổi entry thành ./src/entry-server.js. Nội dung của file webpack.config.js như sau:
var path = require('path')
var webpack = require('webpack')

module.exports = {
  entry: './src/entry-client.js',
  output: {
    path: path.resolve(__dirname, './dist'),
    publicPath: '/dist/',
    filename: 'build.js'
  },
  module: {
    rules: [
      {
        test: /\.css$/,
        use: [
          'vue-style-loader',
          'css-loader'
        ],
      },
      {
        test: /\.scss$/,
        use: [
          'vue-style-loader',
          'css-loader',
          'sass-loader'
        ],
      },
      {
        test: /\.sass$/,
        use: [
          'vue-style-loader',
          'css-loader',
          'sass-loader?indentedSyntax'
        ],
      },
      {
        test: /\.vue$/,
        loader: 'vue-loader',
        options: {
          loaders: {
            // Since sass-loader (weirdly) has SCSS as its default parse mode, we map
            // the "scss" and "sass" values for the lang attribute to the right configs here.
            // other preprocessors should work out of the box, no loader config like this necessary.
            'scss': [
              'vue-style-loader',
              'css-loader',
              'sass-loader'
            ],
            'sass': [
              'vue-style-loader',
              'css-loader',
              'sass-loader?indentedSyntax'
            ]
          }
          // other vue-loader options go here
        }
      },
      {
        test: /\.js$/,
        loader: 'babel-loader',
        exclude: /node_modules/
      },
      {
        test: /\.(png|jpg|gif|svg)$/,
        loader: 'file-loader',
        options: {
          name: '[name].[ext]?[hash]'
        }
      }
    ]
  },
  resolve: {
    alias: {
      'vue$': 'vue/dist/vue.esm.js'
    },
    extensions: ['*', '.js', '.vue', '.json']
  },
  devServer: {
    historyApiFallback: true,
    noInfo: true,
    overlay: true
  },
  performance: {
    hints: false
  },
  devtool: '#eval-source-map'
}

if (process.env.NODE_ENV === 'production') {
  module.exports.devtool = '#source-map'
  // http://vue-loader.vuejs.org/en/workflow/production.html
  module.exports.plugins = (module.exports.plugins || []).concat([
    new webpack.DefinePlugin({
      'process.env': {
        NODE_ENV: '"production"'
      }
    }),
    new webpack.optimize.UglifyJsPlugin({
      sourceMap: true,
      compress: {
        warnings: false
      }
    }),
    new webpack.LoaderOptionsPlugin({
      minimize: true
    })
  ])
}
Tiếp theo, hãy tạo một file webpack.server.config.js để config webpack build entry server file. Nội dụng file này như sau:
var path = require('path')
var webpack = require('webpack')
var merge = require('webpack-merge')
var baseWebpackConfig = require('./webpack.config')
var webpackConfig = merge(baseWebpackConfig, {
  target: 'node',
  entry: {
    app: './src/entry-server.js'
  },
  devtool: false,
  output: {
    path: path.resolve(__dirname, './dist'),
    filename: 'server.bundle.js',
    libraryTarget: 'commonjs2'
  },
  externals: Object.keys(require('./package.json').dependencies),
  plugins: [
    new webpack.DefinePlugin({
      'process.env': 'production'
    }),
    new webpack.optimize.UglifyJsPlugin({
      compress: {
        warnings: false
      }
    })
  ]
})
module.exports = webpackConfig
Ở đây các bạn chú ý là chúng ta có dùng package webpack-merge để sự dụng lại những config trong file webpack.config.js, chỉ thay đổi config entry và output.
2. Edit file package.json.
Edit nội dung của property script file package.json thành như sau.
"scripts": {
    "dev": "cross-env NODE_ENV=development webpack-dev-server --open --hot",
    "build": "npm run build-client && npm run build-server",
    "start": "npm run build && npm run start-server",
    "build-client": "cross-env NODE_ENV=production webpack --progress --hide-modules",//build client file
    "build-server": "cross-env NODE_ENV=production webpack --config webpack.server.config.js --progress --hide-modules",//build server file
    "start-server": "node server.js" //start node server
  },
3. Code
Do yêu cầu khi đọc bài này là các bạn phải có kiến thức cơ bản về Vuejs, Vue Router và VueX. Do đó trong phần này chủ yếu mình trình bày bằng code và không giải thích nhiều.
1. Edit nội dung file index.html thành như sau:
<!doctype html>
<html lang="en">
<head>
  {{{ meta }}}
  <title>{{ title }}</title>
</head>
<body>
    <!--vue-ssr-outlet-->
  <script src="dist/build.js"></script>
</body>
</html>
Trong file index.html chúng ta có: '<!--vue-ssr-outlet-->' nơi mà vue ssr sẽ render html vào '<script src="dist/build.js"></script>': Ta inport file build.js, là file được sinh ra khi ta build với file webpack.config.js
2. File Vue component
Edit các file như sau:
//.src/App.vue
<template>
  <div id="app">
    Hello World!
    <p>
      <router-link to="/">Go To Home</router-link>
      <router-link to="/about">Go To About</router-link>
    </p>
    <router-view></router-view>
  </div>
</template>
<script>
  export default {
  };
</script>
//.src/components/Home.vue
<template>
  <div>
  {{name}}
  </div>
</template>
<script>
  import { mapState } from 'vuex'
  export default {
    computed: {
      ...mapState('home', ['name']),
    }
  };
</script>
//.src/compoents/About.vue
<template>
  <div>
    {{name}}
  </div>
</template>
<script>
  import { mapState } from 'vuex'
  export default {
  	computed: {
      ...mapState('about', ['name']),
    }
  };
</script>
3. Router file configuration
Tạo một file ./src/router/router.js và edit nội dung như sau:
import Vue from 'vue';
import Router from 'vue-router';
import Home from '../components/Home.vue';
import About from '../components/About.vue';

Vue.use(Router);

export function createRouter () {
  return new Router({
    mode: 'history',
    routes: [
      { path: '/', component: Home },
      { path: '/about', component: About }
    ]
  });
}
4. Vuex store.
Trong thư mục store tạo ba file lần lượt có nội dung như sau:
//about.js
export default {
  namespaced: true,
  state: () => ({
    name: 'Page About'
  }),
  mutations: {},
  actions: {},
  getters: {}
}
//home.js
export default {
  namespaced: true,
  state: () => ({
    name: 'Page Home'
  }),
  mutations: {},
  actions: {},
  getters: {}
}
//index.js
import Vue from 'vue'
import Vuex from 'vuex'
import home from './home'
import about from './about'

Vue.use(Vuex)

export function createStore () {
  return new Vuex.Store({
    modules: {
      home,
      about
    }
  })
}
5. Vue componet file configuration
Edit lại file ./src/main.js với nội dung:
//main.js
import Vue from 'vue'
import { sync } from 'vuex-router-sync'
import App from './App.vue'
import { createRouter } from './router/router.js'
import { createStore } from './store/index.js'

// export a factory function for creating fresh app, router and store
// instances
export function createApp() {
  // create router instance
  const router = createRouter()
  const store = createStore()

  sync(store, router)

  const app = new Vue({
    router,
    store,
    // the root instance simply renders the App component.
    render: h => h(App)
  });

  return { app, router, store };
}
6. Client entry point
Đây là file webpack.config.js sẽ dùng để build file ./dist/bundle.js- file này ta sẽ inport vào file index.html ở trên.
//client-entry.js
import { createApp } from './main.js';

const { app } = createApp()

// this assumes App.vue template root element has `id="app"`
app.$mount('#app')
7. Server entry point
File này là entry-point cho webpack.server.config.js, output của file này là file bundle.server.js sẽ được dùng trong file server.js.
//entry-server.js
import { createApp } from './main.js';

export default context => {
  // since there could potentially be asynchronous route hooks or components,
  // we will be returning a Promise so that the server can wait until
  // everything is ready before rendering.
  return new Promise((resolve, reject) => {
    const { app, router, store } = createApp();

    // set server-side router's location
    router.push(context.url);

    // wait until router has resolved possible async components and hooks
    router.onReady(() => {
      const matchedComponents = router.getMatchedComponents();
      // no matched routes, reject with 404
      if (!matchedComponents.length) {
        return reject({ code: 404 });
      }

      context.rendered = () => {
        // After the app is rendered, our store is now
        // filled with the state from our components.
        // When we attach the state to the context, and the `template` option
        // is used for the renderer, the state will automatically be
        // serialized and injected into the HTML as `window.__INITIAL_STATE__`.
        context.state = store.state
      }

      // the Promise should resolve to the app instance so it can be rendered
      resolve(app);
    }, reject);
  });
}
4. Configuring and starting the server
Bây giờ ta sẽ build một server sử dụng express ta đã cài đặt ở trên.
//server.js
const express = require('express');
const server = express();
const fs = require('fs');
const path = require('path');
//obtain bundle
const bundle =  require('./dist/server.bundle.js');
//get renderer from vue server renderer
const renderer = require('vue-server-renderer').createRenderer({
  //set template
  template: fs.readFileSync('./index.html', 'utf-8')
});

server.use('/dist', express.static(path.join(__dirname, './dist')));

//start server
server.get('*', (req, res) => {

  bundle.default({ url: req.url }).then((app) => {
    //context to use as data source
    //in the template for interpolation
    const context = {
      title: 'Vue JS - Server Render',
      meta: `
        <meta description="vuejs server side render">
      `
    };

    renderer.renderToString(app, context, function (err, html) {
      if (err) {
        if (err.code === 404) {
          res.status(404).end('Page not found')
        } else {
          res.status(500).end('Internal Server Error')
        }
      } else {
        res.end(html)
      }
    });
  }, (err) => {
    console.log(err);
  });
});

server.listen(8080);
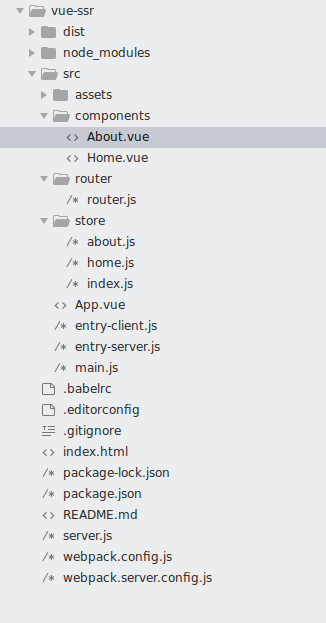
Bây giờ project của chúng ta sẽ có cấu trúc như sau:
 Cuối cùng chúng ta chạy lệnh:
npm start
để chạy build và start server.
Truy cập vào http://localhost:8080/ sẽ thấy:
 Các bạn mở debug tool lên để ý là bất cứ ở link nào bạn F5 thì server cũng sẽ trả về code html -> file server đã render ra code html từ code và code trong vue, khác với bình thường là server sẽ trả về index.html còn nội dung thì do file bundle.js render.
Kết
Code mình đã upload lên github. Nếu các bạn muốn tham khảo thì có thể clone tại đây và chỉ cần chạy npm run start là được. Bài viết mình tham khảo tại đây. Thân chào các bạn.
All rights reserved
