Ví dụ về upload nhiều files trong Laravel 5.5
Bài đăng này đã không được cập nhật trong 7 năm
Upload file có lẽ là phần cơ bản của bất kì dự án nào nhưng với những newbie thì có thể gặp vài vấn đề lúc mới tiếp xúc, ví dụ như thực hiện upload nhiều files cùng lúc có validation sẽ không biết làm như nào. Trong bài viết này tôi sẽ tập trung vào một phần nhỏ đó trong nhiều thứ có thể làm khi upload nhiều file lên. Tôi sử dụng thư mục storage của Laravel và có DB khi upload files lên kết hợp dùng Bootstrap để code được dễ dàng hơn.

Model với Migration
Trước hết tôi sẽ đi tạo ra model và bảng nơi tôi sẽ lưu files. Trong thư mục root của ứng dụng tôi chạy lệnh sau :
php artisan make:model Product -m
php artisan make:model ProductDetails -m
Khi migration và model đã được tạo thành công thì đến file app/Product.php và thêm code protected $fillable = ['name']; vào :
<?php

namespace App;

use Illuminate\Database\Eloquent\Model;

class Product extends Model
{
    protected $fillable = ['name'];
}
Sau đó đến thư mục database/migration và mở file migration bạn sẽ nhìn thấy cấu trúc mặc định có trong đó gồm id và timestamps, hãy thêm $table->string('name'); vào như dưới :
<?php

use Illuminate\Support\Facades\Schema;
use Illuminate\Database\Schema\Blueprint;
use Illuminate\Database\Migrations\Migration;

class ProductsTable extends Migration
{
    /**
     * Run the migrations.
     *
     * @return void
     */
    public function up()
    {
        Schema::create('products', function (Blueprint $table) {
            $table->increments('id');
            $table->string('name');
            $table->timestamps();
        });
    }

    /**
     * Reverse the migrations.
     *
     * @return void
     */
    public function down()
    {
        Schema::dropIfExists('products');
    }
}
Còn ProductDetails sẽ thêm code như sau :
<?php
namespace App;
use Illuminate\Database\Eloquent\Model;

class ProductDetails extends Model
{
    protected $fillable = ['product_id', 'filename'];

    public function product()
    {
        return $this->belongsTo('App\Product');
    }
}
?>
Trong đoạn code trên tôi sử dụng belongsTo bởi vì ProductDetails là thuộc về bảng Product và product_id là khoá ngoại, cái này là quan hệ nghịch đảo (inverse relation) trong Laravel.
Bạn hãy mở file tương ứng của productdetails trong thư mục database/migration, tương tự như product bạn sẽ thấy có id và timestamps, hãy thêm vào đoạn code dưới :
            $table->integer('product_id')->unsigned();
            $table->foreign('product_id')->references('id')->on('products');
            $table->string('filename');
thành nội dung đầy đủ như sau :
<?php

use Illuminate\Support\Facades\Schema;
use Illuminate\Database\Schema\Blueprint;
use Illuminate\Database\Migrations\Migration;

class CreateProductDetailsTable extends Migration
{
    /**
     * Run the migrations.
     *
     * @return void
     */
    public function up()
    {
        Schema::create('product_details', function (Blueprint $table) {
            $table->increments('id');
            $table->integer('product_id')->unsigned();
            $table->foreign('product_id')->references('id')->on('products');
            $table->string('filename');
            $table->timestamps();
        });
    }

    /**
     * Reverse the migrations.
     *
     * @return void
     */
    public function down()
    {
        Schema::dropIfExists('product_details');
    }
}
?>
Tiếp theo, trong app/Providers/AppServiceProvider.php hãy thiết lập mặc định độ dài của chuỗi là 200 :
<?php

namespace App\Providers;

use Illuminate\Support\ServiceProvider;
use Illuminate\Support\Facades\Schema;

class AppServiceProvider extends ServiceProvider
{
    /**
     * Bootstrap any application services.
     *
     * @return void
     */
	public function boot()
	{
		Schema::defaultStringLength(200);
	}
    /**
     * Register any application services.
     *
     * @return void
     */
    public function register()
    {
        //
    }
}
?>
Trong ứng dụng Laravel thiết lập DB được handle bởi hai files env và config/database.php, tôi đã tạo DB với tên là multiupload và thiết lập kết nối tới nó.
CREATE SCHEMA `multiupload` DEFAULT CHARACTER SET utf8 COLLATE utf8_unicode_ci ;
<?php
// config/database.php
    'default' => env('DB_CONNECTION', 'mysql'),
    // giản lược
        'mysql' => [
            'driver' => 'mysql',
            'host' => env('DB_HOST', '127.0.0.1'),
            'port' => env('DB_PORT', '3306'),
            'database' => env('DB_DATABASE', 'multiupload'),
            'username' => env('DB_USERNAME', 'root'),
            'password' => env('DB_PASSWORD', 'xxx'),
            'unix_socket' => env('DB_SOCKET', ''),
            'charset' => 'utf8',
            'collation' => 'utf8_unicode_ci',
            'prefix' => '',
            'strict' => true,
            'engine' => null,
        ],
        // giản lược
?>
// .env
DB_CONNECTION=mysql
DB_HOST=127.0.0.1
DB_PORT=3306
DB_DATABASE=multiupload
DB_USERNAME=root
DB_PASSWORD=xxx
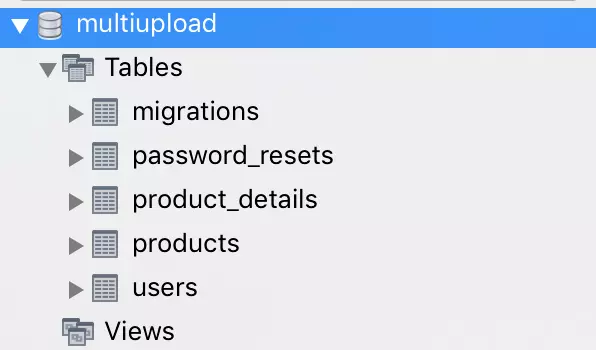
Hãy chạy lệnh sau để tạo bảng trong DB đó :
php artisan migrate
Bạn kiểm tra DB thì sẽ thấy có 5 bảng được tạo thành công như hình
Route, Controller, View
Thiết lập Route
Route thiết lập URL của ứng dụng và các phương thức của cho URL đó. Routes được lưu ở trong routes/web.php và chứa code sau :
Route::get('/multiuploads', 'UploadController@uploadForm');
Route::post('/multiuploads', 'UploadController@uploadSubmit');
Tạo Controller
Chỉ cần chạy lệnh sau bạn sẽ tạo ra được Controller :
php artisan make:controller UploadController
Kế đến mở app/Http/Controller/UploadController.php rồi thêm vào code như sau:
<?php
namespace App\Http\Controllers;
use Illuminate\Http\Request;

class UploadController extends Controller
{
    public function uploadForm()
    {
        return view('upload_form');
    }

    public function uploadSubmit(Request $request)
    {
        // coding ….
    }
}
?>
Tạo View (upload_form.blade.php)
Trong View file tôi sử dụng Bootstrap để stlyle cho code, dùng jQuery, JavaScript.
<!doctype html>
<html lang="{{ app()->getLocale() }}">
<head>
	<meta charset="utf-8">
	<meta http-equiv="X-UA-Compatible" content="IE=edge">
	<meta name="viewport" content="width=device-width, initial-scale=1">

	<title>Laravel Multi Uploading Example</title>
	<link rel="stylesheet" href="https://maxcdn.bootstrapcdn.com/bootstrap/3.3.7/css/bootstrap.min.css" 		integrity="sha384-BVYiiSIFeK1dGmJRAkycuHAHRg32OmUcww7on3RYdg4Va+PmSTsz/K68vbdEjh4u" crossorigin="anonymous">

	<!-- Optional theme -->
	<link rel="stylesheet" href="https://maxcdn.bootstrapcdn.com/bootstrap/3.3.7/css/bootstrap-theme.min.css" 		integrity="sha384-rHyoN1iRsVXV4nD0JutlnGaslCJuC7uwjduW9SVrLvRYooPp2bWYgmgJQIXwl/Sp" crossorigin="anonymous">

	<!-- Fonts -->
	<link href="https://fonts.googleapis.com/css?family=Raleway:100,600" rel="stylesheet" type="text/css">

	<!-- Styles -->
	<style>
		.container {
			margin-top:2%;
		}
	</style>
</head>
<body>
	@if (count($errors) > 0)
	<div class="alert alert-danger">
		<ul>
			@foreach ($errors->all() as $error)
				<li>{{ $error }}</li>
			@endforeach
		</ul>
	</div>
	@endif
	<div class="container">
		<div class="row">
			<div class="col-md-2"> <img src="/upload_icon.png" width="80" /></div>
			<div class="col-md-8"><h2>Laravel 5.5 Multiple File Uploading</h2></div>
		</div>
		<br>
		<div class="row">
			<div class="col-md-3"></div>
			<div class="col-md-6">
				<form action="/multiuploads" method="post" enctype="multipart/form-data">
					{{ csrf_field() }}
					<div class="form-group">
						<label for="Product Name">Product Name</label>
						<input type="text" name="name" class="form-control"  placeholder="Product Name" >
					</div>
					<label for="Product Name">Product photos (can upload multi photos):</label>
					<br>
					<input type="file" class="form-control" name="photos[]" multiple />
					<br><br>
					<input type="submit" class="btn btn-primary" value="Upload" />
				</form>
			</div>
		</div>
	</div>
</body>
</html>
Validation
Tôi sẽ dùng Bootstrap để hiển thị cảnh báo cho validation và sử dụng các phương thức validate của Laravel để kiểm tra loại file được phép upload.
<?php
namespace App\Http\Controllers;
use App\Product;
use App\ProductDetails;
use Illuminate\Http\Request;

class UploadController extends Controller
{
	public function uploadForm()
	{
		return view('upload_form');
	}

	public function uploadSubmit(Request $request)
	{
        // Thiết lập required cho cả 2 mục input
		$this->validate($request, [
			'name' => 'required',
			'photos'=>'required',]
		);
        // kiểm tra có files sẽ xử lý
		if($request->hasFile('photos')) {
			$allowedfileExtension=['jpg','png'];
			$files = $request->file('photos');
            // flag xem có thực hiện lưu DB không. Mặc định là có
			$exe_flg = true;
			// kiểm tra tất cả các files xem có đuôi mở rộng đúng không
			foreach($files as $file) {
				$extension = $file->getClientOriginalExtension();
				$check=in_array($extension,$allowedfileExtension);

				if(!$check) {
                    // nếu có file nào không đúng đuôi mở rộng thì đổi flag thành false
					$exe_flg = false;
					break;
				}
			}
			// nếu không có file nào vi phạm validate thì tiến hành lưu DB
			if($exe_flg) {
                // lưu product
				$products= Product::create($request->all());
                // duyệt từng ảnh và thực hiện lưu
				foreach ($request->photos as $photo) {
					$filename = $photo->store('photos');
					ProductDetails::create([
						'product_id' => $products->id,
						'filename' => $filename
					]);
				}
				echo "Upload successfully";
			} else {
				echo "Falied to upload. Only accept jpg, png photos.";
			}
		}
	}
}
?>
Lưu dữ liệu và files
Laravel cung cấp chức storage để lưu tất cả loại dữ liệu bao gồm cả ảnh và các loại files khác.
Với config/filesystems.php bạn có thể chỉ định rõ nơi mà nội dung của bạn được lưu trữ.
return [
    'default' => 'local',
    'disks' => [
        'local' => ['driver' => 'local',
        'root' => storage_path('app')],
// ...
Để cho demo thì tôi đã tạo một thư mục photos trong storage/app/.
Thực hiện chạy php artisan serve

Giờ hãy truy cập vào http://localhost:8000/multiuploads bạn sẽ thấy như hình dưới.
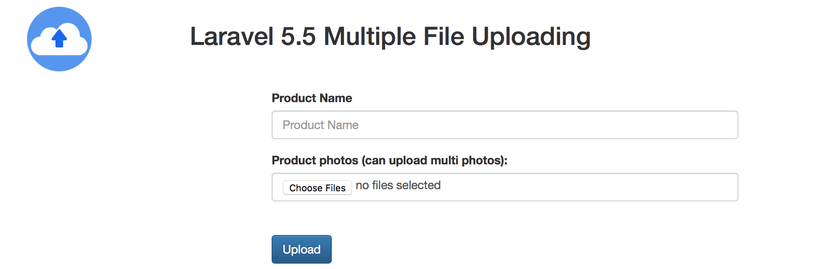
Hãy thử thực hiện upload khi chưa chỉ định cả 2 mục không có gì bạn sẽ gặp lỗi required.

Tương tự bạn hãy thử với file có đuôi không đúng định dạng sẽ bị báo Falied to upload. Only accept jpg, png photos..
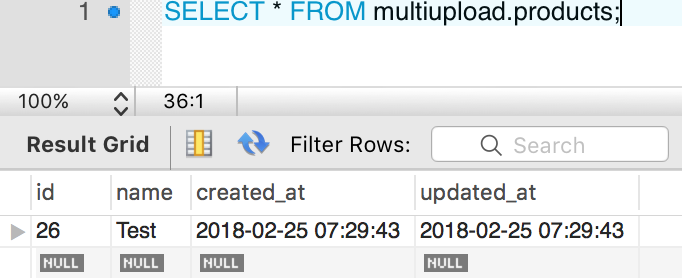
Còn khi thực hiện đúng file sẽ được upload lên folder storage/app/photos/ và dữ liệu được lưu vào 2 bảng products và product_details.

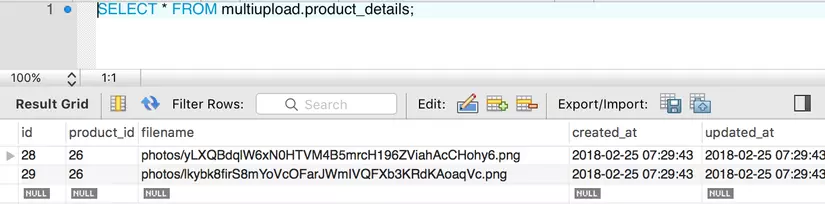
Khi upload lên storage/app/photos/ tên file qua store() sẽ được mã hoá nên nếu bạn muốn giữ nguyên tên file gốc thì có thể dùng storeAs() kết hợp dùng getClientOriginalName() để lấy ra tên gốc của file như sau :
$filename = $photo->storeAs('photos', $photo->getClientOriginalName());
All rights reserved
