Ví dụ CRUD với Laravel và Vuejs.
Bài đăng này đã không được cập nhật trong 5 năm
1. Cài đặt Laravel
composer create-project --prefer-dist laravel/laravel vuelaravelcrud
Tiếp theo bạn vào trong thư mục project và chạy lệnh
npm install
Nếu quá trình chạy xảy ra lỗi với npm, các bạn có thể chạy lại với yarn
yarn install
Sau đó các bạn sẽ config cơ sở dữ liệu của các bạn trong file .env.
DB_CONNECTION=mysql
DB_HOST=127.0.0.1
DB_PORT=3306
DB_DATABASE=vuecrud
DB_USERNAME=root
DB_PASSWORD=123456
Sau đó ta chạy lệnh:
npm run dev
Chúng ta cũng có thể chạy lệnh sau để biên dịch khi bạn viết mới hoặc sửa code:
npm run watch
2. Cài đặt Vue dependency và chỉnh sửa cấu hình
Ở tutorial này chúng ta cần cài vue-router và vue-axios
- vue-router: được sử dụng để định tuyến trong ứng dụng Vuejs của chúng ta
- vue-axios: được dùng để truyền các request tới server ( giống như với việc bạn dùng ajax thôi) Để cài vue-router và vue-axios ta dùng lệnh:
npm install vue-router vue-axios --save
Bây giờ, chúng ta thay đổi file app.js bên trong thư mục resources/js, code bên trong app.js như sau:
// App.js

require('./bootstrap');

window.Vue = require('vue');

import VueRouter from 'vue-router';
Vue.use(VueRouter);

import VueAxios from 'vue-axios';
import axios from 'axios';
Vue.use(VueAxios, axios);

Vue.component('example-component', require('./components/ExampleComponent.vue'));

const router = new VueRouter({ mode: 'history'});
const app = new Vue(Vue.util.extend({ router })).$mount('#app');
Ở đây chúng ta đã cấu hình để sử dụng được thư viện của vue-router và vue-axios.
Tiếp theo chúng ta vào thư mục resources/views , tạo 1 file post.blade.php
Nội dung file post.blade.php như sau:
<!doctype html>
<html lang="{{ str_replace('_', '-', app()->getLocale()) }}">
    <head>
        <meta charset="utf-8">
        <meta name="viewport" content="width=device-width, initial-scale=1">
        <title>Laravel</title>
        <link href="https://fonts.googleapis.com/css?family=Nunito:200,600" rel="stylesheet" type="text/css">
        <link href="{{ mix('css/app.css') }}" type="text/css" rel="stylesheet" />
        <link href="https://stackpath.bootstrapcdn.com/bootstrap/4.3.1/css/bootstrap.min.css" type="text/css" rel="stylesheet" />
        <meta name="csrf-token" value="{{ csrf_token() }}" />
    </head>
    <body>
        <div id="app">
          <example-component></example-component>
        </div>
        <script src="{{ mix('js/app.js') }}" type="text/javascript"></script>
    </body>
</html>
Tiếp theo chúng ta vào trong routes và sửa file web.php như sau:
<?php

Route::get('/{any}', function () {
  return view('post');
})->where('any', '.*');
Vì chúng ta đang xây dựng một SPA (Single Page Application) sử dụng Laravel và Vue. Vì vậy chúng ta cần xác định trước các route để không có lỗi xẩy ra. Ngoài ra, nó sẽ báo lỗi 404, vì trong Laravel, bạn không có xác là bất cứ route nào, nhưng trong Vue sẽ là xác định các thành phần khác nhau của component route.
Khi sử dụng code như trên, chúng ta có thể sử dụng route trong Laravel như với route Vue, và bạn có thể hiển thị các component tùy theo các URL.
3. Tạo Vue Components
Bên trong thư mục resources/js, ta tạo 1 thư mục components, bên trong thư mục component ta tạo 4 file sau:

Code trong file HomeComponent.vue:
// HomeComponent.vue

<template>
  <div class="row justify-content-center">
      <div class="col-md-8">
          <div class="card card-default">
              <div class="card-header">Home Component</div>

              <div class="card-body">
                  I'm the Home Component component.
              </div>
          </div>
      </div>
  </div>
</template>

<script>
    export default {
        mounted() {
            console.log('Component mounted.')
        }
    }
</script>
Code trong file CreateComponent.vue:
// CreateComponent.vue

<template>
  <div class="row justify-content-center">
      <div class="col-md-8">
          <div class="card card-default">
              <div class="card-header">Create Component</div>

              <div class="card-body">
                  I'm the Create Component component.
              </div>
          </div>
      </div>
  </div>
</template>

<script>
    export default {
        mounted() {
            console.log('Component mounted.')
        }
    }
</script>
Code trong file EditComponent.vue:
// EditComponent.vue

<template>
  <div class="row justify-content-center">
      <div class="col-md-8">
          <div class="card card-default">
              <div class="card-header">Edit Component</div>

              <div class="card-body">
                  I'm an Edit component.
              </div>
          </div>
      </div>
  </div>
</template>

<script>
    export default {
        mounted() {
            console.log('Example Component mounted.')
        }
    }
</script>
Code trong file IndexComponent.vue:
// IndexComponent.vue

<template>
  <div class="row justify-content-center">
      <div class="col-md-8">
          <div class="card card-default">
              <div class="card-header">Index Component</div>

              <div class="card-body">
                  I'm an Index component.
              </div>
          </div>
      </div>
  </div>
</template>

<script>
    export default {
        mounted() {
            console.log('Index Component mounted.')
        }
    }
</script>
4. Cấu hình vue-router
Bên trong file app.js
// app.js

require('./bootstrap');

window.Vue = require('vue');

import VueRouter from 'vue-router';
Vue.use(VueRouter);

import VueAxios from 'vue-axios';
import axios from 'axios';

import App from './App.vue';
Vue.use(VueAxios, axios);

import HomeComponent from './components/HomeComponent.vue';
import CreateComponent from './components/CreateComponent.vue';
import IndexComponent from './components/IndexComponent.vue';
import EditComponent from './components/EditComponent.vue';

const routes = [
  {
      name: 'home',
      path: '/',
      component: HomeComponent
  },
  {
      name: 'create',
      path: '/create',
      component: CreateComponent
  },
  {
      name: 'posts',
      path: '/posts',
      component: IndexComponent
  },
  {
      name: 'edit',
      path: '/edit/:id',
      component: EditComponent
  }
];

const router = new VueRouter({ mode: 'history', routes: routes});
const app = new Vue(Vue.util.extend({ router }, App)).$mount('#app');
Chúng ta vừa import 4 component và xác định các route cho ứng dụng. Sau đây chúng ta tạo router object và truyền nó vào ứng dụng Vue
Tạo 1 file App.vue trong thư mục resources/js với code bên trong như sau
// App.vue

<template>
    <div class="container">
        <div>
            <transition name="fade">
                <router-view></router-view>
            </transition>
        </div>
    </div>
</template>

<style>
    .fade-enter-active, .fade-leave-active {
      transition: opacity .5s
    }
    .fade-enter, .fade-leave-active {
      opacity: 0
    }
</style>

<script>

    export default{
    }
</script>
Chúng ta vừa định nghĩa ra router-view. Việc này sẽ render component theo URL, tức là với tương ứng các URL thì sẽ có 1 màn hình riêng. Vì vậy, nếu URL là /create, thì component CreateComponent sẽ hiển thị trên trình duyệt.
Sau đó nếu npm run watch đang không hoạt động,thì các bạn sẽ phải biên dịch lại, nếu quá trình chạy có lỗi, thì do ứng dụng chưa có vue, các bạn chạy lại npm install –save vue
Sau đó vào trình duyệt test thử các link, ở đây mình chạy với local nên sẽ là 127.0.0.1:8000
127.0.0.1:8000/create
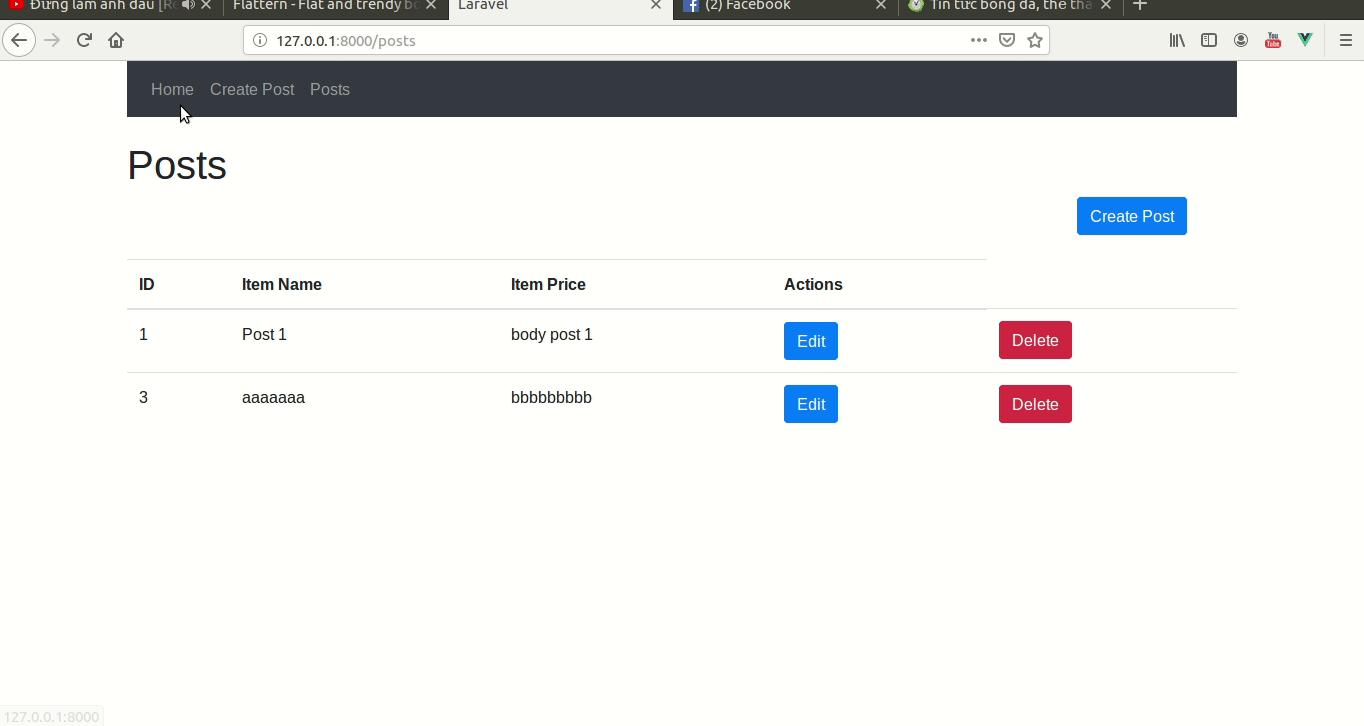
127.0.0.1:8000/posts
127.0.0.1:8000/edit/21
Nếu chạy đúng thế này các bạn sắp thành công rồi đấy 😀
5. Tạo Navigation bar
Sửa code trong App.vue như sau:
// App.vue

<template>
  <div class="container">
    <nav class="navbar navbar-expand-sm bg-dark navbar-dark">
      <ul class="navbar-nav">
        <li class="nav-item">
          <router-link to="/" class="nav-link">Home</router-link>
        </li>
        <li class="nav-item">
          <router-link to="/create" class="nav-link">Create Post</router-link>
        </li>
        <li class="nav-item">
          <router-link to="/posts" class="nav-link">Posts</router-link>
        </li>
      </ul>
    </nav><br />
    <transition name="fade">
      <router-view></router-view>
    </transition>
  </div>
</template>

<style>
    .fade-enter-active, .fade-leave-active {
      transition: opacity .5s
    }
    .fade-enter, .fade-leave-active {
      opacity: 0
    }
</style>

<script>

    export default{
    }
</script>
6. Tạo Form
Sửa file CreateComponent.vue như sau
// CreatePost.vue

<template>
  <div>
    <h1>Create A Post</h1>
    <form @submit.prevent="addPost">
      <div class="row">
        <div class="col-md-6">
          <div class="form-group">
            <label>Post Title:</label>
            <input type="text" class="form-control" v-model="post.title">
          </div>
        </div>
        </div>
        <div class="row">
          <div class="col-md-6">
            <div class="form-group">
              <label>Post Body:</label>
              <textarea class="form-control" v-model="post.body" rows="5"></textarea>
            </div>
          </div>
        </div><br />
        <div class="form-group">
          <button class="btn btn-primary">Create</button>
        </div>
    </form>
  </div>
</template>

<script>
    export default {
        data(){
        return {
          post:{}
        }
    },
    methods: {
      addPost(){
        console.log(this.post);
      }
    }
  }
</script>
Form vừa tạo có 2 field là Post Title và Post Body.
Chúng ta tạo 1 phương thức addPost(). Khi người dùng submit form, chúng ta sẽ nhận được dữ liệu vào phương thức addPost(). Từ đây, ta sử dụng Post request qua Laravel để lưu vào cơ sở dữ liệu.
Các bạn kiểm tra lại trên đường dẫn: http://127.0.0.1:8000/create hoặc /create.
7. Tạo backend Laravel
Công việc chính của Laravel Framework trong ứng dụng này là để xây dựng backend bằng API, các API này có tác dụng tương tác với cơ sở dữ liệu, để thêm sửa xóa, hoặc làm các nhiệm vụ khác nhau.
Đầu tiên chúng ta sẽ tạo 1 bảng Post, kèm theo đó là Post model
php artisan make:model Post -m
Viết vào trong file migration vừa được tạo [timestamp]create_posts_table.php file.
public function up()
{
    Schema::create('posts', function (Blueprint $table) {
       $table->increments('id');
       $table->string('title');
       $table->text('body');
       $table->timestamps();
    });
}
Chạy migrate
php artisan migrate
Trong modle Post.php
<?php

// Post.php

namespace App;

use Illuminate\Database\Eloquent\Model;

class Post extends Model
{
    protected $fillable = ['title', 'body'];
}
Tạo PostController
php artisan make:controller PostController
Chúng ta sử dụng Laravel Resource Collection cho việc phát triển API. Để tạo Laravel Resource Collection ta dùng.
php artisan make:resource PostCollection
Khi xây dựng API, bạn cần chuyển đổi từ Eloquent model sang JSON, Laravel đã giúp bạn làm điều này thật dễ dàng.
Tạo PostCollection bên trong app/Http/Resources/PostCollection.php file.
<?php

// PostCollection.php

namespace App\Http\Resources;

use Illuminate\Http\Resources\Json\ResourceCollection;

class PostCollection extends ResourceCollection
{
    /**
     * Transform the resource collection into an array.
     *
     * @param  \Illuminate\Http\Request  $request
     * @return array
     */
    public function toArray($request)
    {
        return parent::toArray($request);
    }
}
8. xây dựng CRUD
Đầu tiên, xây dựng hàm lưu trữ dữ liệu vào MySQL
<?php

// PostController.php

namespace App\Http\Controllers;

use Illuminate\Http\Request;
use App\Http\Resources\PostCollection;
use App\Post;

class PostController extends Controller
{
    public function store(Request $request)
    {
      $post = new Post([
        'title' => $request->get('title'),
        'body' => $request->get('body')
      ]);

      $post->save();

      return response()->json('success');
    }
}
Sau đó ta viết thêm các hàm edit, update, index, delete như sau :
<?php

// PostController.php

namespace App\Http\Controllers;

use Illuminate\Http\Request;
use App\Http\Resources\PostCollection;
use App\Post;

class PostController extends Controller
{
    public function store(Request $request)
    {
      $post = new Post([
        'title' => $request->get('title'),
        'body' => $request->get('body')
      ]);

      $post->save();

      return response()->json('successfully added');
    }

    public function index()
    {
      return new PostCollection(Post::all());
    }

    public function edit($id)
    {
      $post = Post::find($id);
      return response()->json($post);
    }

    public function update($id, Request $request)
    {
      $post = Post::find($id);

      $post->update($request->all());

      return response()->json('successfully updated');
    }

    public function delete($id)
    {
      $post = Post::find($id);

      $post->delete();

      return response()->json('successfully deleted');
    }
}
9. Định nghĩa các api routes
Chúng ta vào trong routes/api.php file.
<?php

// api.php

use Illuminate\Http\Request;

Route::middleware('auth:api')->get('/user', function (Request $request) {
    return $request->user();
});

Route::post('/post/create', 'PostController@store');
Route::get('/post/edit/{id}', 'PostController@edit');
Route::post('/post/update/{id}', 'PostController@update');
Route::delete('/post/delete/{id}', 'PostController@delete');
Route::get('/posts', 'PostController@index');
10. Sử dụng Axios để gửi các Request
Chúng ta vừa tạo 1 loạt Controller, Model, Route đủ để cho phần backend xử lý CRUD, bây giờ ta sẽ gửi các Post request lên từ axios
Viết bên trong hàm addPost() trong file CreateComponent.vue
// CreateComponent.vue

addPost(){
    let uri = 'http://127.0.0.1:8000/api/post/create';
    this.axios.post(uri, this.post).then((response) => {
       this.$router.push({name: 'posts'});
    });
}
Ở đây, chúng ta sẽ gửi dữ liệu bằng api server và server sẽ dùng dữ liệu này để xử lý
Có dữ liệu được đẩy lên rồi, chúng ta sẽ cho hiển thị ra IndexComponent.vue file.
// IndexComponent.vue

<template>
  <div>
      <h1>Posts</h1>
        <div class="row">
          <div class="col-md-10"></div>
          <div class="col-md-2">
            <router-link :to="{ name: 'create' }" class="btn btn-primary">Create Post</router-link>
          </div>
        </div><br />

        <table class="table table-hover">
            <thead>
            <tr>
                <th>ID</th>
                <th>Item Name</th>
                <th>Item Price</th>
                <th>Actions</th>
            </tr>
            </thead>
            <tbody>
                <tr v-for="post in posts" :key="post.id">
                    <td>{{ post.id }}</td>
                    <td>{{ post.title }}</td>
                    <td>{{ post.body }}</td>
                    <td><router-link :to="{name: 'edit', params: { id: post.id }}" class="btn btn-primary">Edit</router-link></td>
                    <td><button class="btn btn-danger">Delete</button></td>
                </tr>
            </tbody>
        </table>
  </div>
</template>

<script>
  export default {
      data() {
        return {
          posts: []
        }
      },
      created() {
      let uri = 'http://127.0.0.1:8000/api/posts';
      this.axios.get(uri).then(response => {
        this.posts = response.data.data;
      });
    }
  }
</script>
Tại đây, khi component được tạo, chúng ta sẽ nạp dữ liệu vào trong component
Chúng ta cần ghi dữ liệu vì mặc định axios sẽ lấy toàn bộ dữ liệu được trả ra ở phía backend khi ta dùng Resource Collection. Vì vậy nó sẽ đóng gói dữ liệu theo kiểu data key (sử dụng key để truy xuất dữ liệu cần lấy). Để có dữ liệu thực tết, ta cần viết theo kiểu response.data.data
Now, here, we need to write the data because axios is by default wrap our backend data posts with data and we are using the Resource Collection. So it will also wrap the data in the data key. So to get the actual data, we need to write like response.data.data.
Nếu không dùng axios thì dữ liệu có thể ở dạng response.data, nhưng vì chúng ta đang dùng với axios với dữ liệu được trả về đã là response.data nên khi cần ta phải viết dưới dạng response.data.data
11. Edit và Update
Khi edit data, chúng ta cần nạp dữ liệu từ server để hiển thị dữ liệu đã tồn tại trên form
Sau khi thay đổi dữ liệu trên textbox và textarea, chúng ta click nút button để thực hiện hàm updatePost() , để gửi dữ liệu tới server và thực hiện cập nhật dữ liệu:
Trong file EditComponent.vue:
// EditComponent.vue

<template>
  <div>
    <h1>Edit Post</h1>
    <form @submit.prevent="updatePost">
      <div class="row">
        <div class="col-md-6">
          <div class="form-group">
            <label>Post Title:</label>
            <input type="text" class="form-control" v-model="post.title">
          </div>
        </div>
        </div>
        <div class="row">
          <div class="col-md-6">
            <div class="form-group">
              <label>Post Body:</label>
              <textarea class="form-control" v-model="post.body" rows="5"></textarea>
            </div>
          </div>
        </div><br />
        <div class="form-group">
          <button class="btn btn-primary">Update</button>
        </div>
    </form>
  </div>
</template>

<script>
    export default {

      data() {
        return {
          post: {}
        }
      },
      created() {
        let uri = `http://vuelaravelcrud.test/api/post/edit/${this.$route.params.id}`;
        this.axios.get(uri).then((response) => {
            this.post = response.data;
        });
      },
      methods: {
        updatePost() {
          let uri = `http://127.0.0.1:8000/api/post/update/${this.$route.params.id}`;
          this.axios.post(uri, this.post).then((response) => {
            this.$router.push({name: 'posts'});
          });
        }
      }
    }
</script>
12. Delete dữ liệu
Để xóa 1 bản ghi, ta viết trong IndexComponent.vue như sau
// IndexComponent.vue

<template>
  <div>
      <h1>Posts</h1>
        <div class="row">
          <div class="col-md-10"></div>
          <div class="col-md-2">
            <router-link :to="{ name: 'create' }" class="btn btn-primary">Create Post</router-link>
          </div>
        </div><br />

        <table class="table table-hover">
            <thead>
            <tr>
                <th>ID</th>
                <th>Item Name</th>
                <th>Item Price</th>
                <th>Actions</th>
            </tr>
            </thead>
            <tbody>
                <tr v-for="post in posts" :key="post.id">
                    <td>{{ post.id }}</td>
                    <td>{{ post.title }}</td>
                    <td>{{ post.body }}</td>
                    <td><router-link :to="{name: 'edit', params: { id: post.id }}" class="btn btn-primary">Edit</router-link></td>
                    <td><button class="btn btn-danger" @click.prevent="deletePost(post.id)">Delete</button></td>
                </tr>
            </tbody>
        </table>
  </div>
</template>

<script>
  export default {
      data() {
        return {
          posts: []
        }
      },
      created() {
      let uri = 'http://127.0.0.1:8000/api/posts';
      this.axios.get(uri).then(response => {
        this.posts = response.data.data;
      });
    },
    methods: {
      deletePost(id)
      {
        let uri = `http://127.0.0.1:8000/api/post/delete/${id}`;
        this.axios.delete(uri).then(response => {
          this.posts.splice(this.posts.indexOf(id), 1);
        });
      }
    }
  }
</script>
Ở đây, chúng ta lấy sự kiện nhâp chuột trong Vue để lấy id của post và remove dữ liệu khỏi database cũng như xóa dữ liệu khỏi mảng ở phía client sử dụng hàm splice.
Và đây là thành quả chúng ta đã có =))
Như vậy là tôi đã hướng dẫn xong cách tạo một ví dụ về CURL với Laravel và Vuejs.
All rights reserved
