Vanilla JS: Tạo mã QR với VietQR
1. Yêu cầu
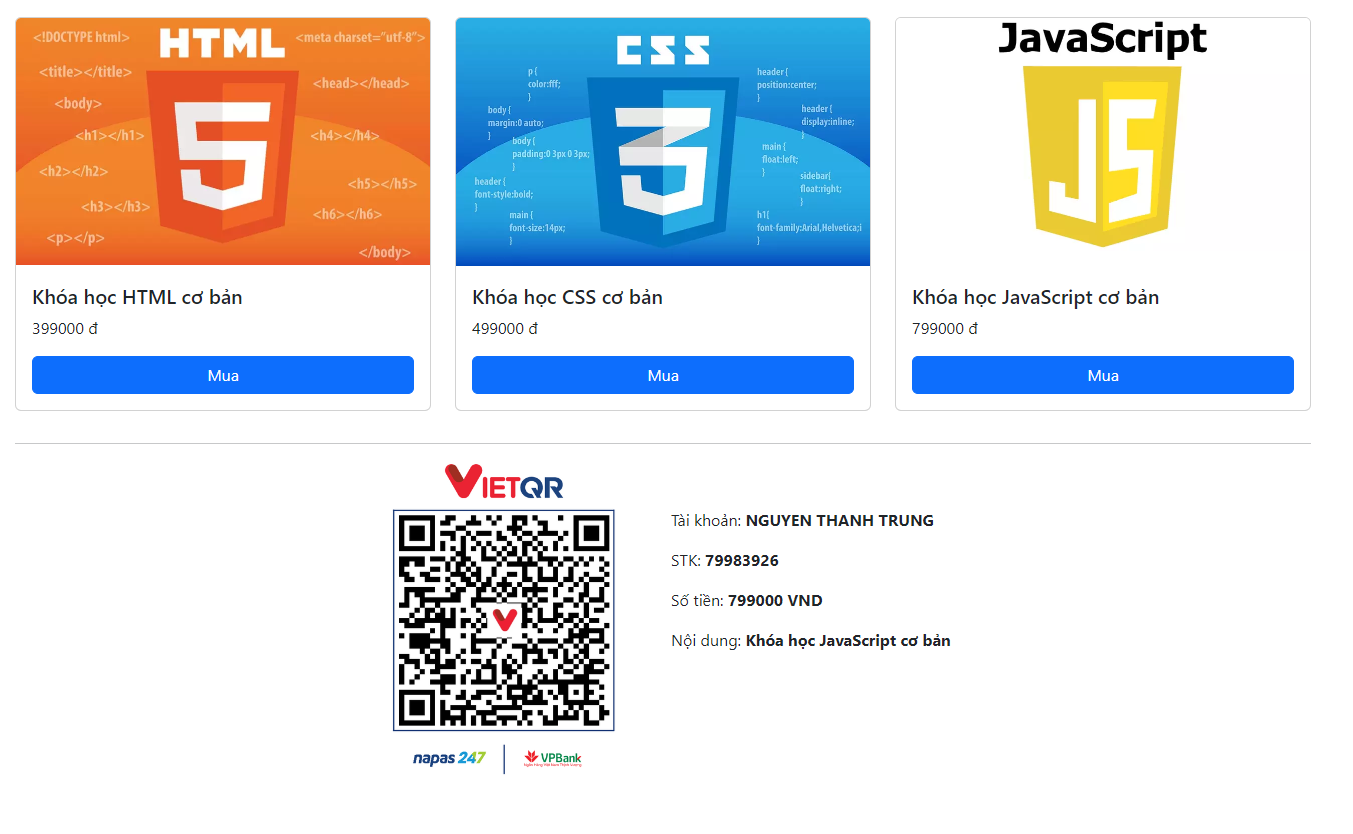
- Yêu cầu bài toán là khi click vào button Mua khóa học sẽ hiển thị ảnh QRCode để quét mã chuyển tiền.
- Bài tập này có sử dụng VietQR API: https://www.vietqr.io/intro
- VietQR cung cấp dịch vụ thanh toán điện tử qua mã QR, giúp thực hiện giao dịch nhanh chóng, an toàn và tiện lợi.
- Đây là một trong những bài tập vanilla JavaScript ở mức cơ bản giúp các bạn làm quen, chủ yếu giải thích về JavaScript nên phần giao diện sẽ không phân tích nhiều.
- Hi vọng với bài tập này các bạn sẽ thấy thích thú khi học JavaScript.

2. Giao diện HTML - CSS
<!DOCTYPE html>
<html lang="en">
<head>
  <meta charset="UTF-8">
  <meta name="viewport" content="width=device-width, initial-scale=1.0">
  <title>Vanilla JS Project: Create QrCode with VietQR</title>
  <link href="https://cdn.jsdelivr.net/npm/bootstrap@5.3.3/dist/css/bootstrap.min.css" rel="stylesheet">
</head>
<body>
  <div class="container">
    <br>
    <div class="row" id="courses-wrapper">
      <!-- javascript -->
    </div>
    <hr>
    <div class="row justify-content-center d-none" id="paid-wrapper">
      <div class="col-6">
        <div class="mb-4 d-flex gap-2">
          <img class="w-50" src="" alt="" id="paid-qr-code">
          <div class="pt-5">
            <p>Tài khoản: <b id="paid-account-name"></b></p>
            <p>STK: <b id="paid-account-no"></b></p>
            <p>Số tiền: <b id="paid-price"></b> <b>VND</b></p>
            <p>Nội dung: <b id="paid-content"></b></p>
          </div>
        </div>
      </div>
    </div>
  </div>

  <script> // code JavaScript </script>
</body>
</html>
- HTML sẽ có 2 phần:
- Phần 1 là div có id là
courses-wrapper, div này rỗng, chúng ta sẽ lấy danh sách các khóa học và render HTML vào trong này. - Phần 2 là div có id là
paid-wrapper, div này để hiển thị thông tin thanh toán khóa học, mặc định div này sẽ ẩn, khi click vào button Mua khóa học nào đó thì sẽ fill thông tin vào phần này và hiển thị lên.
3. Hướng giải quyết chính
Ta khởi tạo sẵn danh sách các khóa học, mỗi khóa học sẽ có id, thumbnail, title, price
Ta dựa trên danh sách khóa học này để render ra HTML
Bên dưới phần hiển thị danh sách này chúng ta có để 1 div payment để hiển thị thông tin QRCode
Mặc định div này để ẩn bằng class d-none
Khi click vào button Mua ta sẽ bỏ class d-none để nó hiển thị ra
Lấy các thông tin của khóa học và fill vào div payment
Phần tạo ảnh QRCode ta sử dụng VietQR tham khảo tại đây: https://www.vietqr.io/
const qrCode = `https://img.vietqr.io/image/${BANK_ID}-${BANK_ACCOUNT_NO}-${TEMPLATE}.png?amount=${AMOUNT}&addInfo=${DESCRIPTION}&accountName=${BANK_ACCOUNT_NAME}`
- BANK_ID: ví dụ ngân hàng Vietinbank có mã BIN là
970415, thường gọi làVietinbank, Napas quy ước tên viết tắt làICB, như vậy ta có thể sử dụng 1 trong các giá trị trên. - BANK_ACCOUNT_NO: số tài khoản người nhận
- TEMPLATE: VietQR cung cấp một số kiểu hiển thị QRCode: kiểu chỉ có ảnh QR hay kiểu kèm cả logo và thông tin chuyển khoản...
- AMOUNT: số tiền cần chuyển khoản
- DESCRIPTION: nội dung chuyển khoản
- BANK_ACCOUNT_NAME: tên người nhận muốn hiển thị trên ảnh QRCode, tên này tùy ý không phải tên thật trên ngân hàng
const bankInfo = {
 id: 'VPB',
 accountNo: '79983926',
 accountName: 'Trung DZ',
 template: 'compact'
}
4. Javascript
const courses = [
  {
    id: 'course01',
    thumbnail: 'https://images.viblo.asia/e421fe25-2feb-4623-aad2-4ad915ec3b31.jpg',
    title: 'Khóa học HTML cơ bản',
    price: '399000'
  },
  {
    id: 'course02',
    thumbnail: 'https://images.viblo.asia/b49ab717-6e4e-4f51-9885-05dfeccd3df9.jpg',
    title: 'Khóa học CSS cơ bản',
    price: '499000'
  },
  {
    id: 'course03',
    thumbnail: 'https://images.viblo.asia/6b8d138b-6632-4189-9bf9-58cf47aea20c.jpg',
    title: 'Khóa học JavaScript cơ bản',
    price: '799000'
  },
]

const bankInfo = {
  id: 'VPB',
  accountNo: '79983926',
  accountName: 'NGUYEN THANH TRUNG',
  template: 'compact',
}

function renderCourses() {
  const coursesWrapper = document.querySelector('#courses-wrapper')
  let html = ''
  courses.forEach(course => {
    html += `
      <div class="col-4">
        <div class="card mb-3">
          <div style="height: 150px">
            <img src="${course.thumbnail}" class="card-img-top h-100" alt="${course.title}">
          </div>
          <div class="card-body">
            <h5 class="card-title">${course.title}</h5>
            <p>${course.price} đ</p>
            <div class="d-grid gap-2">
              <button class="btn btn-primary course-buy" data-title="${course.title}" data-price="${course.price}">
                Mua
              </button>
            </div>
          </div>
        </div>
      </div>
    `
  })
  coursesWrapper.innerHTML = html
}

renderCourses()

const paidWrapper = document.querySelector('#paid-wrapper')
const paidQRCode = document.querySelector('#paid-qr-code')
const paidAccountName = document.querySelector('#paid-account-name')
const paidAccountNo = document.querySelector('#paid-account-no')
const paidPrice = document.querySelector('#paid-price')
const paidContent = document.querySelector('#paid-content')

const coursesBtnBuy = document.querySelectorAll('.course-buy')
coursesBtnBuy.forEach(item => {
  item.addEventListener('click', function () {
    const courseTitle = item.getAttribute('data-title')
    const coursePrice = item.getAttribute('data-price')
    const qrCode = `https://img.vietqr.io/image/${bankInfo.id}-${bankInfo.accountNo}-${bankInfo.template}.png?amount=${coursePrice}&addInfo=${encodeURIComponent(courseTitle)}&accountName=${bankInfo.accountName}`

    paidWrapper.classList.remove('d-none')
    paidQRCode.setAttribute('src', qrCode)
    paidAccountName.innerHTML = bankInfo.accountName
    paidAccountNo.innerHTML = bankInfo.accountNo
    paidPrice.innerHTML = coursePrice
    paidContent.innerHTML = courseTitle
  })
})
5. Kết quả
Bài viết đến đây là hết, hi vọng với bài viết này các bạn đã thêm được nhiều kiến thức bổ ích. Hẹn gặp lại các bạn ở bài viết tiếp theo!
- Demo
- Source code
- Series vanilla javascript projects
- Liên hệ: trungnt256
All rights reserved