Unlocking the Power of WebSockets: A Deep Dive into Real-Time Web Communication
Bài đăng này đã không được cập nhật trong 2 năm
Giới thiệu
WebSocket cung cấp một kênh truyền thông hai chiều (full-duplex) qua một kết nối TCP duy nhất. Điều này có nghĩa là cả máy khách và máy chủ có thể gửi dữ liệu cùng lúc mà không cần bất kỳ yêu cầu nào.
Cách thức hoạt động cơ bản cùa Websocket
- Client sẽ gửi xuống server với field
Upgradeyêu cầu chuyển đổi từ giao thức HTTP sang WebSocket.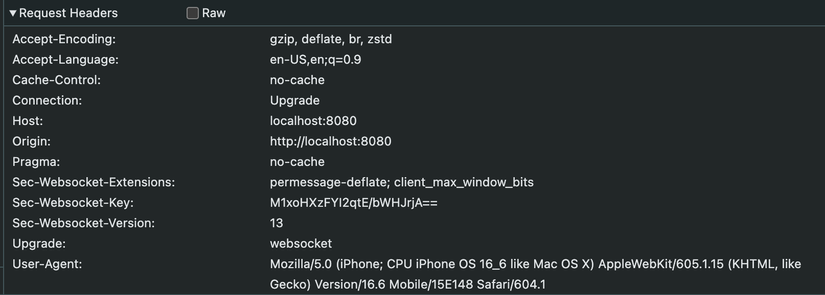
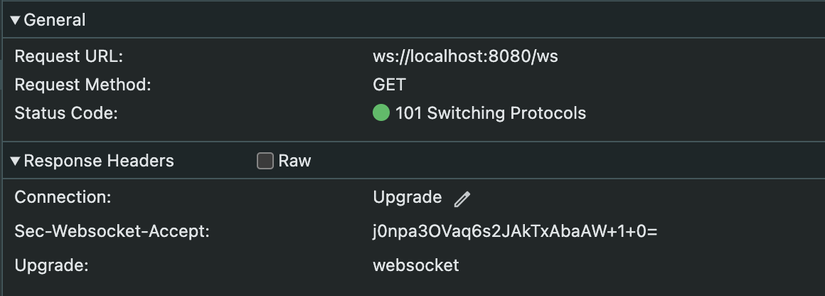
- Server nhận request và response với http code 101 (Switching Protocols) nếu chấp nhận sang WebSocket.
2 quá trình trên giống như handshake ở TCP dùng để tạo 1 connection. Sau khi tạo connection xong thì cả 2 bên client, server sẽ trao đổi dữ liệu bằng các frame được định nghĩa trong RFC 6455 specification

- Cuối cùng là close kết nối, 1 trong 2 bên client, server sẽ gửi 1 yêu cầu close connection
WebSocket giải quyết nhiều vấn đề đau đầu khi phát triển các ứng dụng web thời gian thực và có nhiều lợi ích so với HTTP truyền thống:
- Header nhẹ giúp giảm chi phí truyền dữ liệu.
- Chỉ cần một kết nối TCP cho một client.
- Máy chủ WebSocket có thể push data tới các client.
Lý thuyết
Keep alive
Các bạn có tự hỏi làm sao 1 connection nó có thể keep alive không, trong khi những kiến thức chúng ta được học khi http connection nhận được reponse nó sẽ đóng connection. Đó chính là keep-alive field được định nghĩa trong bảng nâng cấp http/1.0 rfc2616 specification. Cơ chế hoạt động chính để keep connection đó chính là trong khoảng thời gian nếu không có request nào thì sẽ gửi 1 lệnh request rỗng để xem bên kia có response không, nếu không response thì sẽ đóng connection. Cơ chế chính là vậy 😅
Protocol overview
Phần protocol overview mình đã nói khá chi tiết ở phần giới thiệu rồi để làm rõ hơn bạn có thể đọc thêm ở đây protocol overview
Cài đặt
Thì để giúp các bạn hiểu rõ hơn thì mình sẽ implement 1 cơ chế đơn giản dùng websocket bằng thư viện "github.com/gorilla/websocket" golang
Server
Code bên dưới mình tạo ra một server open websocket connection để transfer file từ client --> server. Đoạn code này mình thấy có nhiều ứng dụng, như trong lúc mình làm về bitcoin testnet nó sẽ sync data giữa các node với nhau. Nên mình code demo này cũng dựa vào ý tưởng đó. Các bạn đọc code + comment bên dưới để hiểu hơn nhé 😅
package main

import (
	"bufio"
	"fmt"
	"log"
	"net/http"
	"os"

	"github.com/gorilla/websocket"
)

// upgrader is used to upgrade the HTTP connection to a WebSocket connection
var upgrader = websocket.Upgrader{
	CheckOrigin: func(r *http.Request) bool {
		return true
	},
}

var filename = "000000000.fdb"

func handlerWS(w http.ResponseWriter, r *http.Request) {
	conn, err := upgrader.Upgrade(w, r, nil) // upgrade the HTTP connection to a WebSocket connection
	if err != nil {
		log.Println(err)
		return
	}
	defer conn.Close()

	fmt.Println("Client connected, start sync data from file " + filename)

	for {
		messageType := websocket.TextMessage // messagetype use to specify the type of message when sending data to the client

		file, err := os.Open(filename) // open the file
		if err != nil {
			log.Fatalf("Failed to open file: %s", err)
		}
		defer file.Close()

		// Create a new buffered reader to read the file
		reader := bufio.NewReader(file)
		count := 0

		for {
			data, err := reader.ReadBytes('\n') // read the file line by line
			if err != nil {
				if err.Error() == "EOF" {
					log.Println("End of file, close connection")
					closeMsg := websocket.FormatCloseMessage(websocket.CloseNormalClosure, "Server is closing the connection")
					err = conn.WriteMessage(websocket.CloseMessage, closeMsg) // send a close message to the client
					return
				}
				log.Fatalf("Failed to read file: %s", err)
			}

			err = conn.WriteMessage(messageType, data) // send the data to the client, with messageType as TextMessage
			if err != nil {
				fmt.Println("len: ", len(data))
				log.Println("Error write message:", err)
				return
			}

			fmt.Printf("Successfully sent %d messages\n", count)
			count++
		}
	}
}

func main() {
	http.HandleFunc("/ws", handlerWS) // handle the WebSocket connection, and upgrade the HTTP connection to a WebSocket connection
	fmt.Println("Server started on localhost:8080")
	if err := http.ListenAndServe(":8080", nil); err != nil { // start the server
		log.Fatal(err)
	}
}
Client
Client thì đơn giản hơn nhiệm vụ chính là tạo 1 connection tới server, rồi đọc data từ connection đó rồi viết vào file 😅
package main

import (
	"fmt"
	"os"

	"github.com/gorilla/websocket"
)

var filename = "000000000.fdb"

func main() {
	// This is a client implementation

	conn, _, err := websocket.DefaultDialer.Dial("ws://localhost:8080/ws", nil)
	if err != nil {
		fmt.Println("Error create Dial:", err)
		panic(err)
	}
	defer conn.Close()

	fmt.Println("Client connected, start sync data from file " + filename)
	count := 0

	for {
		_, p, err := conn.ReadMessage()
		if err != nil {
			if websocket.IsCloseError(err, websocket.CloseNormalClosure) {
				fmt.Println("Close connection, err: ", err)
				return
			}
			fmt.Println("read message from connection fail, err: ", err)
			return
		}

		file, err := os.OpenFile(filename, os.O_CREATE|os.O_WRONLY|os.O_APPEND, 0666)
		if err != nil {
			fmt.Printf("Failed to open file: %s", err)
		}
		defer file.Close()

		_, err = file.Write(p)
		if err != nil {
			fmt.Printf("Failed to write file: %s", err)
		}

		fmt.Printf("Successfully received %d messages\n", count)
		count++
	}

}
Repo: https://github.com/phanquocky/go-fundamental/tree/main/websocket
Tổng kết
Bài viết về Websocket này cũng cơ bản, chủ yếu là những đoạn code POC để giúp các bạn thực hành. Các bạn có thể nghĩ ra nhiều ý tưởng hơn giống như tạo chat app mình cũng có đề cập trong repo github của mình. Đó bài nà chỉ vậy thôi 😅 ref: https://yalantis.com/blog/how-to-build-websockets-in-go/#:~:text=WebSockets allow a browser to,tracking apps%2C and so on.
All rights reserved
