Universal Link IOS
Bài đăng này đã không được cập nhật trong 4 năm
Bài viết đc làm theo tutorial của Owen Brom trên Raywenderlich và sử dụng Xcode 8, swift 3 Tải project start đã đc dựng sẵn UI và 1 số thứ cần thiết
Cài đặt cho app
Mở project start và làm theo như trong ảnh
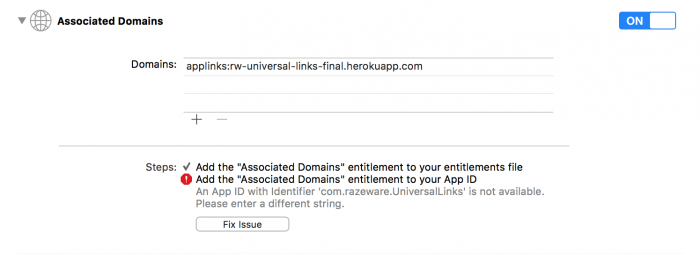
 để làm bật được Asociated Domains bạn cần đăng nhập tài khoản developer của mình, thay thế Bundle Id com.razeware.UniversalLinks bằng budle id của bạn
Tiếp theo, ta sẽ add domain của website với tiền tố applinks:
để làm bật được Asociated Domains bạn cần đăng nhập tài khoản developer của mình, thay thế Bundle Id com.razeware.UniversalLinks bằng budle id của bạn
Tiếp theo, ta sẽ add domain của website với tiền tố applinks:
Cài đặt cho website
Khác với deep link, ta cần có website để cấu hình cho Universal Link, và tôi sử dụng https://rw-universal-links-starter.herokuapp.com/arduino.html để hướng dẫn nhưng với ứng dụng của mình bạn sẽ cấu hình cho website của bạn. Bạn phải tạo file apple-app-site-asociation với định dạng của 1 file JSON như sau
{
  "applinks": {
    "apps": [],
    "details": [
    {
      "appID": "KFCNEC27GU.com.razeware.UniveralLinksTutorial",
      "paths": ["*"]
    }
    ]
  }
}
Thay team id KFCNEC27GU thành team id của bạn, bundle id com.razeware.UniveralLinksTutorial thành bundle id của bạn paths tôi để ["*"] thì mọi liên kết của trang web đều liên kết với app của bạn. Còn nếu muốn giới hạn chỉ một vài trường hợp cụ thể ta sẽ thêm như sau
  "paths": [
          "/auth/password/edit*",
          "/boards/*/accept_invitation*",
          "/auth/confirmation*"
        ]
Sau đó kiểm tra file trên website của bạn theo link sau. Thường thì file này sẽ có thể download về theo đường dẫn với định dạng "domain của bạn" +/apple-app-site-association
Xử lý Universal Link
Trong Appdelegate Mã code xử lý khi từ link mở đến app của mình
func application(_ application: UIApplication,
                   continue userActivity: NSUserActivity,
                                        restorationHandler: @escaping ([Any]?) -> Void) -> Bool {

  // 1
  guard userActivity.activityType == NSUserActivityTypeBrowsingWeb,
    let url = userActivity.webpageURL,
    let components = URLComponents(url: url, resolvingAgainstBaseURL: true) else {
      return false
  }

  // 2
  if let computer = ItemHandler.sharedInstance.items.filter({ $0.path == components.path}).first {
    self.presentDetailViewController(computer)
    return true
  }

  // 3
  let webpageUrl = URL(string: "http://rw-universal-links-final.herokuapp.com")!
  application.openURL(webpageUrl)

  return false
}
tiếp theo viết hàm để mở xem chi tiết
func presentDetailViewController(_ computer: Computer) {

  let storyboard = UIStoryboard(name: "Main", bundle: nil)

  let detailVC = storyboard.instantiateViewController(withIdentifier: "NavigationController")
      as! ComputerDetailController
  detailVC.item = computer

  let navigationVC = storyboard.instantiateViewController(withIdentifier: "DetailController")
      as! UINavigationController
  navigationVC.modalPresentationStyle = .formSheet

  navigationVC.pushViewController(detailVC, animated: true)
}
Mọi công việc cần thiết đã được hoàn thành, bây giờ hãy chạy app và tận hưởng thành quả của mình Nếu paths bạn đê ["*"] thì gõ bất kỳ link nào trên website vào safari của iphone (simulator) còn với link khác thì hãy gõ đúng theo định dạng bạn cài đặt.
All rights reserved
