[Tutorial] Input Tag View
Bài đăng này đã không được cập nhật trong 4 năm
Tag Bằng cách định hướng người dùng cùng trò chuyện về 1 topic có sẵn, rất nhiều ứng dụng, service đã hướng tới việc sử dụng Tag phổ biến hơn. Tất nhiên, trước đó Tag vẫn được sử dụng thường xuyên nhưng không phải bất cứ người dùng phổ thông nào cũng biết và hiểu về nó.
Vì vậy, trong bài viết này mình sẽ tạo 1 tutorial về việc xây dựng 1 Tag input View đơn giản nhưng đáp ứng được nhu cầu hiện nay: thay vì phải nhập 1 cụm từ, người dùng hoàn toàn có thể sử dụng thao tác Touch.
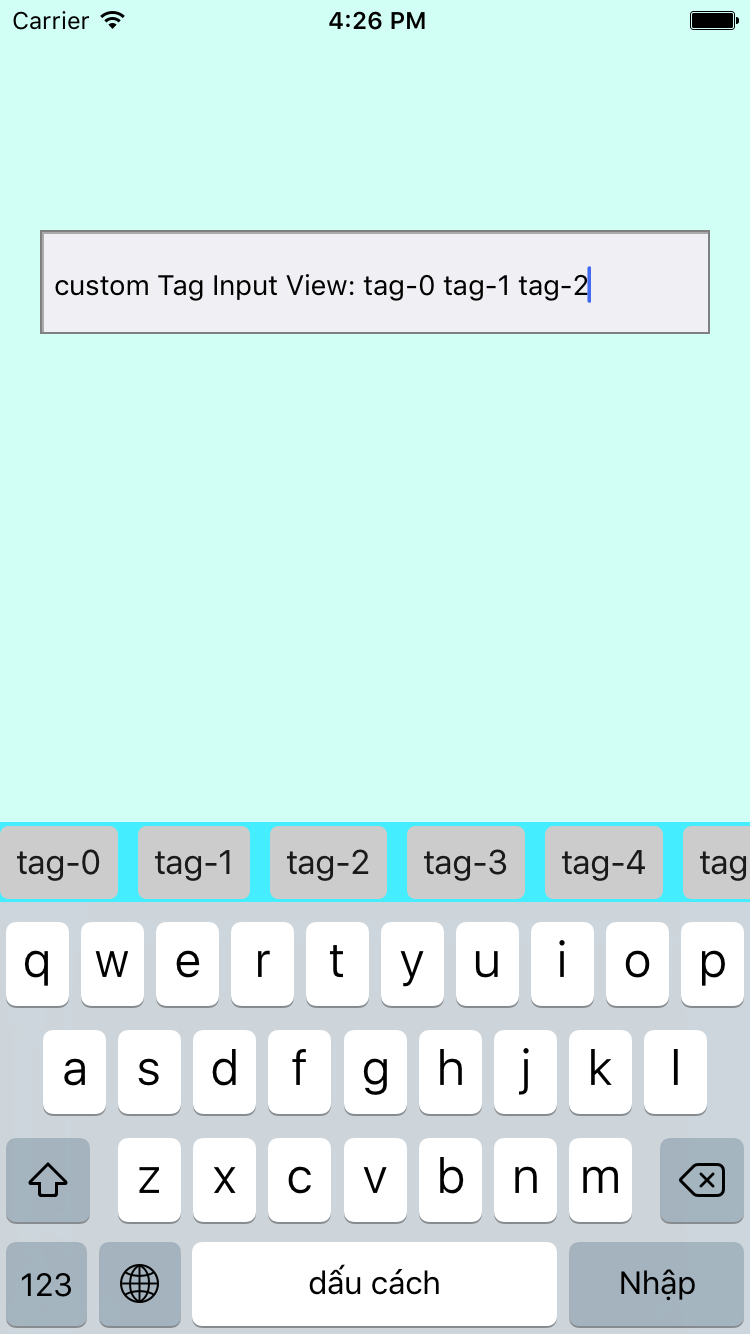
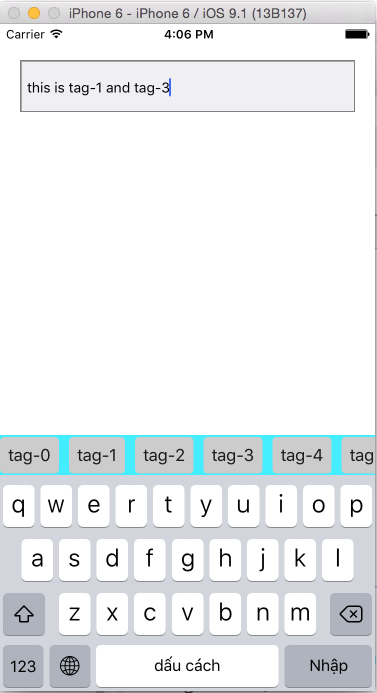
Trước hết, hãy xem qua kết quả mà tutorial này sẽ đem lại:
Mục đích của tutorial sẽ hướng tới việc giải quyết 2 vấn đề chính:
-
Custom UICollectionView
-
Handle adding custom view
OK! Let's do it.
Step 1:
Bạn hãy tạo và thiết lập các bước cơ bản của project như sau:
- Project name
- Language: Swift (ofcourse)
- Hãy tổ chức cho lớp InputTagView như một component với cấu trúc folder bao gồm:
-
TagInputView.swiftvàTagInputView.: subclass của UIView
-
TagCollectionCell.swiftvàTagCollectionCell.xib: collection view cell
-
TagViewCelFlowLayout: layout cho collection view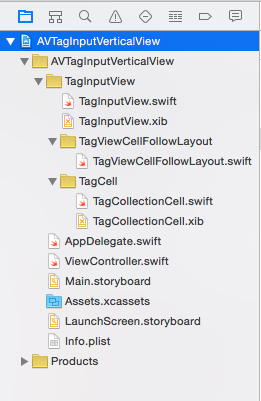
TagInputView
Thiết lập UI cho tagInputView rất đơn giản, bao gồm:
- View Content
- UICollectionView: để hiển thị nội dung (trong trường hợp này chúng ta sẽ sử dụng collection cell tương ứng là các Tag)
- Sử dụng hàm delegate của UICollectionView
didSelectItemAtIndexPathđể ghi nhận action Touch-inside của người dùng. - Ngoài ra các bạn nên tạo 1 simple class/struct để thực hiện việc truyền data cho CollectionView Class data model có thể như sau:
class TagModel : NSObject {
    var tagTitle : String = ""
    var tagIndex : Int = 0

    override init() {
        super.init()
    }

    init(title: String, index: Int) {
        super.init()
        tagTitle = title
        tagIndex = index
    }
}
Khai báo biến để chứa data (tags) dành cho collection datasource:
var arrTags : [TagModel] = []
Khai báo protocol để ghi nhận action Touch-inside của user cho ViewController:
protocol TagInputViewDelegate {
    func didSelectTagAtObjectIndex(object : TagModel)
}
Setting dành cho custom UICollection view bao gồm các thành phần:
- Setting flow layout cho collection view
- Setting cho collection view cell
//MARK: - View Setting
    func settingView () {
        let cellNib = UINib(nibName: "TagCollectionCell", bundle: nil)
        self.clvTagView.delegate = self
        self.clvTagView.dataSource = self
        self.clvTagView.registerNib(cellNib, forCellWithReuseIdentifier: "TagCollectionCell")
        self.clvTagView.backgroundColor = UIColor.clearColor()

        self.sizingCell = (cellNib.instantiateWithOwner(nil, options: nil) as NSArray).firstObject as! TagCollectionCell?
        self.constraintClvMaxWidth.constant = UIScreen.mainScreen().bounds.width
        self.layoutIfNeeded()
    }

    func settingData (data : [TagModel]) {
        self.arrTags = data
    }
Tuy nhiên, các bạn lưu ý về dòng lệnh:
self.constraintClvMaxWidth.constant = UIScreen.mainScreen().bounds.width self.layoutIfNeeded()
Dòng lệnh này để setting lại chiều rộng của custom collection view. Biến constraint constraintClvMaxWidth sẽ tương ứng với layout max width của collection view

Phần setting collection delegate - datasource còn lại như sau:
//MARK: - CollectionView Delegate - Datasource
    func collectionView(collectionView: UICollectionView, numberOfItemsInSection section: Int) -> Int {
        return arrTags.count
    }

    func collectionView(collectionView: UICollectionView, cellForItemAtIndexPath indexPath: NSIndexPath) -> UICollectionViewCell {

        let strCellIdentifier : String = "TagCollectionCell"
        let cell = collectionView.dequeueReusableCellWithReuseIdentifier(strCellIdentifier, forIndexPath: indexPath) as! TagCollectionCell
        self.configureCell(cell, forIndexPath: indexPath)
        return cell
    }

    func collectionView(collectionView: UICollectionView, layout collectionViewLayout: UICollectionViewLayout, sizeForItemAtIndexPath indexPath: NSIndexPath) -> CGSize {
        self.configureCell(self.sizingCell!, forIndexPath: indexPath)
        return self.sizingCell!.systemLayoutSizeFittingSize(UILayoutFittingCompressedSize)
    }

    func configureCell(cell: TagCollectionCell, forIndexPath indexPath: NSIndexPath) {
        cell.lblTagName.text = arrTags[indexPath.row].tagTitle
    }

    func collectionView(collectionView: UICollectionView, didSelectItemAtIndexPath indexPath: NSIndexPath) {
        collectionView.deselectItemAtIndexPath(indexPath, animated: true)
        self.delegate?.didSelectTagAtObjectIndex(arrTags[indexPath.row])
    }
Trong phần setting này cần chú ý hàm chức năng:
func collectionView(collectionView: UICollectionView, layout collectionViewLayout: UICollectionViewLayout, sizeForItemAtIndexPath indexPath: NSIndexPath) -> CGSize {
        self.configureCell(self.sizingCell!, forIndexPath: indexPath)
        return self.sizingCell!.systemLayoutSizeFittingSize(UILayoutFittingCompressedSize)
    }
trong đó
self.sizingCell!.systemLayoutSizeFittingSize(UILayoutFittingCompressedSize)
có chức năng return size dành collection view cell.
Biến sizingCell ta khai báo như sau:
var sizingCell: TagCollectionCell?

TagViewCelFlowLayout
Sau khi khai báo collection và setting cho view xong, chúng ta thực hiện phần layout dành cho collection view.
Step 1 : Tạo mới file TagViewCelFlowLayout
Step 2 : override hàm chức năng layoutAttributesForElementsInRect
class TagViewCellFlowLayout: UICollectionViewFlowLayout {
    override func layoutAttributesForElementsInRect(rect: CGRect) -> [UICollectionViewLayoutAttributes]? {
        let attributesForElementsInRect = super.layoutAttributesForElementsInRect(rect)
        var newAttributesForElementsInRect = [UICollectionViewLayoutAttributes]()

        // use a value to keep track of left margin
        var leftMargin: CGFloat = 0.0;

        for attributes in attributesForElementsInRect! {
            let refAttributes = attributes
            // assign value if next row
            if (refAttributes.frame.origin.x == self.sectionInset.left) {
                leftMargin = self.sectionInset.left
            } else {
                // set x position of attributes to current margin
                var newLeftAlignedFrame = refAttributes.frame
                newLeftAlignedFrame.origin.x = leftMargin
                refAttributes.frame = newLeftAlignedFrame
            }
            // calculate new value for current margin
            leftMargin += refAttributes.frame.size.width + 8
            newAttributesForElementsInRect.append(refAttributes)
        }

        return newAttributesForElementsInRect
    }
}
TagCollectionCell.swift
Setting cho cell như sau nhé, rất là simple thôi 
class TagCollectionCell: UICollectionViewCell {

    @IBOutlet weak var lblTagName: UILabel!
    @IBOutlet weak var constraintMaxWidth: NSLayoutConstraint!

    override func awakeFromNib() {
        self.backgroundColor = UIColor(red: 0.8, green: 0.8, blue: 0.8, alpha: 1)
        self.lblTagName.textColor = UIColor(red: 0.1, green: 0.1, blue: 0.1, alpha: 1)
        self.layer.cornerRadius = 4

        self.constraintMaxWidth.constant = UIScreen.mainScreen().bounds.width - 8 * 2 - 8 * 2
    }

    //MARK: - View Utils
    func settingCellContent (str : String) {
        self.lblTagName.text = str
    }
}
Mục đích là để phân biệt các cell với nhau và mô tả các cell như 1 Tag
ViewController
Quay trở lại với View Controller, việc add Tag View sẽ rất simple:
Chúng ta tạo view với 1textfield và setting như sau:
//MARK: - TextField Delegate
    func textFieldDidBeginEditing(textField: UITextField) {
        let nib = UINib(nibName: "TagInputView", bundle: NSBundle(forClass: TagInputView.classForCoder()))
        let view = nib.instantiateWithOwner(self, options: nil)[0] as! TagInputView
        view.delegate = self
        var arrData : [TagModel] = []
        for var i : Int = 0; i < 10; i++ {
            let tag : TagModel = TagModel(title: String(format: "tag-%d",i), index: i)
            arrData.append(tag)
        }
        view.settingData(arrData)
        view.clvTagView.reloadData()
        self.view.layoutIfNeeded()

        textField.inputAccessoryView = view
    }
Mọi thứ đã trở nên đơn giản hơn hơn rất nhiều, giờ thì hãy build project và thử xem tutorial này có giúp thêm bạn được nhiều không nhé 
Link source code: https://github.com/hoanganh6491/AVInputTagView Contact mình theo skype : hoanganh401
Happy coding!
All rights reserved
