[Tut] tạo custom popup view
Bài đăng này đã không được cập nhật trong 4 năm
Popup View
Một khái niệm rất đơn giản trên mọi loại ngôn ngữ có xây dựng interface và được trình bày dưới rất rất nhiều component khác nhau của iOS. Có thể đưa ra một vài component đơn giản như: Alert view, Mail composer, TWTweetComposeViewController,...
Logic chung của 1 popup view rất đơn giản: đó là 1 việc độc lập, xử lý chức năng cụ thể và thường có thể hiện về mặt interface là "nằm đè" lên tất cả các thành phần view khác. Tất nhiên, đi kèm đó là một vài hiệu ứng màu mè như Blur background, popup xuất hiện bằng cách bay lượn (its fun!)
Để tạo 1 popup view chúng ta cần hiểu qua hoạt động của popup:
1./ Khi xuất hiện, popup view sẽ nằm đè lên trên các view khác, đi kèm với đó là hiệu ứng xuất hiện của popup
- Tạo lập custom view và add vào view controller chính
- Tạo lập animation cho custom view
2./ Popup sẽ có những action của riêng nó và sau khi thực hiện feature, sẽ thực hiện việc callback tới container của popup.
- Xử lý logic của popup
- Tạo lập call back (protocol) cho popup
Thông qua việc phân tích trên, chúng ta tiến hành xây dựng cấu trúc như sau:
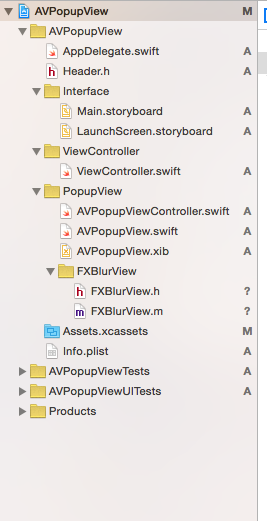
Như hình trên:
chúng ta có 1 lớp PopupViewController đảm nhiệm việc xây dựng và xử lý các animation khi gọi/ huỷ popup. Ngoài ra, lớp PopupView sẽ đảm nhiệm việc tạo dựng interface cho popup.
Xây dựng và xử lý chức năng
PopupViewController
class func initWithNib(nibName: String, classBundle: NSBundle) -> AVPopupViewController {
        let popup : AVPopupViewController = AVPopupViewController()
        popup.setupViewWithNib(nibName, classBundle: classBundle)
        return popup
    }

    //MATK - View Cycle
    override class func initialize() {
        super.initialize()
    }

    override init(frame: CGRect) {
        let rect = UIScreen.mainScreen().bounds
        super.init(frame: rect)
    }

    required init?(coder aDecoder: NSCoder) {
        fatalError("init(coder:) has not been implemented")
    }

    //setup view with nib - class bundle
    func setupViewWithNib (nibName: String, classBundle : NSBundle) {
        containerView = loadViewFromNib(nibName, classBundle: classBundle)
        self.addSubview(containerView)
    }

    //MARK - View Utils
    //loading view from nib - class bundle
    func loadViewFromNib(nibName: String, classBundle : NSBundle) -> UIView
    {
        let nib = UINib(nibName: nibName, bundle: classBundle)
        let view = nib.instantiateWithOwner(self, options: nil)[0] as! AVPopupView
        view.delegate = self
        view.layoutIfNeeded()

        let newRect = calculatingViewFrame(self.frame, sourceFrame: view.viewContentView.frame)
        view.frame = newRect
        view.center = CGPointMake(self.center.x, self.center.y - self.frame.size.height)
        view.layer.cornerRadius = 6.0
        view.clipsToBounds = true

        return view
    }
Đoạn code trên đảm nhiệm việc tạo dựng 1 lớp popup view.
Trong đó:
func initWithNib(nibName: String, classBundle: NSBundle) -> AVPopupViewController là hàm chức năng xử lý việc gọi/ xây dựng 1 popup view mới.
func loadViewFromNib(nibName: String, classBundle : NSBundle) -> UIView là hàm chức năng xử lý việc kết nối view thông qua file .Xib
Tuy nhiên, chúng ta cần chú ý hàm let newRect = calculatingViewFrame việc sử dụng hàm này nhằm mục đích chỉnh sửa lại việc tràn, thừa nội dung hay vượt quá frame size của màn hình thiết bị. Để thực hiện việc tính toán trên ta áp dụng các thông số khai báo chính AVPopupViewMaxSize
let AVPopupViewMaxSize : CGFloat = 0.9
giá trị 0.9 có thể thay đổi tuỳ theo cảm quan và mục đích sử dụng của bạn  như trên, mục đích tôi muốn ước lượng chiều cao và rộng tối đa của popup chỉ bằng 90% chiều cao/rộng của màn hình
Và đoạn code tính toán việc điều chỉnh lại frame size như sau:
//MARK - View Effect
    //re-calculating view frame
    func calculatingViewFrame (viewFrame: CGRect, sourceFrame: CGRect) -> CGRect {
        var newRect : CGRect = CGRectZero
        var transformWidthValue : CGFloat = 1
        var transformHeightValue : CGFloat = 1
        var heightValue : CGFloat = sourceFrame.height
        var widthValue : CGFloat = sourceFrame.width

        if sourceFrame.height >= (viewFrame.height * constantHeightMultiple) {
            transformHeightValue = AVPopupViewMaxSize
            heightValue = viewFrame.height
        }

        if sourceFrame.width >= (viewFrame.width * constantWidthMultiple) {
            transformWidthValue = AVPopupViewMaxSize
            widthValue = viewFrame.width
        }

        let transform = CGAffineTransformMake(transformWidthValue, 0, 0, transformHeightValue, 0, 0)
        newRect = CGRectApplyAffineTransform(CGRectMake(0, 0, widthValue, heightValue), transform)

        return newRect
    }
Như vậy chúng ta đã thực hiện việc xây dựng popup view tương đối ok, tiếp tới là phần xử lý các chức năng và hiệu ứng cho popup.
Hiệu ứng khi xuất hiện
Sử dụng UIViewAnimation, chúng ta dễ dàng thiết lập được hiệu ứng cơ bản của popup với việc chèn 1 Blur view (ở đây tôi sử dụng lib FXBlurView) và animation tuỳ chỉnh (ở đây tôi sử dụng AllowAnimatedContent)
//showing view function
    func show() {
        let mainWindow = UIApplication.sharedApplication().delegate?.window
        self.frame = UIScreen.mainScreen().bounds

        mainWindow!!.addSubview(initBlurView())

        mainWindow!!.addSubview(self)

        UIView.animateWithDuration(0.2, delay: 0, options: .AllowAnimatedContent, animations: { () -> Void in
            self.containerView.center = self.center
            }, completion: { (isCompleted) -> Void in

        })
    }
Hiệu ứng và xử lý khi popup dismiss
Để thực hiện việc dismiss popup view, chúng ta cần xử lý 2 thành phần:
1./ Khi người dùng tác động vào 1 component cụ thể, có thể hiểu đơn giản là touch vào 1 button confirm OK
2./ Khi người dùng tác động vào 1 khu vực nằm ngoài popup view frame
//dismiss function
    func dismissView () {
        UIView.animateWithDuration(0.2, delay: 0, options: .AllowAnimatedContent, animations: { () -> Void in
            self.containerView.center = CGPointMake(self.center.x, self.center.y + self.frame.size.height)
            }, completion: { (isCompleted) -> Void in

        })

        UIView.animateWithDuration(0.2, animations: { () -> Void in
            self.viewBlurView.alpha = 0.0
            }) { (isCompleted) -> Void in
                self.removeFromSuperview()
                self.viewBlurView.removeFromSuperview()
        }
    }
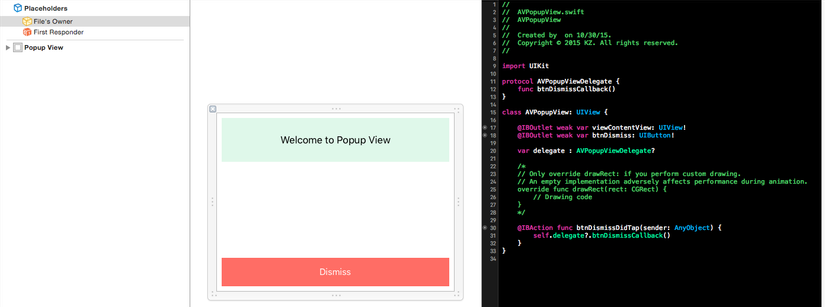
Như vậy, việc xây dựng thành phần xử lý của popup view đã tương đối hoàn thiện. Việc còn lại là tạo lập interface tuỳ mục đích xử dụng, đó có thể là một custom view để share thông tin, 1 customer view để thông báo người dùng nhập dữ liệu,...
Và tất nhiên không thể thiếu việc xây dựng protocol cho popup để có thể liên lạc với view controller chứa nó.
IS IT simple enough
Lets build and run your self Custom Popup View
Source code available here: https://github.com/hoanganh6491/AVPopupView
Please modify to fit your self
All rights reserved
